Are you a Linux user looking to learn terminal (CLI) commands? This beginner-friendly guide covers what you need to know.
In 1991, Linus Torvalds created Linux, a free and open-source operating system that powers a significant number of servers and personal computers worldwide. Linus started this project as a hobby to make a free version of MINIX, another Unix-like operating system. The idea was to let people talk to their computers smartly via commands to get things done.
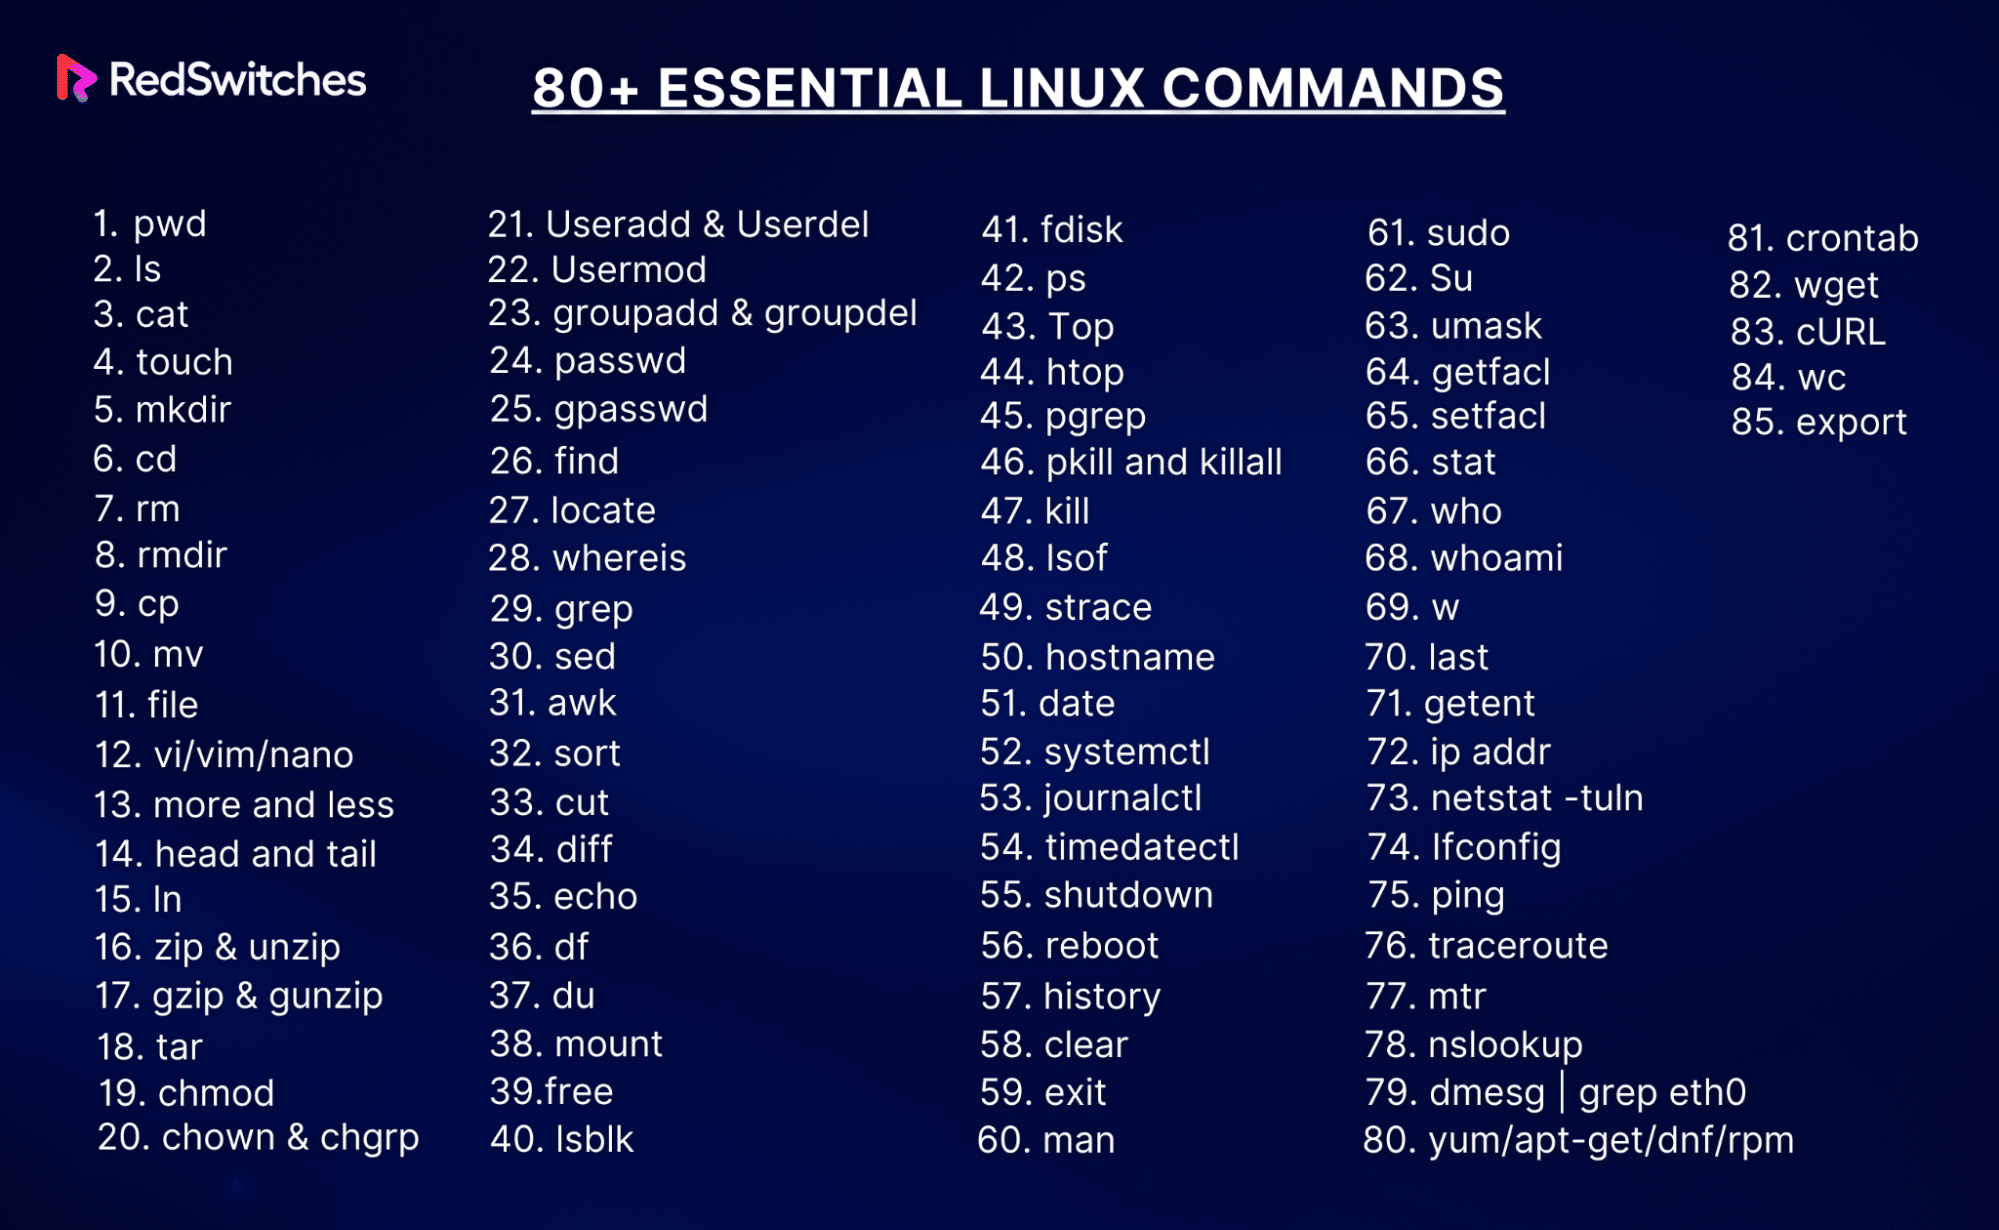
In this guide, we’ll cover 80+ essential Linux commands with examples. These commands will help you navigate files, handle processes, and fix network problems. Once you finish this guide, you’ll become a Linux power user.
Let’s jump in and learn the essentials of Linux to upgrade your experience.
Table Of Contents
- Prerequisites
- 80+ Essential Linux Commands
- Display the Current Path With pwd
- List Directory Contents with ls
- Print to Standard Output with cat
- Create an Empty Directory with touch
- Make a New Directory With mkdir
- cd Changes the Directory
- Remove Files With rm
- Remove Empty Directory With rmdir
- cp to Copy Files and Directories
- Move Files and Directories With mv
- Know the File Type With file
- Launch vi/vim/nano Editors
- View Content With more and less
- Display Content With head and tail
- ln to Create Links
- Compress & Extract Files With zip & unzip
- gzip & gunzip to Faster & Better Compression & Decompression
- Tape Archive With tar
- Change Mode & Permissions With chmod
- chown & chgrp to Alter Permission Roles
- Create & Delete Users With useradd and userdel
- Modify User Accounts With usermod
- groupadd and groupdel to Create & Delete Group
- Set Password With passwd
- Set Group Password With gpasswd
- Find Files and Directories With find
- Search for Files and Directories With locate
- Search Code File With whereis
- Search Specific Patterns With grep
- Replace Text With sed
- Manipulate Text With awk
- Arrange Data With sort
- Extract Text With cut
- diff to View File Differences
- echo to Display Output
- df to Display Disk Space Information
- Disk Space Estimation With du
- Attach & Access Files and Devices With mount
- Check Available Memory With free
- List Block Devices With lsblk
- Create & Modify Partitions With fdisk
- Get Process Status With ps
- top to Show Real-time Processes
- Advanced Real-time Process View with htop
- Search Process by Name With pgrep
- Terminate Processes With pkill and killall
- End a Process With kill
- lsof to List Open Files
- Trace System Calls With strace
- Find Out the System Name With hostname
- Check Date & Time Status With date
- Control System With systemctl
- Display Log Entries With journalctl
- Change System Clock With timedatectl
- Bring the System Down With shutdown
- Restart the System With reboot
- Check Previous Commands With history
- Clear Terminal Contents With clear
- Exit Terminal With exit
- View Manual Pages With man
- Use Superuser Permissions With sudo
- Su to Subtitle User
- Set Default Permissions With umask
- getfacl to Show Access Control Lists
- Modify Access Control List With setfacl
- Check File Info With stat
- Display Users List With who
- Print Username With whoami
- Activity Tracking With w
- last to Check the Users’ Login History
- getent to Fetch Database Info
- Use ip addr to Show Network Interfaces & IP Addresses
- netstat -tuln to List Ports
- Use Ifconfig to Display Network Configurations
- Test Connectivity With ping
- 76. Use traceroute to Trace Data Packet Route
- Get Real-time Data With mtr
- Test DNS Resolution With nslookup
- dmesg | grep eth0 to Display Kernel Messages
- yum/apt-get/dnf/rpm to Manage Software Packages
- crontab to Schedule Commands
- Download Files With wget
- URL to Transfer Data
- wc to Get Word Count
- Export Environment Variables With export
- Conclusion
- FAQs
Prerequisites
Before moving on to Linux commands, ensure you have the following:
- A system running a mainstream Linux distribution
- Access to the Linux terminal
- A user account with root access.
80+ Essential Linux Commands
Let’s start our deep dive into the 80+ Linux commands grouped according to function.
Start by logging in as a root user because some of the following commands need administrator permissions. Once you’re logged in, launch the terminal by pressing Ctrl+Alt+T.
1. Display the Current Path With pwd
The pwd command stands for “print working directory.” This built-in command is used to display the full current path or location of the file system where the user is located at the moment.
Usage: # pwd
The output provides an absolute directory path that begins with the root directory, denoted as /
2. List Directory Contents with ls
The ls command, short for “list,” displays the contents of the current directory.
Usage: # ls
The ls command is very flexible because of several flags that you can combine to customize the output. Here are some examples:
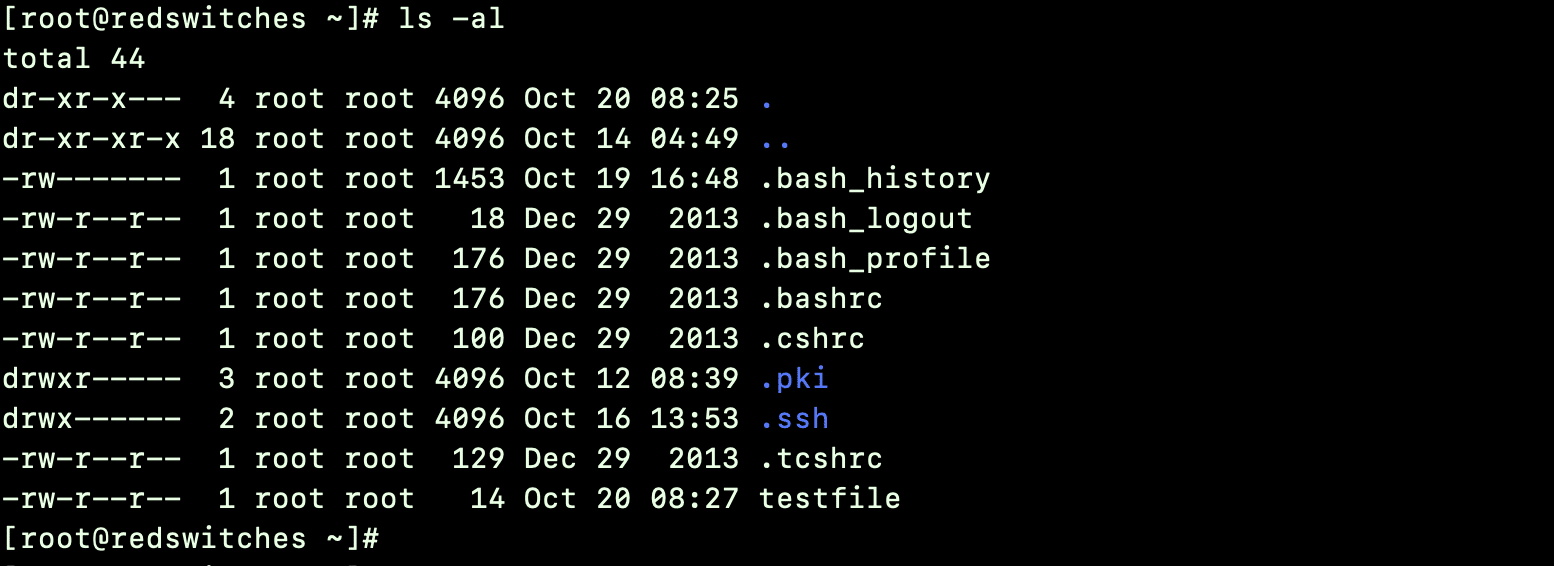
# ls -al
This command displays all contents of the current directory, including the hidden files.
# ls -R [name_of Directory]
This command displays the tree structure of the nested directories.
# ls -l [path to directory]
Combine the ls command with the -l flag and the path of the target directory to see the contents of a different directory.
3. Print to Standard Output with cat
cat (short for concatenate) is a multi-purpose Linux command. It creates a file, displays its contents (as the standard output, stdout), and merges two files.
When working with this command, you must provide a file name in the current working directory or the path to the target file.
Usage: # cat filename or #cat [path]/[filename]
# cat ] file_name
Use this command to create a file. Once you have entered the contents, press CTRL+D to exit.
#cat filename1 ]] filename2
Use this command to merge two files. In this example, the contents of filename2 with filename1. You can use the cat command to see the new contents of filename1.# cat -n filename
You can see the line numbers in the output with the -n flag.
4. Create an Empty Directory with touch
The touch command creates a new empty file in the current or the specified directory.
Usage: # touch filename or # touch [path]/filename
In addition, you can use the touch command to modify the timestamp of an existing file, as illustrated below:
5. Make a New Directory With mkdir
mkdir stands for “make directory.” As the name shows, it creates a new directory (or directories) at the specified location.
Usage: mkdir [directory name]
Here’s how you can use this command:
# mkdir dir1
Make a new empty directory at the current location
# mkdir dir1 dir2 dir3
You can also create multiple directories at the current location with this command: # mkdir -p d1/d2/d3/d4
By default, the mkdir command creates directories at the same level. If you wish to create nested directories, use the mkdir command with option p (short for parent directory).
This command will create the directory d4 inside the directory d3, d3 inside d2, d2 inside d1. If these directories (d1, d2, and d3) do not exist, the -p option ensures they are created during the process.
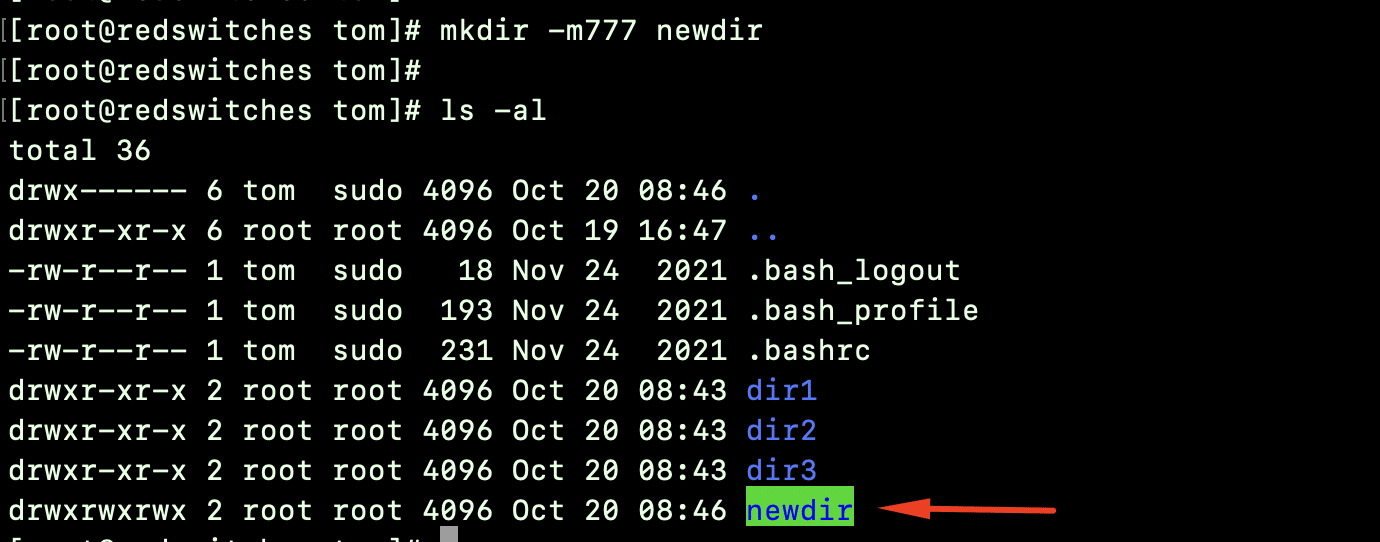
# mkdir -m777 [directoryname]
Lastly, use the -m flag to set permissions when creating a directory. For instance, the above command sets complete access, read, and write permissions for the directory.
6. cd Changes the Directory
cd, short for change directory, changes from the current directory to the target directory.
Usage: # cd or cd [path to directory]
You can use this command to move through directories.
# cd ~ username
This command switches to the home directory of the specified user. For instance, cd ~tom will take you to the home directory of the user tom.
cd ..
This command moves up one directory level.
cd -
This command switches to the previous directory you were in.
7. Remove Files With rm
The rm command stands for “remove” in Linux. Its primary purpose is to delete files or directories from the file system.
Important: Use this command cautiously because removed files are generally unrecoverable. That’s why we advise taking backup before using the command.
Usage: # rm [name-of-file]
# rm -r [dir-name]
Use the -r flag to remove a directory (and all nested files and directories).

- -i: prompts a confirmation before file or directory deletion.
- -f: allows deletion without confirmation.
8. Remove Empty Directory With rmdir
The rmdir command, short for “remove directory,” removes empty directories in the file system.
Usage: # rmdir [directory-name]

9. cp to Copy Files and Directories
The cp command copies files and directory contents from one location to another.
Usage: # cp [source-file] [target-file]
If the target file name already exists, the command will ask for confirmation before overwriting. If not, it will create the target file.
10. Move Files and Directories With mv
The mv command moves and/or renames files and directories.
Usage: # mv [source_file] [new-name] (renames a file)

# mv newfile /home/tom
11. Know the File Type With file
The file command is a core Linux utility used to find out the type of a file. It examines the file’s contents and attributes to identify its format.
Usage: # file [filename]
12. Launch vi/vim/nano Editors
Almost all popular Linux distributions come with several file editors you can use to quickly create and edit files in the terminal.
Generally, you can find VI (Visual Editor) and VIM (Vi Improved) in all mainstream Linux distributions. In most cases, you can also find Nano as the third native file editor.
These are powerful and versatile Linux text editors, often used to create config and script files. Out of these three, Nano offers additional functionalities, such as syntax highlighting, search and replace, and multiple modes for efficient text editing.
Usage:
# vi [filename]
# vim [filename]

# nano [filename]
13. View Content With more and less
Let’s explore more and less commands one by one here:
The more command
Combined with commands like cat, more is used to view the contents of a file one screen at a time. It allows you to navigate the file using the Enter key, displaying the next screenful of content. This command is especially useful for viewing large text files without flooding the terminal with information.
Usage: # more [name_of_file]
The less command
Similar to more, the less command is also used to view file contents, but it provides additional features like backward navigation. You can scroll both forward and backward through the file in the terminal.
Usage: # less [name_of_file]
14. Display Content With head and tail
The head command:
The head command outputs the first few lines of a file for a quick overview. By default, it displays the first 10 lines.
Usage: head [file name]
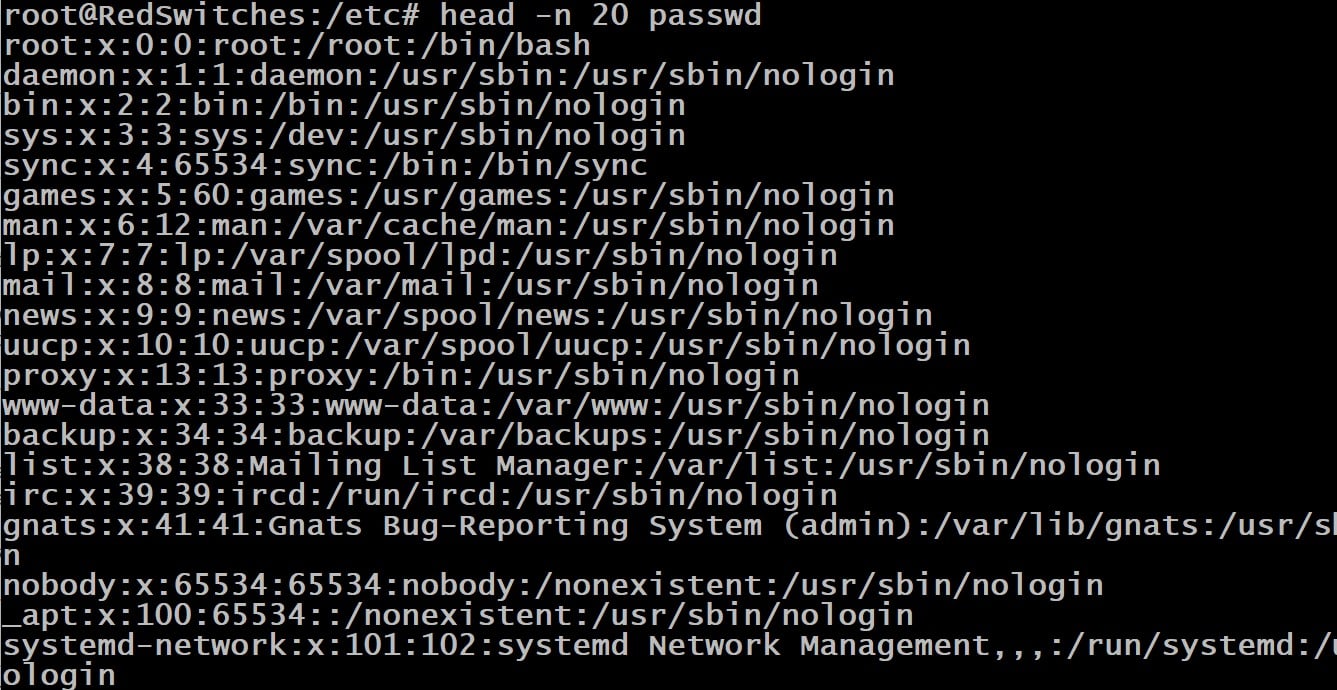
You can use the -n flag to change the command’s default behavior. For instance, the following command will display the first 20 lines of the sample.txt file.
# head -n 20 sample.txt
The tail Command
As the name demonstrates, the tail command outputs the last lines of a file. By default, it displays the last 10 lines of the file.
Usage: # tail [file name]
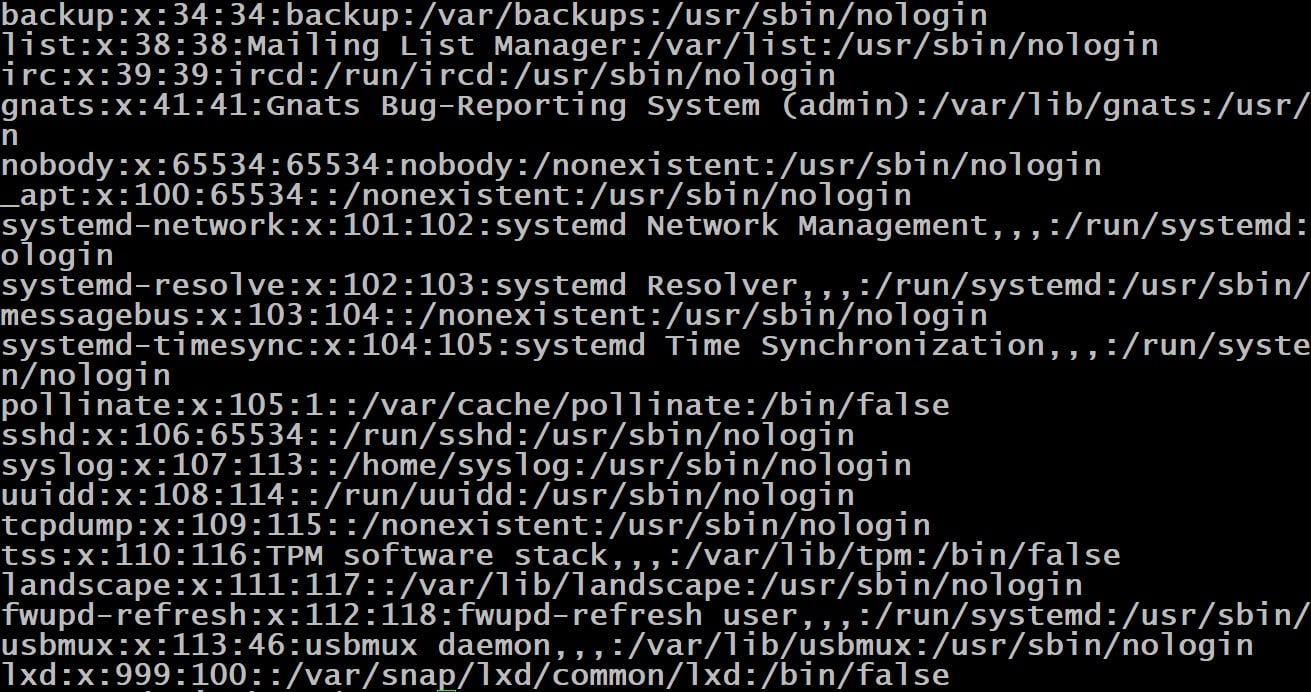
Similar to the head command, you can use the -n flag to display more than the default number of lines. For instance, the following command will display the last 20 lines of the sample.txt file.
# tail -n 20 sample.txt
15. ln to Create Links
The ln command stands for link. Simply put, it creates a link/shortcut between two files. It can create hard and symbolic (soft) links between two files. A hard link essentially creates a duplicate entry point to the same data on the disk, while a symbolic link is a separate file that points to the original location of the file.
Usage:
# ln source_file hardlink_name (creates a hard link)
# ln -s source_file hardlink_name (creates a soft link)
16. Compress & Extract Files With zip & unzip
The zip Command
zip is a command-line utility used for compressing files or directories into an archive file in ZIP format. The command reduces the original file size for efficient storage and transfer.
Usage: zip [zip archive name][source file]
You can compress multiple files in a single archive with the following command:
# zip my_file.zip file1.txt file2.txt file3.txt
The unzip command
unzip is a command-line utility that extracts (uncompresses) files and directories from compressed ZIP archives. The syntax is:
# unzip my_file.zip
Once the command finishes, we recommend using the ls command to view the uncompressed files.
17. gzip & gunzip to Faster & Better Compression & Decompression
The gzip command
gzip is a standard Linux utility for file compression and decompression. We recommend using the gzip command because it is faster, and the archives (with .gz extension) are much smaller in size. Note that the gzip utility only works with a single file.
Usage: # gzip myfile.txt
The gunzip command
Conversely, gunzip is a command-line utility that decompresses the .gz archive.
Usage: # gunzip myfile.txt.gz
18. Tape Archive With tar
tar (Tape Archive) bundles files and directories into an archive file (with a .tar extension). It offers an efficient option for storing, transferring, and backing up multiple files or entire directories in a single, convenient archive.
Usage: tar [options][tar archive name][file1][file2]
A more practical usage of the command adds -xf flags to extract files from the specified TAR archive.
# tar -xf archive_name.tar
19. Change Mode & Permissions With chmod
chmod (change mode) is a UNIX utility that modifies file and directory permissions. You can use it to set or change the read, write, and execute permissions for the groups, files, and directories.
Usage: # chmod [permissions] [file name]
This command is very flexible, and you can combine the permissions to control how users can access and work with files.
# chmod u+x file.txt
This command grants execute permission to the owner of file.txt.
# chmod 755 file.txt
This command sets rwxr-xr-x (read, write, and execute) permissions for file.txt.
We recommend you list the current permissions with the ls -l command before changing the permissions.
20. chown & chgrp to Alter Permission Roles
The chown command
chown stands for “change owner.” You can use this to change the ownership of files and directories. It is typically used to transfer a file or directory ownership to a different user.
Usage: chown [new_owner]:[group] [file]
For instance, the following command transfers the ownership of the myfile.txt to the user john:
# chown john: users myfile.txt
The chgrp command
On the other hand, the chgrp command is used to change the group ownership of a file or directory. You can use this command to assign a file or directory to a different group.
Usage: chgrp [new-group] [file]
21. Create & Delete Users With useradd and userdel
The useradd Command
useradd is used to add new user accounts. It creates a new user, along with associated files and directories.
Usage: # useradd username
The userdel Command
userdel deletes user accounts from the system and associated configurations.
Usage: # userdel username
22. Modify User Accounts With usermod
The usermod utility is a simple way to modify user account properties. You can alter existing user account attributes, such as the username, home directory, shell, and more.
Usage: # usermod [options] username
23. groupadd and groupdel to Create & Delete Group
The groupadd command adds new groups, allowing administrators to organize users in groups to assign shared permissions.
Usage: # groupadd [group_name]
The groupdel command is used to delete existing groups.
Usage: # groupdel [group_name]
24. Set Password With passwd
The passwd (short for password) command is used to set or change the password for a user. Admins and users with sudo permission can change the passwords for all users. A normal user can only change the password for their account.
Usage: # passwd [user_name]
25. Set Group Password With gpasswd
The gpasswd command is used to set a password for the group. Administrators can add or delete users from a group, set group administrators, and manage the group password.
Usage: # gpasswd [group_name]
26. Find Files and Directories With find
The find command searches for files and directories in the specified location based on criteria such as name, type, size, or modification time.
Usage: #find /path/ -name [file_name]
The find command is very flexible, and you can use several flag combinations to extract the desired files and directories. We’ll run through some of these use cases.
# find /path/ -size 50M
Search files based on file sizes. You can use M for MB, k for KB, and G for GB.
# find /path/ -type f
Search files or directories in the given path. Remember to use f for file, d for directory, or l for symbolic link.
# find /path/ -name [file_name]
Search file by name
# find /path/ -iname [file_name]
The -iname option in the find command allows you to perform a case-insensitive search for files based on their names.
# find /path/ -user [username]
Search files belonging to the mentioned user account.
27. Search for Files and Directories With locate
The locate command quickly searches for directories and filenames. It’s faster than the find utility. However, it can fail to fetch the latest files if the command’s database hasn’t been updated recently.
Usage: # locate [file name]
28. Search for Code File With whereis
The whereis Linux command locates the binary, source, and manual page files for a specified command. Its purpose is to provide information about the various components associated with a given command, aiding users in understanding the installation and usage.
Usage: # whereis command
For instance, the following command locates the file for Python:
# whereis python
29. Search Specific Patterns With grep
The grep command is a powerful and versatile text pattern search utility.
The primary purpose of the grep utility is to search for a specified pattern or regular expression in one or more files, displaying the lines that match the criteria.
We have written a detailed guide to the grep utility for efficient pattern discovery.
30. Replace Text With sed
sed (short for Stream Editor) is a text-processing utility. It is commonly used for finding and replacing text and manipulating text in scripts and command-line tasks.
Usage: # sed [options] command file_name
31. Manipulate Text With awk
awk is a versatile text processing tool and utility in Linux. It is designed to process and manipulate text data, typically in structured columns and rows, such as CSV files.
Its name is derived from the initials of its creators (Alfred Aho, Peter Weinberger, and Brian Kernighan). The primary purpose of awk is to search for patterns and perform specific actions on the lines that match those patterns.
Usage: # awk pattern { action } file_name.txt
For instance, use the following awk command to print the second column of a space-separated file called data.txt:
# awk {print $2} data.txt
This command will select every line in data.txt and print the second field (column)in the standard output.
32. Arrange Data With sort
The sort utility is often used for arranging lines of text in a specified order. It organizes data in ascending or descending order based on the defined criteria. Admins use sort for arranging and analyzing text data.
Usage: # sort [options] [file_name]
For instance, use the following sort command variation to sort the lines of a text file named unsorted.txt in ascending alphabetical order and display the sorted result:
# sort unsorted.txt
33. Extract Text With cut
The cut command extracts specific sections (columns) from the file or input stream line and then displays or manipulates this extracted content.
Usage: # cut [options] file
The following command cuts the first and third fields (columns) of a tab-separated file named data.txt and displays the results:
# cut -f1,3 filename
34. diff to View File Differences
The diff command compares and highlights the differences between two text files or directories. You can use it to identify changes, additions, and deletions in the content of files. It is a valuable command-line tool for version control, code review, and highlighting changes in text files.
Usage: # diff [options] file1 file2
For comparing directories, you can use a similar syntax, replacing file1 and file2 with the directory paths:
# diff [options] directory1 directory2
35. echo to Display Output
The echo command is a simple utility that prints to the standard output (usually the terminal). It is among the most commonly used Linux terminal commands. Similarly, it is often used to print/display information, messages, or variable values within scripts.
Usage: # echo [options] [text or variables]
For instance, to print the message “Hello, World!” to the terminal, use:
# echo "Hello, World!"
36. df to Display Disk Space Information
df (short for disk free) displays the amount of disk space used and available on the mounted filesystems.
Usage: # df [flags]
The most common usage of this command is to print out disk space consumption and availability information in a human-readable format.
# df -h
37. Disk Space Estimation With du
du (disk usage) estimates and displays the disk space used by files and directories.
# du -sh
38. Attach & Access Files and Devices With mount
mount is a crucial utility in Unix-like operating systems for attaching filesystems to the directory tree. Its primary purpose is to make the contents of a storage device or network-shared directory accessible by associating it with a specific local directory.
Usage: mount [flags] [device] [directory]
39. Check Available Memory With free
The free command in Linux provides information about the system’s memory usage. It displays detailed information that includes the total, used, and free memory, including swap space.
Usage: # free [flags]
Also Read: Master the Linux Free Command: 6 Examples For Sysadmins and DevOps Engineers
40. List Block Devices With lsblk
The lsblk command lists block devices and provides a clear and concise overview of block devices (disks and partitions) connected to the system. This simple command lets Admins and users quickly identify available storage devices and their relationships.
Usage: # lsblk
41. Create & Modify Partitions With fdisk
fdisk (fixed disk/format disk) is a disk partitioning command that admins use to create, delete, and modify partitions on connected storage devices. It is an essential utility for managing disk partitions.
Usage: # fdisk /dev/sda (creates a new disk partition)
42. Get Process Status With ps
Admins often use the ps command to get information about the currently running processes on the system. This command lets users view process IDs (PIDs), process resource usage, and execution status.
Usage: #ps [flags]
A typical use case is to get detailed information about active processes with the following command:
# ps -aux
43. top to Show Real-time Processes
The top command provides a real-time, dynamic view of system processes. Admins use top to see an interactive and continuously updated display of system resource usage, including CPU, memory, and overall process activity.
Usage: # top
44. Advanced Real-time Process View with htop
The htop command is an interactive process viewer that is very similar to the top utility. It offers more features than the top command and a user-friendly interface that monitors system processes and resource utilization.
Usage: # htop
45. Search Process by Name With pgrep
The pgrep command (short for process grep) searches for and displays the process IDs (PIDs) based on a specific pattern. It’s a quick way to identify processes that match a particular condition.
Usage: # pgrep [options] pattern
46. Terminate Processes With pkill and killall
pkill (short for process kill) sends terminate signals to processes based on specified criteria, typically, process name or other attributes.
Usage: # pkill [flags] pattern
The killall command is another process termination command. While its operation is similar to pkill, it essentially kills processes by name.
Usage: # killall [flags] process_name
47. End a Process With kill
This simple command terminates processes by sending signals to the target process.
Usage: # kill [options] [PID]
Explore our detailed guide on how to kill a Linux process.
48. lsof to List Open Files
The lsof command (short for “list open files”) provides detailed information about files and processes currently open on the system. This command is helpful in troubleshooting and understanding how various processes access files.
Usage: lsof [flags] [files or directories]
49. Trace System Calls With strace
strace (short for system trace) intercepts and records system calls and signals a process makes, providing detailed information about its interactions with the operating system. Developers and admins use it for debugging and understanding the behavior of active apps on the system.
Usage: strace [options] command [arguments]
For instance, use the following command to trace all system calls for the process ID 12345:
# strace -p 12345
50. Find Out the System Name With hostname
The hostname command is used to set or discover the system’s hostname (the human-friendly label used to identify a device on a network).
Usage: # hostname [options]
51. Check Date & Time Status With date
The date command displays or sets the current system date and time. It provides a straightforward way to access and manipulate the current date and time information.
Usage: # date
Also Read: Get Current Date and Time in Python With 2 Easy Methods
52. Control System With systemctl
The systemctl command in Linux is the control panel for the Linux services. Sysadmins and developers often use it for starting, stopping, reloading, and managing services and system resources.
Usage: # systemctl [options] [command] [unit]
53. Display Log Entries With journalctl
The journalctl command in Linux is used to query and display messages from the systemd journal, a centralized logging solution. You can easily filter and view log entries for troubleshooting and system analysis.
Usage: # journalctl [flags]
54. Change System Clock With timedatectl
The timedatectl command queries and changes the system clock and its settings, providing a unified interface for time management on your Linux machine. It handles time zones and network time settings efficiently.
Usage: # timedatectl [flags] [commands]
For instance, you can use the following timedatectl syntax to set the system’s time and date:
# timedatectl set-time YYYY-MM-DD HH:MM:SS
55. Bring the System Down With shutdown
The shutdown command allows you to “gracefully” shut down your Linux system. During this process, the OS closes all active processes and saves the data on disk. You can schedule a time for the shutdown or do it immediately. Optionally, you can allow for a restart or a complete power-off.
Usage: #shutdown [flags]
For instance, the following command gracefully shuts down the system immediately:
# sudo shutdown -h now
56. Restart the System With reboot
The reboot command restarts the system safely. This command closes all active apps and processes, ends all sessions, and performs a full system reboot.
Usage: # reboot
57. Check Previous Commands With history
The history command lists previously executed commands in the current shell session. It is a convenient tool for reviewing and repeating commands.
Usage: #history [options]
58. Clear Terminal Contents With clear
Use the clear command to clear the contents of the terminal quickly. It’s a simple command that clears the terminal.
Usage: # clear
59. Exit Terminal With exit
To close the current terminal session, run the exit command:
Usage: # exit
60. View Manual Pages With man
The man (manual) command is used to access documentation for commands and utilities in the terminal. It provides detailed information about the common, including the usage, flags, and optional commands.
Usage: # man [options] command
61. Use Superuser Permissions With sudo
The sudo (superuser do) command allows an authorized user to execute a command as the superuser or another user. Using this command is a recommended practice for enhancing system security by restricting access to critical commands and operations.
Usage: # sudo [command_name]
62. Su to Subtitle User
The su (usually, switch user) command is used to change the current user account, typically to the superuser (root), without logging out. It’s essential for performing operations with different user privileges in a session.
Usage: # su [user_name]
63. Set Default Permissions With umask
The umask command sets or displays the default file permission mask for new files and directories created by a user. When used without any flags, the command prints the umask value that’s used to determine the default permission for the newly created files and directories.
Usage: # umask
64. getfacl to Show Access Control Lists
The getfacl (Get File Access Control Lists) command retrieves and displays the Access Control Lists (ACLs) of files and directories. ACLs provide more fine-grained control over permissions than traditional (Linux) system permissions.
Usage: #getacl [user-name]
65. Modify Access Control List With setfacl
The setfacl (Set File Access Control Lists) command sets or modifies the Access Control Lists (ACLs) of files and directories. ACLs provide a more flexible and granular control over permissions than the traditional system permissions.
Usage: # setfacl -m u:username: permissions file
66. Check File Info With stat
The stat command displays detailed information about a file. This information includes file type, size, and access and modification times.
Usage: # stat [file_name]
67. Display Users List With who
The who command lists all users currently logged into the system. It provides the username, terminal, login time, and originating IP address.
Usage: # who
68. Print Username With whoami
This command prints the username associated with the currently logged-in user ID. This comes handy when you have been switching accounts and want to know your current account to determine available privileges.
Usage: # whoami
69. Activity Tracking With w
It displays information about currently logged-in users and their activities, such as snapshots of users, their terminal sessions, login times, idle durations, and more.
Usage: # w
70. last to Check the Users’ Login History
This simple command lists the details of the recently logged-in users, including sessions, usernames, terminal IDs, login times, and duration.
Usage: # last
71. getent to Fetch Database Info
The getent command fetches information from various Name Service Switch (NSS) sources, such as passwd, group, hosts, and others.
Usage: # getent database [key ...]
Use the following command to retrieve information for a specific user:
# getent passwd [username]
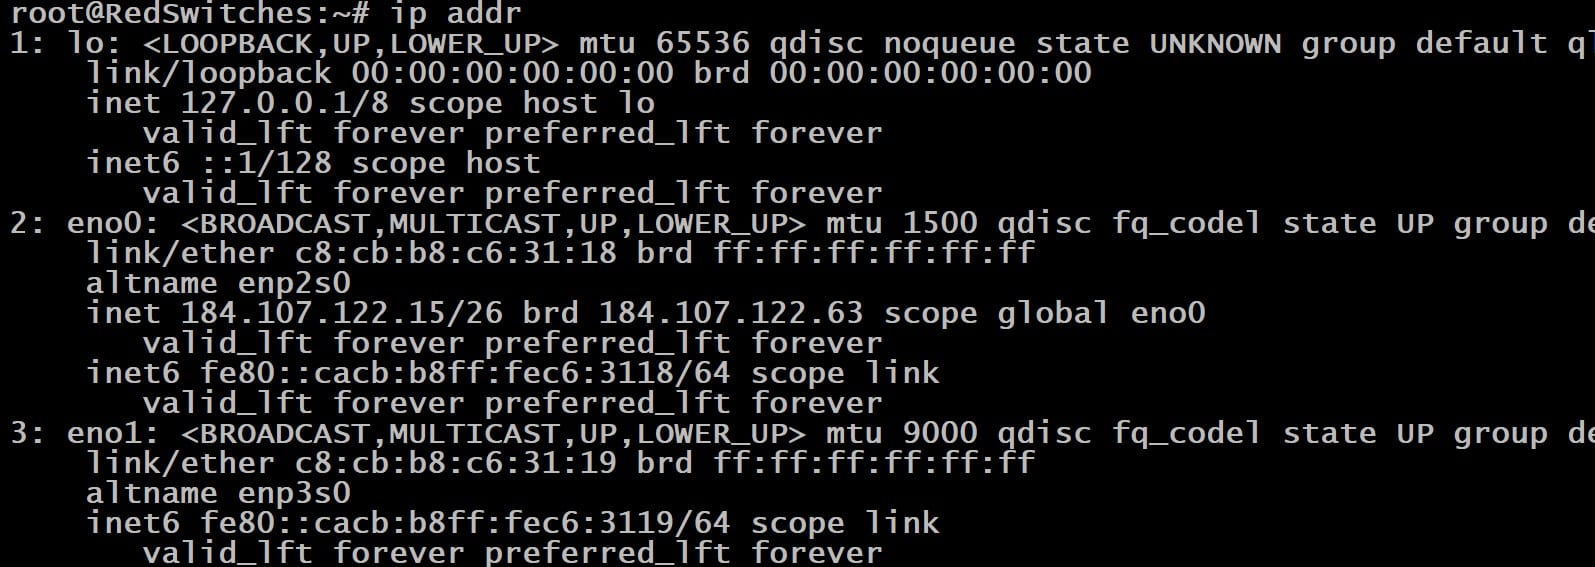
72. Use ip addr to Show Network Interfaces & IP Addresses
As the name shows, this command displays all network interfaces and IP addresses, link status, and MAC addresses.
Usage: # ip addr
73. netstat -tuln to List Ports
The netstat -tuln command provides information about active network connections and ports. Specifically, it focuses on TCP (Transmission Control Protocol) and UDP (User Datagram Protocol) connections, providing details such as local and foreign addresses, state, and the process ID associated with each connection.
Usage: # netstat -tuln
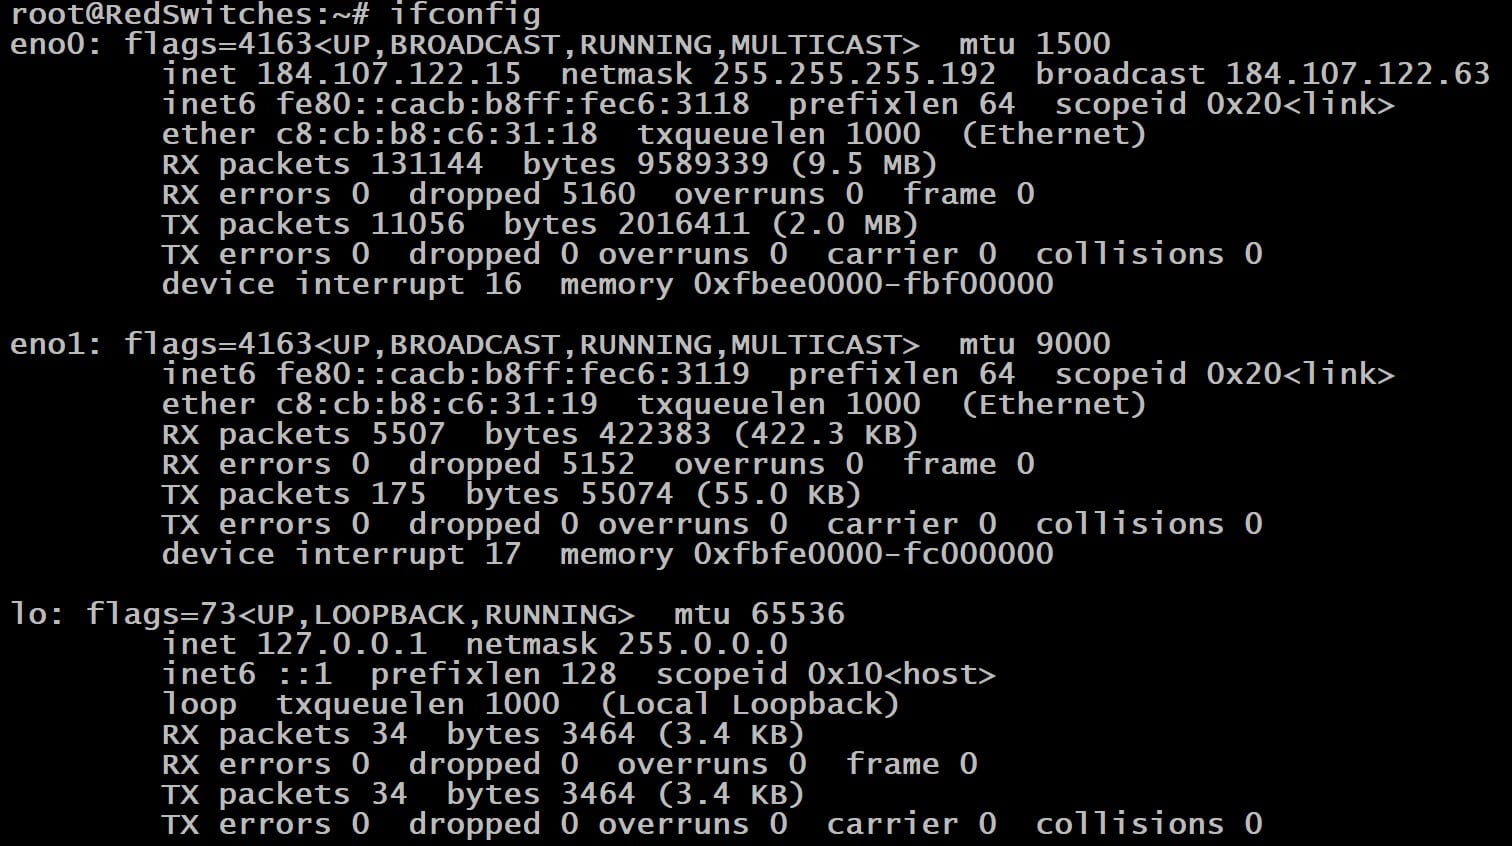
74. Use Ifconfig to Display Network Configurations
The Ifconfig command configures the network interface and enables/disables it. Admins use this utility to adjust interface status, set IP addresses, and configure netmasks (a 32-bit mask that defines the rules of networking in available hosts).
Usage: # ifconfig
75. Test Connectivity With ping
The ping (Packet Internet Groper) is a well-known utility for testing a host’s Internet Protocol (IP) network connectivity. When executed, the utility sends a data packet to a target host and measures the time it takes for the packet to travel to the host and back. This helps in assessing the network’s connectivity and latency.
Usage: #ping [host]
For instance, use the following command to ping Google servers.
# ping www.google.com
76. Use traceroute to Trace Data Packet Route
The traceroute (or tracepath in some distros) command tracks the route data packets take across an Internet Protocol (IP) network.
Admins use this utility to identify the hops (intermediate routers) a packet traverses from the source to the destination. As such, it is useful for diagnosing network connectivity issues and understanding the path data packets take.
Usage: #traceout [host]
For instance, use the following command to trace the route to Google’s servers:
# traceroute www.google.com
77. Get Real-time Data With mtr
mtr (My traceroute) is a network diagnostic tool that combines the functionalities of traceroute and ping utilities.
When executed, it provides a continuous interactive display of network routing and performance information between the source and destination. Admins use it to identify network issues, such as packet loss and latency, over an extended period.
Usage: #mtr [host]
For instance, the following command uses Google’s servers for diagnostics:
# mtr www.google.com
78. Test DNS Resolution With nslookup
nslookup (short for Name Server Lookup) is a command-line tool that queries Domain Name System (DNS) servers to obtain domain-specific information. It translates domain names into IP addresses and vice versa, retrieving other DNS records associated with a domain.
Usage: nslookup [domain]
79. dmesg | grep eth0 to Display Kernel Messages
The command dmesg | grep eth0 is used to filter and display kernel messages related to the network interface named eth0. This command troubleshoots network-related issues and examines the kernel log messages related to the specified network interface.
Usage: #dmesg | grep [network interface]
80. yum/apt-get/dnf/rpm to Manage Software Packages
Different Linux distributions use different package managers to install new software and update the installed packages. Here’s a brief overview of the popular package managers.
yum
Full Form: Yellowdog Updater Modified
Purpose: YUM is a package management utility for compatible RPM (Red Hat Package Manager) Linux systems. It simplifies the process of installing, updating, and managing software packages.
Usage: # sudo yum install [package_name] (used in older RHEL-based distributions)
apt
Full Form: Advanced Package Tool
Purpose: APT is the preferred package management command-line tool in Debian-based distributions. It handles packages and dependencies, making it easier to install, upgrade, and remove software.
Usage: # sudo apt-get install package_name
DNF
Full Form: Dandified YUM
Purpose: DNF is the next-generation version of Yum, used for package management in RHEL-based Linux distributions. It retains all popular YUM functionalities and introduces improvements in performance and dependency resolution.
Usage: # sudo dnf install package_name
RPM
Full Form: RPM Package Manager
Purpose: RPM is both a software packaging format and the package management system used in RPM-based Linux distributions. It allows users to install, upgrade, and manage software packages.
Usage: # sudo rpm -i package_file.rpm (used in Red Hat-based systems, often for manual installations):
81. crontab to Schedule Commands
crontab is a command-line utility that allows users to schedule jobs (commands or scripts) to run periodically at specified times, dates, or intervals. These scheduled tasks are called cron jobs. You can use several flags to customize the functionality of this utility.
Usage: crontab [flags]
Here are a few common use cases of this utility:
# crontab -l
Use this command to view the currently scheduled cron jobs.
# crontab -e
Use this command to edit cron jobs. The standard syntax of a cron job is:
# * * * * * /path/to/script.sh
Field Description Allowed Value
MIN Minute field 0 to 59
HOUR Hour field 0 to 23
DOM Day of Month 1-31
MON Month field 1-12
DOW Day Of Week 0-6
For instance, use the following cron job syntax to schedule a background cron job every 10 minutes:
# */10 * * * * /home/saanvi/check-disk-space
There are special cases in which you can use @ followed by a keyword — such as a reboot, midnight, yearly, and hourly.
keyword Equivalent
@yearly 0 0 1 1 *
@daily 0 0 * * *
@hourly 0 * * * *
@reboot Run at startup.
82. Download Files With wget
wget is a command-line utility for downloading files from online resources. It works with various protocols, such as HTTP, HTTPS, FTP, and FTPS. The command works in a non-interactive format for downloading files. It is a favorite command to download files from the Internet because of its ability to resume interrupted downloads.
Usage: # wget [online resource address]
For example, use the following command to download a file from the example URL to the local current directory:
# wget http://example.com/file.iso
83. cURL to Transfer Data
cURL, short for “Client for URLs,” is a command-line utility and library for transferring data from URLs.
It supports a wide range of protocols, including HTTP, HTTPS, FTP, FTPS, SCP, SFTP, and LDAP. Admins and developers use cURL to make HTTP requests, download files, and interact with various network protocols.
Usage: # curl [URL]
For instance, use the following command to download the webpage contents (http://example.com) to a local file (filename.html):
# curl -o filename.html http://example.com
Also Read: How to Set or Change User Agent with cURL: A Step-by-Step Guide
84. wc to Get Word Count
The wc (word count) command is used to count the number of words, lines, and bytes in files.
Usage: #wc [flags][file name]
For example, the following command outputs the number of words in a file:
# wc -w filename.txt
Similarly, To count the lines in the file named document.txt, you’d use:
# wc -l document.txt
85. Export Environment Variables With export
The export command is used to set environment variables for the current session or child processes initiated from the session.
Usage: # export [env variable] [value]
For instance, use the following command to add a value to the PATH environment variable:
# export PATH=$PATH:/new/directory
While we are on the topic of environment variables, check out our step-by-step guide to set Linux environment variables.
Also Read: 6 Simple Examples of Using the Linux watch Command
Also Read: 13 Examples That Showcase the xargs Command in Linux
Also Read: lsof Command in Linux with Examples
Also Read: A Guide on How to Install and Use Linux Screen Command in 2024
Conclusion
We’ve learned 80+ Linux commands in this article, from basic to advanced. Bookmark this guide, as it’s your go-to source whenever you need to go through any command. Whether you’re a beginner or a tech whiz, they let you easily communicate with the system and accomplish your tasks efficiently. So, play around with them and excel by practicing.
RedSwitches helps customers by offering fully customized Bare Metal Server hosting solutions. Contact us if you are unclear about the server requirements for your most recent projects, and our Expert Support Engineers will help you every step of the way.
FAQs
Q. Which Linux commands are fundamental for all users to be familiar with?
Some essential Linux commands every user should know are mkdir, ls, pwd, cd, cp, rm, mv, cat, grep, and chmod.
Q. How do I create a directory in Linux?
The mkdir command is used to make a new directory in Linux,. For instance, if you want to create a directory named “documents,” you would enter mkdir documents into the terminal.
Q. How do I list files and directories in Linux?
To display the files and directories within Linux, utilize the ls command. Just type ls in the terminal, and it will show all items in the present directory.
Q. How do I check my current working directory in Linux?
You can check your current working directory in Linux using the pwd command. Just type pwd, and it will display the full path of your current directory.
Q. How do I remove a file or directory in Linux?
To delete a file in Linux, the rm command is used. For instance, to eliminate a file named example.txt, you would enter rm example.txt into the terminal. If you need to remove a directory and its contents, the command would be rm -r directory_name.
Q. How do I move a file or directory in Linux?
You can move a file or directory in Linux using the mv command. For example, to move a file called example.txt to a different directory, use the command mv example.txt /path/to/directory.
Q. How do I copy a file or directory in Linux?
You can copy a file or directory in Linux using the cp command. For example, to copy a file called example.txt to a different directory, use the command cp example.txt /path/to/directory.
Q. How do I search for a specific string in a file in Linux?
Using the grep command, you can search for a specific string in a file in Linux. For example, to search for the string hello in a file called example.txt, use the command grep hello example.txt.
Q. What is the process for modifying file or directory permissions in Linux?
In Linux, file or directory permissions can be changed using the chmod command. For instance, to assign read, write, and execute permissions to the owner of a file named example.txt, the command would be chmod u+rwx example.txt.
Q. How many commands does Linux have?
Linux offers a wide range of commands. The exact number can vary depending on which version of Linux you use. But basically, there are a lot of them to help you do different things on your computer.
Q. How do I shut down my Linux system?
You can shut down your Linux system using the shutdown command. Simply type shutdown, and your system will initiate the shutdown process.








![hostname [options]](https://www.redswitches.com/wp-content/uploads/2023/11/hostname-options.jpg)


