
Creating or resizing disk partitions is an important activity when installing any Linux distribution.
Partitioning your system’s disk allows you to divide it into separate sections, each functioning as its own independent storage unit.
It is also a crucial system administration task where the admin optimizes the usage of storage space by creating partitions that the system OS, applications, and users can use without worrying about running out of storage or unused disk space.
In a multi-OS environment, you need disk partitions to allocate space to each OS on the disk. In this case, disk partitioning is an essential activity for ensuring system performance and supporting user applications.
In this comprehensive guide, we will walk you through the process of creating a Linux partition. In particular, we will show you how to create a disk partition with parted and fdisk, two of the most popular disk partition management utilities.
Table Of Contents
How to Create a Disk Partition in Linux
Let’s go ahead and see how we can create a disk partition in Linux. We will cover parted and fdisk, two utilities that get the job done within minutes!
The Prerequisites
Before you try out either of the utilities, make sure you have the following:
- A system with a mainstream Linux distribution.
- You have a user account with sudo or root permissions for administrative tasks.
Option #1: Use the parted Utility to Partition a Disk
GNU parted (Partition Editor) is a popular disk partitioning utility that’s usually present in many Linux distributions.
We recommend the following steps to partition a disk in Linux with the parted utility.
Step #1: List Available Storage Devices & Partitions
Start by listing all the current storage devices and their partitions to identify which one you wish to partition.
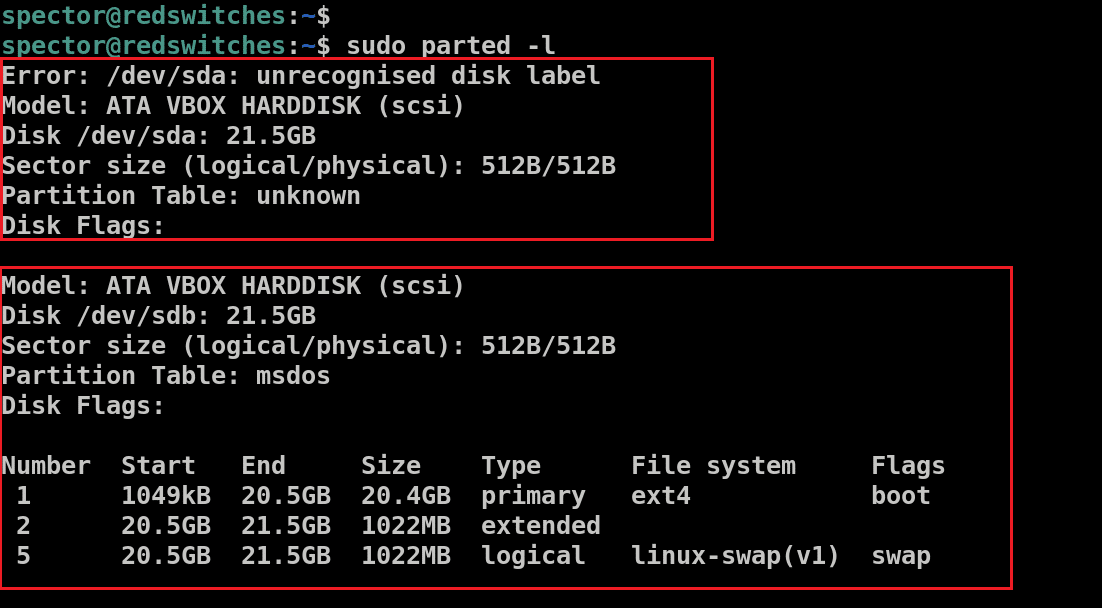
Execute this command with sudo privileges to see a list of storage devices and current partitions:
# sudo parted -l
This will display information for each storage device, including:
- Model: The make of the storage device.
- Disk: The device identifier and its total capacity.
- Sector size: The logical and physical sector sizes are different from the disk’s free space.
- Partition Table: The format of the partition table, which could be one of several types, such as msdos, gpt, and others.
- Disk Flags: Any specific flags set for the disk’s partitions, detailing their size, disk type, filesystem, and other attributes.
Note that partitions in a Linux environment can be one of these types:
- Primary: These partitions typically contain operating system files. A maximum of four primary partitions is allowed.
- Extended: This type allows the creation of more than four partitions on a single disk.
- Logical: These are partitions within an extended partition.
Typically, the primary storage disk (labeled as dev/sda or dev/vda) houses the operating system. Attempting to partition this disk could render your system unbootable. It’s safer to perform partitioning tasks on additional storage disks, such as dev/sdb, dev/sdc, dev/vdb, or dev/vdc, to avoid disrupting your system’s functionality.
For instance, you can see that our test system has two storage devices listed as /dev/sda and /dev/sdb.
Step #2: Access the Target Storage Device
To begin partitioning, you need to access the storage disk you identified for partitioning in the previous step. Now, run the parted command with the device’s name:
# sudo parted /dev/sda
Always specify the storage device you intend to work with when using parted. If you omit the disk name, the utility may select a disk at random, which could lead to unintended changes and potential data loss.
However, you can switch to the intended device with the select command. For instance, we used the following command to switch to the /dev/sda disk:
(parted) select /dev/sda
Now you can work directly with the /dev/sda disk.

Step #3: Create a Partition Table
Before you proceed with creating partitions, it’s necessary to set up a partition table. This table resides at the beginning of the hard drive and contains information about the dimensions and locations of the partitions.
Linux supports several partition table formats, including aix, amiga, bsd, dvh, gpt, mac, ms-dos, pc98, sun, and loop.
The gpt and msdos are the most frequently utilized types of partition tables. msdos can accommodate up to sixteen partitions and manage disk spaces up to 16TB. On the other hand, gpt can handle disk spaces as large as 9.4ZB and supports up to 128 partitions.
Use the following command syntax to initiate a new partition table:
(parted) mklabel [type_of_partition_table]
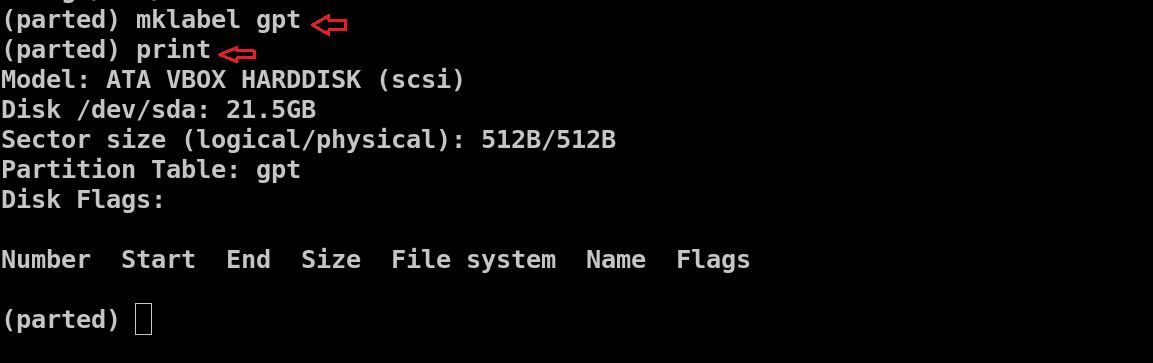
For instance, run the following command to set up a gpt partition table:
(parted) mklabel gpt
Confirm your action by typing Yes when prompted to proceed.
![]()
Step #4: Verify the Partition Table
Before proceeding to the actual partitioning, inspecting the newly created partition table to confirm the type and disk details is critical. For this, execute the print command.
(parted) print
Step #5: Create the New Partition
Now, we’ll create a new partition with a size of 2000MB, formatted with the ext4 file system. This partition will start at 1MB and extend to 2000MB.
To set up this partition, use the mkpart command:
(parted) mkpart primary ext4 1MB 2000MB
Generally, you won’t see any status message about the success or failure of the process. That’s why we strongly recommend rerunning the print command again to check the details of the partition you’ve just created.
Look for the new partition information under the Disk Flags section.

When working with a gpt partition table, it’s essential to note that the partition type actually refers to the name you assign to the partition. For instance, on our test system, the word primary serves as the name for the partition rather than indicating its type.
To finalize your changes and exit the parted utility, simply enter quit. This action will automatically save any modifications you’ve made.

In some cases, you may see the message You may need to update /etc/fstab file. This indicates that the new partition can be set up to mount automatically whenever the system boots. You can make relevant entries in the file to set up automatic mount.
Option #2: Partition a Disk with the fdisk Utility
fdisk has been around since the 1980s. These days, it is part of the Linux kernel utilities (more specifically, the util-linux package).
We recommend the following steps to partition a disk in Linux using the fdisk utility.
Step #1: List the Current Partitions
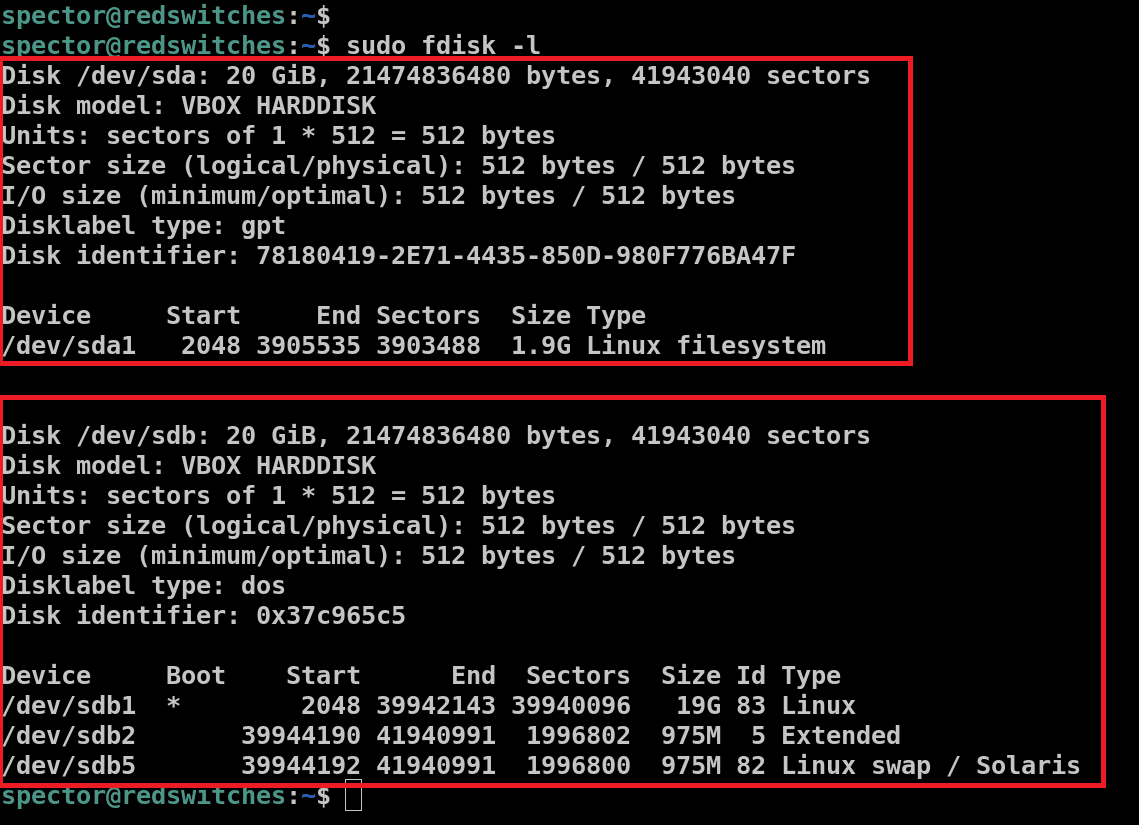
Start by viewing the available disks and partitions with the following command:
# sudo fdisk -l
As you can see, our test system has the following storage drives and partitions.
Step #2: Choose the Target Disk
Identify and select the storage disk where you intend to create new partitions. Next, invoke the fdisk utility with the following command:
# sudo fdisk /dev/sda
This command will line up the /dev/sda for partitioning.

Step #3: Initiate the New Partition
We can now start working on creating the partition. This process has the following steps:
- Start the process by entering the n command (which stands for new partition).
- When prompted to choose a partition number, you can simply press Enter to accept the default value suggested (for example, 2).
- Next, you’ll be asked to specify the starting and ending sectors for the partition. It’s usually safe to go with the default values provided by the utility, which you can accept by pressing Enter.
- Finally, you’ll decide on the size of the new partition. You have the flexibility to specify this in sectors, megabytes (M), or gigabytes (G). To create a 2GB partition, for instance, you would type +2G.
Upon completion, you’ll see a confirmation message indicating that the new partition has been successfully created.

Step #4: Save Changes to the Disk
Note that while the partition has been created, the modifications have not yet been applied to the disk.
We recommend the w (write) command to permanently write these changes to the disk:
w

This action will save the changes you’ve made to the disk.
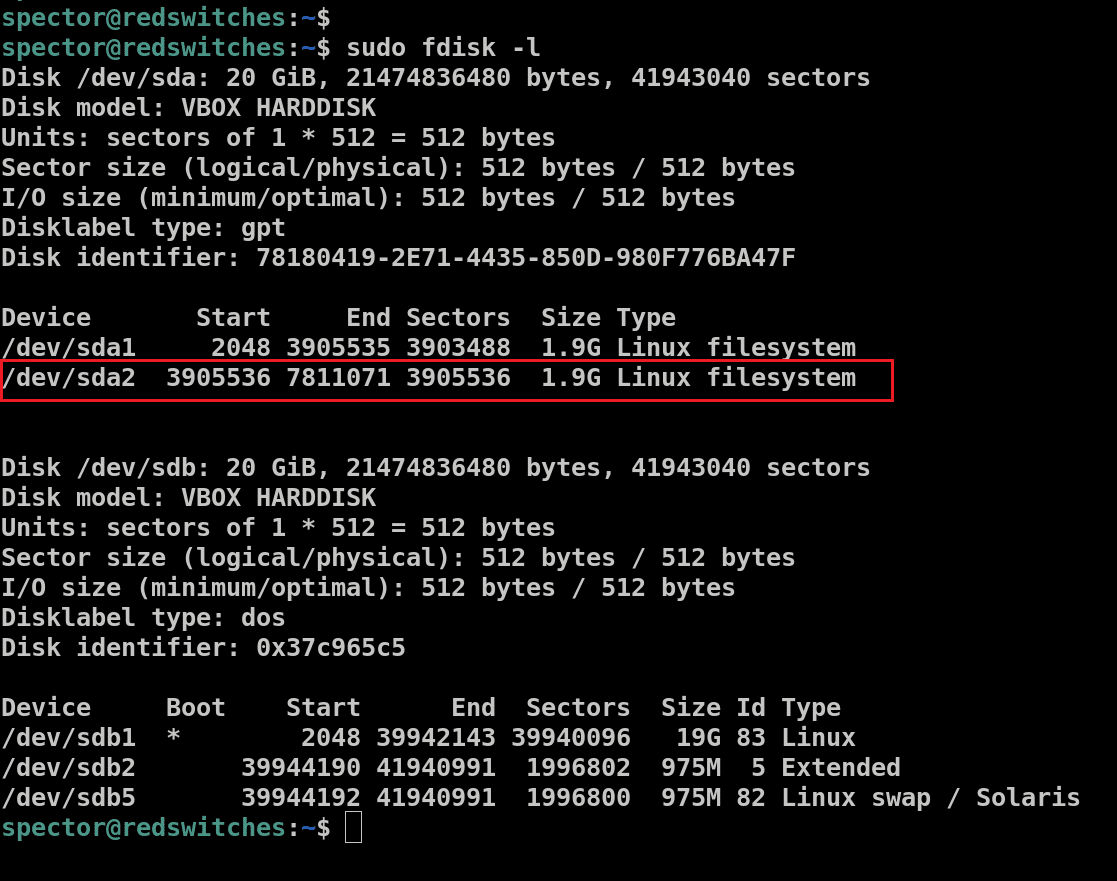
After writing the partition details, we recommend confirming that the partition was successfully created and the information written on the disk. For this, execute the following command:
# sudo fdisk -l
This will list all partitions, and you should be able to see the newly created partition (/dev/sda2) in the output, indicating that your partitioning was successful.
Format the Partition
After successfully creating a partition using either the parted or fdisk, the next step is to format it to prepare it for use.
We recommend the ext4 filesystem to format the newly created partition with the following mkfs command:
#sudo mkfs -t ext4 /dev/sda1
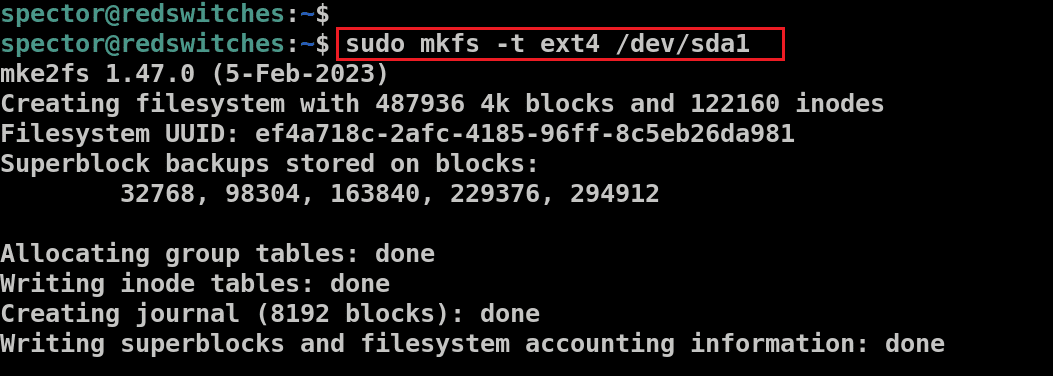
This command initializes the partition at /dev/sda1 with the ext4 filesystem, making it ready to store data.
Formatting disk partitions is a critical step in using the disk partitions. We recommend our guide to formatting disk partitions in Linux for comprehensive coverage of the topic.
Mount the Partition
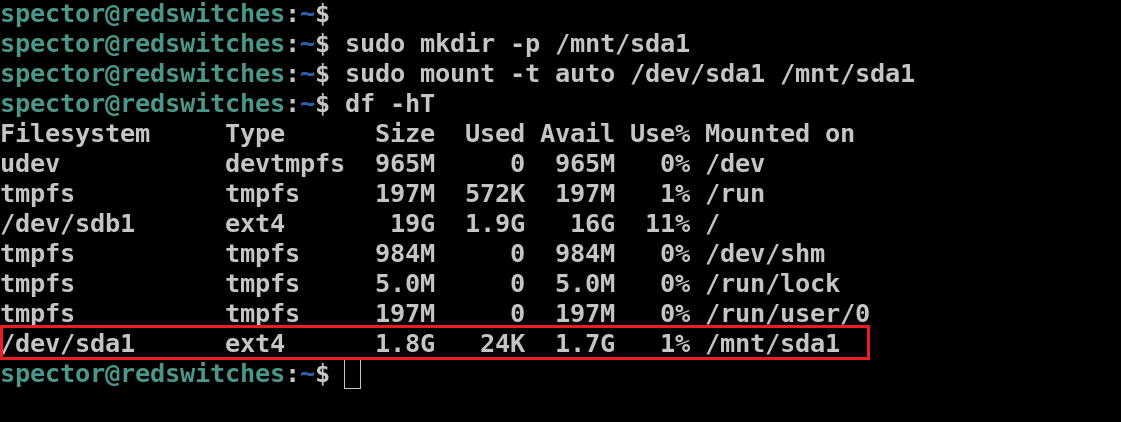
To start using the new disk space, you’ll need to establish a mount point and attach the partition to it.
First, create a directory to serve as your mount point with the mkdir command:
# sudo mkdir -p /mnt/sda1
Next, mount the partition to this newly created directory by executing the following command:
# sudo mount -t auto /dev/sda1 /mnt/sda1
The terminal typically won’t display any status message. So, you need to confirm that the partition is indeed mounted with the following df command that lists all mounted filesystems, including your newly mounted partition:
# df -hT
Here is the output of the command on our test system:
The Linux mount command is versatile and you can use it for more than simply mounting partitions. We have a comprehensive tutorial
Conclusion
Partitioning in Linux is a powerful tool for managing your disk space, improving performance, and organizing data. Whether you prefer a graphical interface with gparted or the command-line approach with fdisk or gdisk, Linux offers the flexibility to suit your needs. Remember to back up your data and plan your partition layout before making any changes.
For those looking to deploy Linux on a larger scale, such as in a data center or for enterprise use, consider RedSwitches bare metal hosting provider. If you’re looking for a robust server for your Linux projects, we offer the best dedicated server pricing and deliver instant dedicated servers, usually on the same day the order gets approved. Whether you need a dedicated server, a traffic-friendly 10Gbps dedicated server, or a powerful bare metal server, we are your trusted hosting partner.
We offer robust, high-performance hosting solutions that can accommodate the needs of demanding Linux environments, ensuring your systems run smoothly and efficiently.
FAQs
Q. What is the fdisk utility in Linux, and how is it used to create a disk partition?
The fdisk command in Linux is a disk utility that is used to manipulate disk partition tables. To create a disk partition using fdisk, you can run the command “fdisk /dev/sdX” where “sdX” is the device name of the disk you want to partition.
Q. Can you explain how to create a disk partition in Ubuntu using fdisk?
To create a disk partition in Ubuntu using fdisk, you can follow these steps: 1. Open a terminal window. 2. Run the command “sudo fdisk /dev/sdX” where “sdX” is the device name of the disk you want to partition. 3. Use the fdisk commands to create a new partition, set the partition type, and write the changes to the disk.
Q. What is the parted command in Linux, and how does it differ from fdisk?
The parted command in Linux is another disk partitioning utility that allows for more advanced partitioning options than fdisk. Parted supports a wider range of partition table types and can work on disks larger than 2TB, which is a limitation of fdisk.
Q. How can I create a disk partition in Linux using the parted command?
To create a disk partition in Linux using the parted command, you can run the command “sudo parted /dev/sdX mkpart primary xFs 0% 100%” where “sdX” is the device name of the disk and “xFs” is the file system type of the partition you want to create.
Q. What are some common file system types that can be used when creating partitions in Linux?
Some common file system types that can be used when creating partitions in Linux include ext4, xFs, btrfs, and NTFS. The choice of file system type depends on factors such as compatibility and performance requirements.
Q. Can I mount the partition after creating it in Linux?
After creating a partition in Linux, you can mount it to a specific directory in the file system using the “mount” command. This allows you to access and use the partition for storing data or running applications.
Q. What is the difference between creating a primary partition and a logical partition in Linux?
In Linux, primary partitions are used to boot operating systems and usually have a limit of four partitions per disk. Logical partitions, on the other hand, are used to extend the number of partitions beyond the four-primary partition limit by creating an extended partition that can hold multiple logical partitions.
Q. What is a GPT disk, and how does it differ from MBR?
A GPT (GUID Partition Table) disk is a standard for the layout of partition tables on a physical hard disk, enabling more flexible disk management. Unlike MBR (Master Boot Record), which is limited to four primary partitions and a total disk size of 2TB, GPT supports up to 128 partitions by default and can accommodate disks larger than 2TB, up to 9.4ZB.
Q. What is a logical disk?
A logical disk, or logical partition, is created within an extended partition on an MBR disk, allowing for more than four partitions.
Q. How do I determine the appropriate partition size when partitioning a disk?
The appropriate partition size depends on your specific needs, such as the operating system requirements, applications, data storage, and future expansion plans.
