

In a Linux environment, each file and directory has an owner (a user, group, or service). This ensures that the file is managed and has proper access permissions.
In most cases, the user or service creating the file or directory is tagged as the owner, with read, write, and execute privileges. Other users and services get selective privileges depending on their requirements.
The great thing about file and directory access in Linux is the ease of changing file permissions. You can use several native commands and utilities to check and change file and directory permissions.
In this tutorial, we will show you how to use the chown (change owner) command in Linux to change the ownership of files, directories, or symbolic links to a different user.
Let’s start with a look at the basic syntax of the command.
Table Of Contents
- The Syntax of the chown Command in Linux
- Use chown to View and Modify File and Directory Ownership
- Use chown To Modify The Group Of a File or Directory
- Change file ownership Recursively
- Change the Ownership of the Symbolic Link With chown
- Display the chown Command Execution Details
- Suppress Errors in the chown Command Execution
- Conclusion
- FAQs
The Syntax of the chown Command in Linux
chown is a robust command that supports a range of flags and options that modify the behavior of the command in the terminal. Note that because of security reasons, you need superuser privileges for the chown command execution.
The basic syntax of the command is as follows:
# chown [OPTIONS] USER[:GROUP] FILE(s)
Here’s a breakdown of the syntax:
- [OPTIONS] – The command may be used with or without additional options.
- [USER] – The new file owner’s username or their numeric user ID.
- [:] – Remember to use a colon when modifying the group of a file.
- [GROUP] – Modifying group ownership of a file is an optional action. Note that all members of the group get access to the file.
- FILE – The file in question.
Check the chown Command Version
You should know that the chown command is part of the GNU coreutils. That means the command is available on all GNU-based operating systems. However, the version of the command may be different on the OS distribution.
In this tutorial, our test system has Ubuntu 18.04.2 LTS with the chown version 8.28. Since there might be subtle functional differences in the chown versions, we recommend checking the command version before proceeding further with the tutorial.
To determine the chown version installed on your system, enter the following command:
# chown --version
The output should resemble the following:

Also Read: lsof Command in Linux with Examples
Use chown to View and Modify File and Directory Ownership
Let’s now see how you can use this command syntax to view and change file and directory ownership. We will discuss specific scenarios where you can apply this command to change the ownership of these resources.
The Prerequisites
Here are the prerequisites you should have for trying out the ideas presented in this tutorial:
- A mainstream Linux distribution
- A user account with sudo privileges
Also Read: 6 Simple Examples of Using the Linux watch Command
How to Verify File Ownership in Linux
Before making any changes to files and directories, you should identify the current ownership to verify that you have the proper rights to carry out the operations.
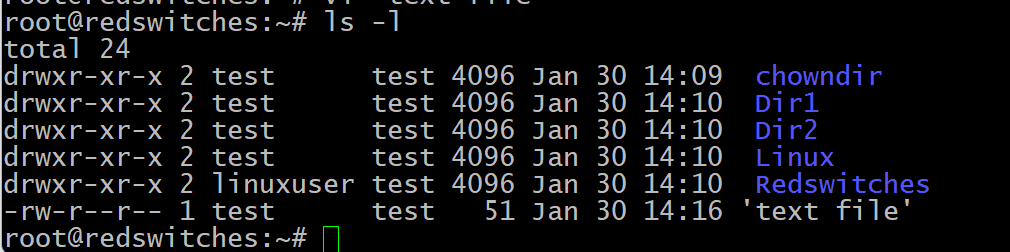
To check the ownership and group of files and directories in the current directory, execute the following ls command:
# ls -l
Here’s the output of the command on our test system:
Change User and Group Ownership
You can use the chown command to verify and set user and group level permissions. For instance, you can run the following command syntax to change and verify the user and group ownership.
# chown --from=CurrentUser:CurrentGroup NewUser:NewGroup FILE
For instance, run the following command to change user and group ownership of the sample3 file from root (original owner) and group2 (original group) to linuxuser (new owner) and group3 (new group).
# chown --from=root:group2 linuxuser:group3 sample3
Change the Owner Only
The chown command is very flexible, and you can change just the user ownership of a file. For this, we recommend using the –from option with the following command syntax to change the current owner of a file. Note that since the group isn’t mentioned in the syntax, the group ownership will remain unchanged.
# chown --from=CurrentUser NewUser FILE
For instance, the following command changes the file ownership from root (the current owner) to linuxuser (the new user):
# chown --from=root linuxuser sample3
Change the Group Only
Just like in the previous section, you can change the group ownership of a file with the –from option mentioned in the following syntax. Note that since the user isn’t mentioned in the command, the user-level ownership will not change:
# chown --from=:CurrentGroup :NewGroup FILE
For instance, the following command will change the group ownership from group3 (the current group) to group4 (the new group) without disturbing the user ownership.
# chown --from=:group3 :group4 FILE
Important: If you see an error when running the command, check that you have placed a colon(:) with both group names.
Change Ownership of a Single or Multiple Files and Directories
You can apply the chown command to change the ownership of a single or multiple files. Let’s look at these scenarios:
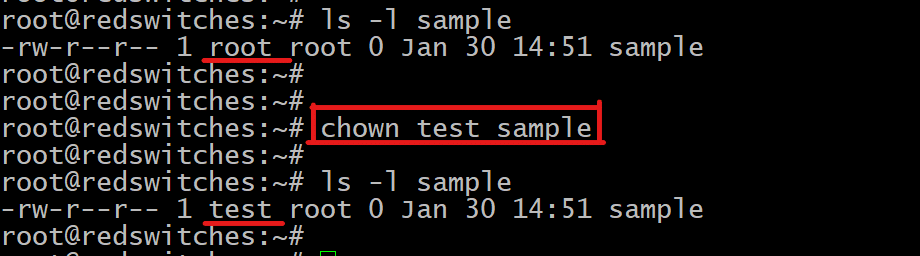
Change the Ownership of a Single File or Directory
The standard chown command syntax for changing the ownership of a single file/directory is as follows:
chown NewUser FILE
As you can see, the syntax uses the new username and the filename.
For instance, the following command transfers the ownership of a file called sample to the test user.
# chown test sample
Change Ownership By Mentioning the User ID (UID)
In addition to the username, you can opt to use a user ID with the chown command.
For instance, the following command transfers the ownership of the sample2 file to the 1002 UID:
# chown 1002 sample2
Important: You should make sure that there is no username identical to the UID you use with the command. In the instances where the chown command finds the same username and UID, it will prefer the username over the UID.
Change Ownership of Multiple Linux Files
Running any command multiple times can get tedious very quickly. That’s why chown allows you to modify the ownership of multiple files in a single go. For this, add the list of the target files after specifying the new user, ensuring there is a single space between each file name.
For instance, the following command sets the ownership of the sample2 and sample3 files to the root user:
# chown root sample2 sample3
You can even group files and directories in a single command without affecting the execution. For this, consider the following example:
# chown root sample3 Dir1
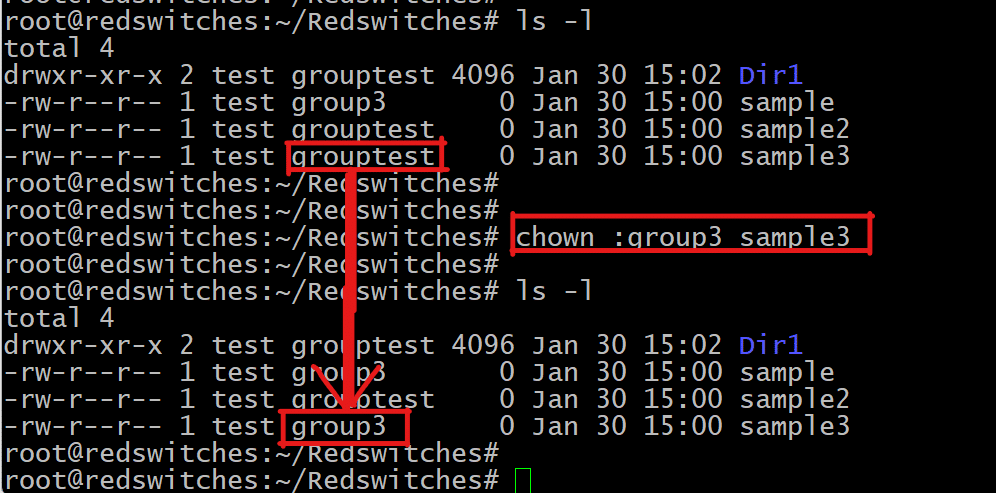
Use chown To Modify The Group Of a File or Directory
You can change the group associated with a file or directory, leaving the ownership untouched. This essentially works the same as the chgrp (change group) command.
It is crucial to note that the groupnames are preceded by a colon (:) in chown command syntax. Omitting the colon can throw error messages.
The command syntax to change the group ownership is as follows:
# chown :NewGroup FILE
Consider the following example where we used the chown command to change the group of the sample3 file from grouptest (the old group) to group3 (the new group):
# chown :group3 sample3
You can list multiple file or directory names to perform bulk changes to group ownership.
Modify a File’s Group Using the Group ID (GID)
Similar to employing a UID for changing user ownership, you have the option to use a Group ID (GID) in place of a group name for altering a file’s group.
For instance, the following command changes the group ownership of the sample file to 1003 GID:
# chown :1003 sample
Note that the GID is preceded by a colon to indicate that it is a group ID.
Modify Both Owner and Group Ownership
You can reassign the owner and group ownership in a single chown command as outlined below:
# chown NewUser:NewGroup FILE
For instance, the following command assigns linuxuser as the new owner and group2 as the new group for the sample2 file:
# chown linuxuser:group3 sample3
Make sure there’s no space around the colon.
Change the Group to Align with a User’s Primary Group
When no group is explicitly mentioned, you can use the chown command to set the file’s group to the owner’s default login group.
For this, enter the new user, followed by a colon and then the file you want to target, without any space in between:
# chown NewUser: FILE
Consider the following example that changes the group ownership to correspond with the login group of linuxuser:
# chown linuxuser: sample3
Shift Ownership and Group Settings from One File to Another
In some cases, you wish to mirror the user and group ownership of existing files for other files and directories on the system.
We recommend using the –reference option in the chown command to replicate the settings from one file to another. The syntax of the command is as follows:
# chown --reference=ReferenceFILE FILE
You need to be very careful about the filenames to prevent encountering error messages, such as the following:

Change file ownership Recursively
You can apply the chown command to change ownership for all files and subdirectories in a specified directory. To do this recursively, just add the -R option to the command. The syntax of the command is:
# chown -R NewUser:NewGroup DirNameOrPath
For instance, we will apply the command syntax to recursively change the owner and group for all files and subdirectories within the Dir1 directory:
# chown -R linuxuser:group3 Dir1
Change the Ownership of the Symbolic Link With chown
To change the owner of a symbolic link, use the -h option. If you omit this option, the chown command changes the ownership of the linked file instead of the symlink.
Consider the following screenshot that illustrates the default behavior of the chown command on a symbolic link when the -h option is not used.

As you can see, the user and group ownership of the symbolic link remains unchanged. Instead, the command changes these values for the textfile file.
Now, when we use the command with the -h flag to apply the changes to the symlink:
# chown -h NewUser:NewGroup SymbolicLink

Display the chown Command Execution Details
By default, you won’t see detailed process information for the chown command in the terminal. As a result, you don’t see any status messages.
However, you can use one of the following flags to access insights into the underlying operations:
- The -v option generates process details, even if the ownership remains unchanged.
- The -c option presents output information exclusively when there is a modification in the owner or group of the target file.
For instance, when we use the following command to designate the current owner as the new owner of the sample2 file:
# chown -v linuxuser sample2
The terminal will display the following output:

If you substitute -v with -c, there will be no messages in this scenario because there are no alterations in the owner or group.
The -c and -v flags are particularly valuable when dealing with the recursive chown commands. Consider the following example:
# sudo chown -v -R test sample*

As you can see in the output, the command provides a list of all the affected entities.
Suppress Errors in the chown Command Execution
You can prevent the display of potential error messages while executing the chown command by adding the -f flag.
The syntax of the command is as follows:
# chown -f NewUser FILE
Consider the scenario where the following command generates a detailed error:
# sudo chown linuxuser symblinks

Now when we rerun the command with a mistake (linuxusers instead of linuxuser), the -f flag to suppress the error message:
# sudo chown -f linuxusers symblinks

Also Read: Mastering the Linux tee Command for Redirecting Output In 9 Examples
Also Read: A Guide on How to Install and Use Linux Screen Command in 2024
Conclusion
Having learned how to utilize the chown command in Linux to modify file ownership and group, it’s crucial to exercise caution when making these changes. Efficient permission management is vital for a secure and organized file system.
Experience seamless database management, maximize efficiency, and tailor your hosting to specific needs. Sign up now with RedSwitches for cutting-edge dedicated hosting that transforms to meet your requirements.
We offer the best dedicated server pricing and deliver instant dedicated servers, usually on the same day the order gets approved. Whether you need a dedicated server, a traffic-friendly 10Gbps dedicated server, or a powerful bare metal server, we are your trusted hosting partner.
FAQs
Q. What is the chown Command in Linux?
Linux’s chown command changes ownership of a file, directory, or link. It empowers users to modify both the owner and group of each file or directory.
Q. How to Use the chown Command to Change File Ownership?
To change the ownership of a file in Linux, use chown command with the desired owner and group names, like this: chown [user]:[group] [file].
Q. Can the chown Command Recursively Change Ownership of Multiple Files?
Yes, the chown command can recursively change the ownership of multiple files using the -R option, for example: chown -R [user]:[group] [directory].
Q. How Does the chown Command Affect File Permissions?
While chown changes the owner and group of a file or directory in Linux, it doesn’t directly affect file or directory permissions.
Q. What is the Role of chgrp Command in File Ownership?
While the chgrp command is specifically for changing the group of a file in the Linux operating system, the chown command provides greater versatility by allowing changes to both the owner and group.
Q. How Can I Change the User Ownership of a File Using chown?
To modify the user ownership of a file in a Linux system using the chown command, you can specify the new owner’s username in the basic chown command syntax: chown [user] [file]. This action will change the owner of the file while leaving the group ownership unchanged.
Q. Is it Possible to Change Only the Group Ownership of a File with chown?
Certainly, you can exclusively use the chown command to change the group ownership of a file in Linux. Simply provide the new group’s name in the following format: chown :[group] [file]. This ensures that only the group ownership is modified while the user ownership remains unchanged.
Q. How Does the chown Command Impact Ownership and Permissions?
The chown command provides users with the capability to alter both the owner and group ownership of files. However, it does not directly affect the permissions associated with those files. To manage permissions, users typically employ the chmod command, which enables them to alter access rights for different user categories.
Q. What are the Various Types of File Permissions in Linux?
In Linux, file permissions are divided into three groups: owner, group, and others. The owner permissions dictate what the file’s owner can do, group permissions apply to users in the file’s group, and others permissions apply to everyone else. The chown command is primarily concerned with altering ownership, while chmod is used to manage these file permissions.
Q. Can I Use the chown Command on a normal User in a Private Server Environment?
Certainly, the chown command is a powerful tool in Linux, providing the root user with the capability to change the ownership of files and directories. This flexibility is especially beneficial in a private server setup where administrators often need to change ownership for various reasons, including managing user permissions and access control.
Q. How Does chown Syntax Differ From chmod?
chown and chmod are two distinct commands in Linux. The chown command manages owner and group ownership, while chmod modifies file permissions, controlling file access. Understanding their syntax and purpose is essential for effective system administration.
