Key Takeaways
- WordPress staging sites are essential tools for safely testing updates, themes, plugins, and custom code without affecting the live site.
- A staging site is a private copy of your live site, allowing risk-free experimentation and development in a controlled environment.
- Creating a staging site can be done manually or using plugins, with options for both local and online staging environments.
- Regular synchronization between the live and staging sites ensures accurate testing conditions and prevents issues when deploying changes.
- Addressing common staging site problems like synchronization issues, plugin conflicts, and deployment errors is crucial for smooth operations.
- Utilizing version control systems like Git within staging practices enhances collaboration, change tracking, and deployment efficiency.
- Staging sites are invaluable for major website changes, including WordPress core updates, theme or plugin updates, and custom development work.
- Security and SEO considerations, such as preventing staging site indexing by search engines and using access controls, protect your site’s integrity.
- Backing up the live site before deploying changes from the staging site is a best practice to avoid data loss and ensure a reliable recovery option.
- RedSwitches is highlighted as a hosting service that supports the implementation of staging sites, offering a platform for risk-free website management and updates.
WordPress staging sites have emerged as a game-changer for website management and development in the ever-evolving world of web development. With over 41,024 websites recorded as users of WordPress staging environments and 9,755 actively using this feature, the significance of staging sites in the WordPress ecosystem is undeniable.
These staging sites are not just a trend but a vital tool for website administrators, developers, and content creators. They offer a unique blend of flexibility and security, allowing users to test changes, updates, and new features in a controlled environment before going live.
This isn’t just a feature; it’s a revolution in website management. In this blog, we’re diving into the heart of WordPress staging sites, exploring why they’re the secret weapon in a web developer’s arsenal.
Whether you’re a WordPress wizard or just starting, get ready to unlock the full potential of your website with the power and safety of staging sites. Let’s embark on this journey together!
Table Of Contents
- Key Takeaways
- What Is a WordPress Staging Site?
- The Difference Between a Staging Site and a Development Site in WordPress
- The Importance of a Staging Site
- How to Set Up a WordPress Staging Site?
- Managing and Using a WordPress Staging Site
- Common Staging Problems and Fixes in WordPress
- Conclusion
- FAQs
What Is a WordPress Staging Site?
A WordPress staging site is essentially a replica of your live website, operating in a secluded environment. It’s your testing ground, where you can experiment, update, and make changes without fearing breaking your main website.
Credits: Unsplash
Technical Insight: Behind the Scenes
Technically, a staging site is a complete but private copy of your website, including the database, themes, plugins, and content. It exists on a separate subdomain or a completely different directory, invisible to regular visitors and search engines.
Purpose: Why It Matters
The primary purpose of a staging site is risk management. It’s an essential tool for:
- Testing Updates: Before applying any updates to WordPress core, themes, or plugins on your live site, you can test them on the staging site.
- Development: For developers, it’s a sandbox for coding custom features or tweaking the website design.
- Troubleshooting: A staging site offers a safe environment to identify and fix the issue if something goes wrong on your live site.
How It Works: The Process
- Creation: You can create a staging site manually or use tools offered by many WordPress hosting providers.
- Testing: Implement your changes – from simple text edits to comprehensive design overhauls.
- Review: Thoroughly check the functionality and appearance to ensure everything works as intended.
- Deployment: Once satisfied, you can manually deploy the changes to your live site or use automated tools provided by some hosts.
Security and SEO Considerations
- Privacy: Protecting your staging site from public access and search engines is crucial to prevent duplicate content issues and security risks.
- Syncing: Regularly syncing your live and staging sites ensures that the testing environment accurately reflects the current state of your live site.
In summary, a WordPress staging site is your backstage area, where all the rehearsals happen before the final show goes live. It’s invaluable for anyone serious about maintaining a robust, dynamic, error-free WordPress website.
Also read: How to Check Your WordPress’s Latest Version?
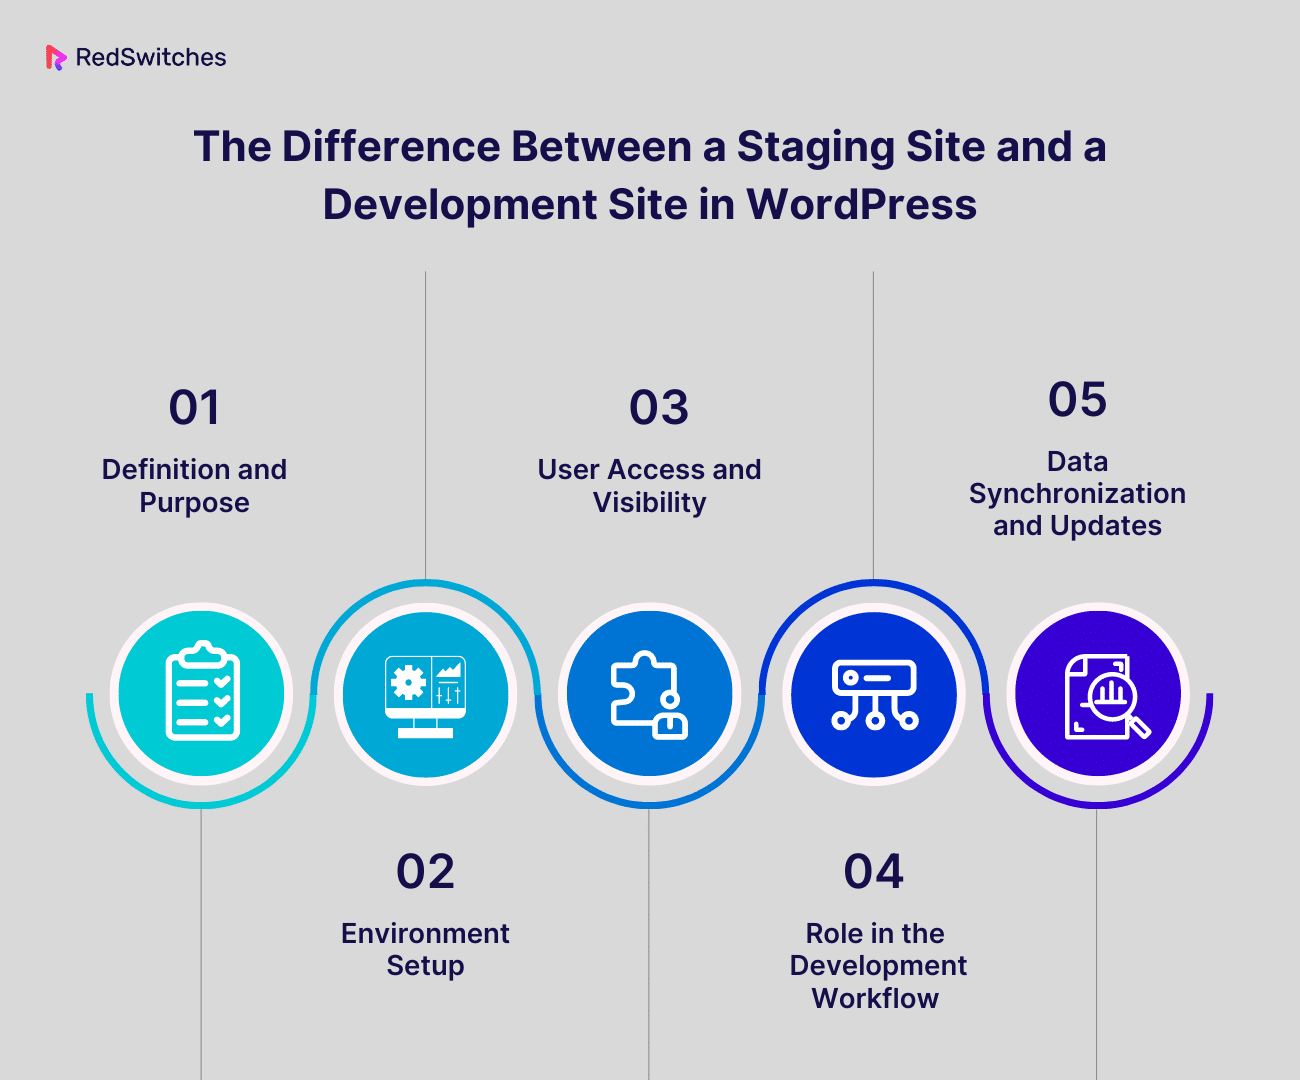
The Difference Between a Staging Site and a Development Site in WordPress
In the realm of website development, particularly within the WordPress ecosystem, the terms “staging site” and “development site” are often used. While both are critical components in the website creation and maintenance, they have distinct roles and functionalities. Understanding the differences between these two types of environments is key to effectively managing and deploying a WordPress site.
Definition and Purpose
Development Site:
- A development site is essentially a testing ground for developers. It’s where new features, code changes, plugins, or themes are initially created and tested.
- The primary purpose of a development site is to provide a safe space for experimentation and innovation without impacting the live site.
- Development sites are often local environments, which are set up on a developer’s computer and inaccessible to the public.
Staging Site:
- A staging site replicates the live site. It’s used for final testing before changes are pushed to the live environment.
- The critical purpose of a staging site is to test changes in an environment that closely mimics the live site, catching any potential issues before they affect the actual site.
- Staging sites are usually hosted online, similar to the live site, and can be accessed remotely, though they are generally inaccessible to the general public.
Environment Setup
Development Site:
- Development sites can be set up on local machines using tools like XAMPP, MAMP, or WAMP.
- They often enable debugging tools and may have different configurations from the live site to facilitate development.
Staging Site:
- Staging sites are typically set up on a subdomain or a separate domain and are hosted on a server that mirrors the live server’s environment.
- They are designed to replicate the live site as closely as possible, including the same server settings, plugins, themes, and database.
User Access and Visibility
Development Site:
- Access is usually limited to the developers or the development team.
- Since it’s often hosted locally, it’s not accessible to external users or clients for review.
Staging Site:
- Access can be extended to stakeholders, including clients, project managers, and quality assurance teams for review and testing.
- Staging sites may be password-protected or have restricted access to prevent public visibility and search engine indexing.
Role in the Development Workflow
Development Site:
- Used in the initial stages of development for coding and creating new features or redesigns.
- Acts as a sandbox for developers to try out new ideas without fearing breaking the live site.
Staging Site:
- Used as the final step before deployment to ensure everything works as expected.
- It’s a checkpoint for quality assurance, bug testing, and client approval.
Data Synchronization and Updates
Development Site:
- Frequently updated with new code and features as they are developed.
- Does not necessarily require up-to-date content from the live site.
Staging Site:
- Regularly synchronized with the live site to ensure it has the latest data and content for accurate testing.
- Changes on the staging site are usually the ones that are intended to go live.
The development and staging sites serve distinct yet complementary roles in the WordPress website development and maintenance process. A development site is a playground for innovation and initial testing, primarily accessed by developers.
In contrast, a staging site is a near-exact replica of the live site, used for final checks and client approvals before any changes are made public. Understanding and effectively utilizing both environments are crucial for a smooth, efficient, and error-free website deployment and update process.
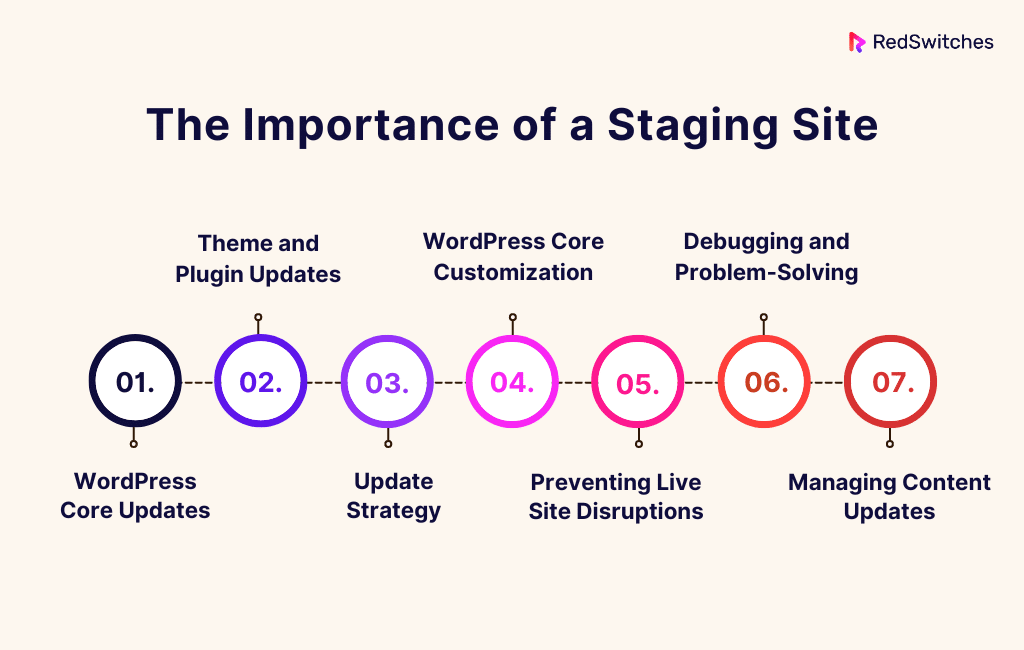
The Importance of a Staging Site
A WordPress staging site is vital for any serious website owner or developer. It not only safeguards the integrity of the live site but also enhances the overall development process, ensuring that every update is delivered with the highest quality and least risk.
WordPress Core Updates
WordPress Core Updates are essential for security, performance, and feature enhancements. They include updates to the leading WordPress software, ensuring your site runs on the latest, most secure version.
Types of Core Updates
- Major Updates: Introduce significant changes, new features, or major improvements.
- Minor Updates: Focus on maintenance and security, often released to patch vulnerabilities or fix bugs.
The Role of Staging Sites in Core Updates
- Testing Compatibility: Before applying a core update to your live site, test it on your staging site to check for compatibility issues with themes, plugins, and custom code.
- Identifying Issues: Discover and resolve any conflicts or performance issues arising from the update.
- Planning for Major Changes: Major updates might substantially change WordPress’s functionality or UI. A staging site allows you to familiarize yourself with these changes and plan their integration.
Best Practices
- Regular Backups: Always back up your site before applying updates.
- Staying Informed: Keep track of upcoming WordPress updates and their features or changes.
- Routine Testing: Regularly test updates on your staging site to maintain a stable and secure live environment.
In summary, WordPress core updates are crucial for the health and security of your website. Using a staging site to test these updates before applying them to your live site is a best practice that ensures a smooth, trouble-free update process.
Theme and Plugin Updates
Themes and plugins extend the functionality and appearance of WordPress sites. Keeping them updated is crucial for security, performance, and compatibility with the latest WordPress version.
Staging Site as a Test Bed
- Preventing Compatibility Issues: Themes and plugins can sometimes conflict with each other or the latest WordPress core updates. Testing updates on a staging site first helps identify and resolve these conflicts.
- Ensuring Design Consistency: Theme updates can alter the site’s appearance. Validate the visual and functional aspects of the staging site to ensure consistency.
- Plugin Functionality Check: Some plugins may behave differently after an update, especially if they interact with other plugins or custom code. A staging site allows for thorough testing of these interactions.
Update Strategy
- Prioritize Security Updates: Always prioritize updates that address security vulnerabilities.
- Incremental Updates: Apply updates one at a time on the staging site to isolate any issues.
- Monitor Performance: Assess the site’s performance post-update to ensure optimal performance.
Theme and plugin updates are vital for a secure, functional, and visually appealing WordPress site. Using a staging site to test these updates mitigates risks and ensures seamless integration into the live site.
WordPress Core Customization
Customizing the WordPress core involves altering WordPress’s default functionalities. This is generally not recommended because it can lead to compatibility issues with plugins and themes, making updating WordPress challenging.
Using a Staging Site for Customization
- Safe Experimentation: Test any core customizations on a staging site to ensure they don’t break your live site.
- Update Impact Analysis: Custom changes can be affected by WordPress updates. Testing updates on a staging site helps you understand how they interact with your customizations.
Best Practices
- Child Themes and Custom Plugins: Instead of modifying the core directly, use child themes or custom plugins. This approach maintains changes even after core updates.
- Documentation: Keep detailed records of all customizations for future reference and troubleshooting.
In summary, while customizing WordPress core is risky and generally discouraged, a staging site provides a safe environment to test such changes. It is always better to use child themes and custom plugins for modifications to ensure stability and future compatibility.
Also Read Best Free WordPress Blog Themes in 2024
Preventing Live Site Disruptions
In this section, we delve into the pivotal role of WordPress staging sites as a sandbox for experimentation and development, effectively preventing disruptions on live websites.
Mitigating Risk with Staging Sites
- Isolating Changes: Use staging sites to isolate all updates, customizations, or significant changes from your live environment. This reduces the risk of accidental disruptions or downtime.
- Testing in Real-Time Conditions: Staging sites mirror your live environment, allowing you to test changes under real-world conditions without impacting your site visitors.
- Scheduled Updates: Schedule updates during low-traffic periods after successful testing to minimize potential user impact.
Workflow Integration
- Regular Testing Routines: Integrate regular testing on staging sites into your workflow to catch issues before they reach the live site.
- Feedback Loop: Use staging sites to gather feedback from team members or clients, ensuring changes meet all requirements before going live.
Utilizing a staging site is critical in preventing disruptions on a live WordPress site. It serves as a crucial checkpoint, ensuring that only thoroughly tested and approved changes are made live, thereby maintaining a stable and reliable online presence.
Debugging and Problem-Solving
This segment focuses on the essential skills and strategies for effective debugging and problem-solving within WordPress environments, ensuring smooth and efficient website maintenance and development.
Identifying and Resolving Issues Safely
- Replicating Errors: Use the staging site to replicate and diagnose issues occurring on the live site without affecting user experience.
- Version Control: Implement version control to track changes and revert to previous states if new code leads to issues.
Collaborative Troubleshooting
- Team Access: Grant developers or external support access to troubleshoot issues on the staging site, avoiding risks on the live site.
- Real-Time Fixes: Implement and test fixes in real-time, ensuring that solutions are effective before applying them to the live site.
In summary, a staging site is an invaluable tool for debugging and problem-solving in a controlled environment. It allows for safe error replication, thorough testing of solutions, and collaborative troubleshooting without risking the live site’s stability.
Managing Content Updates
In this section, we discuss the best practices for managing and implementing content updates in WordPress, highlighting strategies for maintaining website relevance and engaging user experience.
Streamlining Content Deployment
- Bulk Content Updates: Test large-scale content updates, such as new blog posts, product listings, or multimedia additions, on the staging site to ensure they integrate seamlessly.
- Editorial Review: Use the staging environment for final editorial reviews, allowing writers and editors to preview how content appears and functions on the live site.
Quality Assurance
- Consistency Check: Verify formatting, links, and multimedia elements to maintain consistency and quality.
- SEO Preview: Evaluate how content updates may affect SEO, including checking meta tags, headings, and keyword integration.
In summary, a WordPress staging site plays a crucial role in managing content updates, ensuring that new content is thoroughly reviewed, consistent, and optimized before going live, thus maintaining the quality and integrity of the website.
How to Set Up a WordPress Staging Site?
Embarking on setting up a WordPress staging site can be likened to equipping yourself with a secret weapon in website management. Whether you’re a seasoned developer or a WordPress enthusiast, mastering the art of creating a staging site is a skill that will elevate your website’s safety and professionalism to new heights.
This guide will walk you through the various methods of setting up a WordPress staging site, ensuring that your next website update or overhaul is as smooth and risk-free as possible. Let’s dive into the world of staging sites, where preparation meets perfection!
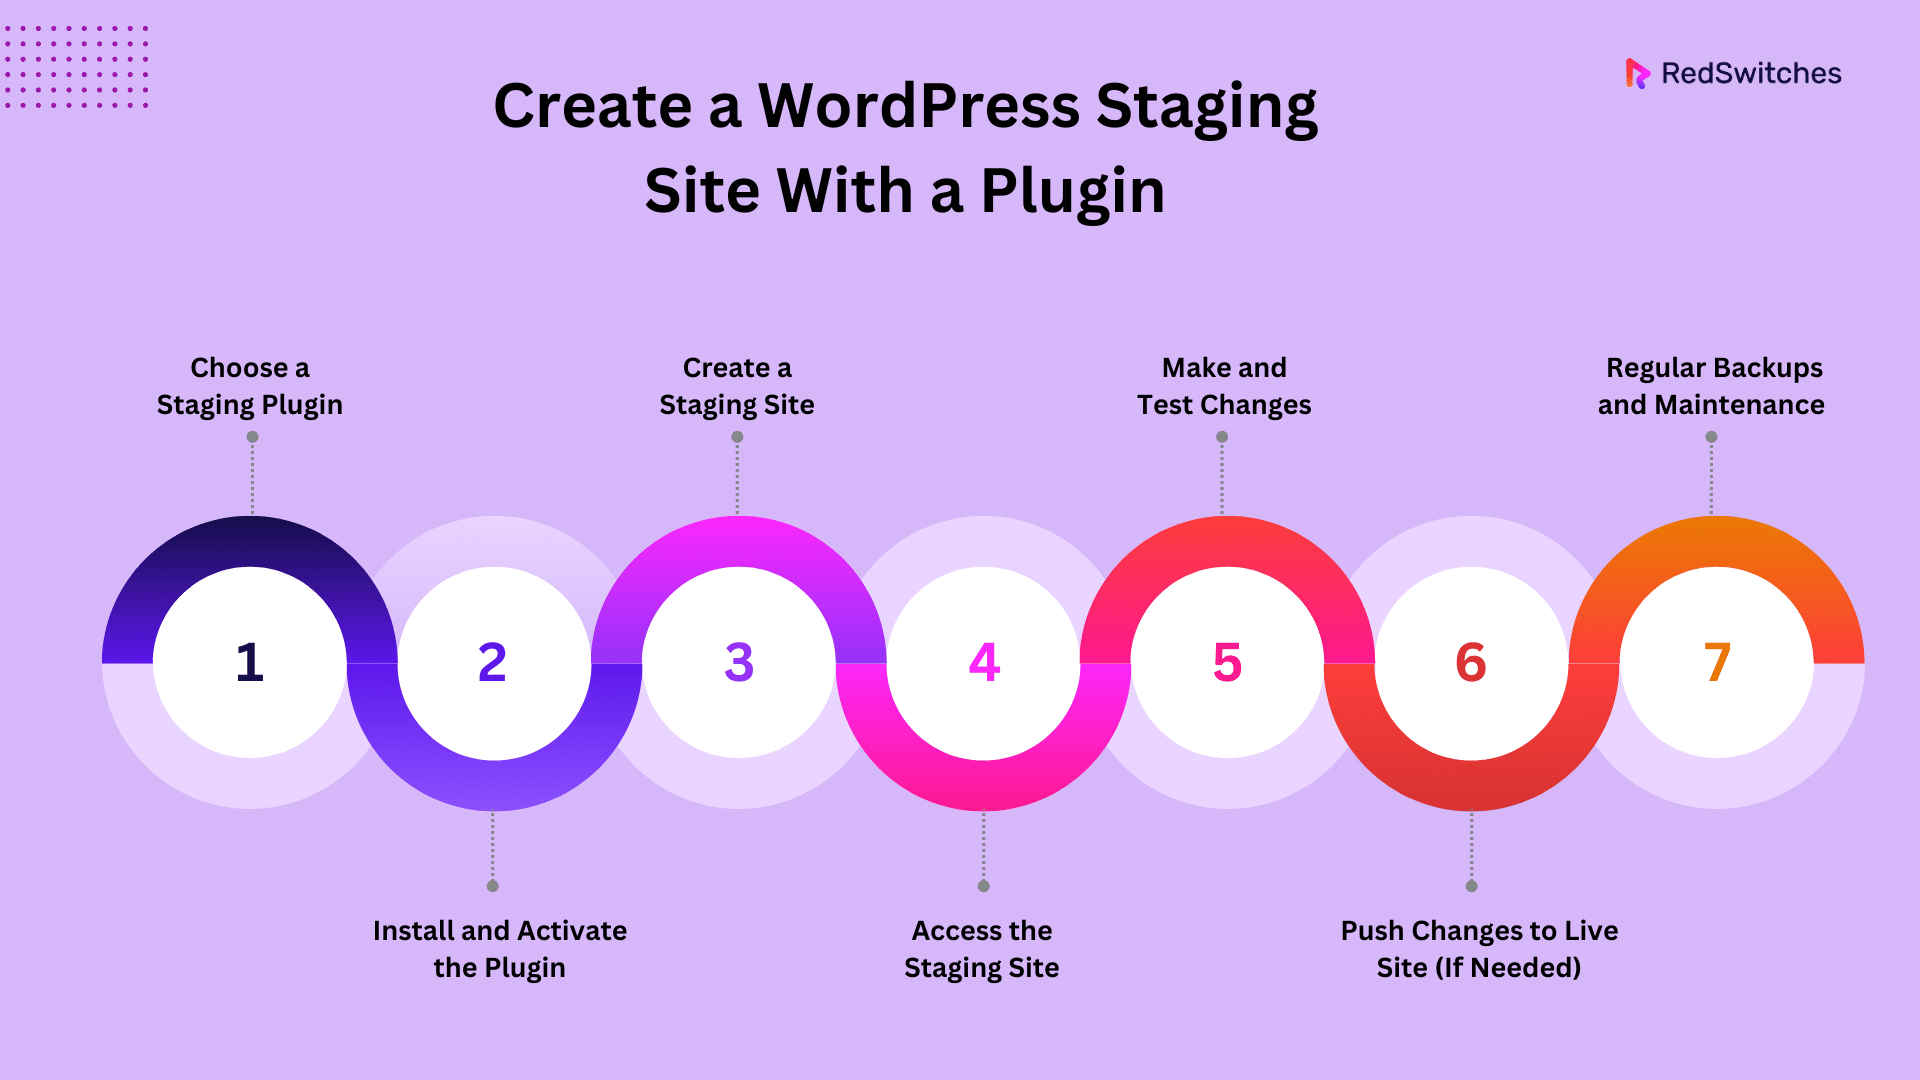
Create a WordPress Staging Site With a Plugin
Creating a WordPress staging site using a plugin is a straightforward process that allows you to develop and test changes to your website without affecting the live site. A staging site is essentially a clone of your live website where you can safely experiment with themes, plugins, and custom code.
Here’s a detailed guide on creating a WordPress staging site using a plugin:
1. Choose a Staging Plugin:
- There are several plugins available for creating a staging site.
- Ensure the plugin you choose is compatible with your version of WordPress.
2. Install and Activate the Plugin:
- Go to your WordPress dashboard.
- Navigate to ‘Plugins’ > ‘Add New’.
- Search for your chosen staging plugin, install it, and activate it.
3. Create a Staging Site:
- Once the plugin is activated, go to its settings. Usually, there will be a direct option to ‘Create Staging Site’ or something similar.
- Click on the button to initiate the staging site creation process.
- The plugin might ask you to specify specific settings or preferences, such as what to copy to the staging site (e.g., files, database).
- The process might take a few minutes, depending on the size of your website.
4. Access the Staging Site:
- After creating the staging site, the plugin will provide a URL. This URL is usually a subdomain of your leading site, like ‘staging.yourwebsite.com.’
- Log in to the staging site using your WordPress credentials.
5. Make and Test Changes:
- You can make changes, update theme plugins, or try out custom code.
- Since this is a separate environment, any changes made here won’t affect your live site.
6. Push Changes to Live Site (If Needed):
- Once you’re satisfied with the changes on your staging site, you can push them to your live site.
- Some staging plugins offer an easy option to ‘Push to Live.’ Be cautious with this step, as it will overwrite content on your live site.
7. Regular Backups and Maintenance:
- Regularly back up your staging site as you would with your live site.
- Update the staging site to mirror the live site’s environment closely.
Note:
- Always read the plugin’s documentation for specific instructions and best practices.
- Ensure your staging site is protected and not publicly accessible to search engines, as this can affect your SEO.
Creating a staging site using a plugin is a safe and efficient way to change your website. It is an essential practice for professional website development and maintenance, minimizing the risk of errors and downtime on your live site.
Also Read: Exploring the Best WordPress eCommerce Plugins in 2023
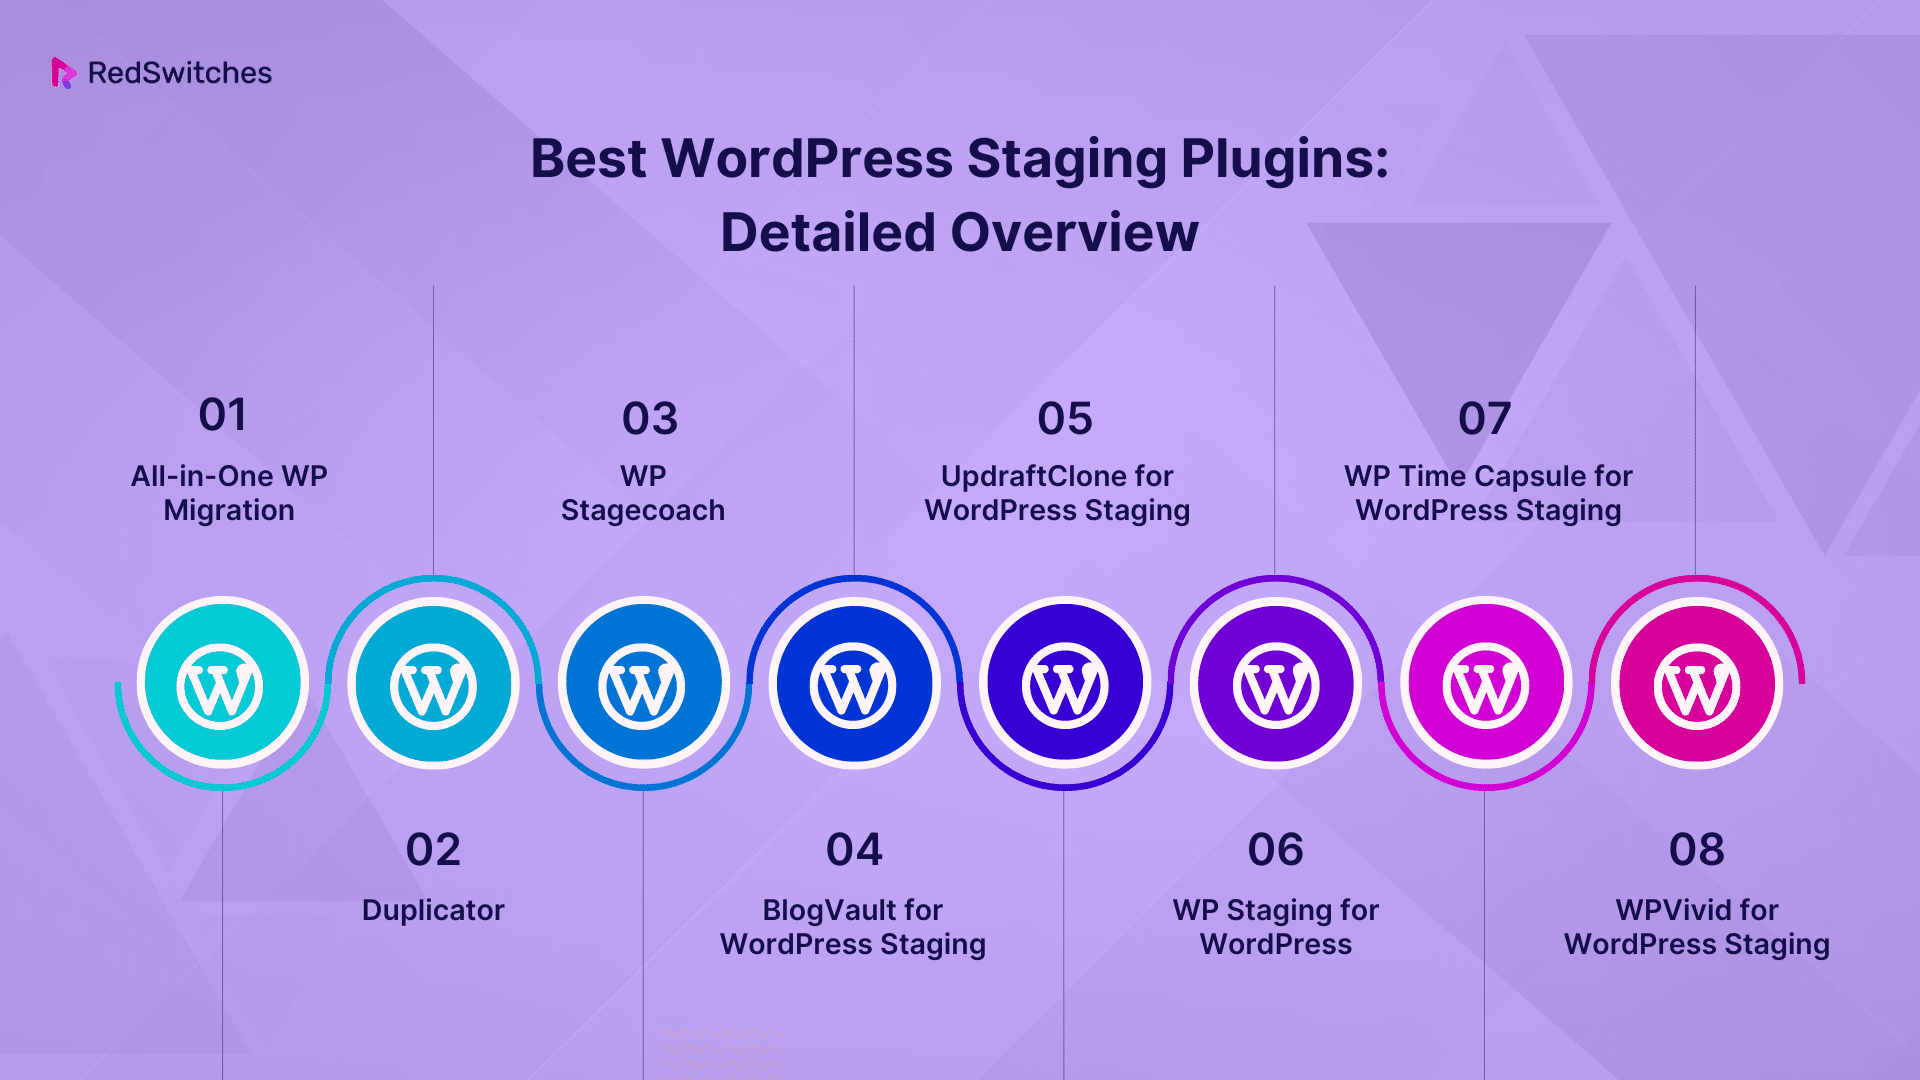
Best WordPress Staging Plugins: Detailed Overview
WordPress staging plugins are essential tools for developers and website managers, enabling them to create test environments to safely try out new features, updates, and changes without affecting the live site.
Here’s a detailed overview of some of the best WordPress staging plugins available as of 2024:
1. All-in-One WP Migration
- Ideal For: Migrating websites to staging environments.
- Pricing: Free, with premium extensions starting at $69/year.
Features:
- Bypass Size Restrictions: Overcomes file size limits by uploading or downloading site data in segments.
- Find-and-Replace: Modify database entries during export for compatibility with new environments.
- Selective Migration: Option to exclude specific components like spam comments from exports.
- Automatic Backups: Creates backups every time you export, offering a safety net.
- Multilingual Support: Over 50 languages available, enhancing user accessibility.
- Accessibility Compliance: Adheres to Web Content Accessibility Guidelines 2.1 AA Level.
- Cloud Storage Integration: Facilitates export to cloud platforms, applicable for large sites or hosting with restrictions.
2. Duplicator
- Ideal For: Migrating, copying, or cloning WordPress sites.
- Pricing: Freemium model, with plans starting at $49.50/year.
Features:
- Preconfigured Sites: Save time on staging setups by replicating the production site.
- Scheduled Backups: Automated backups with frequency options in the premium version.
- Cloud Storage Compatibility: Integrates with platforms like Google Drive, Dropbox, and OneDrive.
- Large Site Support: Efficiently handles more significant sites, making it versatile for different scales.
- Drag-and-Drop Installs: Simplifies transferring staged sites to live environments.
- Direct Server Transfers: Streamlines migration by eliminating the need to download packages locally first.
3. WP Stagecoach
- Ideal For: Dedicated WordPress staging with database merge feature.
- Pricing: Plans begin at $99/year.
Features:
- One-Click Setups: Streamlines creating staging sites and pushing changes live.
- Password Protection: Ensures staging site security with password-protected access.
- Selective Migration: Provides control over what changes are pushed to the live site.
- Large and Multiple Site Capability: Efficiently handles larger or numerous websites.
- Recovery Feature: Offers a fallback option in case of errors during staging.
- Changelog Check Pre-Migration: Allows reviewing changes before importing them to the live site.
- Progress Messaging: Offers informative updates instead of generic loading icons during staging processes.
4. BlogVault for WordPress Staging
- Ideal For: Seamless staging and backup solutions.
- Pricing: Plan Begins at $149/Year
Features:
- Effortless Staging Setup: Provides an intuitive interface for creating and managing staging environments.
- Real-Time Backups: Offers reliable backup solutions, ensuring data safety during staging and live updates.
- Incremental Syncing: Minimizes server load by syncing only changed elements between staging and live sites.
- Easy Merging: Simplifies pushing changes from the staging site to the live environment.
- Security Focused: Enhances site security with robust backup and staging features.
- Performance Optimization: Aids in site performance testing, ensuring updates do not adversely affect site speed.
5. UpdraftClone for WordPress Staging
- Ideal For: Quick and easy site cloning and staging.
- Pricing: The whole package (all add-ons, updates, support) From $70.00 / year
Features:
- Instant Cloning: Enables users to clone a site instantly without setting up a staging server.
- Ease of Use: Simplifies the staging process, ideal for users who need a straightforward solution.
- Direct Integration with UpdraftPlus: Seamless integration with UpdraftPlus for backups and restoration.
- Temporary Cloning: Provides temporary site clones for testing or development purposes.
- Resource Efficiency: This does not require additional server resources, as the cloning happens on Updraft’s servers.
Also Read What Is a Website? Explore Its 4 Components
6. WP Staging for WordPress
- Ideal For: Creating a staging site quickly and efficiently.
- Pricing: Pro version starting from $27/month.
Features:
- Fast Cloning: Quickly clones the entire site, including database and files, with just a few clicks.
- User-Friendly Interface: Easy to use, making it suitable for beginners and professionals.
- Safe Testing: Provides a secure environment to test updates, themes, and plugins.
- SEO Friendly: Search engines do not index the staging site, protecting your SEO efforts.
- Selective Data Push: In the Pro version, selectively push plugins, themes, or specific data to the live site.
7. WP Time Capsule for WordPress Staging
- Ideal For: Users seeking an incremental backup solution with staging capabilities.
- Pricing: Offers various subscription plans. Starting from $49/year.
Features:
- Incremental Backup: Takes backups of only the changed files and database entries, reducing server load.
- Staging Site Creation: Allows users to test updates on a staging site before applying them to the live site.
- Real-Time Backup: Automatically backs up changes as they occur, providing up-to-date backups.
- Easy Restoration: Enables quick restoration to any previous state using stored backups.
- Cloud Storage Integration: Backups can be stored in popular cloud services for added security and convenience.
8. WPVivid for WordPress Staging
- Ideal For: Complete backup, migration, and staging tasks.
- Pricing: Pro version with advanced features starts from $29.4/year.
Features:
- Backup and Restoration: Robust options for site backup and easy restoration.
- Staging Environment Creation: Facilitates the creation of a staging site to test updates and changes safely.
- Migration Services: Efficiently migrates websites to different domains or hosts.
- Flexible Storage Options: Supports multiple cloud storage options for backups.
- One-Click Operations: Simplifies processes with one-click backup, restoration, and migration.
These plugins offer a unique blend of features, making them valuable tools for WordPress staging, from migration and cloning to comprehensive staging solutions. Their varied feature sets cater to various users and needs, ensuring efficient and secure staging experiences.
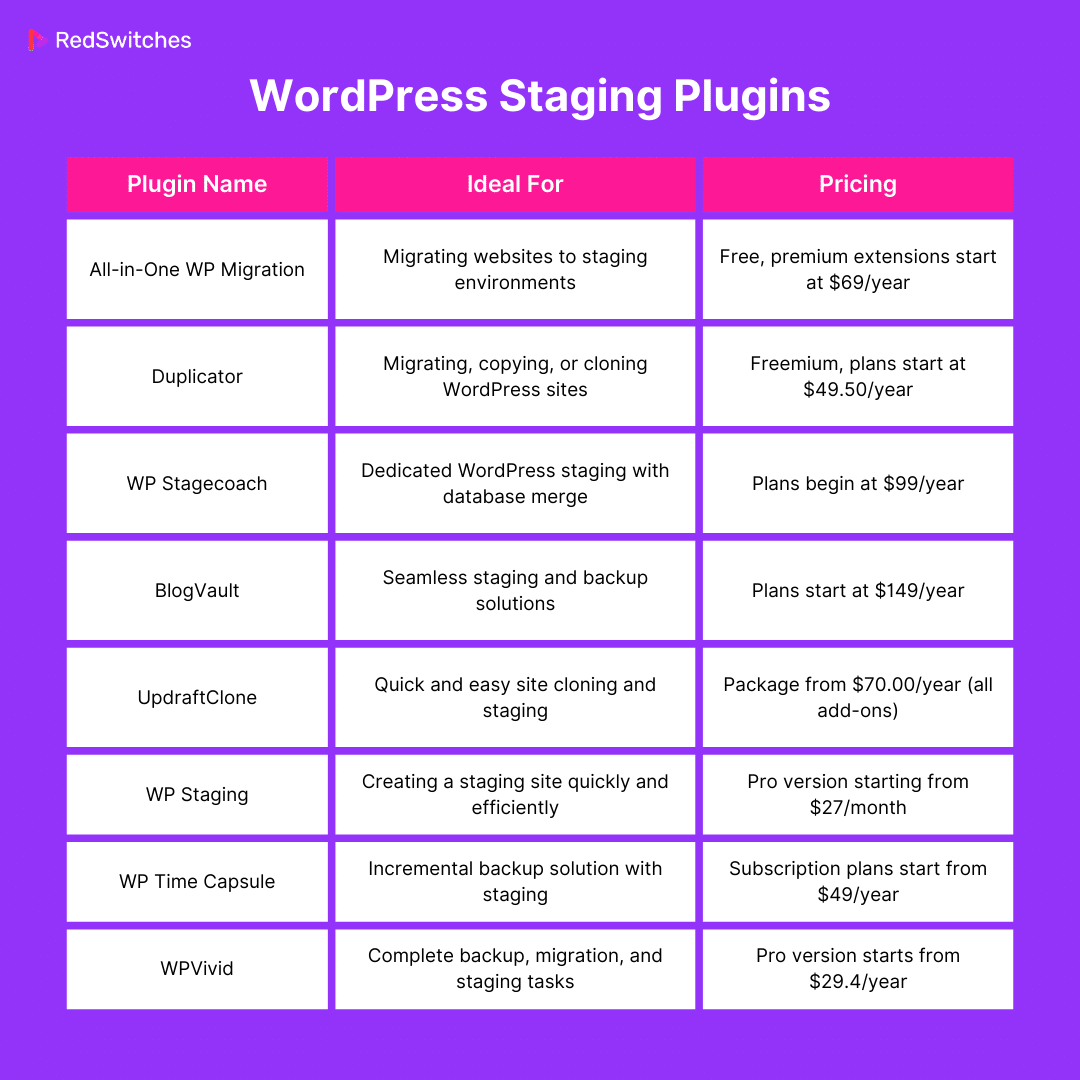
Here’s the summary table for the WordPress staging plugins focusing only on their ideal use cases and pricing:
Also Read The 25 Best SEO Plugins for WordPress for 2024
How To Create a WordPress Staging Site With Plugins?
Creating a WordPress staging site using plugins involves a series of straightforward steps. Here’s a detailed guide:
Choose a Staging Plugin:
Select a staging plugin such as WP Staging, Duplicator, or All-in-One WP Migration. Consider the features you need, like the ease of use, backup options, and selective data push.
Staging Environment with WP Stagging Plugin
Let’s suppose you choose the wp staging plugin the following is a step-by-step guide on how to stage your WordPress site with wpstagging.
Creating a WordPress staging environment using WP Staging is a straightforward process, ideal for those seeking a simple method to test changes. Here’s how to do it:
- Installing WP Staging: After installing the WP Staging plugin from the WordPress admin area, navigate to the ‘WP Staging’ tab.
- Creating a Staging Site: Click ‘CREATE NEW STAGING SITE’. You can name your staging site (e.g., ‘staging’), which will be appended to your domain (https://domain.tld/staging).
- Database and File Selection: Adjust which database tables and files to clone. Sticking with the default settings if uncertain is best to ensure a smooth process.
- Initiating Cloning: Click on ‘Start Cloning’. The time taken depends on your website’s size.
- Accessing the Staging Site: Once cloning is complete, a URL will be provided to access the staging site. You can also find this in the WordPress dashboard under ‘WP Staging’ → Staging Sites’.
This approach, especially with WP Staging, offers an easy and reliable way to create a staging environment. It is an excellent choice for users who prioritize ease of use and efficiency.
Creating a WordPress Staging Site with BlogVault
Let’s suppose you choose the blogvault plugin the following is a step-by-step guide on how to stage your WordPress site with wpstagging.
- Setting Up with BlogVault:
- Sign up for a BlogVault account; a free trial is available without requiring credit card details.
- Add your site to the BlogVault dashboard.
- Install the BlogVault plugin on your WordPress site manually, or let BlogVault do it for you using your admin credentials.
- Wait for the Initial Backup:
- BlogVault will start backing up your site to its servers. The first backup completion is necessary before proceeding.
- Creating the Staging Site:
- Once the backup is visible in your BlogVault dashboard, create a staging site using the ‘Add Staging’ button.
- Choose which backup version to use as the basis for your staging site.
- The process may take a few minutes, longer for more significant sites.
- You’ll receive unique credentials to access the staging site, keeping it secure from public view.
- Pushing Changes to the Live Site (Optional):
- If needed, you can push changes from the staging site to the live site.
- BlogVault lets you view the differences (Site Diff) between the live and staging sites and choose which changes to push live.
BlogVault’s approach offers a comprehensive solution that combines backups and staging, hosted on BlogVault’s servers, providing an integrated, efficient way to manage and test site changes.
Creating a WordPress Staging Site with Duplicator Pro
Now, let’s discuss the staging process using Duplicator Pro.
Step 1: Install Duplicator Pro
- Subscription Selection: Choose a suitable subscription for Duplicator Pro.
- Plugin Installation: Download and install Duplicator Pro on your live WordPress site.
- License Activation: Activate your license in ‘Duplicator Pro’ > ‘Settings’ > ‘Licensing’.
Step 2: Create a Backup
- Package Creation: Navigate to ‘Packages’ > ‘Create New’ in Duplicator.
- Build Package: Name your package and click ‘Next,’ then ‘Build’.
Step 3: Import Package to Staging Site
- FTP/cPanel Upload: Use FTP or cPanel to upload the package to your staging site’s root directory.
Step 4: Create a New Database
- Database Creation: Create a new database and user in your hosting control panel.
- Assign Privileges: Add the user to the database with full privileges.
Step 5: Run Duplicator Installer
- Installation URL: Access the installer by navigating to ‘https://subdomain.example.com/installer.php’.
- Database Setup: Enter your new database details and validate.
Step 6: Add Password Protection
- Secure Staging Site: Use hosting control panel features to add password protection to your staging site.
Step 7: Push Changes to Live Site
- Backup Staging Site: Create a new package of your staging site.
- Import to Live Site: Use ‘Duplicator Pro’ > ‘Import’ on your live site to import the staging site package.
- Launch Installer: Select ‘Full install single site’ in the Duplicator installer to overwrite the live site.
This process with Duplicator Pro provides a comprehensive and secure method for creating, managing, and implementing changes from a WordPress staging site to a live environment.
Also Read How to Create a Website From Scratch
Build a Staging Site Using Your Web Host
Credits: Freepik
Creating a staging site with your web host is a straightforward process designed to provide a safe environment for testing and updating your WordPress site. Here’s a detailed guide to help you through the process:
Accessing Your WordPress Admin Dashboard
- Initial Step: Begin by logging into your WordPress admin panel. This dashboard serves as the nerve center of your website, where you can manage content, settings, and various site functionalities.
Navigating to your web host’s Staging Feature
- Locating your web host Options: Once in the WordPress dashboard, find the “your web host” section in the menu. This dedicated area contains various hosting-related features provided by your web host.
Initiating the Creation of a Staging Site
- Starting Staging Process: Look for the “Staging” button within the web host options. Clicking on this will start the procedure for setting up your staging environment.
Waiting for the Staging Environment Setup
- Setup Process: The web host will automatically begin preparing a separate staging environment after creating the site. This environment replicates your live site, functioning independently to ensure your live website remains unaffected by any tests or updates.
Accessing the Staging Site
- Using the Staging Site: Once your web host completes the setup, you’ll gain access to the staging site. This duplicate of your live site is the perfect place to try out updates, modifications, and new features without any risk to your live environment.
Advantages of Using Web Host Staging
- Safe Testing Area: The web host staging environment is crucial for website development and upkeep, allowing you to thoroughly test everything before going live.
- Best Practices for Website Management: Regularly using a staging site is recommended in website management, ensuring smooth updates and minimizing disruptions to your live site.
Deploying Changes to Live Site
- Deployment Options: After finalizing your changes in the staging environment, your web host offers several deployment options:
- Deploy All Changes: Update your live site with all the changes made in the staging site.
- Selective File Deployment: Choose only specific files modified for deployment.
- Database Changes Only: If your changes are confined to the database, update only the database elements on your live site.
Creating and utilizing a staging site with your web host is essential to website management. It ensures that your updates and changes are error-free before going live and provides a hassle-free way to maintain and improve your website without risking downtime or functionality issues. This practice is especially beneficial for sites with significant traffic or complex functionalities, where each update needs to be meticulously tested.
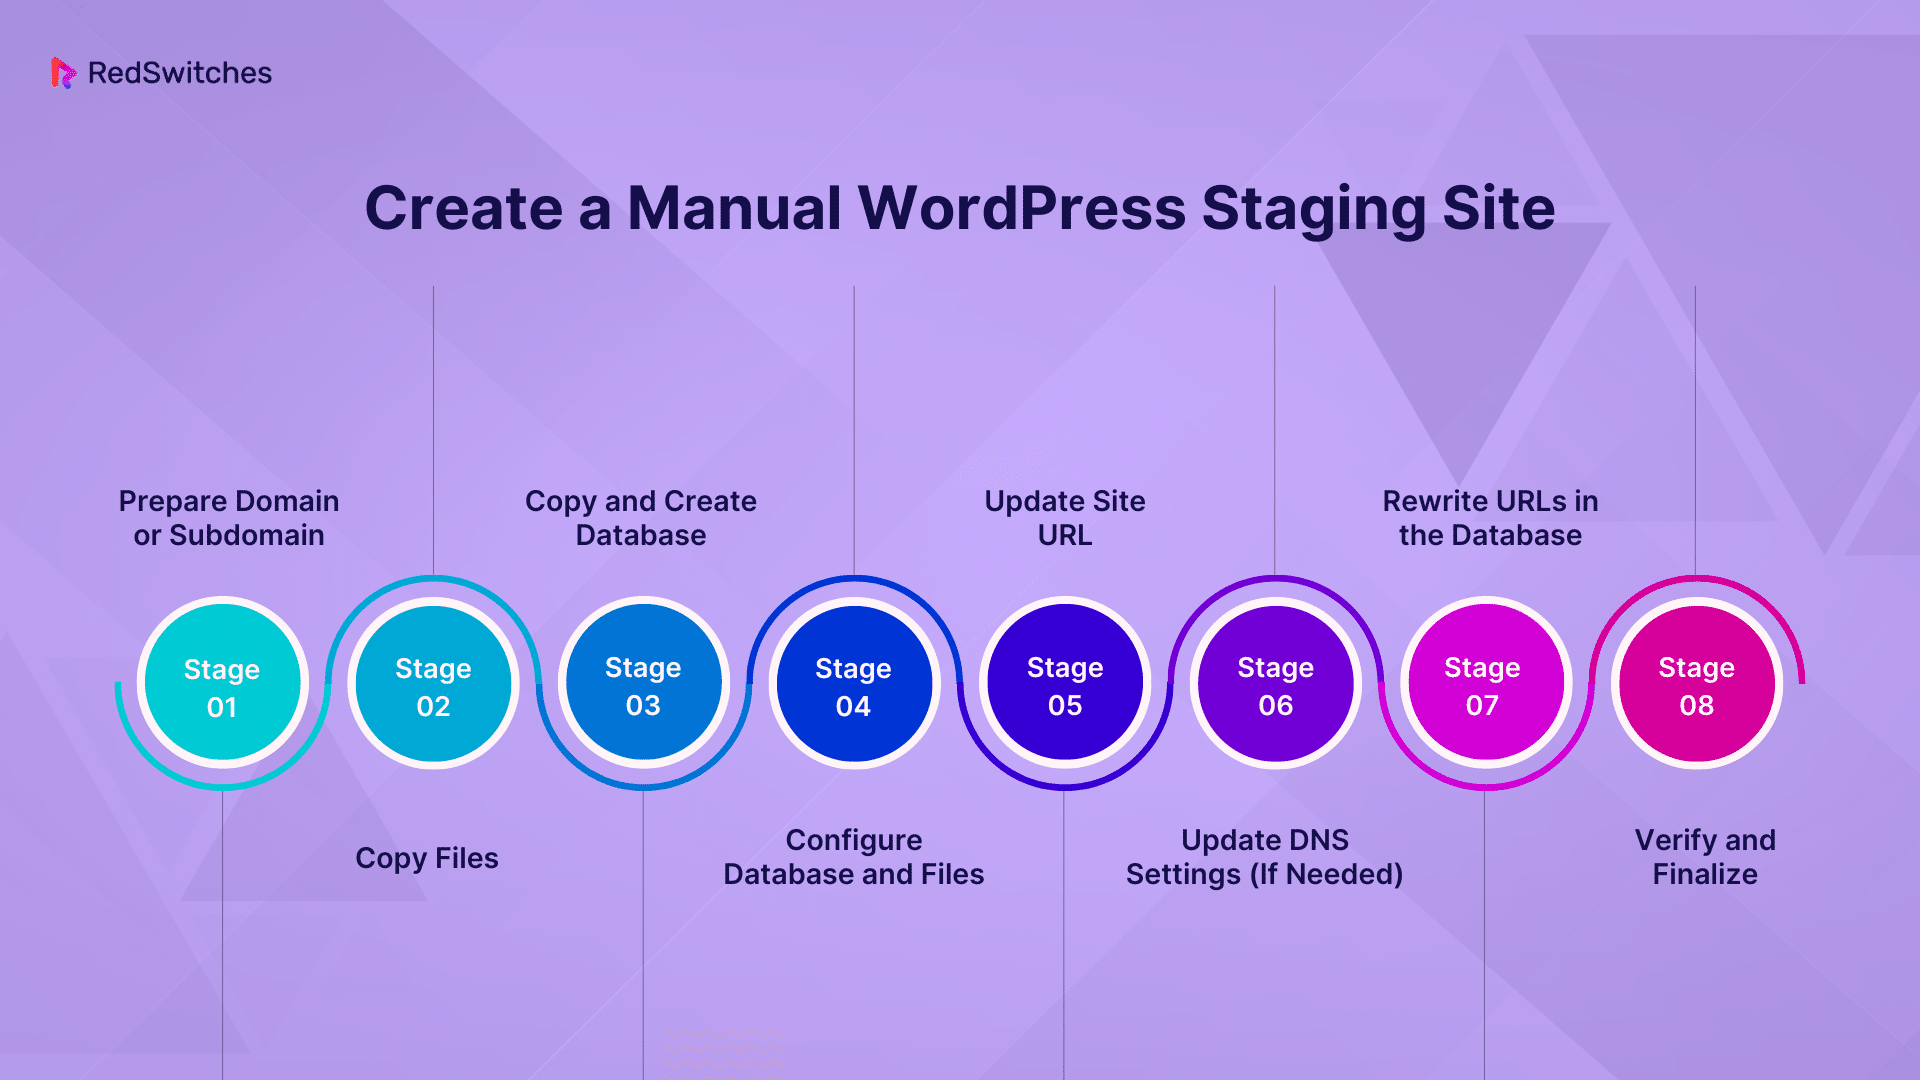
Create a Manual WordPress Staging Site
Creating a manual WordPress staging site is a valuable skill, especially when your web hosting doesn’t offer a one-click staging option or you’re dealing with a large, critical website. Here’s a step-by-step guide to manually clone or duplicate your WordPress site, either on the same server or onto a new one:
Step 1: Prepare Domain or Subdomain
- Set Up: If you’re creating a staging site, start by adding a new domain or subdomain through your web hosting account. For a staging site, a subdomain like staging.yoursite.com is commonly used.
Step 2: Copy Files
- Access File Manager: Navigate to your hosting account’s file manager.
- Show Hidden Files: Make sure to enable the view of hidden files (like .htaccess).
- File Duplication: Copy all files from the current site directory to the new staging directory. Exclude unnecessary directories if needed.
Step 3: Copy and Create Database
- Database Duplication: Through phpMyAdmin, export the database from your site.
- Create a New Database: Set up a new database in your hosting account for the staging site.
- Import Database: Import the exported file into the newly created database.
Step 4: Configure Database and Files
- Edit WP Config: In the staging site directory, edit the wp-config.php file to update the database name, user, and password.
- Database Credentials: You can create a new database user with full permissions or use the existing one from your live site.
Step 5: Update Site URL
- Edit WP Options Table: In phpMyAdmin, navigate to the wp_options table of your staging database. Update the site URL and home values to the staging site URL.
Step 6: Update DNS Settings (If Needed)
- DNS Configuration: For new domains or external DNS management (like Cloudflare), add an A record pointing to the IP address of your hosting server.
Step 7: Rewrite URLs in the Database
- Install URL Rewrite Plugin: Install a plugin like “Better Search Replace” on your staging site.
- Update URLs: Use the plugin to replace all instances of your live site URL with the staging site URL in the database.
Step 8: Verify and Finalize
- Check Staging Site: After completing these steps, your site should be up and running. Verify that the site is functioning correctly and reflects the live site accurately.
Creating a WordPress staging site is a more hands-on approach but offers greater control. It’s especially useful for significant or critical websites where automated scripts might not be reliable. This method ensures a thorough and precise duplication of your site, allowing for safe testing and development.
Also Read Weebly vs WordPress: 11 Key Differences To Consider Before Building Your Website
Managing and Using a WordPress Staging Site
Credits: Unsplash
Embarking on the adventure of managing and using a WordPress staging site is like having a secret lab where you can conduct experiments and make magic happen without the world watching. Let’s dive into how you can master this essential tool for innovative, stress-free, and effective web development.
Reasons for Using a Staging Site
Using a staging site in managing a WordPress website offers numerous benefits, enhancing the overall development process, ensuring site stability, and optimizing user experience. Below are key reasons why implementing a staging site is a wise strategy.
Workflow Improvement
A staging site streamlines the workflow in website management. It allows for a structured approach to implementing changes, where each alteration can be methodically tested and refined before being made live. This is particularly beneficial in environments involving multiple team members, ensuring consistency and coordination in the development process.
Handling Automatic Updates
WordPress, known for its ease of use, frequently releases updates for its core software, themes, and plugins. While these updates are essential for security and functionality, they can sometimes cause conflicts or issues with existing site elements. A staging site provides a controlled environment to test these updates, ensuring they do not disrupt the live site’s operation. This is especially crucial for websites with complex functionality or many plugins.
Collaboration with Developers
In scenarios where a website is managed or developed by external professionals, a staging site offers a platform for collaboration without risking the integrity of the live site. Developers can implement and showcase new features, fix bugs, or make design changes, and site owners can review and approve these changes before they go live. This collaborative approach minimizes misunderstandings and ensures the final product aligns with the site owner’s vision.
Prevention of Launch Failures
Perhaps one of the most significant advantages of a staging site is its role in preventing launch failures. When launching a new website or implementing significant changes, there are always risks of unforeseen issues arising. With a staging site, these risks are mitigated as any potential problems can be identified and resolved in the staging environment. This ensures a smooth transition when the site goes live, maintaining the site’s reputation and user experience.
When Not to Use a Staging Site
While a staging site is an invaluable asset for many scenarios in website management, there are situations where its use may not be necessary or could even complicate simple tasks. Understanding when not to deploy a staging environment can save time and resources.
Infrequent Content Updates
For websites that do not undergo frequent or significant changes, especially those primarily informational with static content, setting up a staging site for minor updates may be overkill. Simple content updates like altering text, adding a blog post, or updating contact information can often be done directly on the live site without significant risk.
Minor Changes and Adjustments
If the changes are minor and unlikely to impact the site’s overall functionality – such as updating a few product prices, changing a color scheme, or tweaking a page layout – using a staging site might be unnecessary. In these cases, the likelihood of introducing critical errors is low, and the changes can be quickly reversed if needed.
Considerations for Content-Heavy Sites
For sites that regularly add new content, like news portals or blogs, using a staging site for every new piece of content can be inefficient. A well-planned content management strategy and regular backups may be more practical. However, a staging environment is still recommended for significant redesigns or functional changes to these types of sites.
Also Read A Guide to the 17 Best Page Builders for WordPress
Situations Where Staging May Not Be Ideal
- Simple Plugin or Theme Updates: If the updates are minor and are from trusted sources, they might not require a complete staging process. However, caution is advised, and backups should be in place.
- Routine Maintenance Tasks: Tasks like deleting old posts or products or adding new users generally do not require a staging environment.
- Text Edits and Small Graphic Updates: Direct edits on the live site are often sufficient for these changes, provided they do not drastically alter the site’s structure or functionality.
- Cost-Benefit Analysis: The time and resources needed to manage a staging site might not justify the benefits for small or low-traffic sites.
Best Practices for Using a Staging Site
When employing a WordPress staging site, adhering to best practices ensures that you maximize its benefits while minimizing potential risks. Here are some guidelines:
Credits: Freepik
Identifying Scenarios for Staging Site Usage
- Major Design or Functional Changes: When overhauling the site’s design or implementing significant functional changes, use a staging site to test these alterations thoroughly.
- Swapping Themes or Updating Plugins: Before switching to a new theme or updating essential plugins, testing them in a staging environment is crucial to ensure they don’t break the site.
- WordPress Core Updates: Major WordPress updates should be tested on a staging site to prevent compatibility issues with existing themes and plugins.
- Developing New Templates: If you’re adding custom templates like a 404 page, a search results page, or a blog post archive, test them on a staging site first.
Staging Site Use Case Scenarios
- eCommerce Site Redesign: Before revamping your shop page layout or product pages, utilize a staging site to test new designs and functionalities without affecting live sales.
- Content and Layout Updates for Web Developers: When tasked with updating text content and adding complex features like animations or restructuring layouts, a staging site allows for safe experimentation and client approvals before going live.
- Testing New Plugins: Before integrating new plugins that add significant functionality, such as a chat feature, test them on a staging site to avoid conflicts with existing plugins.
Best Practices for Effective Staging Site Management
- Regular Syncing: Keep your staging site regularly synced with your live site to ensure you work with the most current data.
- Access Control: Limit access to your staging site to prevent unauthorized changes or leaks of unready content.
- Testing Across Devices and Browsers: Ensure changes work well across different devices and browsers to maintain a consistent user experience.
- Monitoring Performance: Test the impact of changes on site performance and load times in the staging environment.
- Document Changes: Keep a log of changes made in the staging site for reference and troubleshooting.
- Feedback and Review: Before pushing changes live, gather feedback from team members or clients to ensure the changes meet the required standards.
- Final Testing Before Going Live: Perform a final round of thorough testing in the staging environment before making the changes live.
Pushing Your Staging Site Live
Once you have finalized and tested your changes on the staging site, the next step is to move these changes to the live environment. This critical phase requires careful planning and execution to ensure a smooth transition.
Credits: Freepik
Criteria for Going Live
- Thorough Testing: Ensure that all changes, including design updates, functionality enhancements, and content additions, have been rigorously tested on the staging site.
- Cross-Device and Browser Compatibility: Verify that the updates work seamlessly across different devices and web browsers.
- Performance Checks: Confirm that the changes do not adversely affect the site’s load time or overall performance.
- Final Review and Approval: Obtain final approval from all stakeholders, including team members, clients, or management.
Importance of Backups Before Going Live
Before pushing your staging site to the live environment, it is crucial to back up your current live site. This step ensures a reliable recovery point if something goes wrong during the transition.
- Database Backup: Ensure you have a recent backup of your live site’s database.
- Files and Content Backup: Back up all files, themes, plugins, and content from your live site.
- Testing the Backup: Verify the integrity of the backup by testing it in a separate environment if possible.
Disabling the Staging Site Post-Launch
After successfully updating the live site, it is advisable to disable or restrict access to the staging site to avoid confusion and prevent search engines from indexing duplicate content.
- Updating Search Engine Visibility: Ensure that your staging site is not accessible to search engines, which can affect your live site’s SEO.
- Access Restriction: Limit or remove access to the staging site to avoid unauthorized use or edits.
- Maintenance and Clean-Up: Regularly maintain and clean up the staging site to keep it synchronized with the live site for future use.
- Post-Launch Monitoring: After going live, closely monitor the site for any unexpected issues and be prepared to revert to the backup if necessary.
Integrating Git with Your WordPress Site
Git, a widely used version control system, can be a powerful tool for managing the development and maintenance of a WordPress site. Its integration into your workflow can significantly improve collaboration, tracking, and deployment processes.
- What is Git?: Git is a free, open-source version control system designed to handle everything from small to large projects quickly and efficiently. It allows multiple developers to work on the same codebase without conflicts.
- Key Features: Git tracks changes in files, enabling developers to revert to earlier versions, compare changes over time, and collaborate with others without overwriting each other’s work.
Benefits of Using Git for Site Management
- Change Tracking: With Git, every change made to your website’s codebase is tracked. This is crucial for debugging and understanding the history of your project.
- Branching and Merging: Git allows you to create branches, making it easy to experiment with new features without affecting the main project. Once ready, these branches can be merged into the main codebase.
- Collaboration: In team environments, Git facilitates smooth collaboration among developers. Each team member can work on separate features or fixes and merge their work without conflicts.
Git in the Testing Phase
- Creating Feature Branches: For testing new features or updates, create a separate branch in Git. This isolates your experiments from the main codebase, allowing for safe testing and development.
- Rollback Flexibility: If a new feature causes issues, Git makes it easy to roll back to a previous state, ensuring the stability of your site.
Collaboration with Git in Team Environments
- Concurrent Development: Git allows multiple developers to work on different aspects of the site simultaneously, improving efficiency.
- Code Review and Merging: Different developers can review and merge changes systematically, ensuring code quality and consistency.
- Conflict Resolution: Git provides tools for resolving coding conflicts that may arise when merging different branches.
- Remote Repositories: Using remote repositories like GitHub or Bitbucket, teams can push and pull changes from a centralized codebase, enabling remote collaboration.
- Integration with Deployment Tools: Git can be integrated with deployment tools to automate updating the live site after changes are tested and finalized.
Implementing Git with WordPress
- Initial Setup: Set up a Git repository for your WordPress site. This includes the theme, plugins, and custom code.
- Regular Commits: Make regular commits to track changes and maintain your site’s development history.
- Excluding Certain Files: Use a .gitignore file to exclude specific files or directories (like uploads or cache) from being tracked.
- Automation and Workflow Integration: Integrate Git into your development workflow, potentially automating deployments to staging and live environments.
In summary, mastering WordPress staging sites, understanding when and how to back up your site effectively, and integrating tools like Git into your workflow are key components of successful website management. This holistic approach ensures that your WordPress site remains a dynamic, secure, and continuously evolving digital presence, capable of adapting to changing needs and technological advancements.
Also Read The 12 Best WordPress Membership Plugins
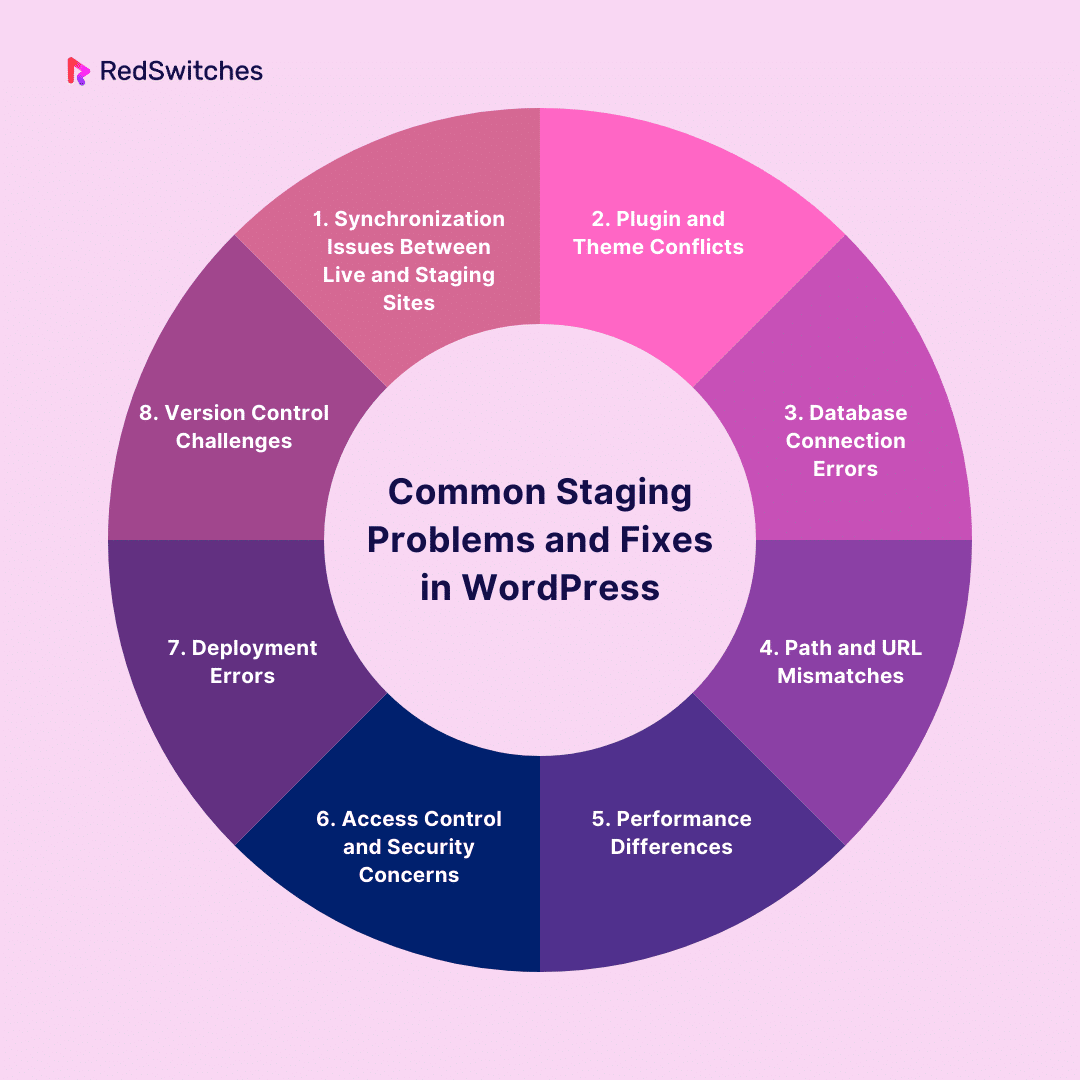
Common Staging Problems and Fixes in WordPress
Staging environments are crucial for testing and deploying updates to WordPress sites, but they’re not without their challenges. Several common problems can arise when working with a staging site, from synchronization issues to deployment errors. This article explores these common issues and provides practical solutions to ensure a smooth and efficient staging process.
1. Synchronization Issues Between Live and Staging Sites
Problem: One common issue is the lack of synchronization between the live and staging environments. This can lead to outdated testing environments or the risk of pushing outdated versions to the live site.
Solution: Regularly sync your staging site with the live site. Use tools or plugins that automate this process. Ensure you are syncing all aspects of the site, including the database, files, themes, and plugins.
2. Plugin and Theme Conflicts
Problem: Plugins and themes that work well on the live site may behave differently in the staging environment, leading to conflicts and errors.
Solution: Test all plugins and themes in the staging environment before deploying them. Disable plugins one by one to identify the source of the conflict. Once identified, check for plugin updates or seek alternative solutions compatible with your staging environment.
3. Database Connection Errors
Problem: Database connection errors are frequent in staging environments, often due to incorrect database credentials or server configurations.
Solution: Double-check your database credentials (username, password, host) and ensure they match the settings in your wp-config.php file. Also, verify that your database server is correctly configured and running.
4. Path and URL Mismatches
Problem: Moving a site to a staging environment can result in path and URL mismatches, causing broken links and missing images.
Solution: Use a search and replace tool to update URLs and file paths in the database. Ensure that all links and resource paths correctly point to the staging environment’s URL.
5. Performance Differences
Problem: Performance in the staging environment may not accurately reflect the live site, leading to misleading test results.
Solution: Ensure that the staging environment is as close as possible to the live environment in terms of server specifications and configurations. Use performance testing tools to compare and adjust settings for an accurate representation.
6. Access Control and Security Concerns
Problem: Staging sites, if not properly secured, can be accessed by unauthorized users or indexed by search engines, leading to security risks and SEO issues.
Solution: Implement access controls, such as password protection or IP whitelisting, to restrict access to the staging site. Use a robots.txt file or set meta tags to prevent search engines from indexing the staging site.
7. Deployment Errors
Problem: Errors during the deployment process from staging to live can cause site downtime or data loss.
Solution: Always perform a backup of the live site before deploying changes. Use reliable deployment tools and check for errors in the staging environment before pushing changes live. After deployment, monitor the live site closely for any issues.
8. Version Control Challenges
Problem: Keeping track of changes and coordinating between multiple developers can be challenging in staging environments.
Solution: Integrate a version control system like Git into your workflow. This allows for better tracking of changes, easier collaboration, and more efficient rollback if needed.
Credits: Freepik
While staging environments are essential to the WordPress development process, they can present various issues that need careful attention. By understanding these common problems and implementing the suggested solutions, you can maintain an efficient and effective staging process, ensuring that updates to your WordPress site are smooth, secure, and successful.
Conclusion
In wrapping up, the journey through the world of WordPress staging sites reveals a landscape rich with opportunities for growth, innovation, and security. These staging environments are invaluable assets, offering a safety net for testing and refining changes, ensuring your live site remains pristine and uninterrupted.
Whether you’re a seasoned webmaster or stepping into WordPress for the first time, embracing the staging process is a step towards professional, risk-free website management.
For those in pursuit of a hosting service that aligns with these values, RedSwitches stands out as a commendable choice. Our offerings are not just about hosting your site; we’re about empowering your website’s journey, ensuring that each update and change is a stride toward excellence.
With RedSwitches, you’re not just maintaining a website; you’re cultivating a robust, dynamic digital presence crafted with precision and care in the safe, innovative environment that staging sites provide.
FAQs
Q. What is a staging site on WordPress?
A staging site is a private copy of your live website where you can test updates, themes, plugins, and custom code before making these changes on the live site. It’s essentially a safe playground for experimentation and debugging.
Q. Is WordPress staging free?
Staging can be free or paid, depending on your approach. Some web hosts offer accessible staging environments as part of their hosting packages, and free plugins are available. However, more advanced features might require paid solutions.
Q. What is the difference between staging and live WordPress?
A live WordPress site is the public-facing version of your website, accessible to visitors. On the other hand, a staging site is a private clone where changes and tests are made without affecting the live site. Changes are only made live after thorough testing in the staging environment.
Q. What is a staging site or dev site?
A staging or dev (development) site is a working copy of your live website used for development and testing purposes. It’s where developers and site administrators test new features, updates, and fixes before applying them to the live, public-facing website.
Q. What is a WordPress staging environment?
A staging environment is like a secret lab for your WordPress site. It’s a copy of your live site where you can test changes without anyone else seeing. Think of it as a sandbox where your site’s clone lives, letting you experiment without risk.
Q. Why do I need a WP staging site for WordPress?
You need a staging site to make and test changes without messing up your live site. It’s a safe space to try new plugins, update themes, or any major change. It’s like practicing a speech in front of a mirror before going on stage.
Q. How do I create a staging site for WordPress?
You can create a staging site in two ways: manually or by using a plugin. Manually involves creating a subdomain and copying your site over. Using a plugin, like WP Staging, simplifies this by doing the heavy lifting with just a few clicks.
Q. What’s the difference between a staging site and a production site?
Think of your production site as your main stage, visible to the audience (your visitors). The staging site is your backstage, where you prepare and make everything perfect before going live. Changes happen in staging first for testing, then move to production.
Q. Can I prevent search engines from indexing my staging site?
Yes, you can and should! You don’t want your test site showing up in search results. You can do this by adjusting the settings in WordPress or using a plugin to discourage search engines from indexing your staging site.
Q. How do I move changes from my staging site to the live site?
Once you’re happy with the changes on your staging site, you can move them to your live site. This can be done manually by copying the changes over or using a staging plugin that allows you to push changes directly from staging to live with a button click.
Q. Is it possible to access my staging site from anywhere?
Yes, you can access your staging site as long as you have the URL and login credentials. It’s hosted online, just like your live site, but it’s usually protected from public view.
Q. Do I need to install WordPress again for my staging site?
If you’re creating a staging site manually, yes, you’ll install WordPress on your staging environment. However, many staging plugins or hosting services with built-in staging features might handle this for you, making the process smoother.
Q. What should I name my staging site?
Choose a name that’s easy to remember but distinct from your live site. Something like “staging.yoursite.com” or “test.yoursite.com” works great. It’s a label to remind you and your team that it’s for testing only.
Q. How often should I use my staging site?
Use your WordPress staging website whenever you plan to make changes to your WordPress files, try new plugins, or update anything that could affect your live site. It’s a best practice to test in staging before making any changes live.
