Key Takeaways
- Dedicated servers offer superior performance, security, and customization compared to shared hosting environments.
- Migrating to high-performance servers can significantly improve website speed and SEO rankings.
- Careful pre-migration planning is crucial, including assessing website needs, choosing the right provider, and developing a detailed strategy.
- Prioritize server security from the outset with firewalls, strong passwords, SSH keys, and regular updates.
- A thorough content audit and SEO optimization are essential steps in the migration process.
- Secure data backup and transfer protocols are non-negotiable to minimize downtime and prevent data loss.
- Rigorous testing in a staging environment helps uncover potential issues before going live on the new server.
- Post-migration monitoring, user feedback, and regular maintenance are key to long-term success.
- Evaluate website growth regularly and adapt your strategy to scale alongside your business needs.
- Migrating to a dedicated private server unlocks greater control, flexibility, and the ability to handle increased traffic while maintaining optimal performance.
If your website feels slow or struggles to keep up with traffic, it might be time to upgrade. Migrating to a server can give your website the room to thrive. It’s like moving from a cramped studio apartment to a spacious house – you get more resources and control.
This switch can make a huge difference. Websites on dedicated private servers often see big speed improvements. A study has shown that nearly 40% of people will leave a website if it doesn’t load quickly, underlining the need for dedicated hosting.
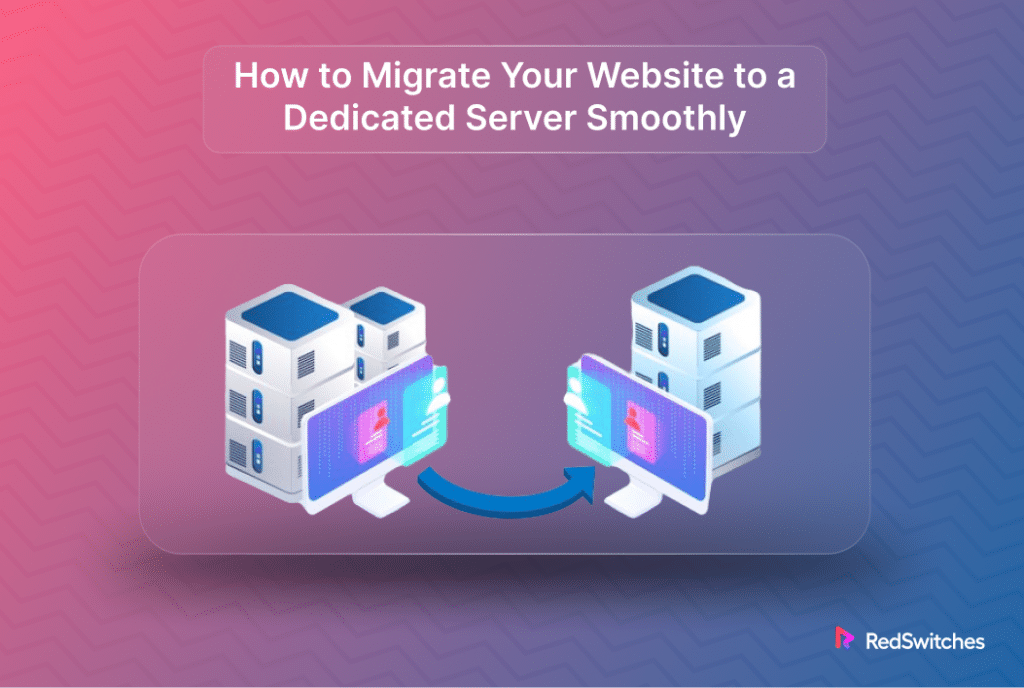
Faster loading times make visitors happier and can boost your search engine rankings. Plus, you’ll be free to customize your site exactly how you want. If you’re ready to take your website to the next level, this guide will walk you through How migrate website to a dedicated server.
Table of Contents
- Key Takeaways
- What Are Dedicated Servers?
- Why To Select Servers With Dedicated Resources
- Pre-Migration Planning
- How to Migrate Your Website to a Dedicated Server Smoothly
- Post-Migration Activities: Ensuring Long-Term Success on Your Dedicated Private Server
- Benefits of Migrating to Dedicated Hosted Server
- Choosing the Right Hosting Provider to Migrate to a New Server
- Conclusion
- FAQs
What Are Dedicated Servers?

Credits: Freepik
Dedicated servers are powerful tools in the digital world. They are like having a big house all to yourself. You don’t share your space, resources, or utilities with anyone else. This exclusivity offers several benefits, especially for websites that need much room to operate efficiently or securely handle sensitive information.
Why To Select Servers With Dedicated Resources
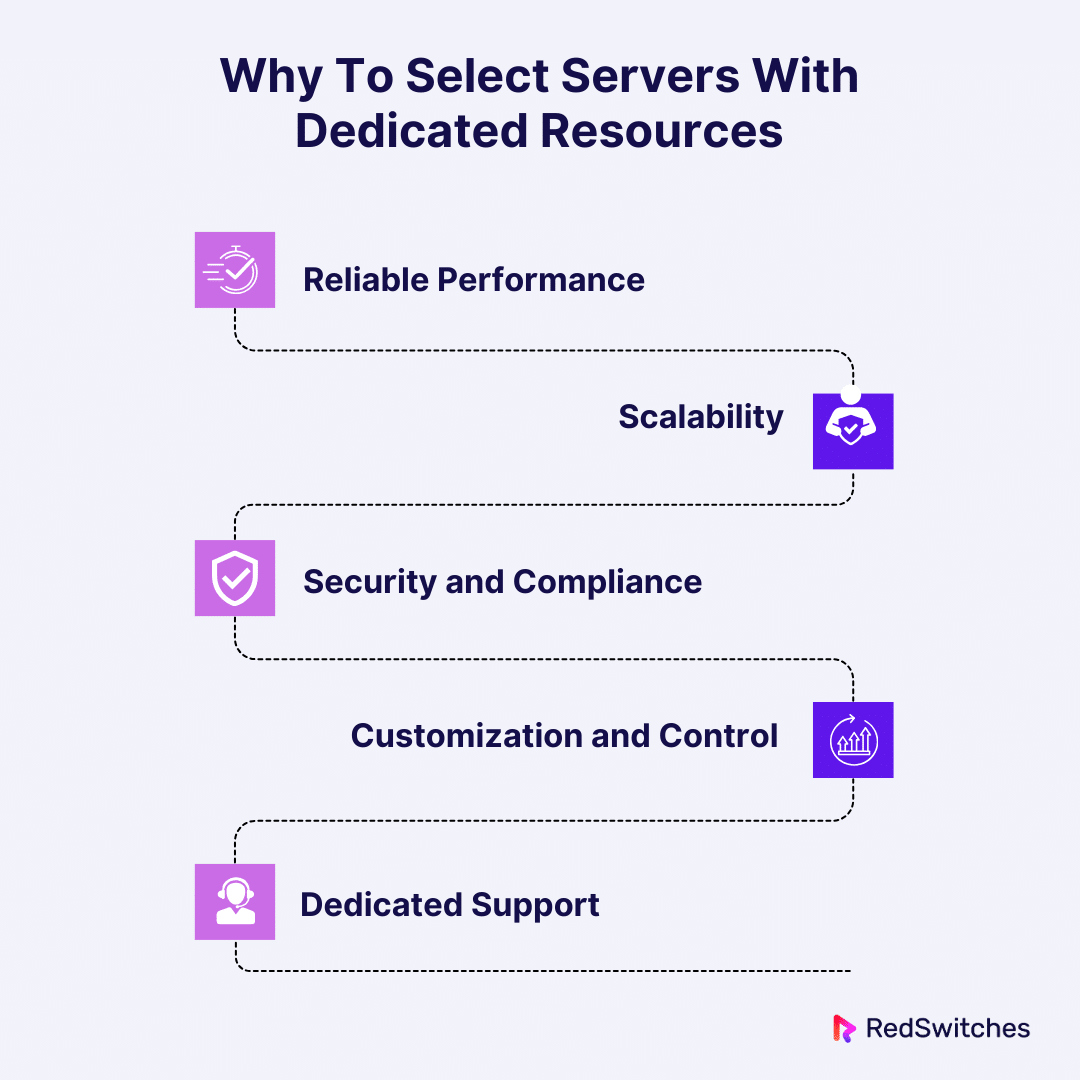
Choosing a dedicated hosted server is a significant step towards optimizing your website’s performance and security. Let’s explain why making this choice can be crucial for your online success.
Reliable Performance
Your website’s speed and reliability can significantly impact user experience and search engine ranking. Dedicated private servers provide the resources to ensure your site remains fast and accessible, reducing the risk of downtime or slow loading times.
Scalability
As your website grows, so do your hosting needs. Dedicated private servers allow you to easily upgrade your resources—such as CPU, RAM, and storage—without migrating to a new server or experiencing significant downtime.
Security and Compliance
For websites that handle sensitive information, such as personal data, financial transactions, or health records, dedicated private servers offer a secure platform that can be customized to meet strict server compliance standards.
Customization and Control
Having complete control over your server environment means you can tailor every aspect to fit your needs perfectly. Everything can be customized, from the operating system and software to the security protocols and performance settings.
Dedicated Support
Many providers offer dedicated support for their dedicated hosting clients. This means you have access to experts who can help you manage your server, address issues quickly, and provide guidance on best practices.
Pre-Migration Planning
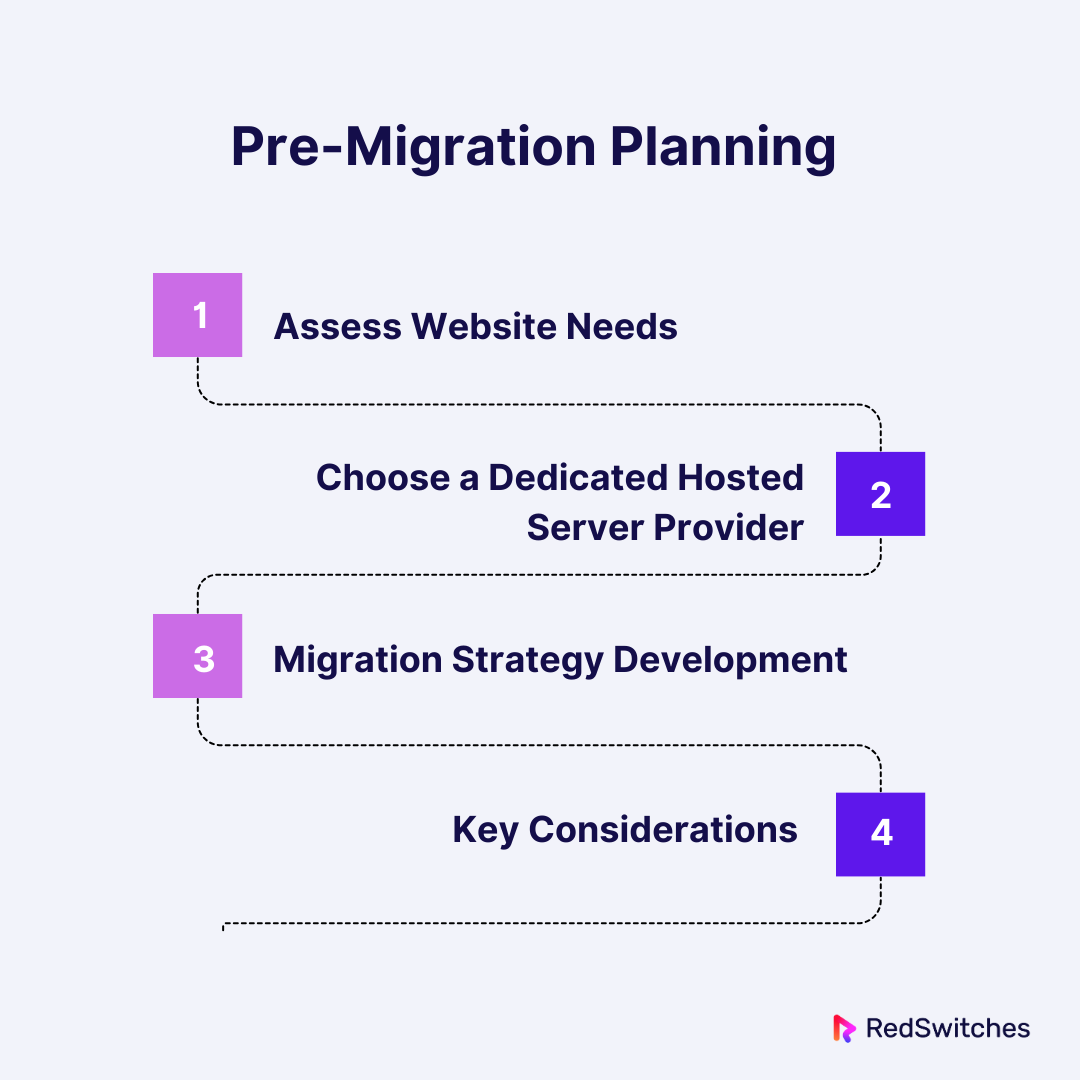
A well-thought-out strategy is crucial When migrating your website to a dedicated private server. This involves assessing your website’s needs, choosing the right server provider, and developing a comprehensive migration plan. Let’s investigate these steps to ensure your migration is smooth and efficient.
Assess Website Needs
First, thoroughly analyze your website’s requirements. This step is about understanding what your site needs to perform at its best. Consider factors like traffic volume, data storage needs, and the specific applications your website runs. For instance, a high-traffic e-commerce site will have different requirements than a personal blog. Think about future growth, too. A server that fits your needs today should also be able to handle the expected growth in traffic and data over the next few years.
Choose a Dedicated Hosted Server Provider
Choosing the right server provider is crucial. Aim for providers with a reputation for dependability, outstanding customer service, and the ability to adjust resources as needed. Look at the specs of the servers they offer, like CPU speed, memory, type of storage (SSD or HDD), and bandwidth restrictions. Also, check their security features and backup options. Reviewing reviews can help you understand the quality of service and how responsive the support team is.
Migration Strategy Development
Developing a migration strategy involves outlining every process step to avoid downtime or data loss. This strategy should include:
- Timing: Choose a migration time that minimizes impact on your users, often during off-peak hours.
- Data Backup: Ensure a complete website backup, including all files, databases, and configurations. This is your safety net in case anything goes wrong during the migration.
- Testing Environment Setup: Before going live, set up a testing environment on your new dedicated private server. This allows you to catch and fix any issues without affecting your live site.
- DNS Changes Planning: Prepare for the necessary DNS changes to redirect traffic from your old hosting to the new server. Understand the timing and propagation of these changes to minimize the transition period.
Key Considerations
- Security: With the increasing cyber-attack threats, ensure your new server is fortified with robust security measures, including firewalls, malware scanning, and intrusion detection systems.
- SEO Impact: Migrations, if not handled correctly, can impact your search engine ranking. Maintain URL structures where possible, and use 301 redirects for any changes to prevent broken links.
- Content Quality: To reduce spammy, low-quality content, ensure the migration process includes a content audit. Remove outdated or irrelevant content and optimize existing content to provide value to your users.
Keep in mind that a successful migration goes beyond simply transferring data. It is crucial to keep your website fast, secure, and reliable on a stronger hosting platform. Focus on your site’s technical and content details. With careful planning, you can lay the groundwork for better performance and growth on your new server.
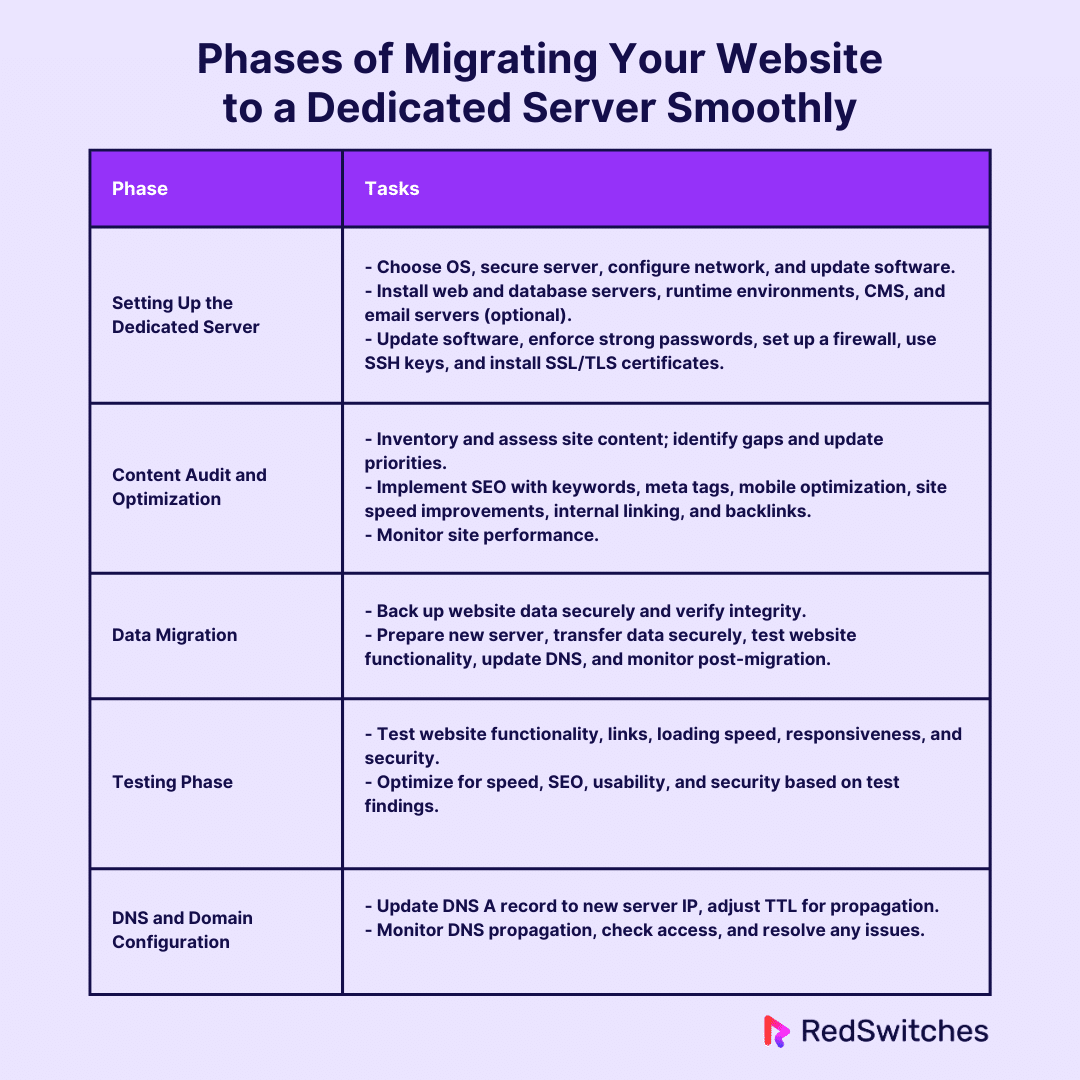
How to Migrate Your Website to a Dedicated Server Smoothly
Migrating your website to a dedicated hosted server is crucial to enhancing its performance, security, and reliability. This process involves two key phases: setting up the server and installing the necessary applications.
Let’s delve into these stages, creating helpful and informative content while keeping the explanation straightforward.
Setting Up the Dedicated Private Server
Moving your website to a dedicated private server is a strategic step toward enhancing its performance, security, and overall quality. This process involves two crucial stages: configuring the server and installing necessary applications. Let’s explore these steps in detail.
Server Configuration
Server configuration is the foundation of a smooth migration. It sets the stage for a secure, efficient, and robust website performance. Here’s how to approach it:
- Choose the Right Operating System (OS): Select an OS that aligns with your technical skills and website requirements. Linux servers and Windows servers are popular choices, each with its own set of advantages.
- Secure Your Server: Initial security setups are non-negotiable. Implement firewalls, secure SSH access, and change default ports to prevent unauthorized access attempts.
- Network Settings: Properly configure your server’s network settings to ensure it communicates effectively with the internet. This includes setting up a dedicated IP address.
- Update and Upgrade: Keep your server’s software up to date. Regular updates are crucial for security and performance.
Application Installation
With the server configured, the next step is installing your website’s applications. This process can vary widely but generally involves:
- Web Server Software: Install a web server application (Apache, Nginx, IIS) to handle incoming requests from the internet and deliver your website’s content to users.
- Database Server: If your site relies on a database, install and configure a database server (MySQL, PostgreSQL). Secure and optimize your database according to your website’s needs.
- PHP or Other Runtime Environments: Many websites, especially those managed through CMS like WordPress, require specific runtime environments. Install the necessary version and ensure it’s properly configured.
- Content Management System (CMS): Install your chosen CMS, if applicable, and any other critical scripts or software. Ensure they’re correctly connected to your database and functioning as expected.
- Email Server (Optional): If managing email through your server, set up an email server application and configure it to handle your email services securely.
Performance and Security Optimization
After setting up your dedicated private server and installing the necessary applications, the next vital steps are performance tuning and securing your server environment. These processes are crucial to ensure your website operates efficiently and is protected from threats.
Secure Server Environment
Security is paramount in today’s digital landscape. A secure server environment protects your website from unauthorized access, data breaches, and other cyber threats. Here’s how to enhance your server’s security:
- Regular Updates: Keep the operating system and all software up-to-date with the latest security patches to mitigate vulnerabilities.
- Strong Password Policies: Implement and enforce strong password policies for all server and website accounts to prevent brute force attacks.
- Firewall Configuration: Configure a robust firewall to monitor and control incoming and outgoing network traffic based on predetermined security rules.
- SSH Key Authentication: Use SSH keys for remote server access to enhance security. Disable root login and change the default SSH port to reduce the risk of unauthorized access.
- SSL/TLS Certificates: Install SSL/TLS certificates to encrypt data transmitted between the server and users’ browsers. This is crucial for protecting sensitive information.
By prioritizing these security measures, you create a fortified server environment that significantly reduces the risk of cyber threats and ensures the safe operation of your website.
Performance Tuning

Credits: Freepik
An optimized server delivers the best possible performance, handling high traffic volumes efficiently and ensuring a smooth user experience. Here’s how to tune your server for optimal performance:
- Web Server Optimization: Configure your web server (Apache, Nginx, IIS) settings for maximum efficiency. This includes adjusting worker processes and connection limits based on your traffic patterns.
- Database Optimization: Regularly optimize your database to improve query performance and reduce load times. This can involve indexing, cleaning up old data, and configuring caching.
- Content Delivery Network (CDN): Utilize a CDN to cache and deliver your content from locations closer to your users, significantly improving site speed and reducing server load.
- Caching Mechanisms: Implement caching strategies (e.g., page caching, object caching) to reduce the number of requests to your server, thereby improving response times for your users.
- Monitoring and Adjustments: Monitor your server’s performance using tools and scripts. Analyze data to identify bottlenecks and adjust hardware or software configurations.
Content Audit and Optimization
Imagine migrating to a dedicated private server as the perfect time to spring-clean your website’s content. It’s your chance to remove clutter, refresh what works, and boost your site’s quality.
Conduct a Content Audit
A content audit is a thorough review of all the content on your website. It helps identify outdated, redundant, or low-quality content that could dilute your website’s value. Here’s how to approach it:
- Inventory Your Content: List your site’s pages, posts, and media. Tools like Screaming Frog can automate this process and provide a comprehensive view of your site’s content landscape.
- Assess Quality and Relevance: Evaluate each piece of content for its quality, relevance to your audience, and alignment with your current goals. Mark outdated, off-brand, or underperforming content for revision or removal.
- Identify Gaps and Opportunities: Look for topics or areas that are underrepresented on your site but are valuable to your audience. These gaps are opportunities for new, high-quality content.
- Plan for Updates: Prioritize content that needs updating or rewriting. High-value pages that are outdated or not optimized for search engines should be on this list.
SEO Best Practices Implementation

Credits: Freepik
Optimizing your website for search engines is critical to ensure your target audience finds it. Implementing SEO best practices can significantly impact your site’s visibility and ranking. Focus on:
- Keyword Optimization: Research and identify keywords relevant to your content and used by your target audience. Incorporate these keywords naturally into titles, headers, and body content.
- Meta Tags and Descriptions: Write descriptive and keyword-rich meta titles and descriptions for each page. These elements are crucial for search engine rankings and click-through rates from search results.
- Mobile Optimization: Ensure your website is responsive and mobile-friendly. Google’s mobile-first indexing prioritizes mobile-optimized sites.
- Site Speed: Fast loading times are crucial for user experience and SEO. Use tools like Google PageSpeed Insights to identify and fix issues slowing down your site.
- Internal Linking: Use internal links wisely to help users navigate your website and distribute page authority.
- Quality Backlinks: Aim to get high-quality backlinks from reputable sites in your industry. Backlinks are a strong ranking signal for search engines.
- Regular Monitoring: Use tools like Google Analytics and Google Search Console to track your site’s performance and make data-driven decisions.
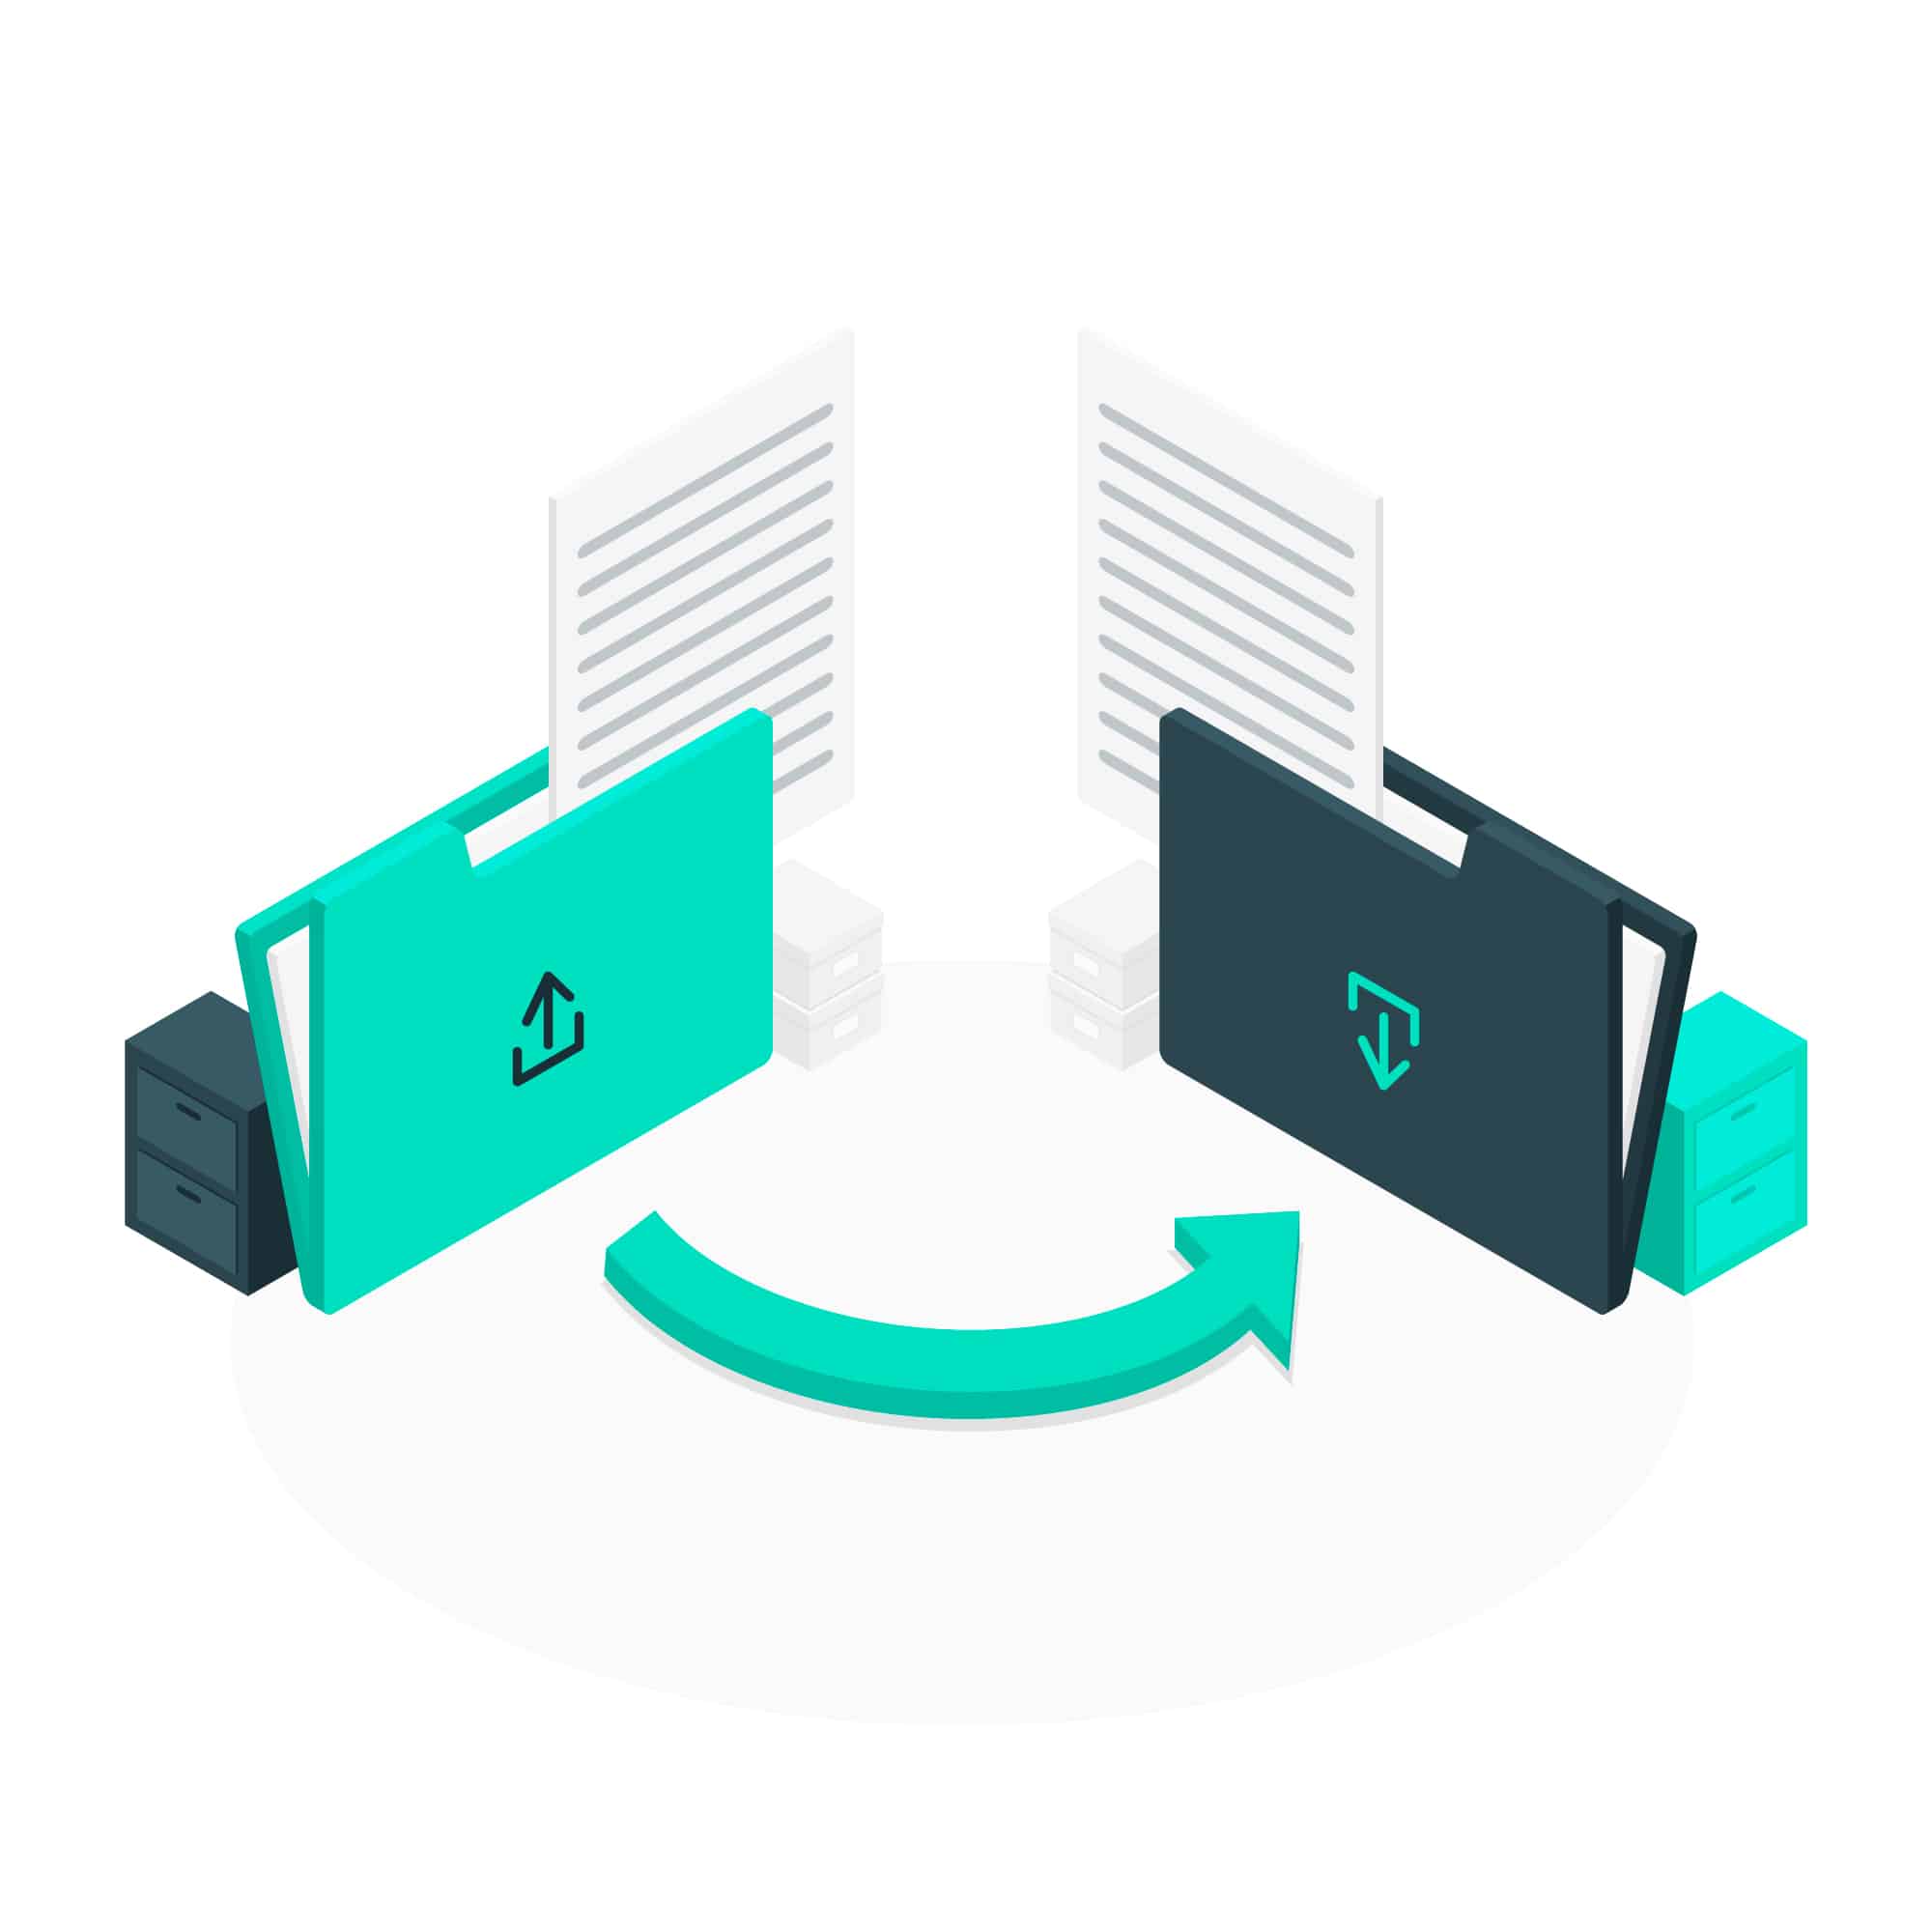
Data Migration
After ensuring your dedicated hosted server is configured for optimal performance and security, and your website content is audited and optimized for SEO, the next crucial steps in migrating your website smoothly involve data backup and transfer. These processes ensure your website’s data is securely moved to the new server without loss or corruption.
Data Backup
Before initiating the migration, creating a comprehensive backup of your website’s data is essential. This includes all files, databases, and configurations. Backing up data ensures that you have a recovery point in case of any issues during the migration process. Here’s how to approach it:
- Choose Your Tools: Use reliable backup software or plugins for your website’s platform. Your hosting provider might even offer built-in backup tools.
- Back-Up Everything: Include all files, your database, and important settings or configurations.
- Store it Safely: Save your backup securely from your current server. Cloud storage options offer excellent redundancy.
- Test the Backup: Don’t just assume it works! Make sure you can restore all the data from the backup file before proceeding with the migration.
Backing up your data is a precautionary but necessary step to guard against potential migration mishaps and ensure your website can be restored to its former state.
Data Transfer
Credits: Freepik
With backups, the next step is transferring your data to the new dedicated private server. This process must be handled carefully to ensure data integrity and minimize downtime. Here’s a detailed approach:
- Prepare the New Server: Ensure the new server is configured to receive the data. This includes setting up databases, installing necessary applications, and configuring network settings.
- Use Secure Transfer Methods: To protect your data during transit, transfer it using secure protocols such as SFTP (Secure File Transfer Protocol). Avoid using unencrypted methods that can expose it to interception.
- Migrate in Stages: If possible, migrate your website data in stages. Start with less critical data and progressively move to more vital components. This staged approach allows you to identify and resolve issues without significant impact.
- Test After Transfer: Once the data transfer is complete, thoroughly test your website on the new server before making the switch public. Check for broken links, functionality issues, and performance problems.
- Update DNS Settings: After ensuring that your website is fully operational on the new server and you are satisfied with the performance, update your DNS settings to point to the new server. This step will make your site accessible to users on the new server.
- Monitor Post-Migration: Continue to monitor your website closely after the migration. Pay attention to site performance, user feedback, and any unexpected issues that may arise.
Testing Phase
Once you’ve successfully backed up and transferred your website’s data to the new dedicated hosted server, the next critical steps involve thorough testing and optimization to ensure everything runs smoothly. These phases are vital to confirm that the migration process has not negatively impacted the website’s functionality or performance.
Website Testing
After migration, comprehensive testing of your website on the new server is essential. This process includes:
- Functionality Testing: Verify that all aspects of your website, including forms, databases, and e-commerce functionalities, operate correctly. Check for any broken features or errors.
- Link Verification: Use tools to scan for broken links within your site. Ensure that internal and external links function as intended, leading visitors to the correct pages.
- Load Time and Performance Testing: Use tools like Google PageSpeed Insights to assess your site’s loading speed. Fast load times are crucial for a positive user experience and SEO.
- Responsive Design Testing: Confirm that your website displays correctly across different devices and browsers, maintaining a seamless user experience on desktops, tablets, and smartphones.
- Security Testing: Conduct security assessments to identify vulnerabilities. This might include checking for SSL certificate implementation and testing for potential security loopholes.
Optimization
Based on the outcomes of your testing, you may need to optimize various elements:
- Speed Optimization: If your site’s load times are less than ideal, consider optimizing images, leveraging browser caching, and minifying CSS and JavaScript files to enhance speed.
- SEO Adjustments: Based on your testing, you might identify SEO-related improvements. These could include tweaking meta tags, improving content for keyword optimization, or enhancing site structure for better crawlability.
- Usability Enhancements: Feedback from testing can reveal opportunities to improve the user experience. This might involve simplifying navigation, increasing content readability, or making call-to-action buttons more prominent.
- Security Strengthening: If testing uncovers security issues, take immediate action to patch vulnerabilities, strengthen firewall settings, and ensure that all software and plugins are up to date.
DNS and Domain Configuration
Think of your domain name (like www.yourwebsite.com) as your website’s address. DNS (Domain Name System) is like a giant phone book that helps visitors find your site. When you move to a dedicated private server, you must update this “phonebook” with your website’s new address.
Update DNS Records
Updating DNS records is critical in pointing your domain to the new dedicated hosted server. Here’s how to approach it:
- Access DNS Settings: Log in to the account where your domain is registered. Navigate to the DNS settings section.
- Modify DNS Records: Locate the A record for your domain and update it to point to the IP address of your new server. If you use subdomains or a separate mail server, update those records as well.
- TTL Adjustment: Before making the change, consider lowering the Time to Live (TTL) setting for your DNS records. A lower TTL ensures faster propagation of the changes, but remember to set it back to a normal value afterward to reduce the DNS server’s load.
- Save Changes: After updating the DNS records, save the changes. DNS changes can take some time to propagate across the internet.
Monitor Propagation

Credits: Freepik
After updating the DNS records, monitoring the propagation process is essential to ensure the changes are recognized globally. Here’s what you need to do:
- Use Propagation Check Tools: Utilize online tools to check the DNS propagation status in different parts of the world. These tools can tell you whether your site is accessible via the new server globally.
- Check Access Regularly: Try accessing your website from different devices and networks to verify that it resolves to the new server. Clearing your browser’s cache or using private browsing mode can help ensure you see the current version.
- Look for Issues: During propagation, look for accessibility issues or errors. If problems persist beyond the typical propagation time (usually up to 48 hours), investigate the DNS settings or contact your domain registrar for assistance.
- Feedback Loop: Consider asking users or stakeholders to report any access issues during this period. Quick feedback can help you address any overlooked problems promptly.
Here’s a summarized overview of migrating a content-rich website and optimizing it for a dedicated server:
Post-Migration Activities: Ensuring Long-Term Success on Your Dedicated Private Server
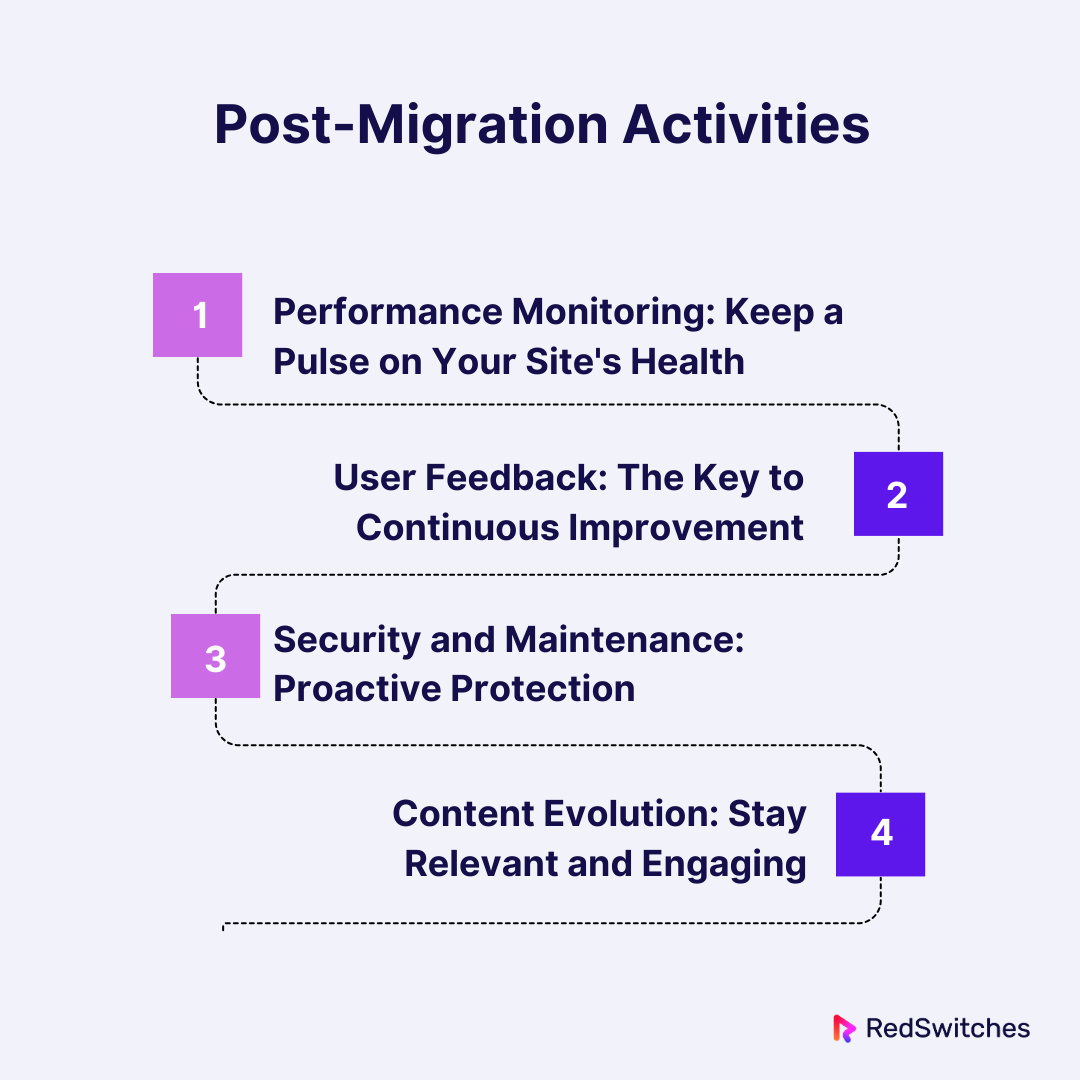
The work isn’t over because your website has successfully migrated to its new home. To fully reap the benefits of your server and achieve long-term online success, prioritize the following key areas:
1. Performance Monitoring: Keep a Pulse on Your Site’s Health
Regularly monitoring your website’s performance ensures a consistently positive user experience. Focus on these key metrics:
- Speed: Fast loading times are essential for happy visitors and better search rankings. Tools like Google PageSpeed Insights and GTmetrix provide detailed analysis and optimization suggestions.
- Uptime: Maximize your website’s availability with uptime monitoring tools. These will alert you if your site goes down, allowing you to address issues promptly.
- Server Resource Usage: Track your CPU, RAM, and disk space usage on your dedicated private server. If you consistently approach your resource limits, it may be time to upgrade to accommodate growth.
2. User Feedback: The Key to Continuous Improvement

Credits: Freepik
Don’t underestimate the power of direct feedback from your audience. Implement ways to gather insights into their post-migration experience:
- Surveys: Use tools like SurveyMonkey or Google Forms to ask targeted questions about site speed, navigation, and overall satisfaction.
- Feedback Forms: Include a simple feedback form on your website for users to leave comments and suggestions.
- Social Media Monitoring: Pay attention to comments and discussions on your social media channels. These can reveal pain points or areas where your website can shine even brighter.
- Direct Engagement: Encourage users to contact you directly with feedback, especially if they encounter issues.
3. Security and Maintenance: Proactive Protection
With greater control over your server comes the responsibility to maintain robust security and update all software. Here’s how:
- Security Updates: Install the latest security patches for your operating system, web server software, CMS, and all plugins or themes as soon as they’re available.
- Firewall and Monitoring: Configure a strong firewall and consider intrusion detection software for additional protection.
- Regular Backups: Implement an automated backup schedule. Store backups off-site for maximum redundancy.
- Proactive Approach: Stay informed about new cyber threats and security best practices to protect your website and its data.
4. Content Evolution: Stay Relevant and Engaging
Your website is a living entity. Continuous content updates and strategic SEO optimization keep it fresh, valuable, and visible in search results.
- Fresh Content: Create a content calendar to consistently add new blog posts, articles, or other relevant content forms. Focus on addressing your audience’s needs.
- Update Existing Content: Regularly audit existing content to improve or expand upon what you already have. Update outdated information and add depth to top-performing pages.
- SEO Adaptation: Keep up-to-date with search algorithm changes and adjust your SEO strategy accordingly. Use tools like Google Search Console to track progress and identify new opportunities.
Remember, a successful migration is just the beginning. By committing to ongoing monitoring, seeking feedback, prioritizing security, and evolving your content, you’ll unlock the full potential of your dedicated hosted server and position your website for long-term success in the ever-changing digital landscape.
Benefits of Migrating to Dedicated Hosted Server
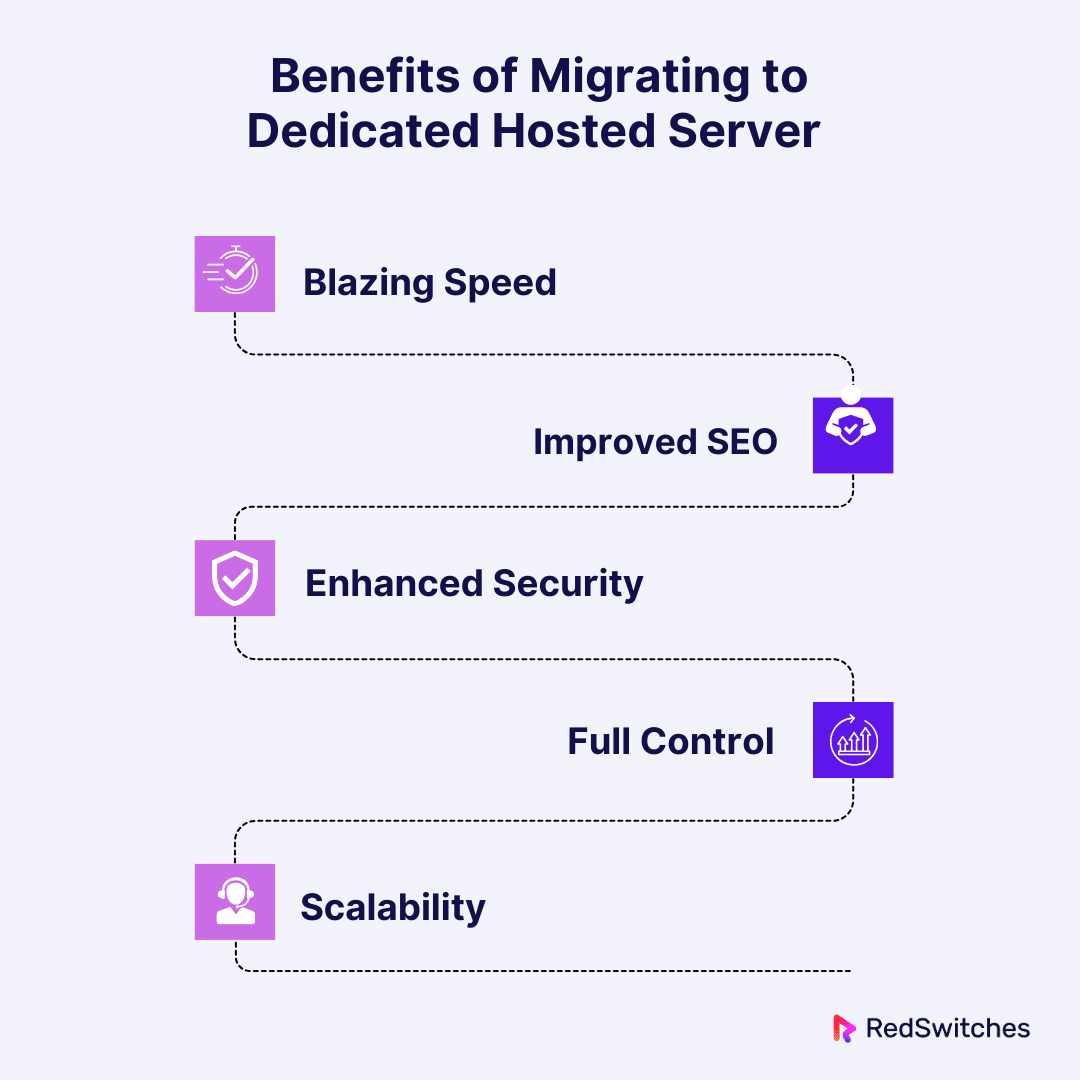
Migrating to dedicated hosted server hosting brings a wealth of benefits. It’s like moving from a crowded apartment complex to your own private house. Here’s how it makes a difference:
Blazing Speed
You don’t share resources with a server—they’re all yours. This setup ensures your website runs at peak performance. It’s similar to having a direct line rather than waiting in a queue. Your pages load faster, providing a smooth experience for visitors. Quick loading times are crucial. They keep users engaged and on your site longer.
Improved SEO
Search engines, like Google, favor fast-loading sites. You enhance your website’s speed by migrating to a dedicated hosted server. This improvement can boost your rankings in search results. Higher rankings mean more visibility, which leads to more visitors. It’s a simple but effective way to increase your online presence.
Enhanced Security
On a dedicated hosted server, you’re in a secure zone. Since you’re not sharing space, the risk of threats is lower. It’s akin to living in a gated community. You have more control over security measures. You can install firewalls, security protocols, and more. This protection is vital. It safeguards your site against attacks and keeps your data safe.
Full Control
One of the biggest perks is having full control. You can customize the server to meet your exact needs—like having a home you can renovate however you wish. You choose the software, the settings, and how things run. This flexibility is invaluable. It allows you to optimize performance and manage your resources more effectively.
Scalability
As your website grows, your needs will change. Dedicated hosted servers make it easy to scale. You can add more resources as required. This adaptability ensures your website can handle increased traffic and data. It’s like adding rooms to your house as your family grows. You have the space and capability to expand without moving to a new location.
Choosing the Right Hosting Provider to Migrate to a New Server
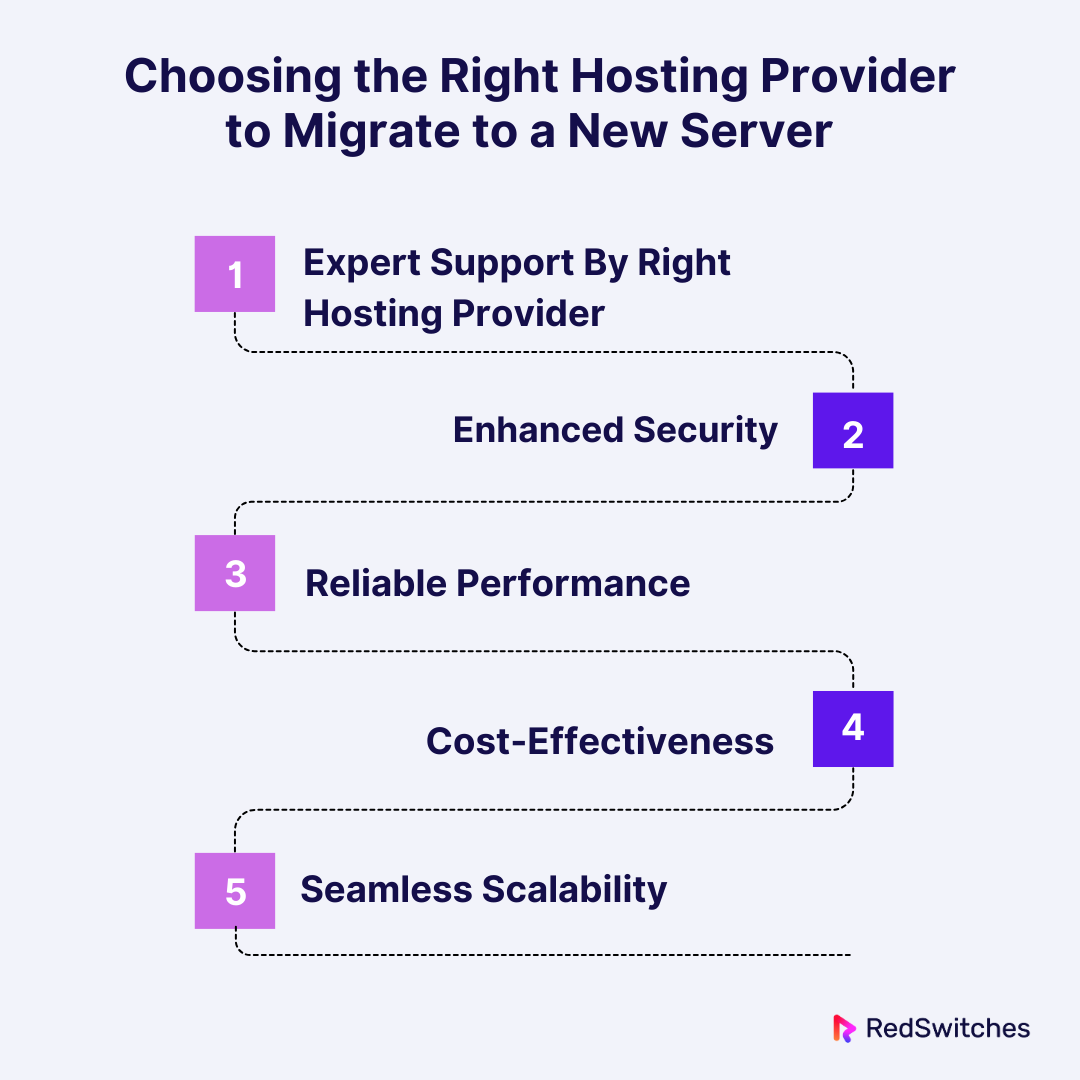
Choosing RedSwitches for migrating your dedicated hosted server ensures a smooth and hassle-free process. We prioritize making the transition as straightforward as possible. Our team handles the technical details, allowing you to focus on your business.
Expert Support By Right Hosting Provider
At RedSwitches, we offer expert support around the clock. Our knowledgeable team is always ready to assist with any questions or concerns. This ensures that your migration is smooth and supported at every step.
Enhanced Security
Security is our top priority. When you migrate to RedSwitches, you benefit from advanced security measures. We protect your data and ensure your server’s integrity, giving you peace of mind.
Reliable Performance
Our dedicated hosted servers are designed for reliability. With RedSwitches, you experience improved performance, crucial for running your applications smoothly. Our infrastructure is built to handle your needs efficiently.
Cost-Effectiveness

Credits: Freepik
Migrating to RedSwitches is a cost-effective choice. We offer competitive pricing without compromising quality or service, ensuring you get the best value for your investment.
Seamless Scalability
As your business grows, so do your server needs. RedSwitches provides seamless scalability options. You can easily upgrade your server resources to match your growing demands without downtime.
Choosing RedSwitches for your dedicated hosted server migration guarantees a smooth transition. Our simplified process, expert support, and reliable performance make us the ideal choice. With enhanced security, cost-effectiveness, and scalability, we ensure that your server migration meets your needs and expectations. Trust us to make your migration worry-free.
Conclusion
Migrating your website to a dedicated hosted server is a smart move. It’s like getting a fast, secure house for your online presence. Your website loads quickly with your server, which users and search engines love. You also get total control, making it easy to meet your exact needs. Plus, you can grow your resources as your site gets bigger. This step isn’t just about speed or looks; it’s about providing a safe, reliable place where your content can shine and attract more visitors. Remember, a server isn’t just a technical upgrade; it’s a growth platform for your website’s future.
Now that you are aware of the many benefits of dedicated hosting, let Redswitches assist you in realizing its greatest potential. Elevate your online presence with Redswitches server hosting! Experience unparalleled speed, enhanced security, and complete control, perfectly aligning with the benefits of dedicated hosting.
Join RedSwitches now for a seamless migration and unlock superior website performance. Make the smart move and transform your digital footprint today!
FAQs
Q. What is migrating a server?
Migrating a server means moving data, applications, and services from one server to another. This can be for upgrades, better performance, or cost reasons.
Q. How do I migrate to another server?
Migrating to another server involves planning, backing up your data, and moving it to the new server. You must also update configurations and test everything on the new server to ensure smooth operation.
Q. How do I plan a server migration?
Planning a server migration starts with understanding your needs and choosing the right new server. List everything you need to move. Make a backup. Plan the move step by step. Think about the best time to do it to avoid busy times.
Q. What are the steps for migration?
The steps for migration include planning, choosing a new server, backing up data, transferring the data and applications to the new server, updating configurations, testing to ensure everything works, and then going live.
Q. What is a dedicated server?
A dedicated hosting server is a type of hosting service in which a client leases an entire server that is not shared with anyone else. This provides maximum control over the server’s resources and optimal performance for websites and applications.
Q. How does VPS hosting differ from shared hosting?
VPS (Virtual Private Server) hosting provides a virtualized, private partition on a physical server, offering more control and dedicated resources than shared hosting, where multiple users share the server’s resources.
Q. What are the benefits of migrating to a new dedicated private server?
Migrating to a new dedicated private server can enhance your website’s performance, provide more storage and processing power, and offer more robust security measures for handling sensitive data.
Q. What steps should be taken to ensure a smooth transition during server migration?
To ensure a smooth transition, plan the migration process carefully, backup all data, test the new environment thoroughly before going live, and communicate the migration schedule with all stakeholders.
Q. How can a hosting provider help with server management and migration services?
A hosting provider can offer expertise in server management, support during the migration process, and tailor server solutions to meet specific needs, ensuring a seamless transition with minimal downtime.
Q. Why is configuring a firewall important for a dedicated hosted server hosting environment?
Configuring a firewall is crucial for protecting the server against unauthorized access and cyber threats, contributing to a secure hosting environment and safeguarding stored data.
Q. What are the advantages of cloud hosting over traditional physical server hosting?
Cloud hosting offers scalability, reliability, and flexibility, allowing for seamless data migration and data transfer across servers without the need for physical infrastructure, leading to enhanced user experience.
Q. Can you migrate from a VPS to a cheap dedicated server, and why would you?
Yes, migrating from a VPS to a cheap dedicated server is common when needing more control, dedicated resources, and better performance to support growing traffic and complex applications.
Q. What does it mean to tailor the server settings to your needs, and why is it important?
Tailoring server settings involves customizing the configuration, security measures, and server resources to meet specific requirements, ensuring optimal application performance and security.
Q. How do best dedicated server solutions differ in a data center environment?
Best Dedicated server solutions in a data center offer high availability, dedicated resources, robust security measures, and managed server options, providing a reliable and efficient hosting solution for businesses requiring intensive resource use.
Q. How do I transfer data from one dedicated server to another within a dedicated server hosting environment?
To transfer data from one dedicated server to another, backup your data, use secure transfer protocols like SCP or Rsync, ensure the new server is configured correctly, then move the data, testing for integrity and performance after the transfer to ensure everything works as expected.
