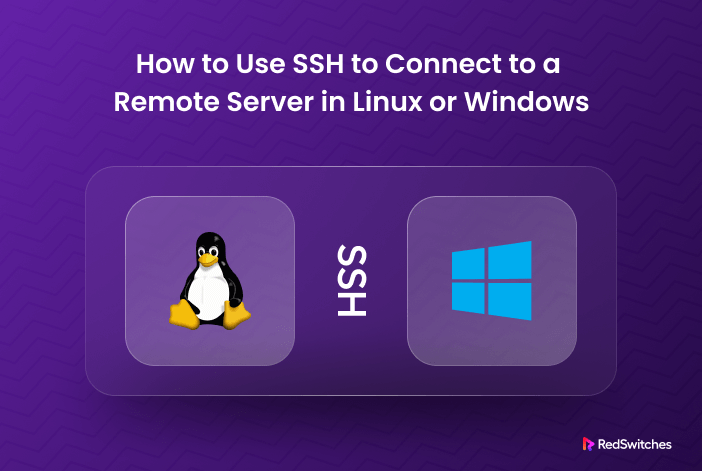
These days, system administrators and developers don’t need to be in the same room as the server or machine they’re working on. Linux and Windows provide secure ways of connecting and working with remote systems.
In fact, working with remote systems is a critical skill developers and system admins should have in their toolset. Using suitable connection protocols, admins can carry out almost all server management operations from the comfort of their office.
When it comes to connecting and working with remote servers, you can opt for one of the following popular methods:
Secure Shell (SSH): This is typically used to connect to Linux-based machines.
Remote Desktop Protocol (RDP): This is used to connect to Windows computers.
These protocols enable users to connect to and remotely control other computers, transfer data, and carry out virtually any operation that can be performed in front of a computer.
In this comprehensive overview of working with remote computers, we’ll go into the details of how you can use SSH and RDP to connect to Linux and Windows computers. Let’s start with the prerequisites of the process.
Table Of Content
- Prerequisites to Working With SSH and RDP
- How to Connect to Remote Servers With SSH?
- How to Connect to Remote Servers With RDP?
- Conclusion
- FAQs
Prerequisites to Working With SSH and RDP
Before you can set up secure remote connections, make sure you have:
1. The remote system must be online and powered on.
2. The client and server programs are installed and activated.
3. You must know the name or IP address of the remote machine to which you want to connect.
4. You must have the necessary permissions to access the remote computer.
5. The remote system’s firewall should allow remote connections.
Let’s start with Secure Shell (SSH)
How to Connect to Remote Servers With SSH?
Let’s see how developers and administrators can use SSH to connect to remote systems.
What is SSH?
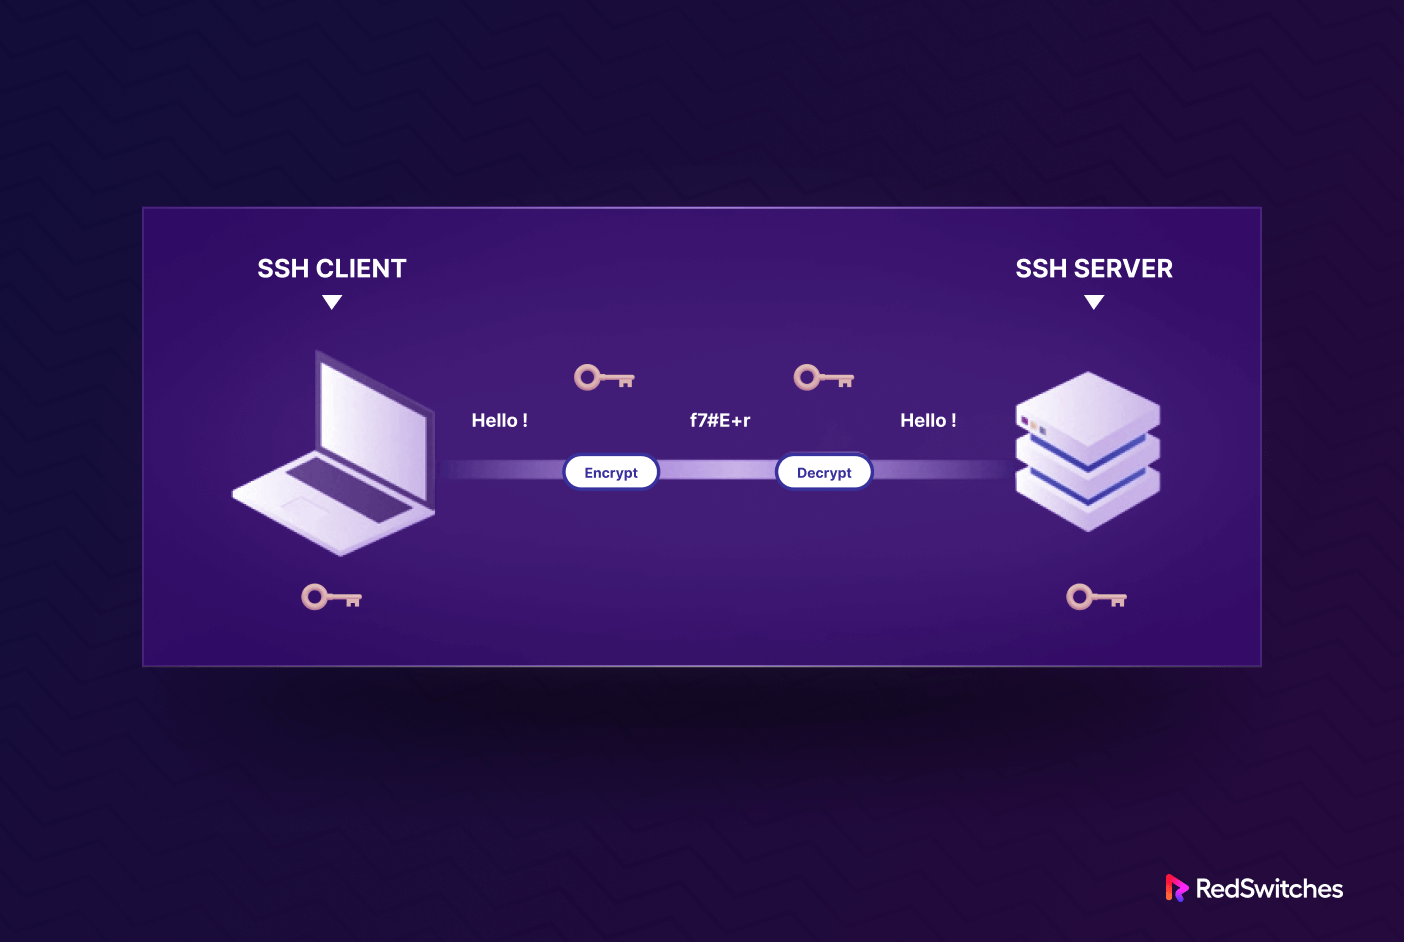
Secure Shell, or SSH, functions as both a network protocol and a software application. The primary purpose is to establish secure and encrypted connections to remote computers via a network.
SSH plays a critical role in enabling secure access and administration of remote devices and servers. It is frequently used in applications like remote login, executing commands on a distant computer, and transferring files between machines.
Administrators and developers use SSH as an everyday tool for securely accessing and working with remote Linux systems.
How Does a Typical SSH Session Work?
You need to have SSH enabled on both the client and server to create a secure connection between the devices. For this, we recommend setting up an SSH client on your device.
When you fire up the SSH client, it will first verify your credentials. When they’re validated, it initiates an encrypted connection using the information provided by the remote host.
On the server side, the SSH component always listens on a specific TCP/IP port for incoming connection requests from an SSH client. When a client successfully connects, the SSH server responds by sharing the software and protocol versions it supports, and both exchange identifying information. After successful validation, SSH creates a new session in the correct environment.
Popular SSH Versions
SSH has the following versions:
SSH-1: The first SSH version was developed in the 1990s. Security experts discovered several security vulnerabilities, and we no longer recommend it for setting up SSH connections.
SSH-2: SSH-2 is the current and widely adopted SSH version. It addresses the security issues in SSH-1 and provides a more secure and efficient way of remote access and data transfer. SSH-2 supports various encryption algorithms, better authentication methods, and improved security features.
Additionally, we have OpenSSH, which is not a version of SSH itself but rather an open-source implementation of the SSH protocols, primarily SSH-2. It is widely used in the UNIX and Linux distributions and provides a secure way to access and manage remote servers.
We strongly recommend using SSH Version 2 for communication between SSH servers and clients because it’s more secure than other SSH options.
How to Enable an SSH Connection
Now that you have a detailed introduction to SSH let’s see how to establish an SSH connection. Note that your device should have an SSH client, and the target server should have an SSH server. Since we are discussing SSH connections in a Linux environment, you’ll be better off using OpenSSH.
We’ll now go into the details of installing an OpenSSH client and server because some Linux distributions (like Ubuntu) don’t have pre-installed OpenSSH.
Important: We’ll use Ubuntu for this demonstration. However, the steps should work with minimum changes on other Linux distributions.
Install an OpenSSH Client
Launch a terminal by searching for terminal or using the keyboard shortcut CTRL + ALT + T.
First, check whether SSH is available on the machine by entering ssh in the terminal. If the SSH client is set up and available, you will get a response similar to the following:
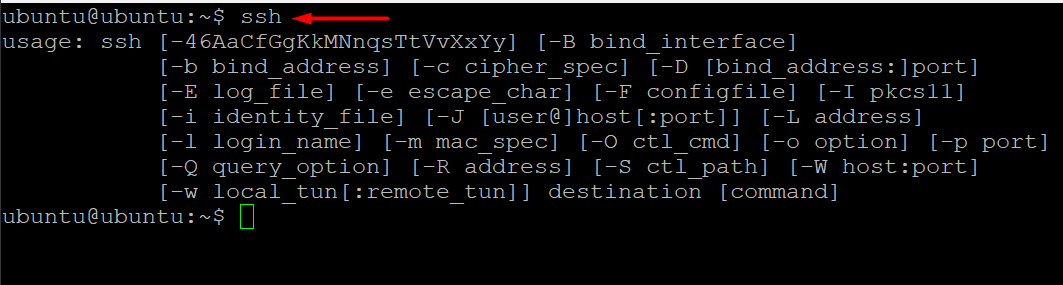
If you don’t see this response in the terminal, you need to set up the OpenSSH client on your device.
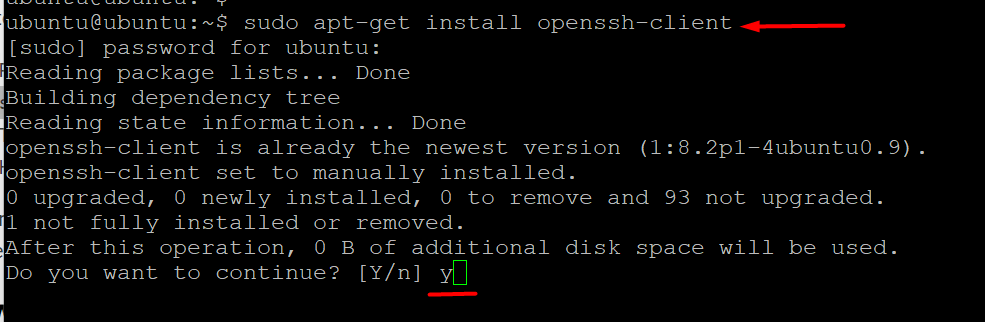
You can install an OpenSSH client on your device by running the following command:
If you are on an Ubuntu/Debian machine:
# sudo apt-get install openssh-client
For CentOS/RHEL machines:
#sudo install yum openssh-server
When prompted, enter your superuser password. Press Enter to finish the installation.
Now, if you have the required access rights and know the hostname or IP address of any machine with an SSH server, you can SSH into the machine.
Install an OpenSSH Server
A machine needs a server-side SSH component to receive SSH connections.
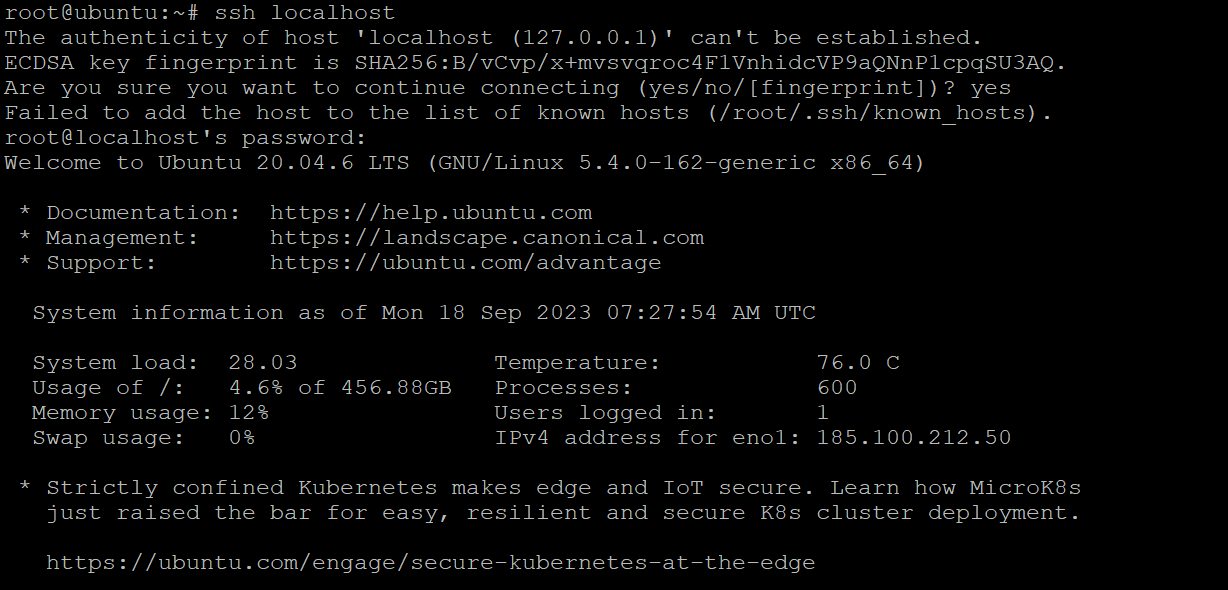
If you want to check if the remote Ubuntu machine can accept SSH connections, start by trying to connect to the localhost (the same computer you’re on).
For this, launch the terminal, enter ssh localhost, and press Enter. If the device doesn’t have an active OpenSSH server, you’ll see something like this:
You can install an OpenSSH server by running the following command:
# sudo apt-get install openssh-server ii.
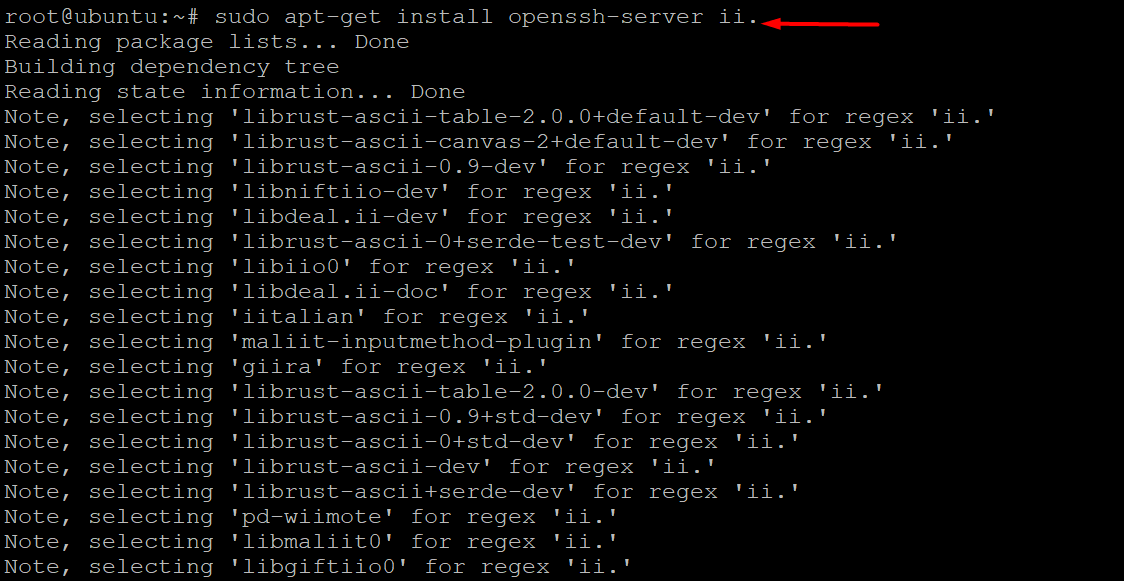
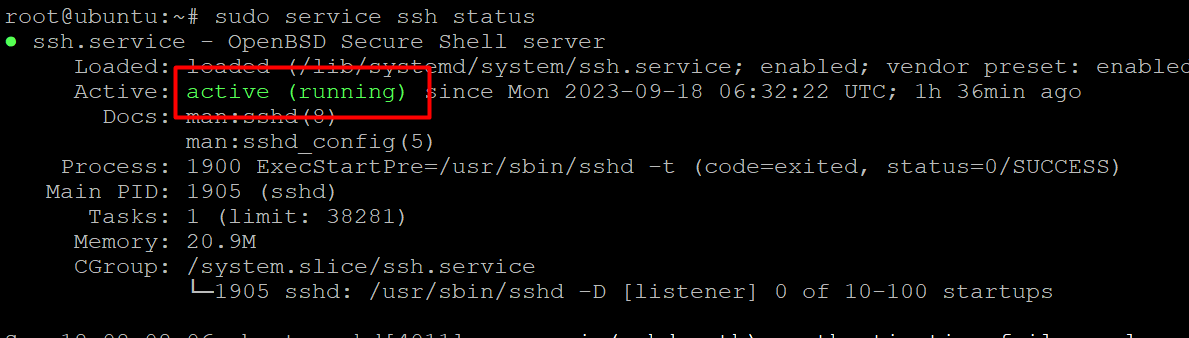
Enter your superuser password when prompted, and press Enter and Y to continue the installation after the disc space prompt. After installing the required support files, you may use the following command to see if the OpenSSH server is working properly:
# sudo service ssh status
If the OpenSSH server is active, the response should look something like this:
Now, you’ll see the connection request if you try to set up an SSH connection to the localhost by running the SSH localhost command in the terminal. Enter y or yes to proceed.
Change the Default SSH Port
The OpenSSH server listens to port 22 by default. You can easily change the port the OpenSSH server listens to by editing the SSH daemon configuration file.
Start by running the following command in the terminal to open the file in the nano editor:
# sudo nano /etc/ssh/sshd_config
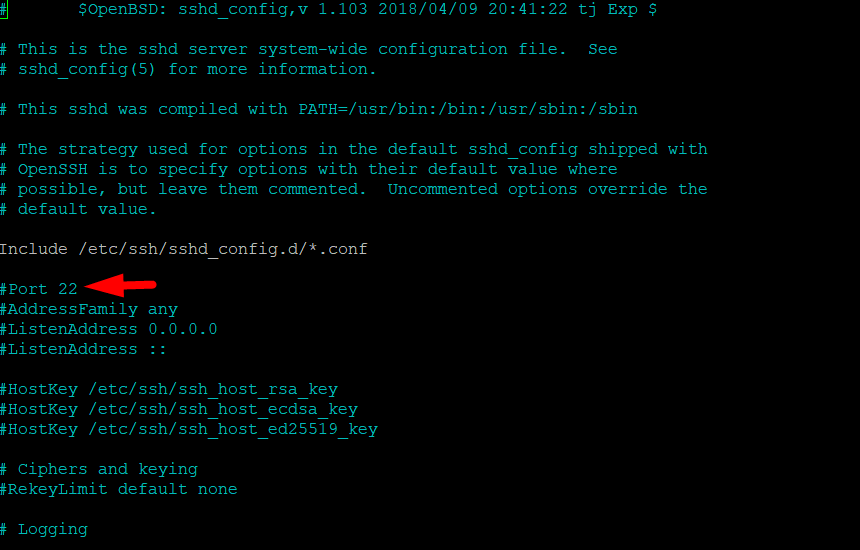
Scroll down to the entry for Port that will be set to 22. Edit this entry and enter the port number of your choice. Remember to save the file before exiting the editor.
Next, restart the SSH service to make sure the changes you make to the sshd_config file are loaded and put into action:
# sudo service ssh restart
How to Connect via SSH
Now that the OpenSSH client and server are installed on the machines, you can easily set up an SSH connection between the two. You need to make sure that you have the IP address and permission to access the server.
Method #1: Use the Terminal
Launch the terminal and enter the following command:
# ssh <your valid username>@<host IP address>
Alternatively, if you have the same username on the local machine and remote server, you can simply use:
# ssh <host IP address>
You’ll be asked to enter the password.
If it’s your first time connecting to the remote server, you’ll be asked if you wish to remain connected. You see this notification because the local device does not acknowledge the remote server. Simply enter yes.
You have now connected to the remote server, and an ECDSA key fingerprint has been added.

We recommend using a private IP address when connecting to a remote machine on the same internal network. If the remote machine is not on the same internal network, you should use a public IP address.
Furthermore, ensure that your SSH port forwarding settings are correct and that you are familiar with the TCP port used by OpenSSH for connection requests. By default, if no modifications have been made to the sshd_config file, OpenSSH operates on the standard port 22. If you are using a custom port, use the -p flag to specify the port number along with the host machine IP address in the following format:
# ssh [email protected] -p334
Method #2: Use an SSH Client (PuTTY)
If you are not comfortable with the terminal or Command Prompt, you can use an SSH client that comes with a GUI. We’ll use PuTTY, an SSH client for Windows, to demonstrate the process. However, you can use the SSH client of your choice.
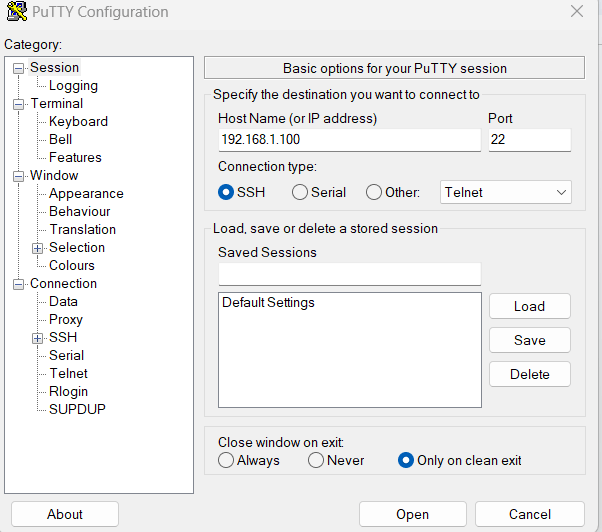
Step #1: Launch PuTTY
Enter the hostname or the IP address of the remote machine. For the moment, leave the default port 22 unchanged.
Click Open, and the command line will open.
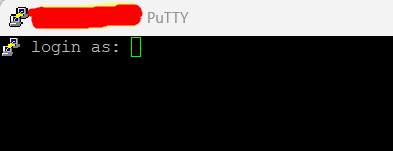
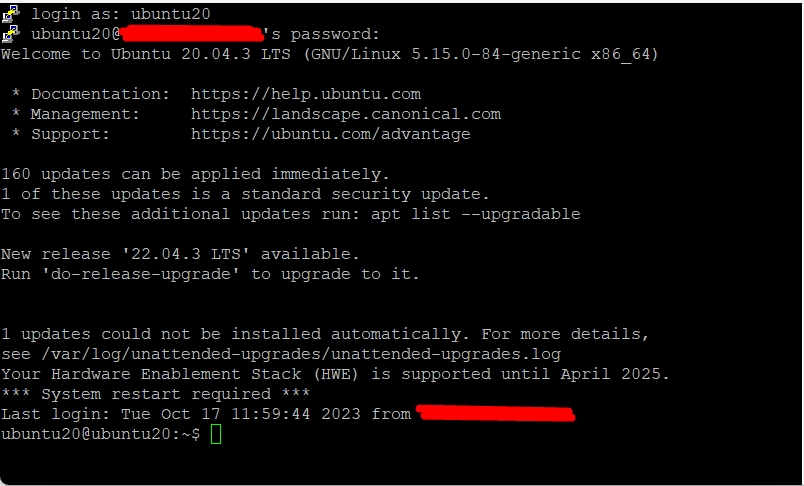
Step #2: Enter the Credentials
Enter the username and password at the login as prompt and press Enter.
Additional Steps for SSH Security
Since the default settings and configurations of an SSH server and client are common knowledge, leaving them unchanged can pose a serious security risk. We’ll now discuss several tips for enhancing SSH security by editing the sshd_config file.
- Change the default TCP port of the SSH daemon from 22 to a higher, less predictable number (like 24596). Avoid using easily guessable port numbers such as 222, 2222, or 22222.
- Enhance security by using SSH key authentication pairs to log in without a password. SSH key pairs provide a safer and more efficient way to access remote servers without relying on passwords.
- Improve security by disabling password-based logins on your server. This step prevents unauthorized server access even when your passwords get compromised. However, before disabling password-based logins, ensure key pair-based authentication is functioning correctly.
- Strengthen security further by disabling direct root access to your server. Instead, access the root user by switching from a regular user account using the su command.
You can also use TCP wrappers to limit access to particular IP addresses or hostnames. For this, you need to edit the /etc/hosts.allow and /etc/hosts.deny files.
You should know that if you have allowed and denied hosts, the allowed hosts will take precedence. For instance, if you want to permit SSH access to just one host, you should start by denying access to all hosts and adding these two lines in the /etc/hosts.deny file:
sshd : ALL
ALL : ALL
Next, in the /etc/hosts.allow file, you can add a line that specifies which hosts are allowed to access the SSH service. This could be a hostname, a range of IP addresses, or just a single IP address. Here’s a sample line SSH server: 10.10.0.5, local
You should also look into installing services like fail2ban to limit SSH access to your servers. These services add a security layer against unauthorized access attempts.
How to Connect to Remote Servers With RDP?
Let’s see how developers and administrators can use RDP to connect to remote systems.
What is RDP?
Microsoft developed the Remote Desktop Protocol (RDP) as a way to remotely manage and control Windows computers.
Unlike Secure Shell, when you use an RDP client to connect to a Windows server, you get access to a GUI that you can use to interact with the remote computer just like you would with your own.
Network admins and system engineers use these Remote Desktop services (previously known as terminal services) to access and manage remote computers on a local network or over the Internet.
However, there’s a downside to using RDP.
Connecting via RDP without a virtual private network (VPN) is not as secure as SSH because your connection is directly exposed to the Internet. Automated scripts constantly scan for vulnerabilities, especially if your Windows Remote Desktop connections use open ports. At the minimum, we suggest you set up and force all users to use strong passwords that are regularly rotated for enhanced security.
How Remote Desktop Protocol Works?
The Remote Desktop Protocol (RDP) is used for Windows Remote Desktop connections, and it’s based on a simple client-server setup. When you enable the Windows Remote Desktop service, it starts listening for connection requests on port 3389.
To connect to a Windows server remotely, you need to provide a valid username for the account you want to use. Once you’re connected, you can run applications, transfer files between the two machines, and perform tasks on the server, just like you would on your own computer.
The good news is that the Remote Desktop client is installed by default, so you can create a secure connection to another computer, regardless of the Windows version you’re using. However, you should note that the computer you want to connect to must be running a Pro, Enterprise, or Server edition. In simple terms, RDP connections can only be established to machines running Windows OS.
Also Read: How to Restart Windows Server 2016 – 4 Reboot Command Scenarios
How to Make an RDP Connection Active
You must enable the Windows Remote Desktop server service in order to accept remote connections to and from machines across a network. Since the Remote Desktop client is built into Windows PCs, it is available right out of the box and does not require any further configuration to connect to another Windows-based machine.
However, for security reasons, accepting Remote Desktop connections from other PCs is disabled by default on all Windows OS versions. Before enabling this service, you must keep the following in mind if you plan on connecting remotely to a server over the Internet rather than the local network:
Port Forwarding: If you’re not using a VPN, ensure the ports are correctly forwarded to the remote host’s IP address. The default TCP port for Remote Desktop Protocol is 3389. Double-check your router’s settings to confirm this. Remember that your Windows server is exposed to the automated port scanning scripts without a VPN.
Use a VPN: Using a VPN is a safer way to connect to Remote Desktop. When you set up a virtual private network on your client computer, you can access services as if on a local connection.
Check Firewall Settings: Check the firewall settings on the remote machine to ensure it’s not blocking Remote Desktop connections. You might need to whitelist the local port for RDP, whether it’s the default port number or a custom one.
Enable Remote Access in Windows 7, 8, 10, and Windows Server Editions
The process of setting up a remote desktop and making it secure for connecting to a server or PC is pretty much the same across all Windows versions. We’ll explain the basic steps for allowing remote access to a computer. But before you start, make sure you’ve thought about the earlier advice regarding port forwarding, VPN setup, and firewall settings.
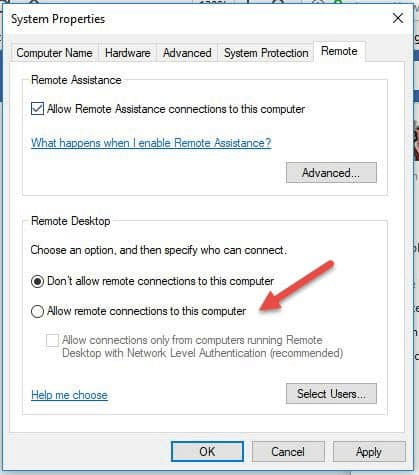
Step #1: Allow Remote Connections
Go to the computer information on the device to authorize remote connections.
Depending on the Windows OS version, right-click Computer or This PC and select Properties. On the left side of the window, select Remote Settings.
Select Allow remote connections to this computer. This should automatically add the Remote Desktop exemptions to the system’s firewall. For added protection of your RDP sessions, you may also choose the checkbox that states Allow connections only from computers running Remote Desktop with Network Level Authentication (recommended).
Step #2: Add Users to Remote Desktop Access Group
If you’re an administrator, your account will be added automatically to the list of allowed users. However, if you wish to add users who are not administrators, you can follow these steps.
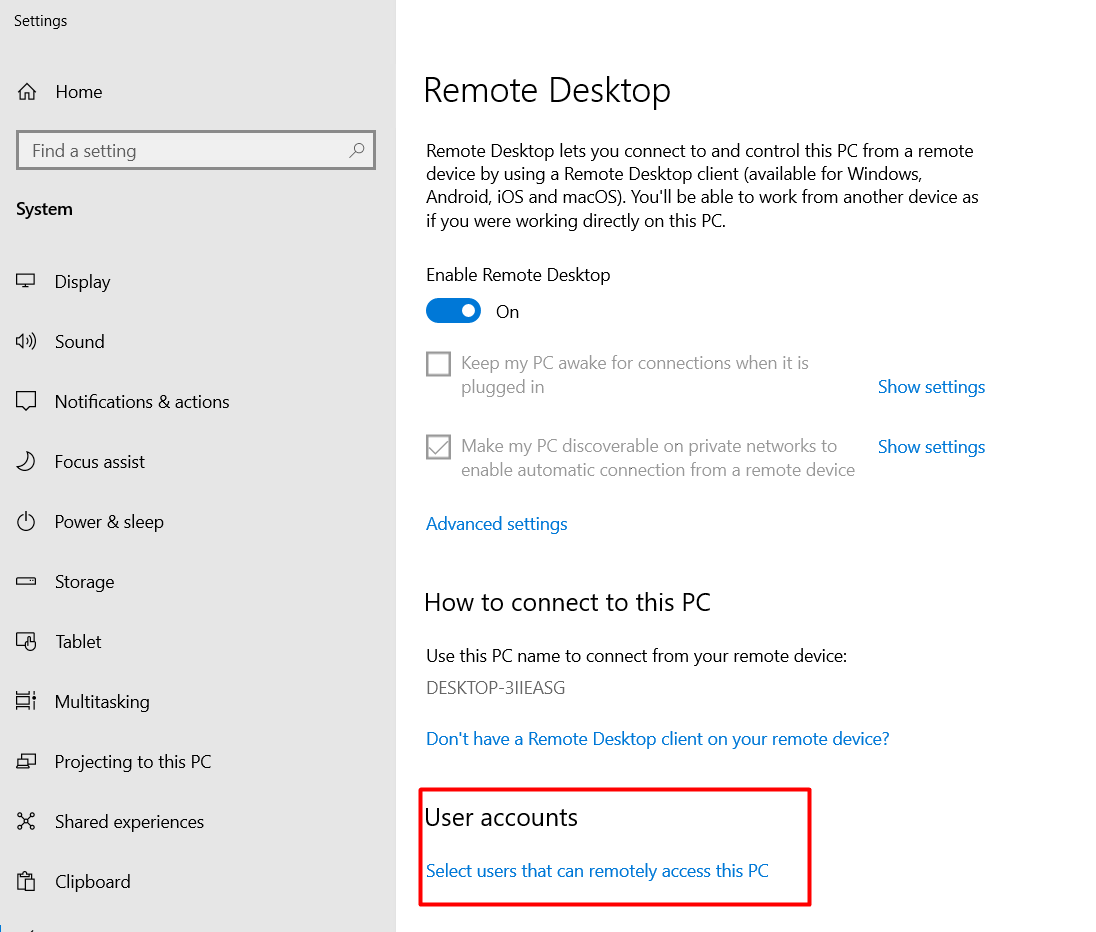
Open the Settings application and select Remote desktop.
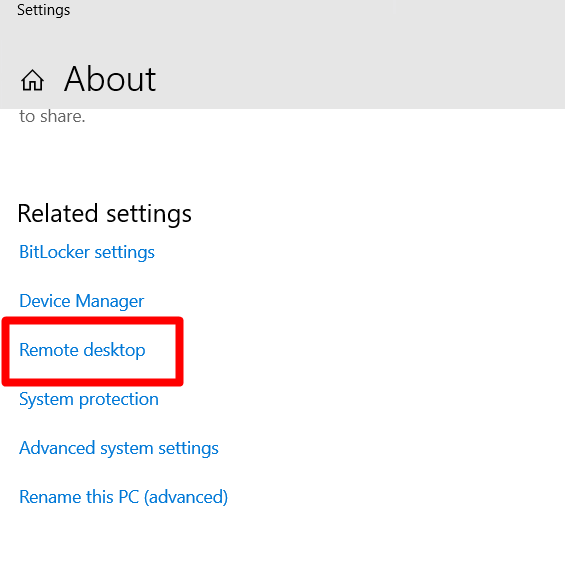
Select users who can remote access this PC by clicking the Select Users option under the Remote Desktop window. Ensure the Remote Desktop Enable function is turned on. If not, you won’t see the link for specific individuals there.
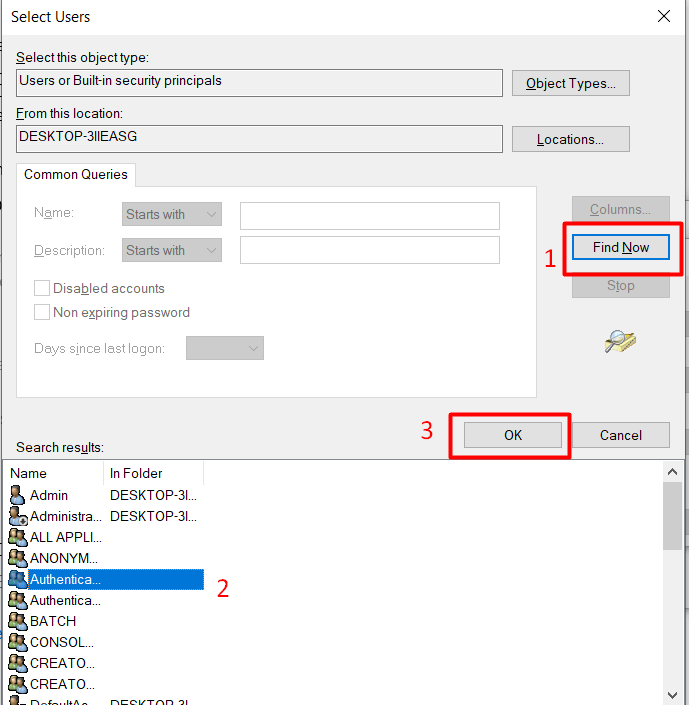
Select the Add button in the Remote Desktop Users dialog box.
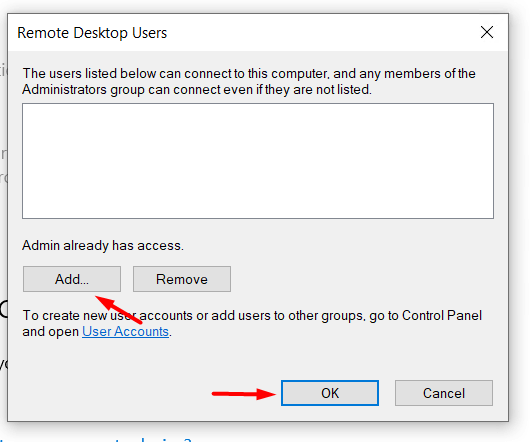
You may either type the user name to add there or pick the user from the list by clicking the Advanced option.
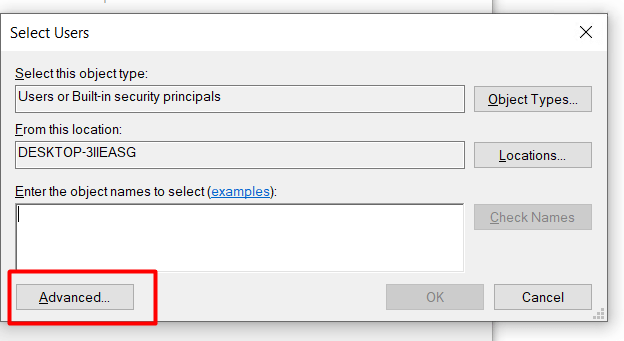
Select the Advanced mode and click the Find now button. Click OK after choosing the name of the user account you want to include as a member.
You can now log in and control this machine remotely as long as no other settings interfere with your remote desktop connection.
How to Connect RDP with Remote Desktop Connection Client
You do not need to configure Remote Desktop on the local computer to utilize the Remote Desktop client. We’ll now walk you through the steps of connecting to a remote desktop client. We’ll use Windows 7 for this demonstration, but the steps apply to other Windows versions.
Start the Desktop Connection Unit
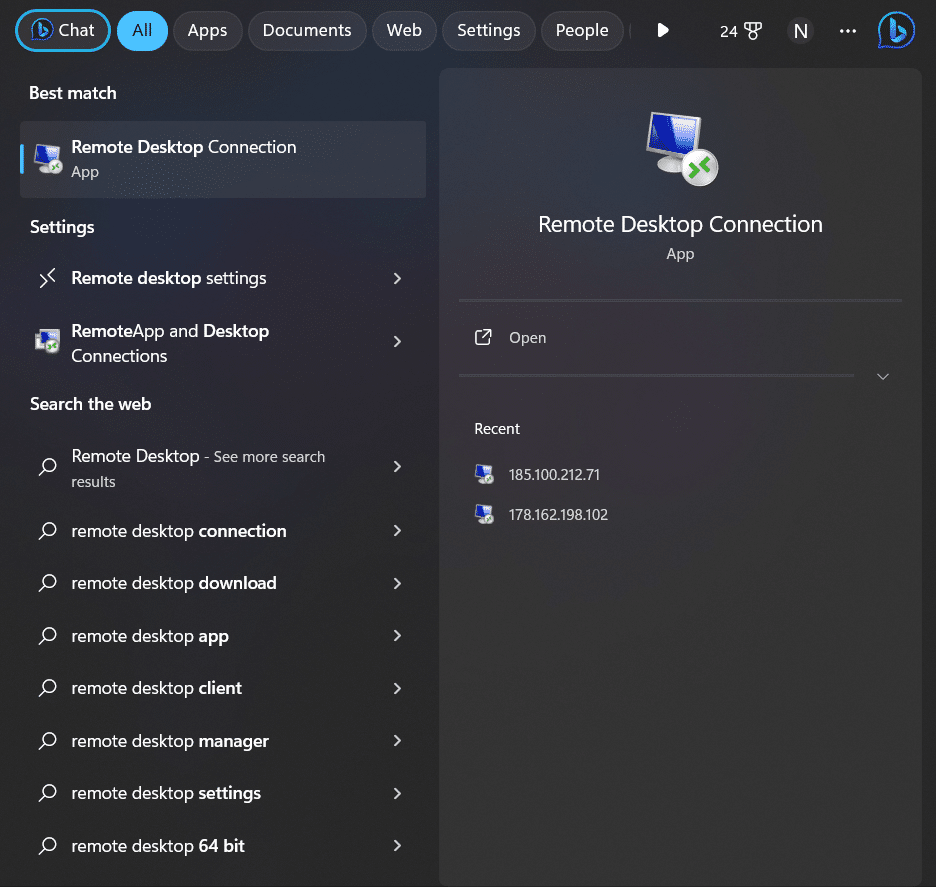
Type Remote Desktop Connection into the search box.
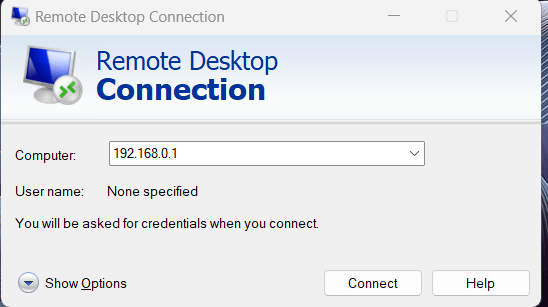
Click the application to select it. You must specify the port after the IP address if the remote host’s default port for Remote Desktop connections, port 8000, has been modified.
For instance, 192.168.0.1:8000
Finalize the Connection by Entering the RDP Credentials
After you click Connect, a loading bar will appear. A pop-up window similar to the following will appear once the remote session has been established and configured:
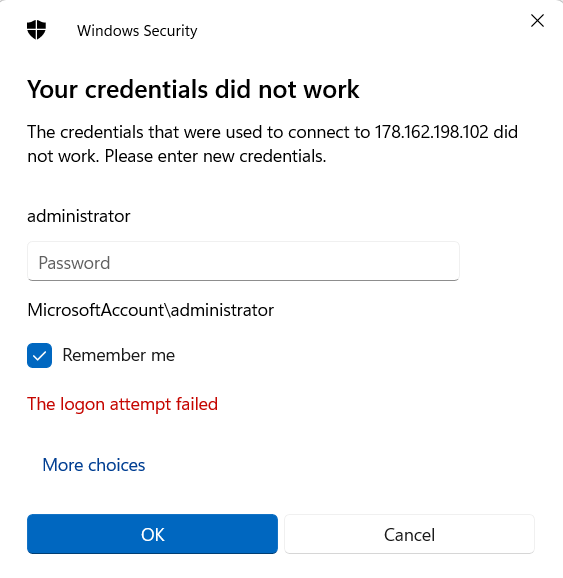
Enter the password for the mentioned username (administrator in our case). Once ready, click OK to remove the security certificate warning. Next, click Yes to continue.
Best Practices and Precautions for Securing RDP
Configuring your remote server or computer to accept RDP connections is critical to the security of your entire infrastructure.
We recommend the following tips to secure your RDP connectivity options:
Use the built-in VPN server on your Windows computer to further protect your traffic. This adds a security layer and further anonymizes traffic.
Set client connection encryption level. By default, this option is set to Not configured. We highly recommend that you activate and force-enable it for all communications between clients and Remote Desktop Session Host servers. The High encryption level brings a strong 128-bit encryption to all data transferred from the client to the server. You can use the Local Group Policy editor for these changes.
Set up two-factor authentication with the help of third-party applications like e Duo Security. These apps help you add two-factor authentication to all Windows login attempts or just the RDP sessions.
Enforce firewall rules for open RDP ports, especially the default RDP TCP port 3389. We recommend using the Windows’ built-in firewall through the Control Panel and modifying its settings to limit traffic to particular ports and IP addresses.
You can restrict access to remote desktop sessions by following these recommended practices for extra RDP security. You won’t have to spend a lot of time changing your machines’ configurations to stop most illegal login attempts.
Conclusion
SSH and RDP are crucial protocols for Linux and Windows remote server connections. They allow for encrypted communication over unsecured networks, protecting the confidentiality and integrity of data. We explained how to set up SSH and RDP clients and connect to remote machines using authorized credentials.
Both SSH and RDP offer additional security in the form of key-based authentication, which requires the creation of an SSH key pair and deploying the public key authentication on the server. Popular SSH solutions for Windows users include PuTTY, WinSCP, and the Windows Subsystem for Linux. You can augment SSH’s efficiency by security procedures such as routine updates, access control, and monitoring.
Ready to experience the power of secure and efficient remote server management? Choose RedSwitches, your trusted global dedicated hosting provider. Enhance your server connectivity with the reliability of SSH.
We offer the best dedicated server pricing and deliver instant dedicated servers, usually on the same day the order gets approved. Whether you need a dedicated server, a traffic-friendly 10Gbps dedicated server, or a powerful bare metal server, we are your trusted hosting partner.
FAQs
1. Why should I use SSH for remote server connections?
SSH is a cryptographic network protocol that ensures secure and encrypted communication between your local machine and a remote server. It should be used for remote connections to protect data integrity and confidentiality.
2. How do I initiate an SSH connection to a remote server in Linux-based machines or Windows?
You can initiate an SSH connection using the ssh command in Linux or SSH clients like PuTTY or WinSCP in Windows. Simply provide the remote server’s IP address or hostname and your username.
3. What is key-based authentication in SSH, and how do I set it up?
Key-based authentication is more secure than passwords. To set it up, generate an SSH key file pair (public and private keys) on your local machine, then copy the public key to the remote server’s ~/.ssh/authorized_keys file.
4. Can I use SSH for file transfers between my local machine and the remote server?
You can use SCP (Secure Copy Protocol) or SFTP (SSH File Transfer Protocol) for secure file transfers over SSH. Both methods are widely supported.
5. What security best practices should I follow when using SSH for remote connections?
Regularly update your SSH client and server, limit access to authorized users, use strong and unique passwords, and consider disabling password-based authentication in favor of SSH keys.
6. Are graphical user interfaces (GUIs) available for SSH on Windows?
Yes, SSH client applications like PuTTY, WinSCP, and Windows Subsystem for Linux (WSL) offer GUIs for SSH connections in Windows.
7. How can I monitor and log SSH connections for security purposes?
You can monitor SSH connections by reviewing Open SSH server logs. Tools like fail2ban can help protect against unauthorized access login attempts.
8. Is SSH supported by all operating systems and servers?
SSH is widely supported and available on most Unix-like operating systems. Windows also has SSH support through third-party clients or native features like Windows Subsystem for Linux.
