The localhost refused to connect error is a common issue when accessing a service or website hosted on your local machine.
This error signifies a failure to connect with the local server or hosted services, frustrating users during the development and testing phases. However, the good news is that it is relatively easy to fix this issue by applying the fixes we’ll discuss in this guide.
So, this guide will explore the various reasons behind this error and provide practical solutions for troubleshooting and resolving it. Whether it’s a misconfiguration, server downtime, or other factors, understanding the potential causes is the first step in selecting the right strategy for resolving this “localhost refused to connect” error.
Let’s start with a look at these potential causes.
Table Of Contents
- Why “localhost refused to connect” Error Happens?
- 6 Simple Ways to Resolve the “localhost refused to connect” Error
- Conclusion
- FAQs
Why “localhost refused to connect” Error Happens?
The localhost refused to connect error typically occurs when a user or service tries to access a service or website hosted on the local machine. Usually, this attempt is directed to the hostname localhost or the IP address 127.0.0.1. However, the server rejects the connection, and the user sees the error at the frontend.
Here are some common reasons for this error:
The Service is Not Running/Active
You will see the error if the service you are trying to access is not running or actively accepting incoming connections. To resolve this, ensure that the server or application you are trying to connect to is actively running and has successfully started.
You’re Accessing the Incorrect Port
Always check that you are using the correct port number in the command, URL, or connection setting. You can also add a fallback port option because many services use the default port 80 for HTTP and port 443 for HTTPS.
Firewall or Security Software is Blocking the Connection
Firewalls, IDS, and similar security software on your machine can block incoming connections. We recommend checking the firewall settings to ensure the target ports are open for the service you are trying to access.
Configuration Issues
Misconfigurations in the server or application settings can cause the localhost refused to connect error . We recommend double-checking the configuration files to ensure the server and applications are set up to accept connections on the specified address and port.
The Server is Not Bound to the Localhost
The server might be configured only to accept connections from a specific network address or network. As a result, it may not be configured to listen for connections and incoming requests to localhost. If you suspect this issue, we recommend checking the server configuration to ensure it is bound to the localhost address.
The Server is Overloaded or Has Crashed
If the server is overloaded or has crashed, it cannot accept or service new connections. As a fix for this issue, check the server logs for any error messages or indications of server crashes.
DNS Resolution Issues
If you are using a hostname like localhost, ensure it resolves to the correct IP address. If you have fixed the server and application configuration issues, we recommend checking for DNS resolution problems that can lead to connection errors.
Check Browser Cache and Cookies
Sometimes, browser-related issues such as old cached data and cookies can cause connection problems. We suggest clearing your browser cache and cookies or using a different browser to see if the issue persists.
6 Simple Ways to Resolve the “localhost refused to connect” Error
Resolving the localhost refused to connect error requires a systematic approach to identify and address potential issues. You can follow these solutions as a checklist to identify and resolve the issue. Alternatively, if you have a good idea of the cause, you can directly apply the relevant fix.
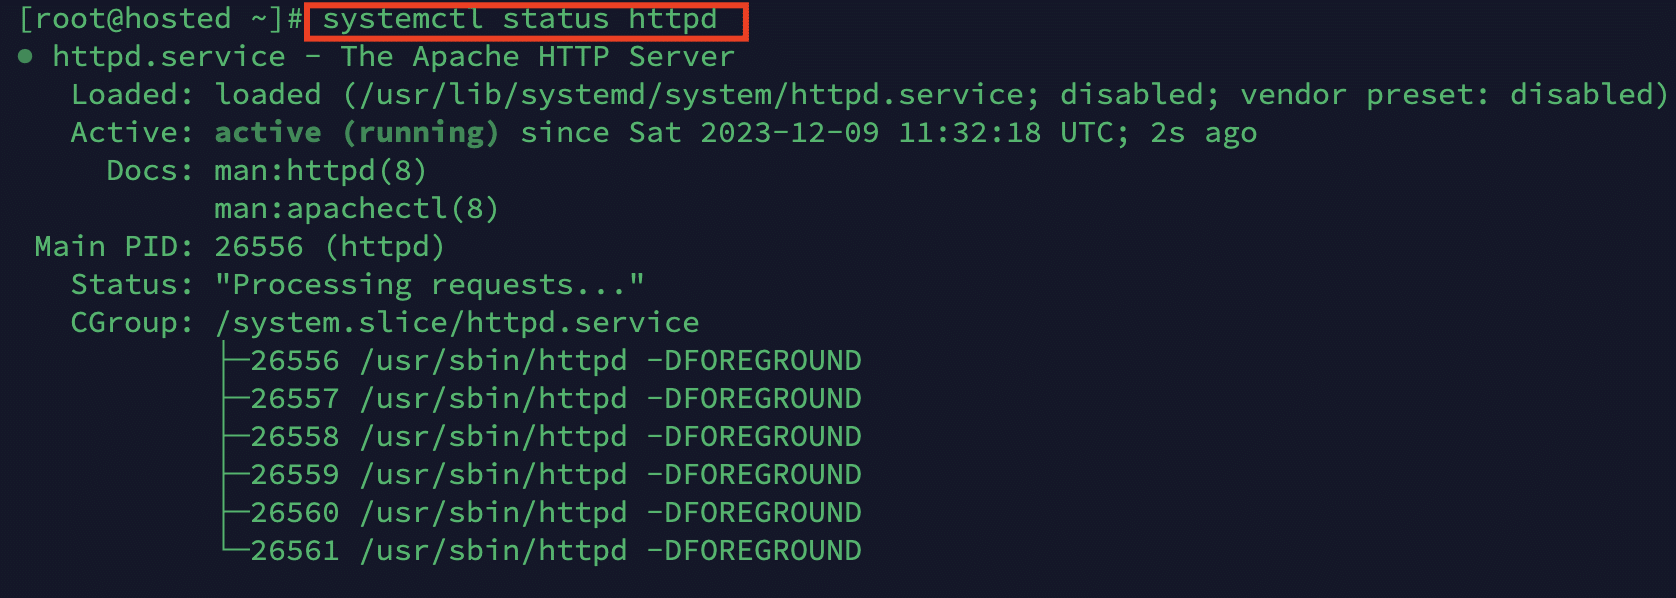
Solution #1: Check Service Status
The first thing you should verify is whether the service or application you’re trying to access on localhost is running. In particular, you should confirm that the server process started successfully and is active.
We’ll use the Apache server in a Linux environment for demonstration purposes,
Depending on the distribution, there are different commands to check if the Apache server process is active.
CentOS/RHEL
Use the following command:
# sudo systemctl status httpd
Ubuntu/Debian
Run the following command in the terminal:
# sudo systemctl status apache2

Solution #2: Verify that You’re Using the Correct Port
Go through the commands or script to confirm that you are accessing the correct port number in the URL and connection settings. Note that some services operate on specific ports, such as 80 for HTTP or 443 for HTTPS.
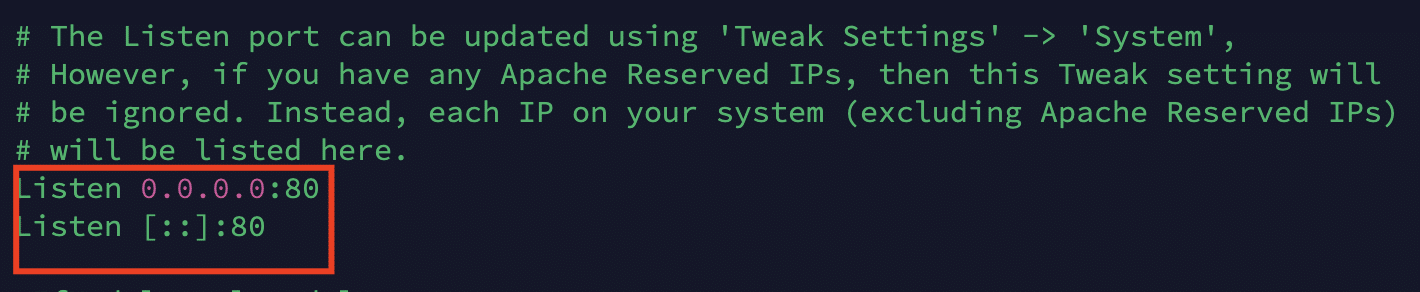
Change the Apache Web Server’s Port on the Linux Server
Using a text editor (Nano or Vim), open the Apache configuration file to check (or change) the default HTTP port (80).
If you’re on CentOS/Fedora, run the following command:
# vi /etc/apache2/conf/httpd.conf
Alternatively, if you’re on Debian/Ubuntu, run the following command:
# nano /etc/apache2/ports.conf
After opening the configuration file, locate the Listen [::] 80 string and change it to an open port.
Change the Apache Web Server’s Port on the Windows Server (in XAMPP/WAMP)
If you are running Windows with XAMPP or WAMP, the most popular solution to fix this mistake is to change the port of the Apache web server. Usually, port 80 (the default option) is banned or unavailable to XAMPP/WAMP because another web application may be using the port on your PC. As a result, even though Apache is operational on the XAMPP/WAMP, it cannot retrieve web pages over the specific port.
Modify the Apache Port in XAMPP
Follow these steps to modify the port that the Apache web server is currently using in XAMPP:
- Launch XAMPP by selecting it from the Start Menu.
- The XAMPP Control Panel Window will now appear. You would see a list of services, such as Apache, MySQL, etc.
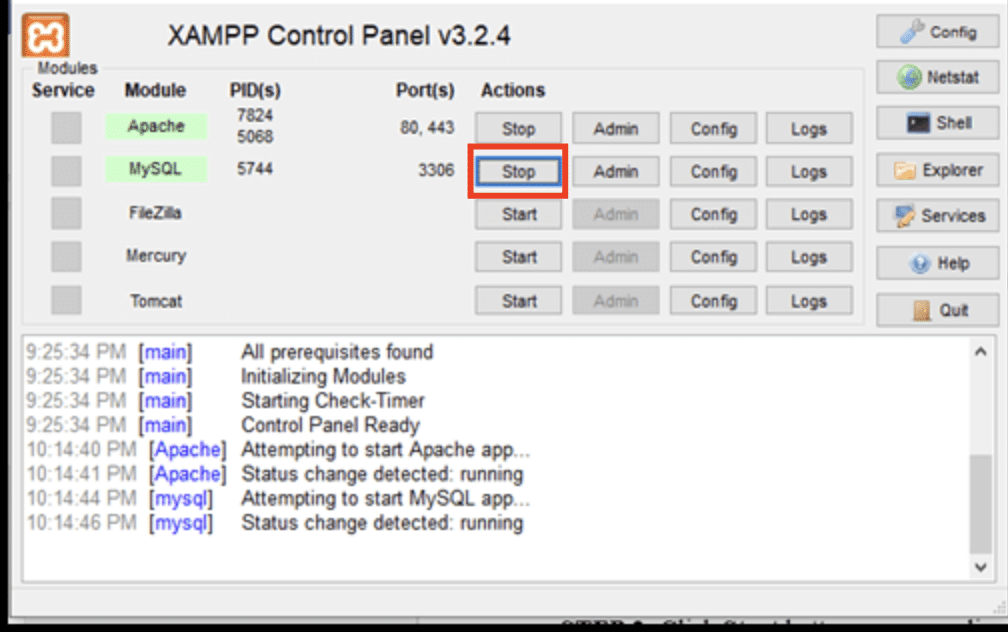
- Click the Stop button to halt the Apache service.
- Open Windows Explorer and navigate to the C:\xampp\apache\conf folder. Look for a file called httpd.conf there.
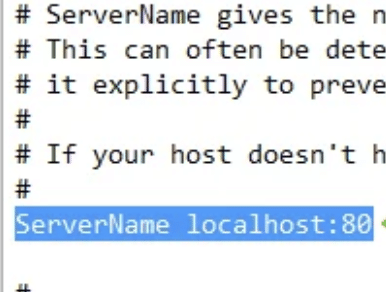
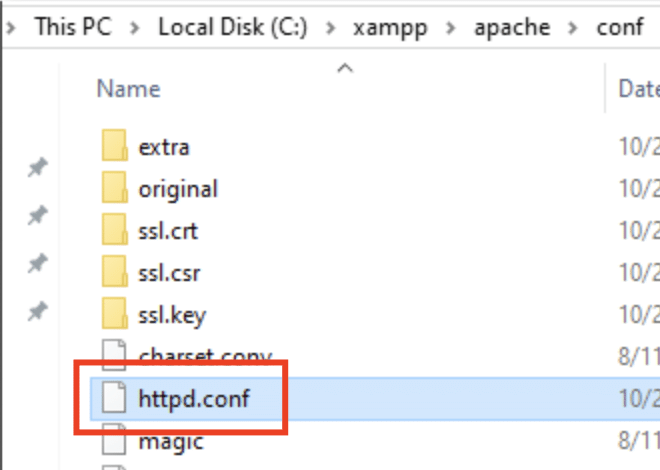 5 . Use Notepad or a similar editor of your choice to open it. Look for the line highlighted in the following screenshot. Change the port number to an appropriate number.
- Save the file and exit the editor. You may need to give the Administrator approval for the changes you made to the file.
- Now launch the Apache server using the XAMPP management panel.
Change the Apache Port in WAMP
Follow these steps to find out and change the assigned Apache port number in WAMP.
Important: Remember to terminate all WAMP processes before trying these steps.
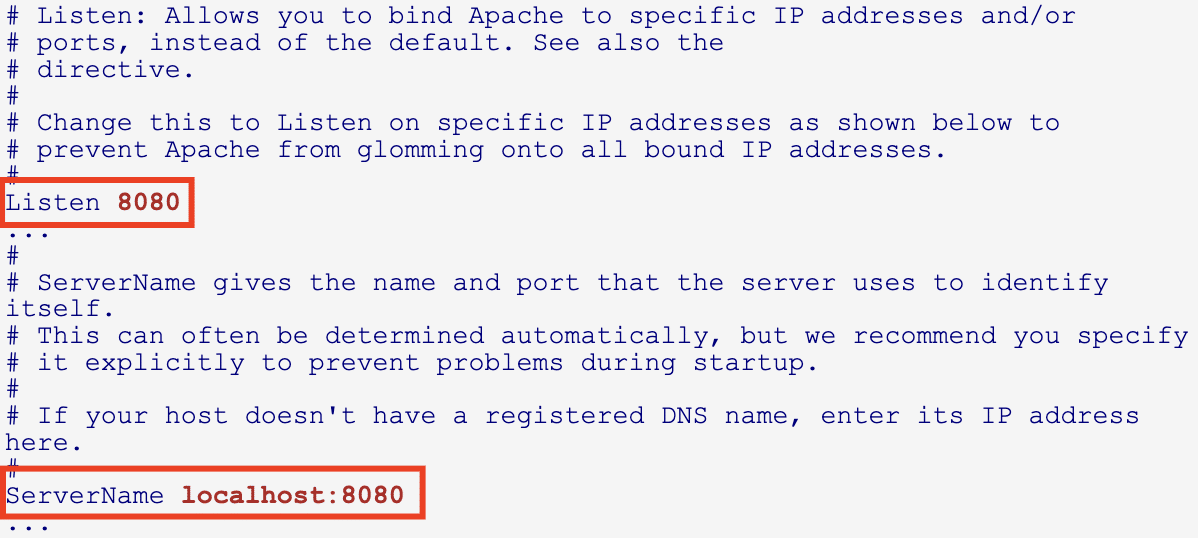
- In the Notepad or your preferred editor, open the file: C:\wamp64\bin\apache\apacheX.X.XX\conf\httpd.conf (where X.X.XX is your Apache version). Alternatively, you can go to the WAMP panel > Apache > httpd.conf.
- Look for the line that says Listen 80. You can change this port to your desired port number. For example, to change the port to 8080, you would modify the line to Listen 8080.
- Save the file and exit the editor.
- Go back to the WAMP manager. Now, depending on the scenario, you can either start the Apache service or all the services.
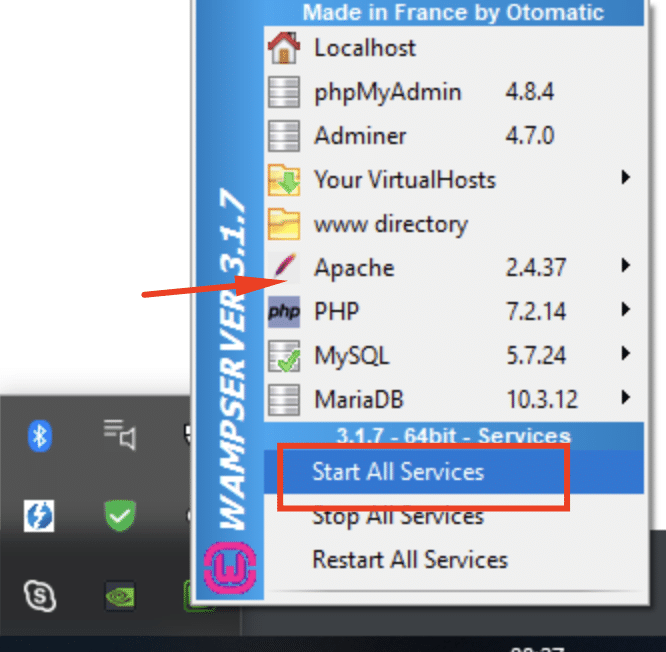
- Test the changes by navigating to http://localhost:8080/ (remember to replace 8080 with the port number you chose).
Solution #3: Check/Modify Firewall and Security Software
We suggest reviewing the system’s firewall settings to ensure it is not blocking any incoming connection. In rare cases, you can find that the firewall is blocking the ports assigned to the localhost services and servers.
During the checking process, you can disable security software temporarily to check if it’s causing the issue.
How to Disable the Firewall in Linux?
Linux distributions use one of the several firewalls as the default protection for the system. For instance, CentOS and RHEL-based distributions employ firewalld, while Ubuntu and other Debian-based distros use UFW.
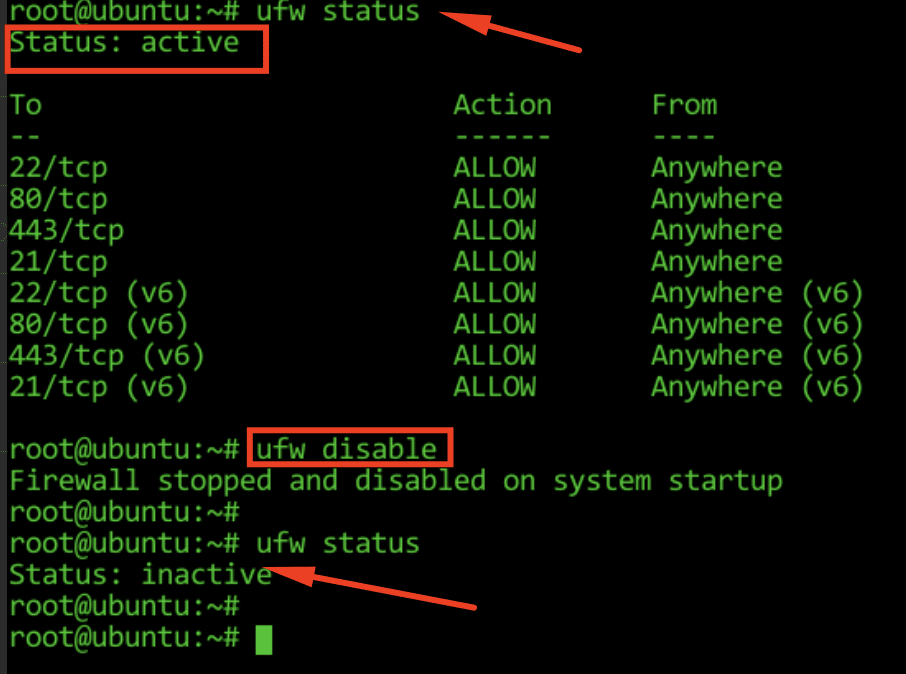
If you’re on an Ubuntu/Debian-based system, launch the terminal and enter the following command:
# sudo ufw disable
Next, check the status by running:
# sudo ufw status
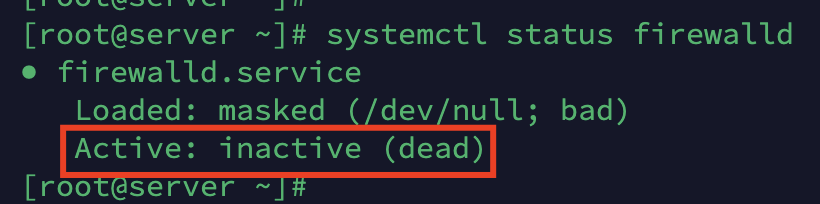
Alternatively, if you are on a CentOS/RHEL-based distribution, run the following command: :
# sudo systemctl stop firewalld
Next, confirm that the firewall’s process is inactive with the following command:
# sudo systemctl status firewalld
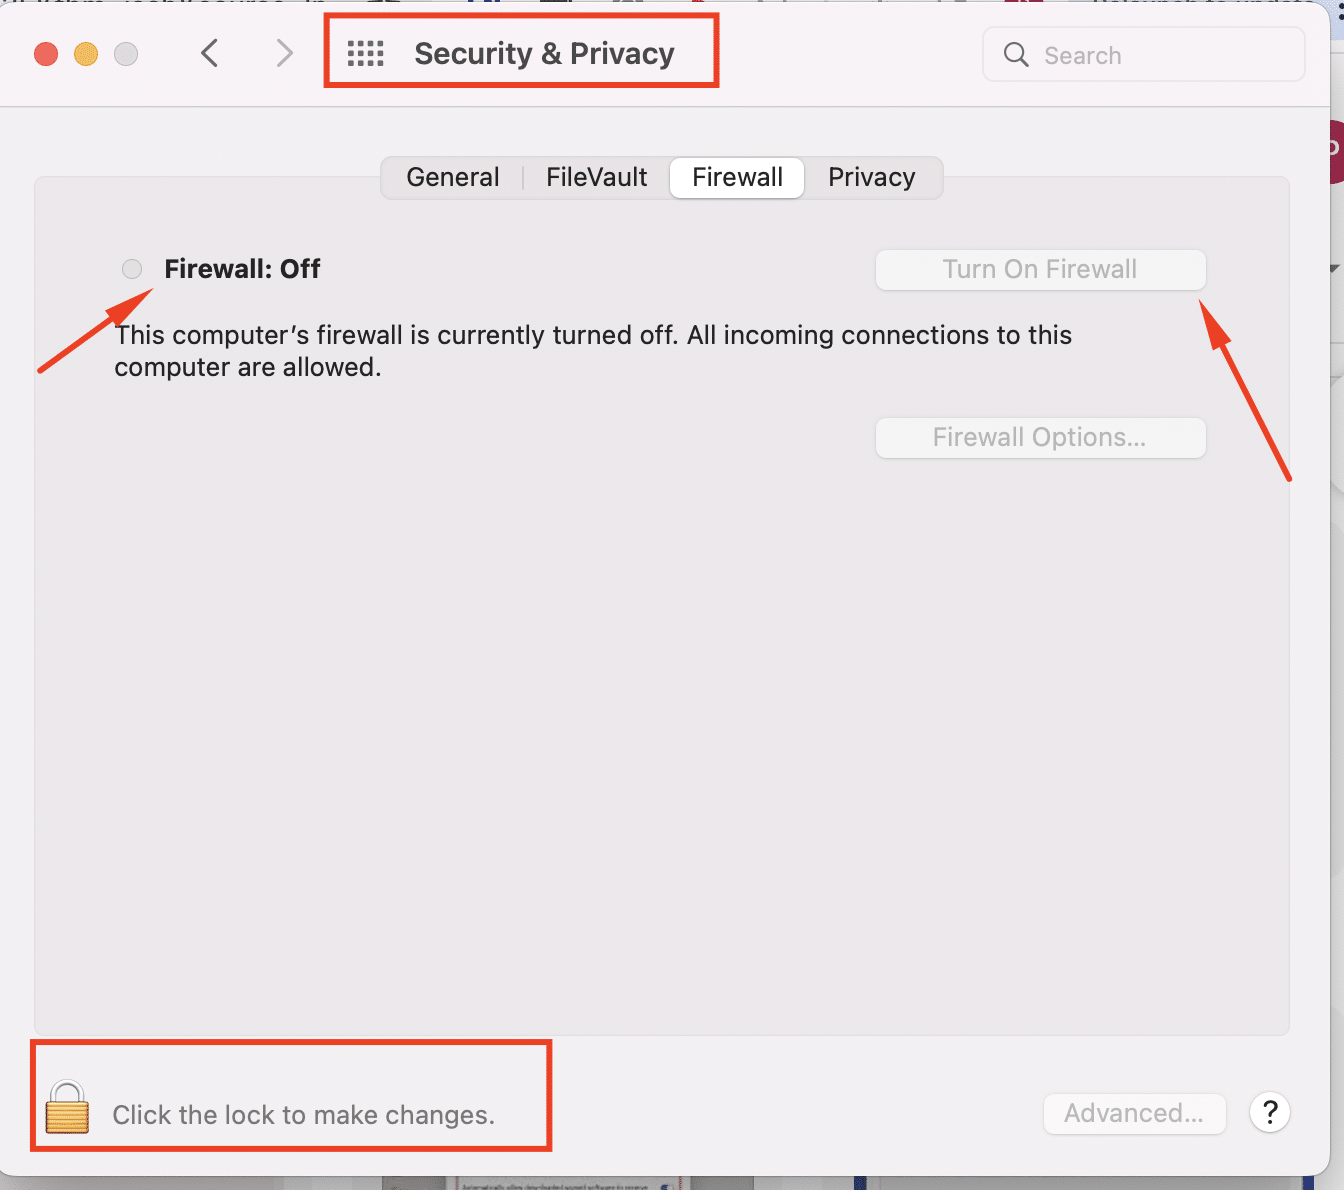
How to Disable the Firewall on macOS?
Follow these steps to disable the firewall on your macOS system:
- From the System Apple menu, choose System Preferences.
- Go to the Security and Privacy > Firewall tab.
- You might need to click the lock icon to “unlock” the panel. You might need to enter the password to verify the changes. To finish, click Turn Off Firewall.
How to Disable the Firewall on Windows?
Follow these steps to disable the system firewall on Windows:
- Select the Windows Defender Firewall icon by opening the Windows Control Panel
- Choose Turn Windows Defender Firewall on or off from the menu on the left side of the window.
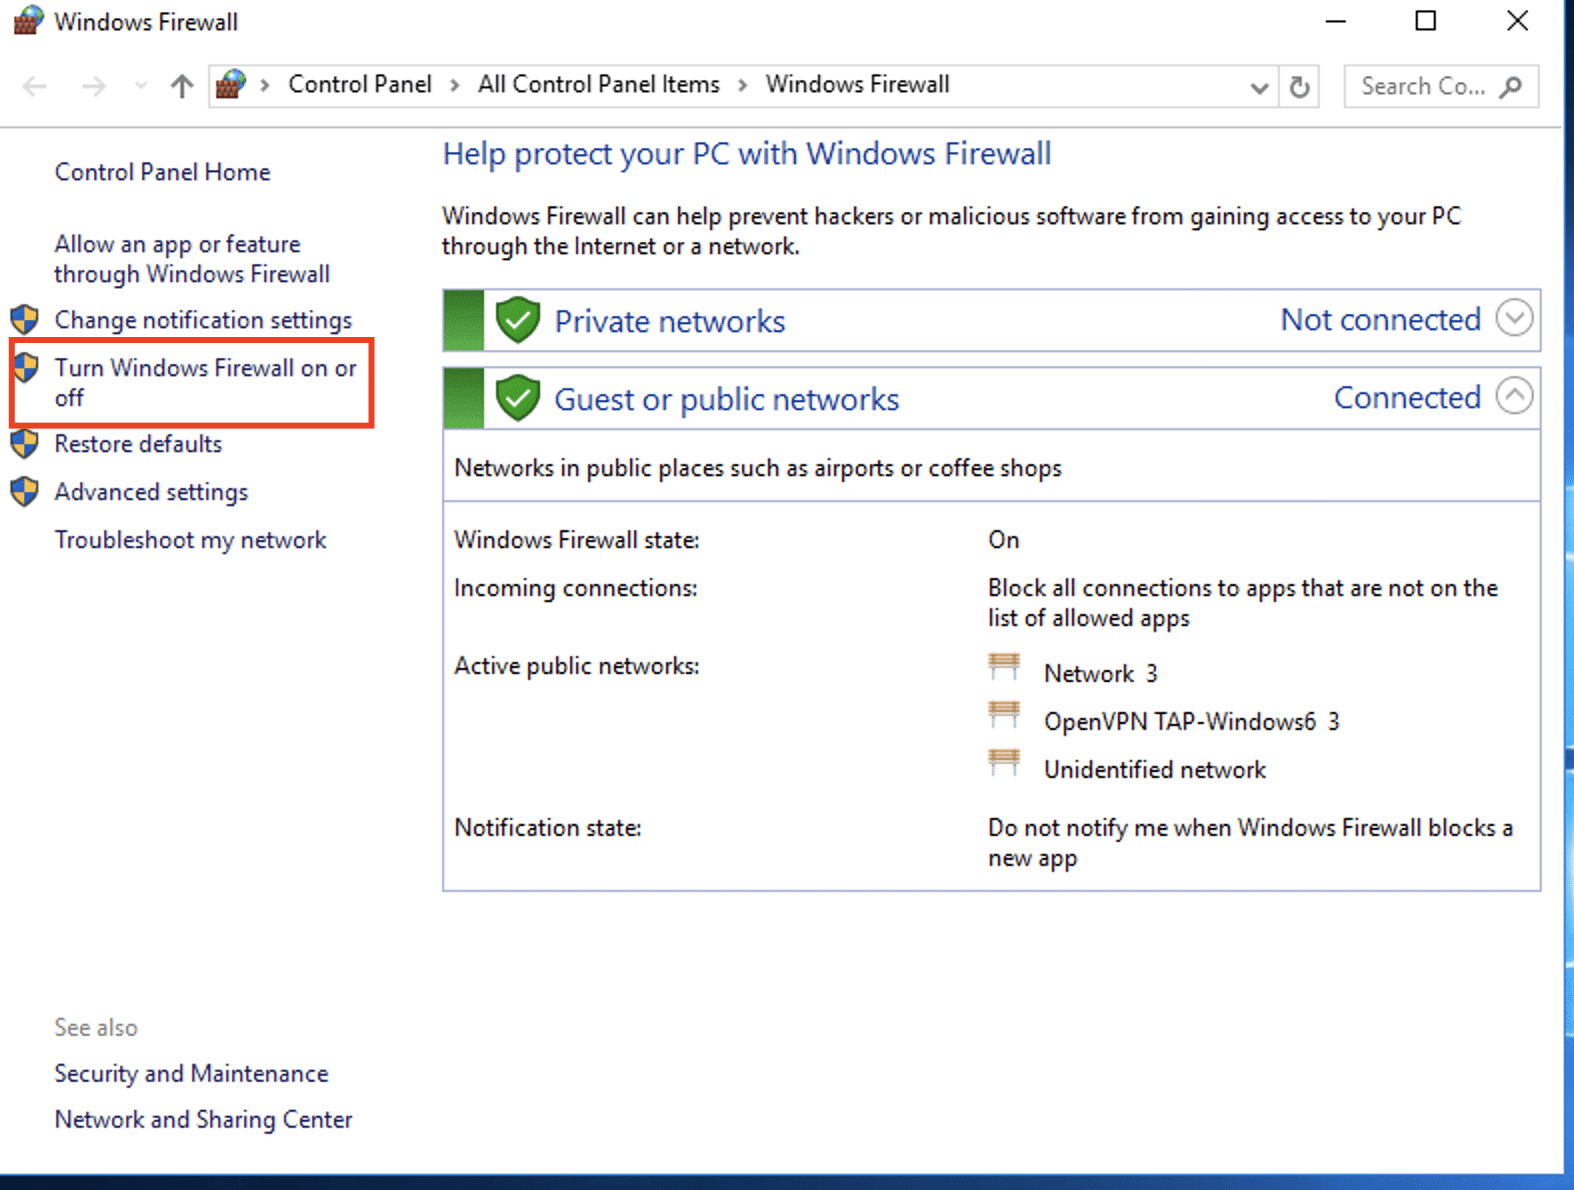
- Lastly, select the option to disable Windows Defender Firewall, press OK, and check if the connection requests are now accepted.
Solution #4: Check Localhost Binding
Verify that the server is bound to the local host address (127.0.0.1). This ensures that the servers that are configured to only accept connections from specific IP addresses or networks don’t face the error.
You should know that the system distinguishes between the IP address 127.0.0.1 and the hostname localhost. Similarly, the IP address 127.0.0.1 is not always the default system loopback address. For instance, IPv6 systems associate the address::1 with the localhost.
So, if you are facing connectivity issues with the localhost, check that the hostname localhost is linked to the default loopback address.
Solution # 5: Check DNS Resolution and Flush DNS Cache
You should know that the system treats the hostname localhost as any other host name. As such, it uses a DNS check to resolve this host name to an IP address. You need to make sure that the hostname resolves to the appropriate IP address.
The system maintains a DNS cache to accelerate the loading of previously visited web pages. The cache could get cluttered as the records accumulate and get corrupted. In such cases, the localhost may refuse connections.
The best solution in this case is to flush the DNS cache and remove all stored DNS lookup data to ensure DNS isn’t interfering with the localhost connection.
The process for DNS flushing depends on the operating system.
Clear DNS Cache in macOS
Go to Applications > Utilities or use Spotlight to find the terminal.
Enter the following command and press Return:
$ sudo killall -HUP mDNSResponder
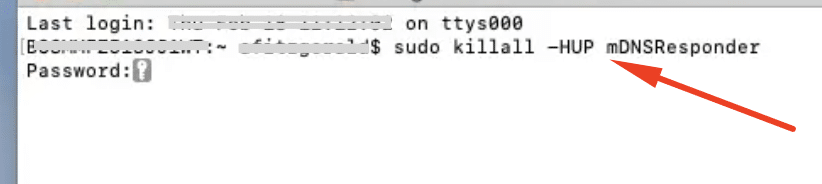
Note that you’ll be asked for the Administrator password before the command executes.
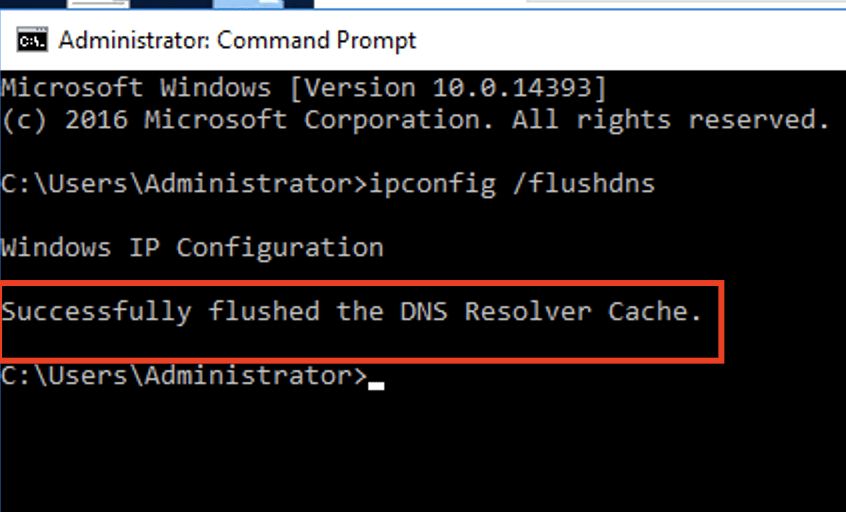
Clear DNS Cache in Windows
Launch the Command Prompt and enter the following command:
ipconfig /flushdns
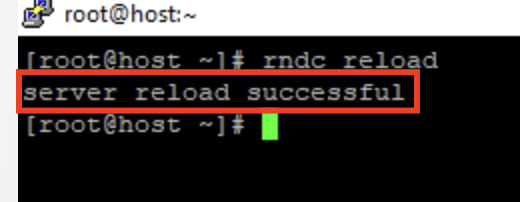
Clear DNS Caches in Linux
You can use several commands to clear BIND’s DNS cache. Note that you might need to enter your admin password.
Here are the commands:
# sudo /etc/init.d/named restart
# sudo rndc restart
Or
# sudo rndc reload
Solution #6: Browser Cache and Cookies:
Clearing your browser cache and cookies can resolve connection problems. However, before that, we recommend accessing the service from a different browser to rule out browser issues.
Start by launching a new browser tab and go to localhost. If the connection fails, a common reason is that browsers frequently automatically reroute HTTP addresses to HTTPS. This mismatch can be resolved by changing the browser settings.
Modify DNS Configuration in Chrome
- Go to the address chrome://net-internals/#hsts to see Chrome’s default settings.
- Next, select the Domain Security Policy tab and navigate to the section labeled Delete domain security policies.
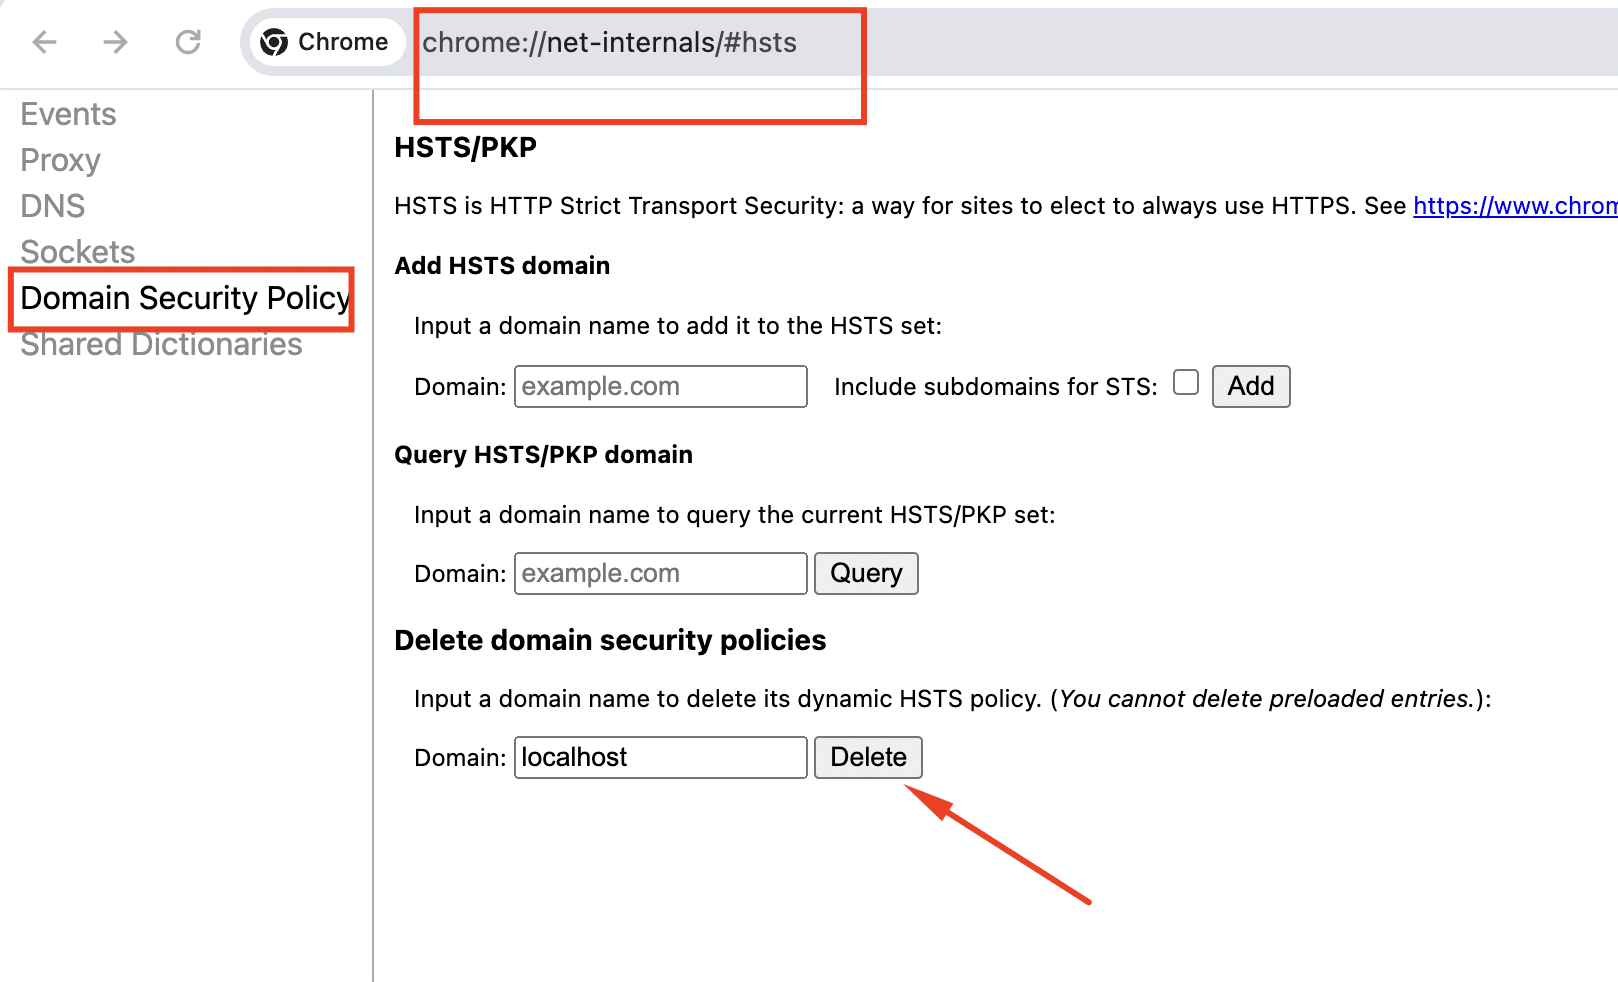
- Click Delete after selecting localhost as the domain name.
Modify DNS Configuration in Firefox
- Select Settings from the Application Menu in the browser window’s upper right corner.
- Go to Privacy & Security, then select HTTPS-Only Mode.
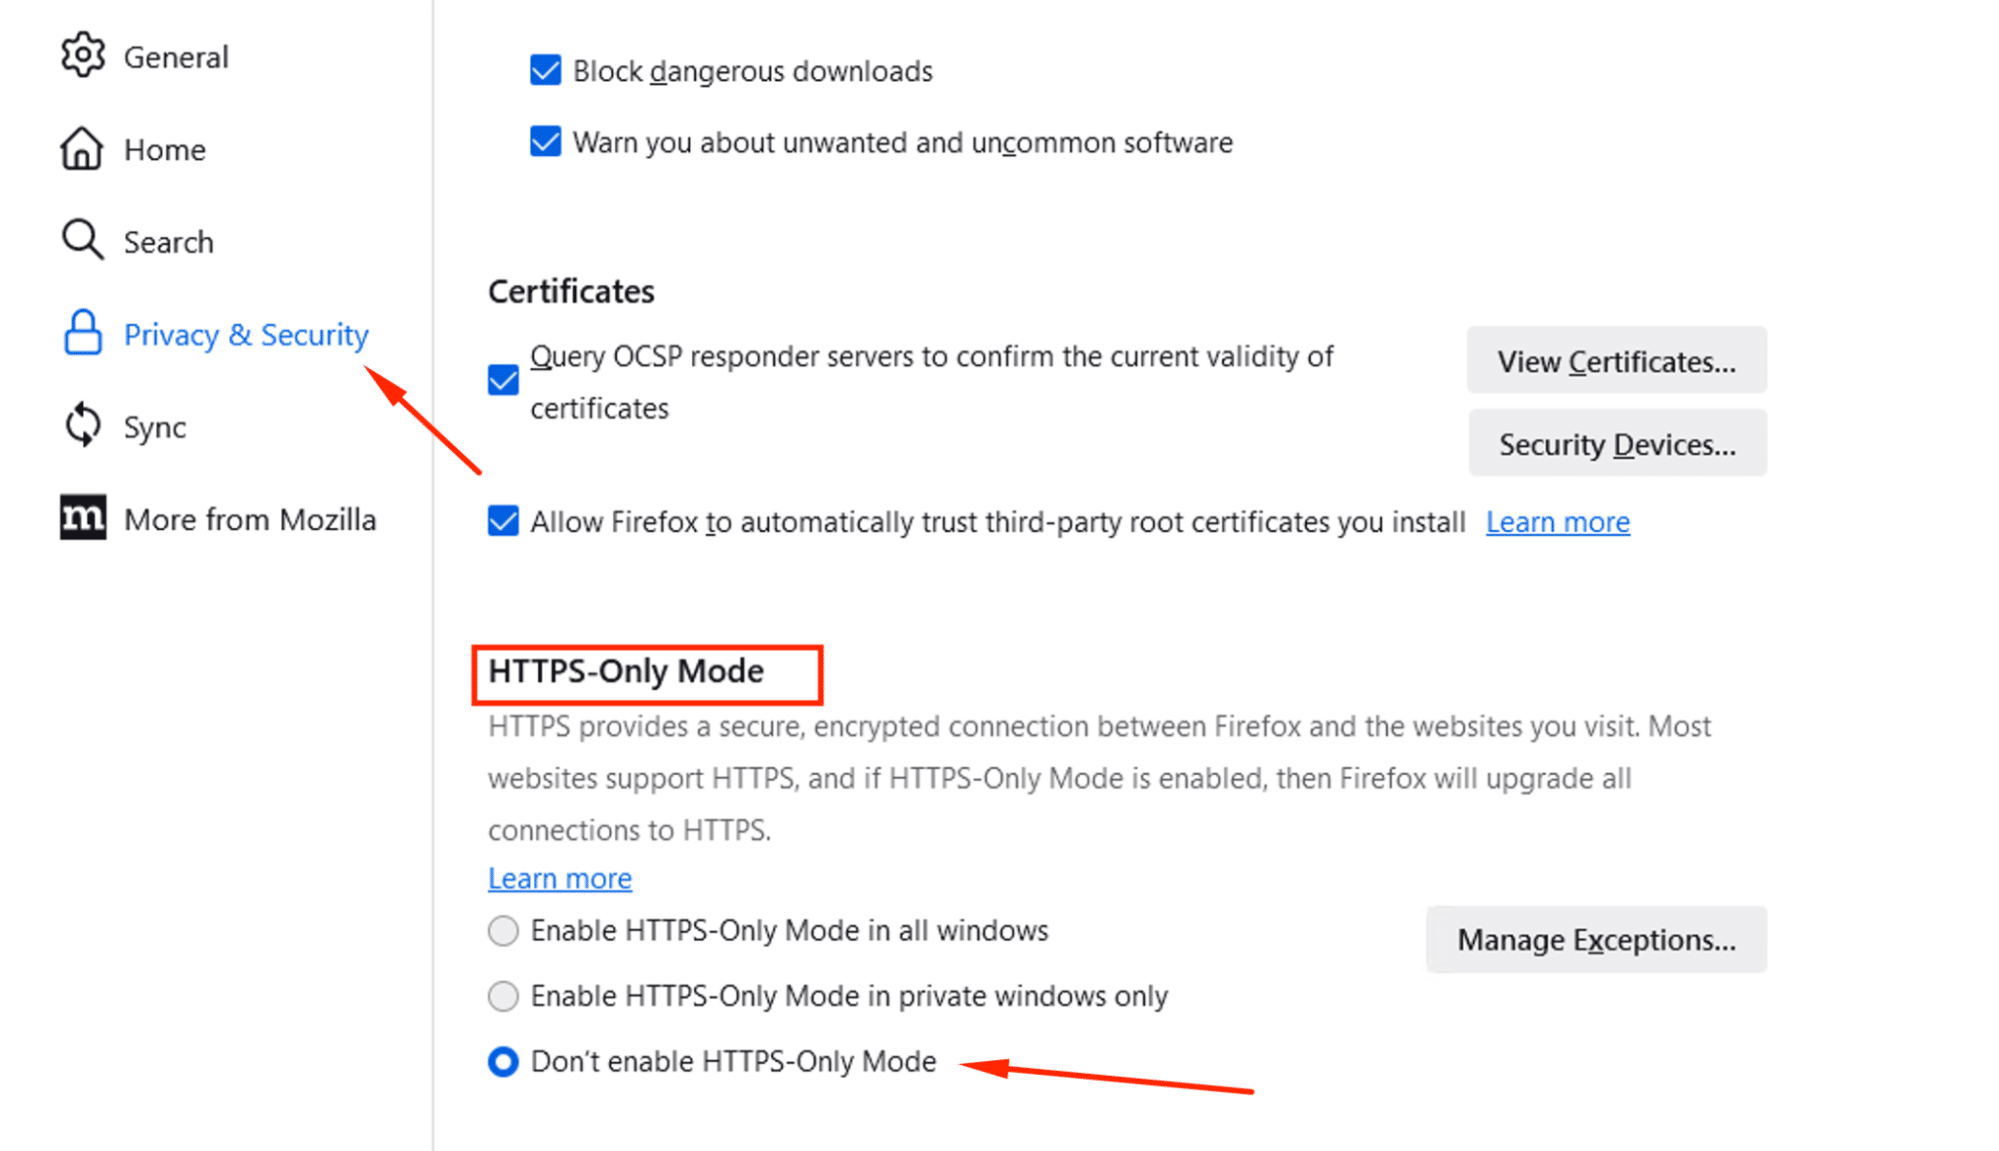
Select Don’t enable HTTPS-Only Mode.
Conclusion :
The localhost refused to connect error is often a result of local server or network connectivity issues. This error signifies a challenge in establishing a connection between the browser and the specified localhost address. Frequently observed causes encompass inaccuracies in server settings, port conflicts, or the server not being in operation.
Effectively addressing this error necessitates a methodical approach involving the examination of server status, verification of port configurations, and scrutiny of firewall settings. By systematically identifying and resolving the underlying issue causing the connection refusal, developers can ensure a seamless and error-free local development environment.
RedSwitches offers the best dedicated server pricing and delivers instant dedicated servers, usually on the same day the order gets approved. Whether you need a dedicated server, a traffic-friendly 10Gbps dedicated server, or a powerful bare metal server, we are your trusted hosting partner.
FAQs
Q. What is the “localhost refused to connect” error?
The localhost refused to connect is a standard error message when the server cannot connect with the localhost or the IP address specified.
Q. How can I fix the localhost refused to connect error?
You can fix the localhost refused to connect error by checking the server status, troubleshooting network configurations, and ensuring that any firewall or proxy settings do not block the connection.
Q. How can the “localhost refused to connect” error in Google Chrome be solved?
To solve the localhost refused to connect error in Google Chrome, you can try clearing the browser cache, checking the proxy server settings, and ensuring that the DNS server address is configured correctly.
Q. What should I do if the server is running but I still encounter the localhost refused to connect error?
If the server is running, but you still encounter the localhost refused to connect error, you can troubleshoot the network status, check for any issues with the network adapter, and verify that the destination server is reachable.
Q. What are the common causes of the “localhost refused to connect” error?
The common causes of the error include issues with the network connection, unreliable internet connection, and blocking of the connection by firewall or proxy settings.
Q. How do I address the err_connection_refused error in my browser?
To address the err_connection_refused error in your browser, you can check the proxy server settings, request a connection to the localhost, and ensure that the network configuration is correct.
Q. Can the “localhost refused to connect” error be related to the IP address?
Yes, the localhost refused to connect error can be related to the IP address, especially if there are issues with the IP configuration or if the requested IP address is not reachable.
Q. Who should I contact if I encounter the “localhost refused to connect” error in a network environment?
If you encounter the error in a network environment, you should contact the network administrator or server administrator to assist with troubleshooting the issue.
Q. What steps can I take to unblock the connection if I encounter the” localhost refused to connect” error?
You can unblock the connection by checking the proxy settings, ensuring that the connection request is valid, and verifying that there are no restrictions on the network or server side.
