SSH, an acronym for Secure Shell, is a protocol to facilitate secure network communication between two devices. Its primary function is to set up and maintain a protected authentication link to a distant server across a network that is not secure (the Internet is a great example of an insecure network).
This protocol ensures that all data transmitted over the connection remains encrypted, preventing unauthorized interception and decryption by external entities.
SSH is a highly reliable option for remote system management, copying files from one directory to another and transferring files. SSH and SSH configuration files present numerous benefits compared to other networking protocols such as Telnet or FTP.
In this tutorial, we’ll discuss how to enable SSH on Debian 9 or 10 through a simple 4-step process. But first, we’ll discuss the importance of enabling SSH on Debian 9 or 10.
Table of Contents
- Significance of Activating SSH on Debian 9 or 10
- How to Enable and Use SSH on Debian 9 or 10
- Conclusion
- FAQs
Significance of Activating SSH on Debian 9 or 10
Activating SSH on Debian 9 or 10 systems offers significant advantages, especially for remote system management operations that require user and system authentication. Once the SSH service is active, you can connect to remote servers from your Debian 9 and 10 machines through a terminal emulator or compatible software.
This capability lets you interact with the remote machine’s console, i.e., SSH server. This functionality is especially advantageous for system administrators who need to oversee and manage multiple servers at various locations, eliminating the need for physical presence at each server’s location.
Moreover, the remote management of servers ensures that downtime is minimized. Sysadmins can remotely connect to the server(s) via SSH, reducing response times to resolve problems with the remote hosts.
How to Enable and Use SSH on Debian 9 or 10
Setting up and using SSH on Debian 9 or 10 is a four-step process that covers the initial setup and subsequent operations such as SSH connections and firewall configuration.
Let’s start with the prerequisites.
The Prerequisites
Before going into the details of setting up and using SSH on Debian systems, make sure you have the following:
- You have access to a machine running Debian 9 or 10
- An account with administrator privileges
- Working knowledge of Linux commands
Step #1: Set up SSH on Debian
When working with remote connections, ensuring security is crucial to prevent the interception of sensitive data like usernames, passwords, and crucial configuration files.
Activating SSH on a Debian 9 or 10 server is a simple task, requiring the installation of the OpenSSH server package and its configuration to operate as a service on a client machine and the SSH server.
Begin by accessing your Debian server with sudo permissions, and proceed with the following steps.
Update/Refresh the Package Repository
Before adding new software, it’s essential to refresh the list of software repositories on the server. This can be done using the following APT package manager command:
# apt-get update.
Once executed, the screen will display confirmation that the package lists have been refreshed.

Set Up the SSH Server
Execute the following apt command on the system designated as the SSH server:
# apt install openssh-server
When requested, enter the sudo password, then select Y to proceed with the setup.

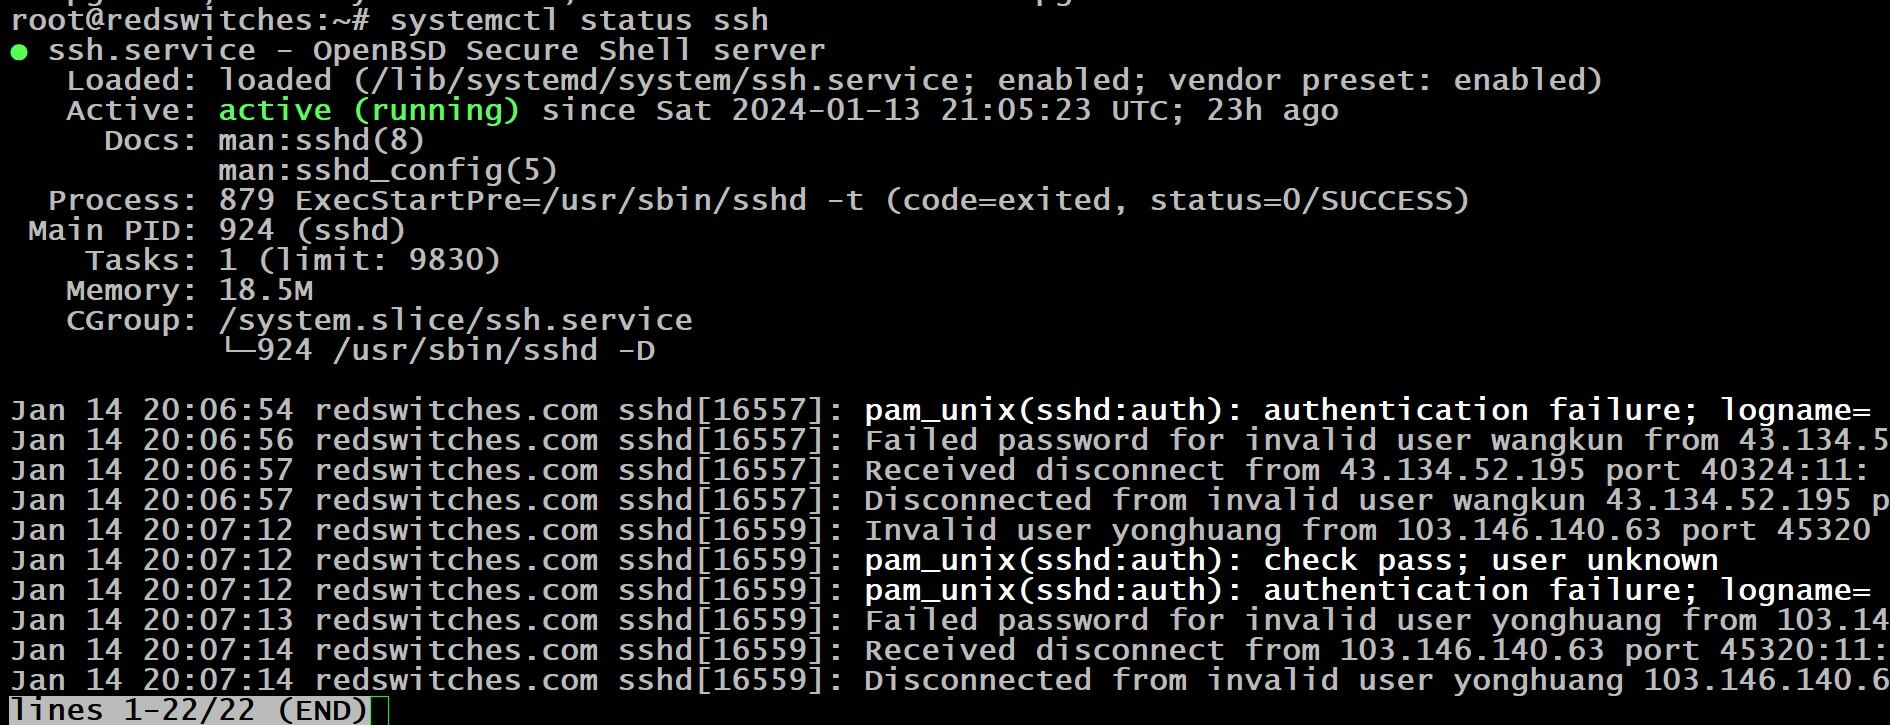
Next, run the following command to verify the operational status of the SSH service:
# systemctl status ssh
This will prompt the system to display confirmation that the SSH service is actively running.
Manage the SSH Server’s Operation
Understanding how to initiate and halt the SSH service is crucial for SSH server operations. The following command ceases the operation of the SSH host server:
# service ssh stop
If you check the SSH service’s status after this action, the system will show that the sshd service is inactive, specifying the precise date and time when the service was halted.

Now, use the following to (re)initiate the SSH service:
# service ssh start
Note that halting the service is temporary and effective only until the system is rebooted. If you wish to permanently deactivate the SSH service (often a requirement of server security checklists) with the following command:
# systemctl disable ssh
To reactivate the SSH service at any time, just substitute disable with enable in the above command.
Get the SSH Server’s IP Address
For a local server setup, you can reveal the IP address in the terminal window:
# ip a
The IP address will appear in a structure similar to
192.168.105.101
You can use this IP address to connect to this server running the SSH server. Alternatively, you can use the server’s hostname or domain name for setting up SSH connections.
(Optional): Set Up SSH Client for File Transfers
You can also set up the SSH client to facilitate file transfer through the SSH connection.
For this, refresh the server package index with the following command:
# apt-get update
Typically, Debian systems have a pre-installed SSH client. However, if it’s not present on your system, run the following command:
# apt-get install openssh-client.
As you can see, we already have a recent version of the SSH client on our test system.

Step #2: Establish an SSH Connection for File Transfers
Now that you have an SSH server, use the following SSH command syntax to securely connect to a server for transferring files from one directory to another.
# ssh UserName@IPAddressOrHostname
Here, replace UserName with the credentials of a user authorized on the server. Add the server’s IP address (obtained in the previous step) after the @ symbol. Alternatively, you can use the server’s domain name or the hostname instead of the IP address.
The first time you establish a secure connection for an SSH session, the system might ask for a password to authenticate the user. Type yes, followed by pressing Enter to allow password-based authentication.
Next, the remote server will request a password for the username.
Once the remote login is successful, the command prompt will change to username@hostname, indicating that all entered commands are now being executed on the remote server.
Step #3: Configure the Firewall for SSH File Transfer
Debian typically employs UFW (Uncomplicated Firewall), which might restrict SSH connections for copying files from one directory to another. Note that SSH communication primarily uses port 22.
To permit SSH traffic (the sshd service), execute the following command to change the default firewall SSH traffic setting:
# ufw allow SSH
Once the command is executed, you’ll receive a confirmation indicating that the firewall rules have been successfully updated to accommodate SSH traffic.

Step #4: Adjust the Firewall Settings for SSH File Transfers
The specifics of this process can vary, and we advise consulting your device’s manual for the steps of this process.
The general approach involves redirecting incoming requests on port 22 to the internal IP address of the server located behind the firewall.
Alternatively, you may configure your firewall or router to accept SSH traffic on a different port. This requires an additional step of redirecting the incoming traffic to port 22 on your server.
This method is particularly useful when exposing your server to internet traffic. Since many attacks and unauthorized access attempts involve port 22 changing the default port helps you limit access exclusively to users who are aware of the correct port. This simple switch reduces the likelihood of unauthorized connection attempts.
Conclusion
Successfully enabling SSH on Debian 9 or 10 is a straightforward process, crucial for securely copying files from one directory to another. The four steps (updating the package manager, installing the SSH server, managing its operation, obtaining your server’s IP address, and optionally installing the SSH client service) lay the foundation for a secure remote connection. Once you have an SSH connection, you can work on the remote system at help in your local terminal and experience enhanced efficiency and security.
RedSwitches helps customers by offering customizable bare metal servers. If you’re searching for a reliable server infrastructure for your projects, we provide competitive, dedicated server pricing and ensure swift delivery, typically on the same day of order approval. Whether you require a dedicated server, a traffic-friendly 10Gbps dedicated server, or a high-performance instant dedicated server, we are your trusted hosting partner!
FAQs
Q. What is the first step in enabling SSH on Debian 9 or 10 for file transfer?
The first step is updating the package manager with sudo apt-get update to ensure all software is current for secure file transfer.
Q. How do I install the SSH Server on Debian to transfer files?
Install the SSH Server on Debian by executing sudo apt install openssh-server, essential for copying files between directories securely.
Q. Can I start and stop the SSH Server on Debian, and why would I do it?
Yes, you can start and stop the SSH Server using sudo service ssh start and sudo service ssh stop. This control is useful for managing server availability for secure file transfers.
Q. Why do I need to obtain my server’s IP address in Debian for SSH?
Knowing your server’s IP address is crucial for establishing an SSH connection, enabling you to securely copy files from one directory to another.
Q. Is installing an SSH Client Service necessary on Debian for file transfers?
Installing an SSH Client Service using sudo apt-get install openssh-client is optional but recommended for streamlined file transfers between directories.
Q. Explain the steps to connect to a server using SSH in Debian?
To connect, use the syntax ssh UserName@IPAddressOrHostname. Remember to replace the values with the appropriate credentials. This is necessary for initiating secure file transfers.
Q. Why are firewall and security settings important in SSH file transfers on Debian?
Proper firewall and security settings ensure secure SSH traffic, which is crucial for safely copying files between directories.
Q. How does updating the package manager help with SSH file transfers?
Updating the package manager ensures all components are up-to-date, reducing security risks while transferring files via SSH.
Q. What is the purpose of starting the SSH server in Debian?
Starting the SSH server activates the service, allowing secure and encrypted file transfers between directories on different systems.
Q. What is the significance of the server’s IP address or hostname in SSH file transfers?
The server’s IP address or hostname is used to establish a secure SSH connection, which is essential for accurately targeting the server for file transfers.
