Port forwarding is like a traffic cop for your computer. It helps make sure messages and packets coming in from external sources get to the right destination.
Setting up port forwarding is a critical aspect of system management, and any issues with this critical operation could result in disruption in service access. Given its importance, Linux offers several ways of setting up port forwarding on a system.
In this tutorial, we will see how to do linux port forwarding with iptables. We will discuss the three critical steps of the process to demonstrate setting up port forwarding on your system.
But first, let’s start with a brief overview of the idea of port forwarding.
Table Of Contents
- What Is Port Forwarding?
- Benefits of Port Forwarding
- How to Forward Ports With iptables
- Conclusion
- FAQs
What Is Port Forwarding?
Port forwarding, or port mapping uses a network address translation gateway that modifies incoming traffic’s destination address and/or port.
This process directs packets to a specific host within a private network, enabling remote computers on the public internet to connect to a server or service within a private LAN.
It is commonly used to redirect traffic from lower-numbered ports to higher ports, allowing secure and efficient communication while avoiding security risks associated with external services interacting directly with critical internal services.
You can set up port forwarding by changing the default rules of the system firewalls. In this tutorial, we will use iptables because it is available in all popular Linux distributions.
Combined with Intrusion Detection Systems (IDS) and system firewall, port forwarding is an essential component of system security.
Benefits of Port Forwarding
- Port forwarding offers the following benefits to users and system administrators:
- Enable remote access to servers and services on your system.
- Sysadmins can control access to outside services and websites.
- Port forwarding adds a security layer by routing all traffic through the firewall rules
- The system can sort incoming traffic and divert packets without any interruption to critical services and operations.
How to Forward Ports With iptables
Now that you know what port forwarding is and why you should consider setting it up on your system, let’s see how you can set up port forwarding with iptables on your Linux machine.
The Prerequisites
Before trying out the steps outlined below, make sure you have the following:
- Two Linux machines on the Same Private Network
- An account with administrator rights on both machines.
Step #1: Configure the Web Server
The first step is to restrict the web server to only accept connections from the private network. For this demonstration, we will set up an NGINX web server that allows sole access from a private IP address.
Get Information on the Web Server’s Network Interface
Open the terminal on the system you would designate as the web server and run the following command to view the active IPv4 connections:
# ip -4 addr show scope global
The output shows the system’s private network interface ( eno0) and the corresponding internal IP address:

We recommend copying this information to a text file.
Install NGINX
We will now start with installing NGINX on the target system and then update the NGINX configuration. If you have NGINX on your system, you can skip this step and move on to the next step.
Start by updating the server package index. Since we have Ubuntu on our test system, we will use the following command:
# sudo apt update
Next, install NGINX with the following command:
# sudo apt install nginx
When prompted, hit Y and then Enter to complete the process.
Configure NGINX Settings
You can edit the NGINX configuration file with your preferred text editor. We will open the file in Vi with the following command:
# sudo vi /etc/nginx/sites-enabled/default
Locate the server section within the file. Its contents should look something like the following:
server {
listen 80 default_server;
listen [::]:80 default_server ipv6only=on;
Insert the server’s private IP address (copied earlier) before the incoming port number in the first line of the section. The line should look like this:
listen [web-server-private-ip]:80 default_server;
You can remove the second line because it pertains to the IPv6 addresses, which are not the topic of this tutorial. After you are finished, the server section should look somewhat like this:

Remember to save the changes and close the text editor.
You should now verify the syntax of the NGINX configuration with the following command:
# sudo nginx -t
The command will display any syntax errors that you should correct. If there are no errors, you should see the following in the terminal output:

Reboot NGINX
Once you have made changes in the configuration file, you need to reboot the NGINX server so that the changes can take effect. For this, run the following command:
# sudo systemctl restart nginx
Verify NGINX Functionality
Now, go to the other system on the same private network and run the following cURL command to verify that the NGINX server is working as expected:
# curl [web-server-private-ip]
If you see the HTML version of the standard NGINX Welcome Page, the NGINX server is functioning as expected.

Step #2: Set up the Firewall Configuration
- After configuring the web server, the next step is to set up a proxy firewall on the second machine using the iptables rules.
Collect Information About the Firewall’s Network Interfaces
Go to the second machine that will serve as the firewall. Start by inspecting the accessible IPv4 network interfaces:
# ip -4 addr show scope global

Note the network interface name and IP address for future use.
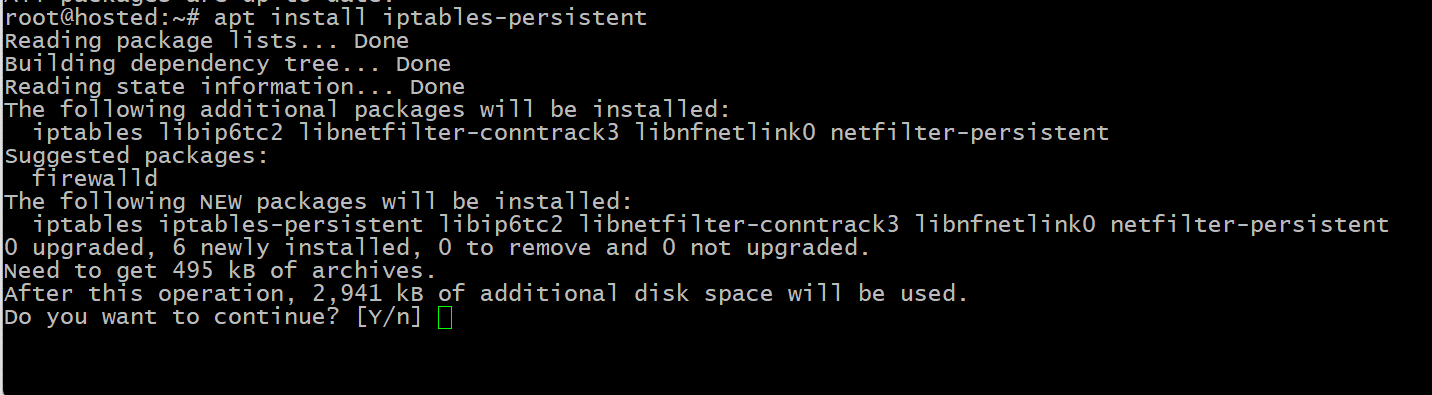
Install the Persistent Firewall Package
Refresh the server’s package index with the following update command:
# sudo apt update
Next, install the iptables-persistent package.
# sudo apt install iptables-persistent
Enter Y and press the Enter key to commence the installation.
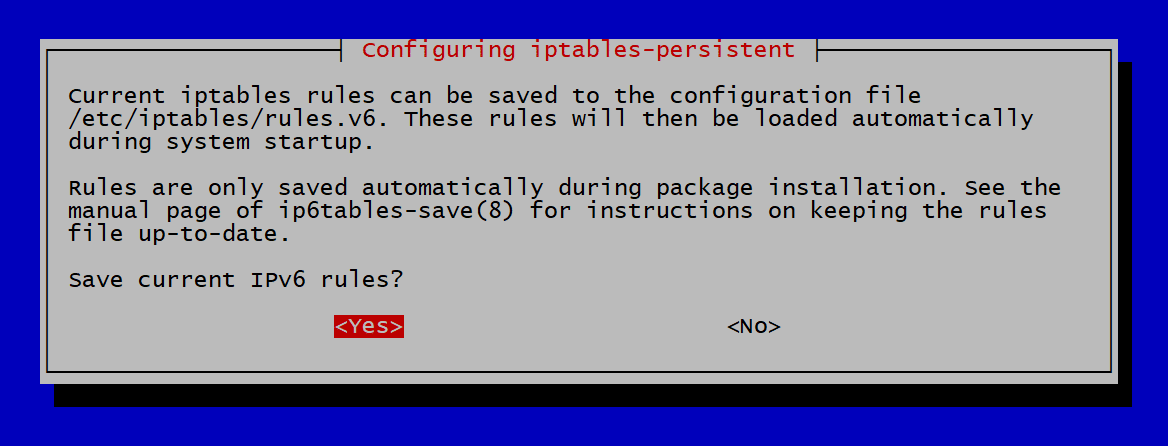
Choose Yes when the system prompts you to save the existing iptables rules.
Set up Basic IPv4 Rules
After successfully installing the persistent firewall, proceed to edit the configuration on the firewall server. The idea is to create fundamental IPv4 rules.
For this, open the rules.v4 in your preferred text editor. We are using Vi as our editor.
# sudo vi /etc/iptables/rules.v4
Here is the typical structure of this file:
*filter
# Drop incoming and forwarding packets; allow outgoing Network packets
:INPUT DROP [0:0]
:FORWARD DROP [0:0]
:OUTPUT ACCEPT [0:0]
# Custom protocol-specific rules
:UDP - [0:0]
# Write UDP rules here
:TCP - [0:0]
# Write TCP rules here
:ICMP - [0:0]
# Write ICMP rules here
# Accept SSH TCP traffic
-A TCP -p tcp --dport 22 -j ACCEPT
# Acceptance default policy
-A INPUT -m conntrack –ctstate ESTABLISHED,RELATED -j ACCEPT
-A INPUT -i lo -j ACCEPT
# Drop a packet if it is invalid
-A INPUT -m conntrack --ctstate INVALID -j DROP
# Pass traffic to protocol-specific chains
# Allow only new TCP connections established with new SYN packets
-A INPUT -p udp -m conntrack --ctstate NEW -j UDP
-A INPUT -p tcp --syn -m conntrack --ctstate NEW -j TCP
-A INPUT -p icmp -m conntrack --ctstate NEW -j ICMP
# Reject anything that reached this point
-A INPUT -p udp -j REJECT --reject-with icmp-port-unreachable
-A INPUT -p tcp -j REJECT --reject-with tcp-reset
-A INPUT -j REJECT --reject-with icmp-proto-unreachable
# Commit the changes
COMMIT
*raw
:PREROUTING ACCEPT [0:0]
:OUTPUT ACCEPT [0:0]
COMMIT
*nat
:PREROUTING ACCEPT [0:0]
:INPUT ACCEPT [0:0]
:OUTPUT ACCEPT [0:0]
:POSTROUTING ACCEPT [0:0]
COMMIT
*security
:INPUT ACCEPT [0:0]
:FORWARD ACCEPT [0:0]
:OUTPUT ACCEPT [0:0]
COMMIT
*mangle
:PREROUTING ACCEPT [0:0]
:INPUT ACCEPT [0:0]
:FORWARD ACCEPT [0:0]
:OUTPUT ACCEPT [0:0]
:POSTROUTING ACCEPT [0:0]
COMMIT
Save the file and close the text editor.
Verify rules.v4 Syntax
Confirm the syntax of the rules.v4 file by executing the following command:
# sudo iptables-restore -t /etc/iptables/rules.v4
Assuming there are no syntax errors in the rules.v4 file, the command will not produce any output in the terminal.
Reload and Verify the Firewall Rules
Now that the firewall rules are in place, you need to make sure they are in effect by reloading the firewall service with the following command:
# sudo service netfilter-persistent reload

Next, confirm the successful application of the changes by displaying the currently active rules with the following command:
# sudo iptables -S
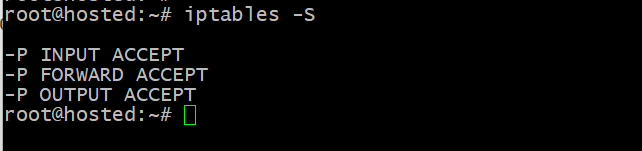
The output showcases the currently-configured rules in the rules.v4 file, confirming the successful application of the changes.
Establish the Fundamental IPv6 Rules
iptables has a companion tool called Ip6tables to configure IPv6 packet rules. If you wish, you can use this tool to set up rules to block all traffic that uses IPv6.
Start by opening the rules.v6 file in your preferred editor. We will open the file in Vi:
# sudo vi /etc/iptables/rules.v6
Block All IPv6 Connections
You can modify the file to block all connections. For this, make sure the file looks similar to the following:
*filter
:INPUT DROP [0:0]
:FORWARD DROP [0:0]
:OUTPUT DROP [0:0]
COMMIT
*raw
:PREROUTING DROP [0:0]
:OUTPUT DROP [0:0]
COMMIT
*nat
:PREROUTING DROP [0:0]
:INPUT DROP [0:0]
:OUTPUT DROP [0:0]
:POSTROUTING DROP [0:0]
COMMIT
*security
:INPUT DROP [0:0]
:FORWARD DROP [0:0]
:OUTPUT DROP [0:0]
COMMIT
*mangle
:PREROUTING DROP [0:0]
:INPUT DROP [0:0]
:FORWARD DROP [0:0]
:OUTPUT DROP [0:0]
:POSTROUTING DROP [0:0]
COMMIT
Save the file and close the text editor.
Reload and Verify the IPv6 Rules
Start by validating the syntax of the configuration with the following command:
# sudo ip6tables-restore -t /etc/iptables/rules.v6
If you find no errors, reload the service to ensure that the new rules are in place:
# sudo service netfilter-persistent reload
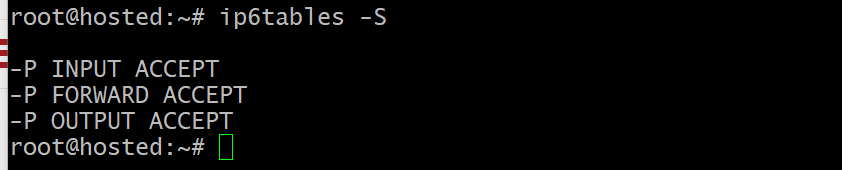
Finally, list the rules using the ‘ip6tables’ command to confirm that the new configuration is in use:
# sudo ip6tables -S
Step #3: Configure Port Forwarding
After configuring both the web server and the proxy firewall, you can establish specific forwarding rules that will:
- Allow data to enter using the public address of the firewall.
- Send the data through the firewall.
- Pass it on to the web server through the private network.
- Let the web server’s data go out to the internet.
Enable Forwarding in the Kernel
Prior to setting up port forwarding, it is necessary to authorize the system for this action. Start by enabling packet forwarding for the current session.
Run the following command:
# echo 1 | sudo tee /proc/sys/net/ipv4/ip_forward

This setup will persist for the duration of the session.
You can make the packet forwarding a permanent system feature by editing the sysctl.conf file in your preferred editor.
# sudo vi /etc/sysctl.conf
Locate the following line in the file and remove the # in the beginning to uncomment it.
# net.ipv4.ip_forward=1
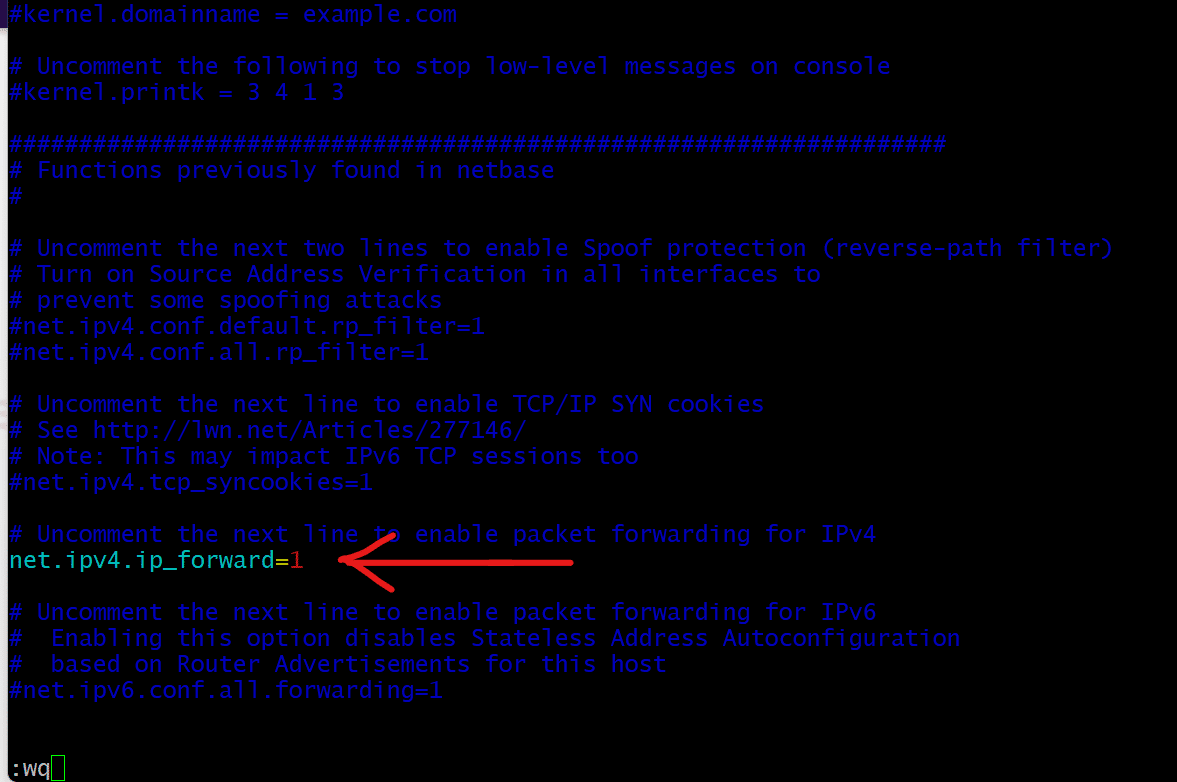
Save the file and then close the text editor.
Next, reload the changes by running the following sysctl command:
# sudo sysctl -p

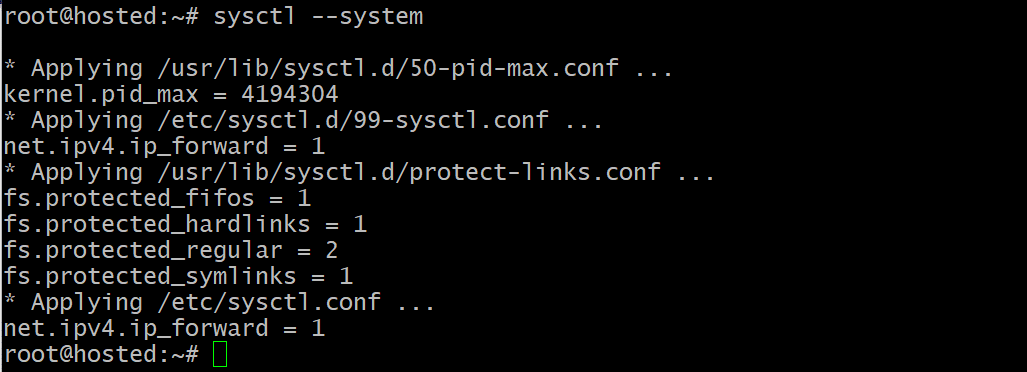
Apply the system changes with the following command:
sudo sysctl --system
Now, the system is set up to forward packets as needed.
Specify the Rules for Forwarding
You can now define the forwarding rules by adding them to the rules. v4 file. Alternatively, you have the option to utilize the following basic command syntax to add the rules manually.
# sudo iptables [rule]
We recommend setting up the following rules to correctly configure the firewall for forwarding packets to and from the web server:
- Permit connections from the public interface to port 80 and route them to the private interface:
# sudo iptables -A FORWARD -i [firewall-public-interface] -o [firewall-private-interface] -p tcp --syn --dport 80 -m conntrack --ctstate NEW -j ACCEPT
In the context of our example, this rule appears as follows:
# sudo iptables -A FORWARD -i eno0 -o enp2s0 -p tcp --syn --dport 80 -m conntrack --ctstate NEW -j ACCEPT
- Allow ESTABLISHED and RELATED packet traffic from the public interface to the private interface.
# sudo iptables -A FORWARD -i [firewall-public-interface] -o [firewall-private-interface] -m conntrack --ctstate ESTABLISHED,RELATED -j ACCEPT
For example, in our case, this command would look like:
# sudo iptables -A FORWARD -i eno0 -o enp2s0 -m conntrack --ctstate ESTABLISHED,RELATED -j ACCEPT
- Allow matching traffic to return from private to public interface.
# sudo iptables -A FORWARD -i [firewall-private-interface] -o [firewall-public-interface] -m conntrack --ctstate ESTABLISHED,RELATED -j ACCEPT
Using the parameters from our demonstration, the command will look like:
# sudo iptables -A FORWARD -i eno0 -o enp2s0 -m conntrack --ctstate ESTABLISHED,RELATED -j ACCEPT
Provide NAT Rules
NAT (Network Address Translation) rules instruct iptables on how to modify packets to enable correct routing between networks. You can accomplish basic port forwarding rules with just two NAT rules.
- Change the packet’s destination address from the firewall’s public interface to the web server’s private interface.
# sudo iptables -t nat -A PREROUTING -i [firewall-public-interface] -p tcp --dport 80 -j DNAT --to-destination [web-server-private-ip]
Here’s how the command would look using the example web server information from this article:
# sudo iptables -t nat -A PREROUTING -ieno0 -p tcp --dport 80 -j DNAT --to-destination 10.3.0.12
- Set the packet’s source address to the firewall’s private IP. During this process, the web server forwards the packet to the firewall, which subsequently returns it to the original sender.
# sudo iptables -t nat -A POSTROUTING -o [firewall-private-interface] -p tcp --dport 80 -d [web-server-private-ip] -j SNAT --to-source [firewall-private-ip]
With our example parameters, the command would appear as follows:
# sudo iptables -t nat -A POSTROUTING -o enp2s0 -p tcp --dport 80 -d 10.3.0.12 -j SNAT --to-source 10.3.0.11
Finally, enter the following command to save all the iptables rules.
# sudo service netfilter-persistent save
Verify the Firewall Configurations
To confirm the firewall configuration, use the cURL command from another machine to send a request to the public IP address of the proxy firewall.
# curl [firewall-public-ip]
The output confirms that the firewall effectively forwarded the NGINX page served by the web server, indicating that the configuration is working as intended.
Conclusion-Linux Port Forwarding
We explored the idea of port forwarding in this detailed tutorial. After a short overview, we did a deep dive into the process of setting up port forwarding in an Ubuntu environment.
RedSwitches offers the best dedicated server pricing and delivers instant dedicated servers, usually on the same day the order gets approved. Whether you need a dedicated server, a traffic-friendly 10Gbps dedicated server, or a powerful bare metal server, we are your trusted hosting partner.
FAQs
Q. What is port forwarding?
Port forwarding is a technique redirecting incoming connections from one port to another, often on a different host or IP address.
Q. How do I forward ports using iptables in a Linux-based system?
To forward ports using iptables in Linux, such as TCP ports, use the command “sudo iptables -t nat -A PREROUTING -p tcp –dport [destination port] -j DNAT –to-destination [destination IP:port].”
Q. What is the purpose of port forwarding in a Linux system?
Port forwarding in a Linux system configures the system to forward incoming connections from a specific port to another host or exact port, enabling services like setting up a web server.
Q. How can I set up port forwarding for port 80 on Ubuntu using iptables?
Set up port forwarding for port 80 on Ubuntu using iptables with a rule like “sudo iptables -A PREROUTING -t nat -p tcp –dport 80 -j DNAT –to-destination [destination IP:port].”
Q. What are the basic steps to configure port forwarding with iptables on a Linux system?
Basic steps involve adding rules in the iptables nat table, using the “iptables” command to forward incoming connections from a specific port to another host or IP address.
Q. How do iptables perform port redirection for port forwarding?
Iptables performs port redirection by modifying the destination IP and port of incoming packets based on the configured rules in the nat table, enabling efficient IP forwarding.
Q. What are the important factors to consider when configuring port forwarding with iptables on a Linux system?
When setting up port forwarding using iptables on Linux, it is crucial to specify the specific ports, destination IP, and port and add appropriate rules in the iptables configuration to ensure secure and efficient forwarding.
Q. Why is iptables considered a powerful tool for configuring port forwarding in a Linux system?
Iptables is considered a powerful tool for configuring port forwarding in a Linux system due to its capability to define and enforce rules for packet filtering, network address translation, and port forwarding at the kernel level, providing extensive control over network traffic.
Q. What is the prevalent use case for port forwarding using iptables?
The most common use case for port forwarding with iptables is to enable access to specific services or applications running on a host by forwarding incoming connections from a designated port to the corresponding service port on the destination IP.
Q. How can I perform simple port forwarding using iptables on a Linux system?
To perform simple port forwarding using iptables on a Linux system, utilize the “iptables” command to add rules to the FORWARD chain for the designated protocol, destination IP, and port, enabling the redirection of incoming connections while adhering to the current iptables rules.
