How to Use Volumes in Docker
Learn how to use Docker volumes for persistent storage, data sharing, and backups. Step-by-step guide with commands, examples, best practices, and troubleshooting for managing volumes in production-ready environments.
Docker volumes are a vital part of containerized applications.
Imagine you are running a database or application. The moment you stop the container, every file, every record, and every configuration is gone.
Docker volumes provide a reliable way to store, share, and persist data across containers, even after they are stopped or removed. They allow data to be stored outside the container’s internal filesystem, making it portable across platforms and easily shareable between containers.
This is particularly useful for preserving important data, improving performance, and enabling collaboration between multiple containers.
In this tutorial, we’ll cover everything you need to know about Docker volumes, including what they are, their types, where they are stored, and how to create, mount, inspect, delete, back up, and restore them.
What are Docker Volumes?
A Docker volume is a dedicated storage area managed by Docker, separate from a container’s writable layer. Storing data in volumes offers several advantages:
- Data persistence: The volume’s data remains intact even if a container is stopped, restarted, or deleted.
- Data sharing: Multiple containers can access the same volume simultaneously.
- Independent backups: You can back up or restore a volume without affecting the container.
- Improved performance: Accessing data directly from the host or other systems reduces file I/O overhead inside containers.
- Isolation from container lifecycle: Volumes survive container deletion, unlike data stored in the container’s own filesystem.
Types of Docker Volumes
Here is a quick look at the Docker volume types and their pros and cons:
| Volume Type | Best For | Pros | Cons |
|---|---|---|---|
| Anonymous Volumes | Temporary, throwaway data | Auto-created by Docker, no setup needed | Not persistent, auto-deleted with container |
| Named Volumes | Persistent app data across restarts | Portable, easy backups, secure, managed by Docker | Slightly more setup than anonymous |
| Host Volumes (Bind Mounts) | Development & real-time host sync | Immediate sync with host files, flexible for dev | Tight host coupling, less secure, not portable for prod |
Docker supports three main types of volumes, each with its own use case:
Anonymous Volumes
- Created automatically by Docker when a container starts without specifying a volume name.
- Not persistent or shareable between containers.
- Deleted automatically when the container is removed.
Named Volumes
- Created explicitly by the user with the docker volume create command.
- Stored in**/var/lib/docker/volumes/<volume_name>/_data** on the host.
- Can be reused across multiple containers.
- Managed entirely by Docker.
Host Volumes (Bind Mounts)
- Directly map a host directory or file into a container.
- Useful when containers need real-time access to host files.
- Changes made inside the container are immediately reflected on the host and vice versa.
- Must be used carefully to avoid accidental data loss on the host.
Where are Docker Volumes Stored?
In my experience managing production servers, most confusion happens when developers switch from Docker Desktop to Linux servers. The worst case scenario is when suddenly paths change and volumes ‘disappear.’ This is why I always verify with docker volume inspect to see the real mount point
Docker volumes are stored in different locations depending on your operating system and Docker setup:
In Linux-based Systems:
- **/var/lib/docker/volumes/**is the standard location on Linux systems
- Each volume gets its own subdirectory named after the volume ID or name
Desktop (Windows/Mac)
For Docker Desktop on Windows and macOS, volumes are not stored directly on the host machine’s file system. Instead, they reside within the Linux virtual machine (VM) that Docker Desktop uses to run the Docker engine.
The path inside this VM is the same as on a native Linux host: /var/lib/docker/volumes/.
Managing Docker Volumes
Docker provides a full set of CLI commands to manage the lifecycle of volumes from creation to deletion.
Let us discover how to manage Docker volumes with these CLI commands.
Create a Docker Volume
Creation is the first stage of docker volumes. If you want to create a Docker volume, run the following command:
# docker volume create myVolume

If you omit the volume name, Docker will generate a random name.
By default, Docker uses the local driver to store data on the host’s filesystem. However, at times, you may need more advanced storage and have to specify the driver. In such cases, use -d or –driver flag.
Some of the other Docker volume flags you can use are the following:
| Flag | Description |
|---|---|
| -d or –driver | Specify the volume driver (default: local) |
| –label | Add key-value metadata to the volume |
| -o or –opt | Provide driver-specific options |
Mount Docker Volumes
To make a volume accessible to a container, you need to mount it. There are two primary ways to do this:
- Use -vor –volume
- Utilize –mount
Method #1: Use -v or –volume
This is the classic and more concise method.
Execute the following command to make the volume accessible to a container:
# docker run -v <volume_name>:/<container_path> <image_name>
For instance, to mount myVolume11 to the /data directory inside the nginx container, run the following command:
# docker run -v myVolume11:/data nginx
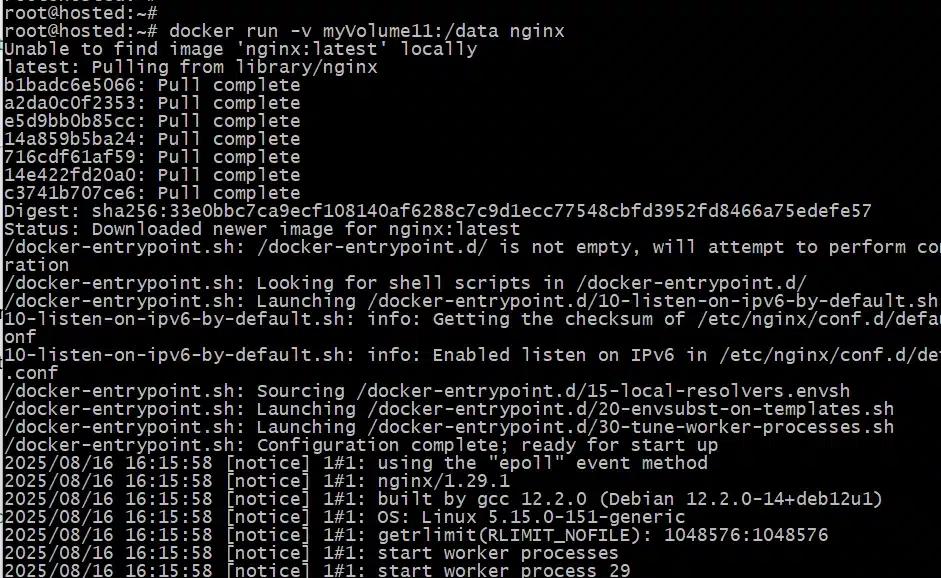
Here, data written to /data will persist even after the container is removed, and the same volume can be attached to multiple containers.
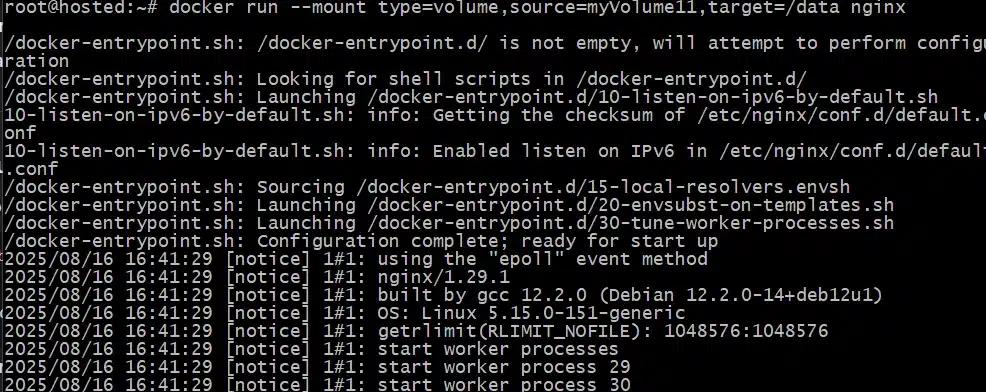
Method 2: Utilize –mount
This method is more verbose but often considered more readable due to which we recommend this approach for new projects. It also supports additional options.
# docker run –mount type=volume,source=<volume_name>,target=<container_path> <image_name>
For instance, in our above example of mounting myVolume11 to the /data directory inside the nginx container using -vcan be achieved with the following command:
# docker run –mount type=volume,source=myVolume11,target=/data nginx
Create and Mount Volumes with Docker Compose
Instead of running multiple CLI commands, you can define and manage volumes within a docker-compose.yml file. This is the preferred method for multi-container applications.
services:
frontend:
image: nginx:latest
volumes:
– myVolume222:/var/lib/misc
volumes:
myVolume222:
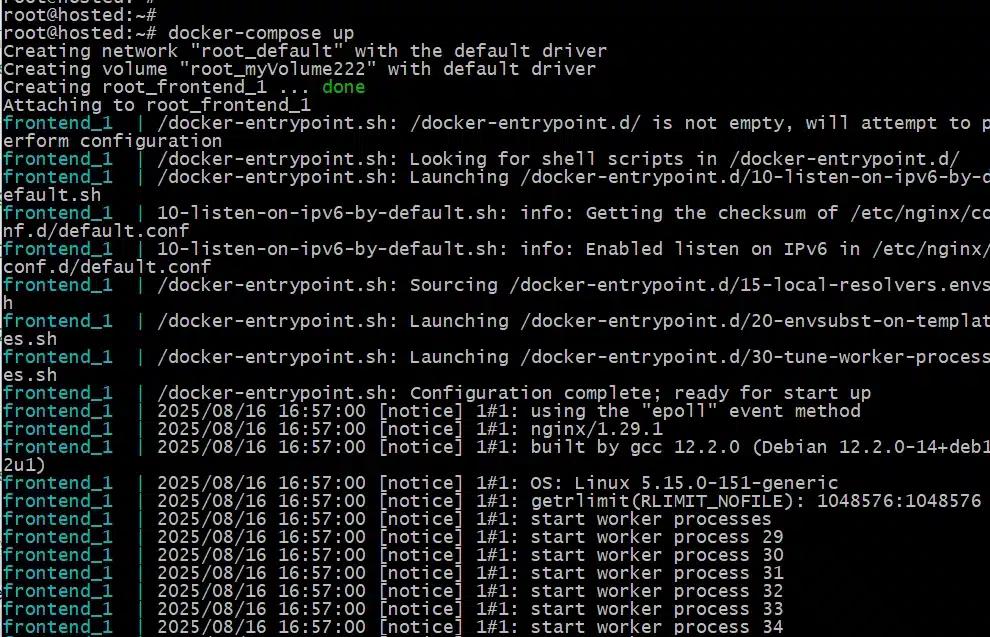
Now, to start and run multi-container Docker applications defined in the **docker-compose.yml file,**run the following command:
# docker-compose up
When you run docker-compose upfor the first time, Docker will automatically create the volume. On subsequent runs, it will reuse the existing volume.
Inspect Docker Volumes
If you want to view detailed information about a specific volume, run the following command:
# docker volume inspect <volume_name>
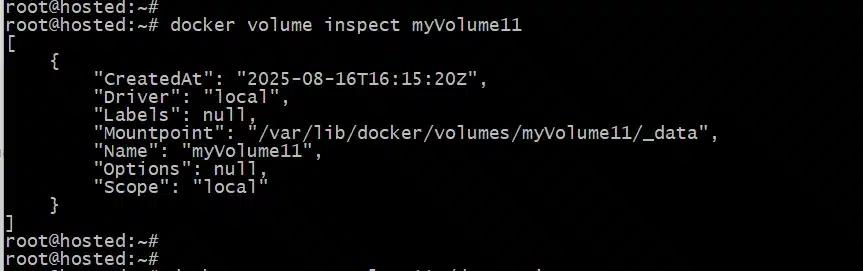
This command provides useful details such as the creation date, driver type, and its mount point on the host.
Now, if you want to inspect a Docker volume and extract a specific field on Windows, execute the following command:
# docker volume inspect <volume_name> | ConvertFrom-Json | ForEach-Object { $_.<field_name> }
Similarly, if you want to view a specific field on Linux/macOS, use jq to extract specific information from a Docker volume:
# docker volume inspect <volume_name> | jq ‘.[].<field_name>’
If you want to list all existing volumes, run the following command:
# docker volume ls

Delete Docker Volumes
For several reasons, such as freeing up disk space or removing clutter you may need to delete Docker volumes.
If you want to remove a single volume, run the following command:
# docker volume rm <volume_name>

Now, to remove all volumes that are not currently in use by a container, execute the following command:
# docker volume prune

Docker will prompt you for confirmation before deleting to prevent accidental data loss.
Back Up and Restore Docker Volumes
You can back up a volume by mounting it to a temporary container and creating an archive. A common method is to use the busybox image.
Run the following command to back up a Docker volume:
*# docker run –rm *
*-v <volume_name>:/volume_data *
*-v <backup_path>:/backup *
*busybox *
tar cvzf /backup/backup.tar /volume_data
The command mounts the volume you want to back up and a local backup directory to a temporary container. It then uses tar to create a compressed archive of the volume’s data.
Now, to restore this backup, you use a similar process, but in reverse.
*# docker run –rm *
*-v <volume_name>:/volume_data *
*-v <backup_path>:/backup *
*busybox *
tar xvz -f /backup/backup.tar -C /volume_data
This command extracts the contents of the backup archive into the specified volume.
Best Practices for Using Docker Volumes
The following are some best practices to follow when using Docker volumes.
Use Named Volumes for Persistent Application Data
Named volumes are managed entirely by Docker and are stored in a dedicated directory on the host (typically **/var/lib/docker/volumes/**on Linux). We recommend this approach for storing persistent application data for several reasons, such as:
- Portability
- Ease of backup and restore
- Isolation and security
- Multi-container sharing
Use Bind Mounts for Development When You Need Real-Time Sync with Host Files
Bind mounts map a specific file or directory from the host directly into the container. This is particularly useful in development environments:
- Real-Time Synchronization: Changes made to files on the host are immediately reflected inside the container, enabling live code reloading and rapid iteration
- Flexibility: Bind mounts allow developers to use their preferred editors and tools on the host while running the application inside a container.
- Host-Container Integration: Useful for sharing configuration files, logs, or build artifacts between the host and container
However, remember, bind mounts are tightly coupled to the host’s directory structure, making them less portable and potentially less secure. They should be avoided in production unless absolutely necessary
Regularly Run docker volume prune to Remove Unused Volumes
Over time, unused volumes can accumulate, consuming disk space and cluttering your environment. Therefore, run docker volume prune regularly to remove all unused volumes, freeing up valuable disk space. This helps keep your Docker environment clean and manageable, especially in environments with frequent container and volume creation.
Always Back Up Critical Volumes Before Performing Destructive Operations
Data loss is unpredictable and can occur due to accidental deletion, corruption, or hardware failure. To mitigate this risk, perform regular backups. By implementing automated backup routines for volumes containing critical data, you can ensure your data is consistently protected.
In the event of data loss, these backups allow you to quickly restore your information with minimal downtime.
Conclusion
Docker volumes are a powerful tool for ensuring data persistence, portability, and efficient sharing between containers. They can be easily created, mounted, inspected, deleted, and backed up with simple Docker commands.
Whether you’re working with a single container or a complex multi-container setup using Docker Compose, mastering volume management is key to building reliable and resilient containerized applications.
FAQs
**What is the difference between a Docker volume and a bind mount?**A Docker volume is managed entirely by Docker and stored under /var/lib/docker/volumes/. In contrast, a bind mount links a specific directory or file from the host machine directly to a container. Volumes are portable and safer for production, while bind mounts are mainly used in development for real-time access to host files.
**Do Docker volumes persist after a container is deleted?**Yes. Unlike container data, which is lost when a container is removed, Docker volumes are persistent. They remain on the host system even if the container is deleted, unless you explicitly remove them using docker volume rm or docker volume prune.
**How can I check where Docker volumes are stored?**On Linux, Docker volumes are stored in the **/var/lib/docker/volumes/**directory. Each volume has its own folder with data located inside a data subdirectory. On Docker Desktop for Windows or Mac, volumes are stored within the internal Linux VM used by Docker.
**Can multiple containers use the same Docker volume?**Yes. You can mount the same Docker volume to multiple containers at the same time. This is useful when containers need to share data, such as application logs, configuration files, or a common database directory. Changes made by one container will be visible to the others instantly.
Ishwar Shinde
Systems Administrator
Ishwar Shinde is a systems administrator specializing in Linux (RedHat, CentOS, Ubuntu, Debian), virtualization with VMware ESXi and Proxmox, and cloud and container tooling across AWS, Docker, and Kubernetes. He contributes PostgreSQL and Docker tutorials to the RedSwitches blog, drawn from hands-on server work.

Ubuntu vs Linux: Key Differences Explained
Linux is the kernel, while Ubuntu is a complete operating system built on it. This guide breaks down their key differences, use cases, and when to choose each.
Reduce Docker Image Size: Best Practices to Slim Your Images
Docker image size can become a serious issue as you add more code to the image. Learn how to reduce Docker image size and optimize Dockerfiles for production to speed up CI/CD pipelines and improve container efficiency.

Best Linux Distros 2026, Full Guide for Beginners, Developers, Gamers & Servers
Match your hardware, workflow, and skill to the right Linux distro in 2026. Compare 23 top picks, Mint, Ubuntu, Fedora, Arch, Bazzite, covering beginners, developers, gamers, and servers.
Power Your Next Project With Bare Metal
10 min delivery, zero setup fees, and 24/7/365 human engineers across 20+ global locations.