Reduce Docker Image Size: Best Practices to Slim Your Images
Docker image size can become a serious issue as you add more code to the image. Learn how to reduce Docker image size and optimize Dockerfiles for production to speed up CI/CD pipelines and improve container efficiency.
Key Takeaways
To reduce Docker image size quickly, use:
FROM alpine:latest
multi-stage builds to keep only runtime deps
This ensures a lean, secure image while removing unnecessary build tools and dependencies.
While developers focus on building efficient code, their Docker images often grow into multi-gigabyte images that consume bandwidth, slow down CI/CD pipelines, create attack surfaces, and introduce more vulnerabilities.
Left unchecked, bloated images can override the very benefits containers promise.
In this guide, we’ll guide you on how to keep Docker images optimized. In addition, you will also learn how to create Dockerfiles and run them step by step, with practical examples you can try immediately.
Let’s start with an understanding of why Docker image size is important.
Why Docker Image Size Matters?
This section covers Dockerfile optimization tips and container image size reduction techniques you can apply in production.
| Quick Commands to Reduce Docker Image Size | ||
|---|---|---|
| Action | Command / File | Notes |
| Check image sizes | docker images | Lists all images with size |
| Build image | docker build -t myapp . | Creates an image from Dockerfile |
| Use Alpine base | FROM alpine:latest | Lightweight (≈5 MB) base |
| Multi-stage build | COPY –from=builder /app/myapp . | Keeps only runtime binary |
| Clean up caches | rm -rf /var/lib/apt/lists/* | Prevents temp files in final layer |
| Ignore files | .dockerignore | Exclude node_modules, logs, .git |
| Scan for vulnerabilities | trivy image myapp | Security check before deploy |
The Docker image size is important for performance, security, and cost. Keeping slim Docker images helps achieve faster deployments and smaller attack surfaces.:
- Performance: Smaller images build, transfer, and deploy faster, leading to reduced CI/CD pipeline times and quicker container startup. This is especially important in large-scale or distributed systems, where even small time savings per deployment can add up significantly
- Security: Lean images have a smaller attack surface, as they contain fewer packages and files, reducing the number of potential vulnerabilities and minimizing the risk of unpatched security flaws
- Cost Efficiency: Reduced image size means lower storage requirements on registries and servers, and less bandwidth usage when transferring images, directly lowering infrastructure and operational costs
- Deployment Speed: Smaller images enable rapid scaling and faster deployments across cloud and edge environments, improving responsiveness and reducing downtime during scaling or recovery events
Common Causes of Bloated Docker Images
Bloated images often come from using heavy base images, failing to clean caches, or not applying Docker build optimization best practices like multi-stage builds
These issues lead to slower pipelines, higher costs, increased security risks, and operational inefficiencies
In the following table, we will summarize some of the common causes of large Docker images.
| Cause | Impact |
|---|---|
| Large base images (e.g., Ubuntu, Debian) | Large image size, slow builds, higher storage and transfer costs |
| Including unnecessary dependencies | Increased size, more vulnerabilities, larger attack surface |
| Not cleaning up caches/temp files | Wasted space, larger images, slower builds |
| Copying full project context (e.g., node_modules, logs) | Larger images, potential data leaks, accidental inclusion of secrets |
| Lack of multi-stage builds | Build tools and dev dependencies remain in final image, increasing size and risk |
How to Reduce Docker Image Size?
Now, let us see how to optimize Docker images. However, before we move on, let us start by creating a Docker image.
Create a Dockerfile
A Dockerfile is a simple text file containing instructions to build an image.
Let’s build a Dockerfile.
Start by creating a new directory for your Docker project:
# mkdir docker-size-demo
# cd docker-size-demo
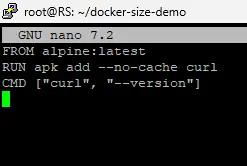
Next, create a new file named Dockerfile with any text editor like Nano:
# nano Dockerfile
Add the following content:
FROM alpine:latest
RUN apk add –no-cache curl
CMD [“curl”, “–version”]
Build the Docker Image with a Lightweight Base Image
Once the Dockerfile is created, build the Docker image inside the directory with the following command:
# docker build -t alpine-curl
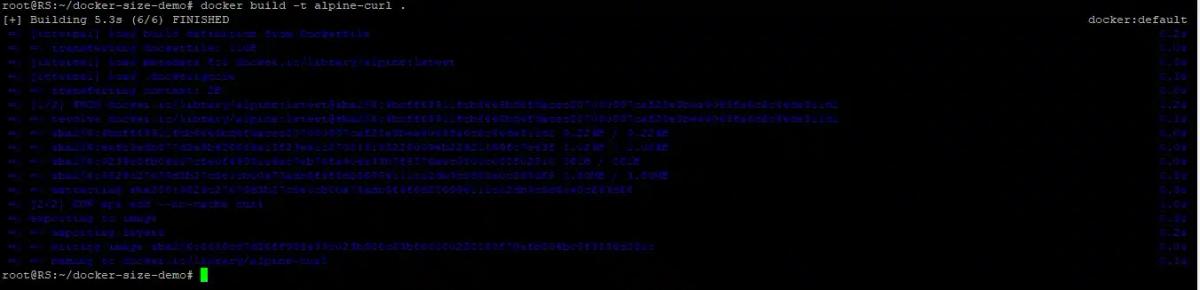
Once created, check the image size:
# docker images alpine-curl

Here, we chose Alpine as the base image. The base image is the foundation of your Docker image, and its size directly impacts the final image size.
Choosing the right base image is foundational for minimizing Docker image size. The two popular base images are:
- Alpine: A popular choice for a small, secure base. It is based on BusyBox, a collection of common Linux utilities in a single executable file, and is often just a few megabytes.
- Distroless: These images from Google contain only your application and its direct runtime dependencies, without a package manager, shell, or any other standard OS components. This not only results in a tiny image but also significantly reduces the attack surface.
Run the Container
Once you have created the Docker image, run your new image to verify it works:
# docker run –rm alpine-curl
You should see output similar to this:
curl

Use Multi-Stage Builds
Multi-stage builds are a powerful way to reduce image size by separating the build environment from the runtime environment. The final image only includes the necessary artifacts from the earlier stages, leaving behind build-time dependencies, compilers, and source code.
When building larger applications, you can use multi-stage builds to separate the build environment from the runtime. This keeps the final image lightweight.
For instance, let’s build a Dockerfile for a Go application with this method.
# Stage 1: Build
FROM golang:1.20 as builder
WORKDIR /app
COPY . .
RUN go build -o myapp
# Stage 2: Run (lightweight)
FROM alpine:latest
COPY –from=builder /app/myapp .
CMD [“./myapp”]
Here in the builder stage full Go image (golang:1.20), which includes compilers and build tools, is used.
In the run stage, a tiny Alpine Linux base image is used. It copies only the compiled binary from the builder stage.
Now that we have created a set of instructions that Docker will use to build the container image in two stages: one for building the app, and one for running it efficiently, run the following commands to execute it:
# docker build -t myapp .
# docker run –rm myapp
Clean Up Unnecessary Files
Each RUN instruction in a Dockerfile creates a new layer, and each layer adds to the final image size. If you install dependencies and then remove temporary files in separate RUN commands, the temporary files are still stored in a lower layer, thus not reducing the overall size.
So the best way is to combine multiple commands into a single RUN instruction using && and ensure that all temporary files and caches are removed in the same command.
For instance, in the following example, a single command updates the package list, installs curl, and then cleans up the package cache and lists, preventing them from being stored in a new layer.
FROM ubuntu:22.04
RUN apt-get update && apt-get install -y curl \
&& rm -rf /var/lib/apt/lists/*

Use .dockerignore File
A**.dockerignore** file prevents unnecessary files and directories from being sent to the Docker daemon during the build process. This is similar to a .gitignorefile. Ignoring files like node_modules, .git folders, or local logs dramatically reduces the build context’s size.
An example of .dockerignore file is:
node_modules
*.log
.git
This command excludes node_modules, *.log, and .git.
Troubleshooting Docker Image Size Issues
Even with best practices, you may run into common problems when slimming Docker images. Here are fixes for frequent issues:
| ERROR: failed to solve with frontend dockerfile.v0 | Incorrect syntax in Dockerfile or missing dependencies | Double-check Dockerfile syntax and ensure dependencies are installed in the correct stage. |
|---|---|---|
| Libraries missing in Alpine builds | Alpine uses musl libc instead of glibc, which some packages depend on | Use apk add libc6-compat or switch to a Debian-slim or Distroless base image. |
| Large image size despite cleanup | Temporary files cached in previous layers | Combine install + cleanup commands in a single RUN statement. |
| .dockerignore not working | File not in build context or misconfigured | Ensure .dockerignore is in the project root (same directory as Dockerfile). |
| Build takes too long | Copying unnecessary files into the build context | Use .dockerignore to exclude logs, test data, and dependencies. |
Conclusion
Keeping Docker images small isn’t just about saving disk space. It improves Docker build performance, reduces costs, strengthens security, and makes deployments faster.
By using lightweight base images, multi-stage builds, cleaning unnecessary files, and leveraging .dockerignore, you can ensure your images remain lean, efficient, and production-ready.
FAQs
What is the ideal size for a production-ready Docker image?
There’s no strict standard, but keeping images under 100–200 MB is generally recommended. Smaller images build faster, deploy quicker, and reduce bandwidth and storage costs.
Is Alpine always the best choice for Docker images?
Not always. Alpine (~5 MB) is lightweight and secure, but some libraries may not be fully compatible. If your app requires glibc or other system libraries, consider Distroless or a slim Debian/Ubuntu base.
How do multi-stage builds reduce image size?
Multi-stage builds separate the build environment (with compilers and tools) from the runtime environment (just the app and required dependencies). This keeps the final image lean by discarding unnecessary build files.
Does Docker image size affect runtime performance?
Mostly no. Image size impacts build, pull, and startup speed, not runtime execution. However, smaller images use less memory during deployment and improve scalability in large-scale environments.
How can I scan Docker images for vulnerabilities?
Use tools like Trivy, Clair, or Docker Scan. For example:
trivy image myapp
This scans your image for outdated packages, known CVEs, and security misconfigurations.
Pratik Kshirsagar
Linux System Administrator
Pratik Kshirsagar is a Linux System Administrator at RedSwitches, certified in Red Hat (RHCSA) and Microsoft Azure (AZ-900). He manages Linux and Windows servers, tunes performance, runs AWS EC2 workloads, and supports clients across the hosting stack.

Ubuntu vs Linux: Key Differences Explained
Linux is the kernel, while Ubuntu is a complete operating system built on it. This guide breaks down their key differences, use cases, and when to choose each.

Best Linux Distros 2026, Full Guide for Beginners, Developers, Gamers & Servers
Match your hardware, workflow, and skill to the right Linux distro in 2026. Compare 23 top picks, Mint, Ubuntu, Fedora, Arch, Bazzite, covering beginners, developers, gamers, and servers.

How to Create and Manage Superusers in PostgreSQL
A PostgreSQL superuser is a user with unrestricted access to all database operations, including altering roles, creating databases, and bypassing permission checks.
Power Your Next Project With Bare Metal
10 min delivery, zero setup fees, and 24/7/365 human engineers across 20+ global locations.