Ultimate Docker Cleanup Guide: Prune Unused Images, Containers & Volumes
Learn how to clean up your Docker system with this ultimate guide. Prune unused Docker images, containers, and volumes for improved performance.
If you’ve been running Docker-based containers for a while, you’ll find that some housekeeping is required to keep the system working smoothly.
A Docker prune command is a powerful tool that can be used to clean up old Docker resources that are no longer needed.
It allows users to quickly and easily remove unused containers, images, networks, and volumes. In addition, you can use the Docker prune to reduce the size of the Docker images stored on a system and reduce the overall number of running resources. The docker prune command can also be used to remove dangling images, which are images that have been built but are not referenced by any containers.
This article introduces Docker prune and covers how it is used to clean up Docker containers and images.
Let’s start with why you should be using Docker prune to manage your containerized infrastructure.
The Top 3 Reasons Why Docker Prune is Crucial to a Successful Container Strategy
The idea of “pruning” or removing unused parts is essential for a successful container strategy. In fact, it is critical to maintaining your Docker environment’s health.
Here are the top 3 reasons why pruning should be an integral part of your container strategy:
Free Up Disk Space
Inactive containers, images, volumes, and networks take up disk space that other applications could use more efficiently. Pruning helps free up disk space to use it more optimally.
Improve Efficiency
Pruning helps improve the efficiency of your Docker environment by removing redundant elements that do not contribute to the overall performance of your system. This can help you get more out of each resource and reduce wastage in the process.
While you might not “feel” the impact of resource wastage on a single server, the challenge becomes acute when you’re running a multi-server cluster. So, if you’re running a Docker swarm cluster, using the Docker prune command to recover resources is a smart move.
Additionally, pruning helps reduce the time needed to deploy new applications or services, as there will be fewer resources to manage and maintain.
Increased Security
By removing any unused or dormant elements, pruning helps reduce your Docker environment’s attack surface.
Unused containers or images can potentially contain vulnerabilities that hackers can exploit to gain access to your system and cause damage.
Pruning helps to ensure that any unused resources are removed from your system, thereby increasing the security of your Docker environment.
If you’re considering Docker, Debian is a great choice for the OS because of little to no compatibility issues. Alternatively, you can run Docker on Windows servers and use Docker prune and Docker exec (and all other Docker commands) without any changes in your scripts.
How to Clean Up Docker Containers?
Docker doesn’t clean up stopped containers by default. As a result, once a container has been stopped, it will remain on your system until you actively remove it. This can be an issue if multiple containers run over time, as the number of stopped containers can quickly add up and take up disk space.
There are two ways to go about cleaning up stopped containers.
- Use the
**docker rm**command to remove a container from your system. This can be done manually or automated using scripts. - Use the Docker command
docker container prune. This command can be used to clean up stopped containers that are no longer in use. However, this command should be used with caution, as it can lead to data loss if active containers are also removed. It is recommended to double-check the list of containers that will be deleted before running the command.
We will demonstrate **docker container prune** by creating a few containers on our test environment based on NGINX, MySQL, Debian, Ubuntu Alpine, and Apache HTTP.
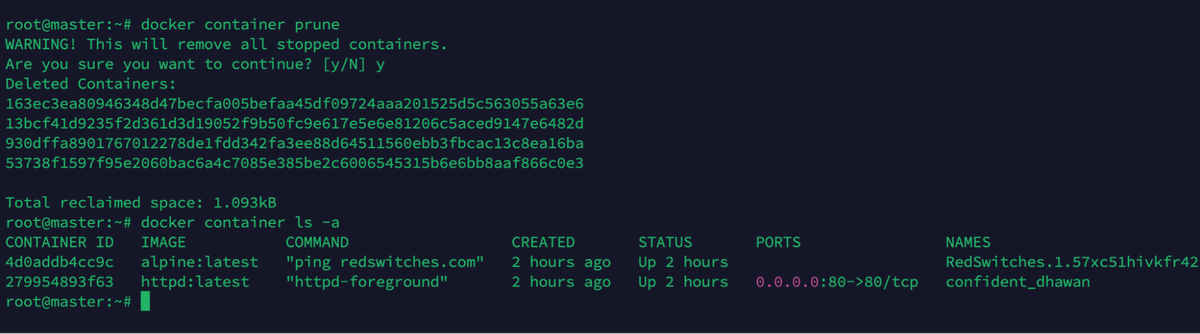
The host has six containers, as shown in the following screenshot. Two of the six containers are running, and the remaining four have an Exited status.
The **docker container prune** command can be used to clean up the containers. This command will delete all inactive containers. However, it will ask you for confirmation. Once you type Y and hit Enter, it will remove the four stopped containers from the server, as shown in this screenshot.

As you can see, all containers with Exited status have been removed from the host node.
Note: Run “docker container prune –help” to get more details about the command.
How to Clean Up Docker Images?
This process involves deleting unused or old images to free up disk space and keep the system organized.
You have two options for removing Docker images (docker prune images).
The first mode is the image prune, which removes all dangling images from the host. Dangling images are those that have no associated containers or have been created as part of a build process but are not used by any running container.
The second method removes all unused images on the host node.
Clean Dangling Images
Dangling images are images on the system that are no longer associated with any tagged images. They can accumulate over time and take up valuable disk space if not managed properly.
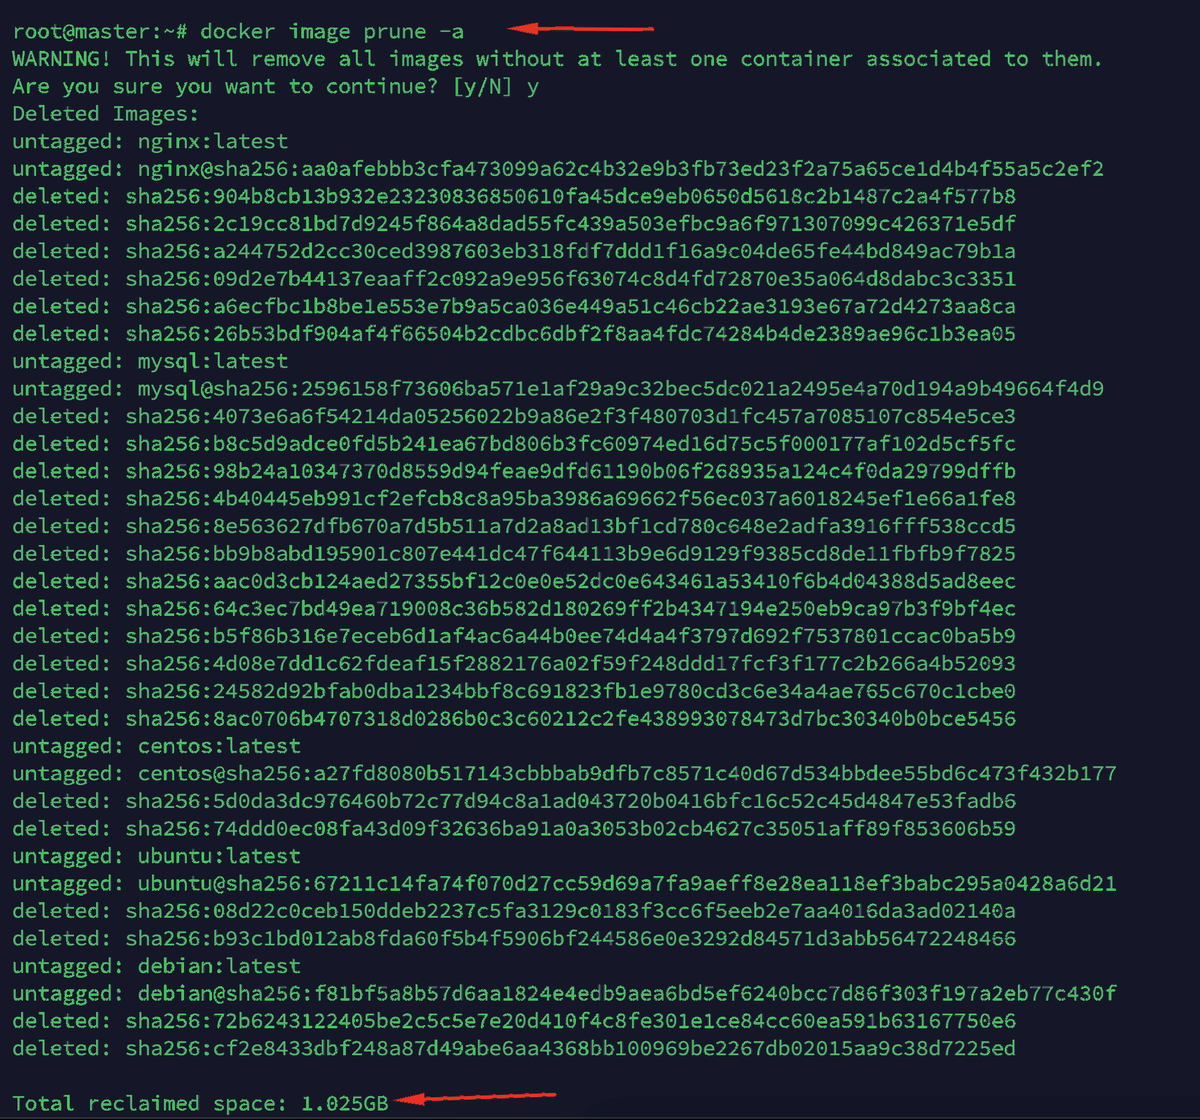
Fortunately, Docker provides a command to clean up these unused images easily: docker image prune. This command will delete all the dangling images in the current repository.
Let’s see an example of this command in action.
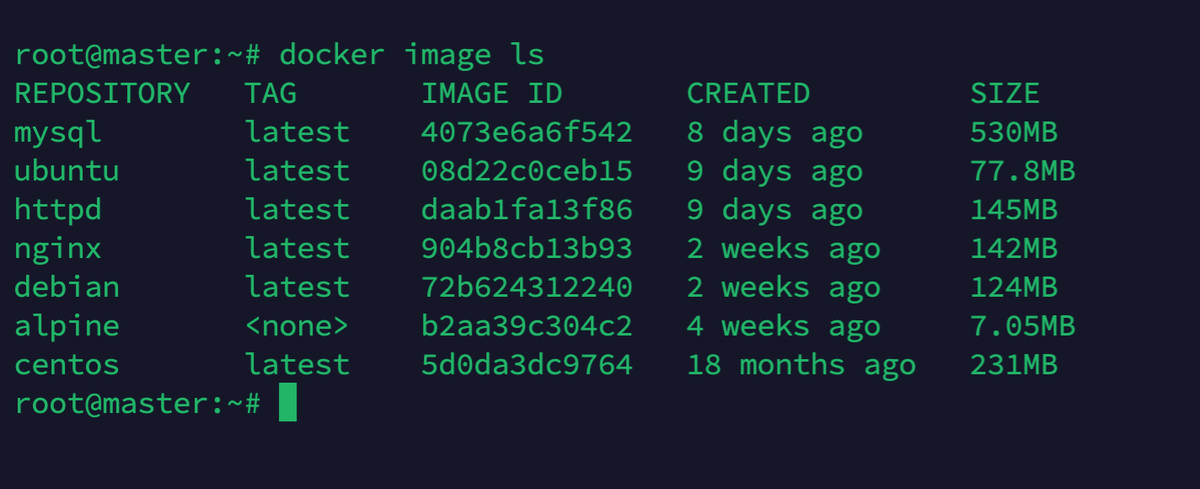
In the screenshot below, we can see seven images present on the server, and all images have TAG except the Alpine image, making it a dangling image.
docker image ls
In addition to this identification, it is always a good idea to verify the list of dangling images by running the following command:
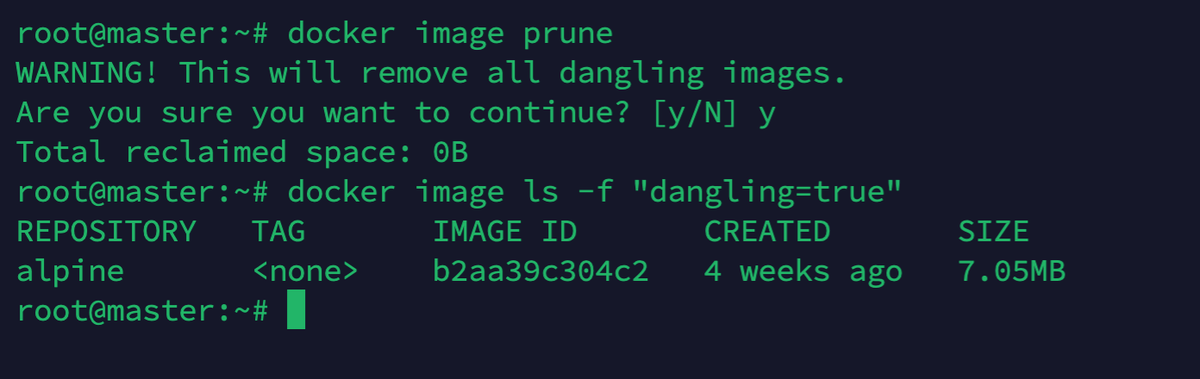
docker image ls -f "dangling=true"

Next, simply run the command to prune dangling images:
docker image prune
Cleaning All Docker Images
If you’re thinking of removing all unused images and containers, you can use the docker prune command with the “-a” flag. On the other hand, if you just want to remove certain items, use the “-f” flag. This flag is especially useful when you are selectively removing images and containers from the system.
Alternatively, you can use the docker image prune -a or docker image prune –allto remove all unused images from your system.
Note:- Run “docker image prune –help” for more details about the command.
Do you know that you can deploy Docker for Mac environments?
How to Clean Up Docker Volumes?
Docker volumes are created when a container is created and can contain important data, such as logs, configuration files, and application data. Over time, these volumes can accumulate unused or outdated data, which takes up significant space on your system.
It’s important to note that deleting a container does not remove any data that is stored in the associated volume. If you want to delete that data as well, you’ll need to manually delete it before running the docker prune command.
Using the docker prune command is simple and requires only one argument: the volume name you want to delete.
For instance, if you want to delete a volume named ‘my-volume’, you would run the command:
docker volume prune -f my-volume
This will delete the specified volume and all of its contents, freeing up disk space and keeping your system running smoothly. You can also use the -a option to delete all unused volumes.
You should clean your Docker volumes regularly (docker prune volumes) to keep your data up-to-date and prevent buggy information from causing issues. However, it is always important to get information about the columns present on the system by running the following command:
docker volume ls
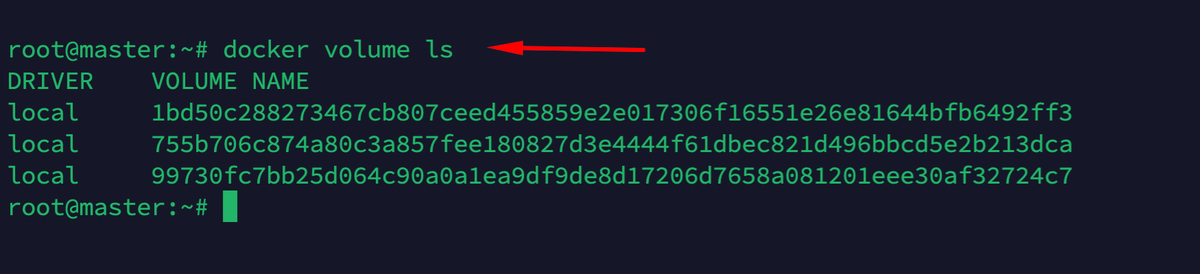
In the output of the above command, you will see volumes with random long names.
The docker volume prune command is a powerful tool for cleaning up the disk space used by Docker. It allows you to remove all unused volumes that are not in use by any container.
However, this command can be potentially dangerous, as it will delete any data stored in those volumes. Therefore, you should always get the list of available volumes and then back up the essential data before running the removal command(s):
docker volume prune
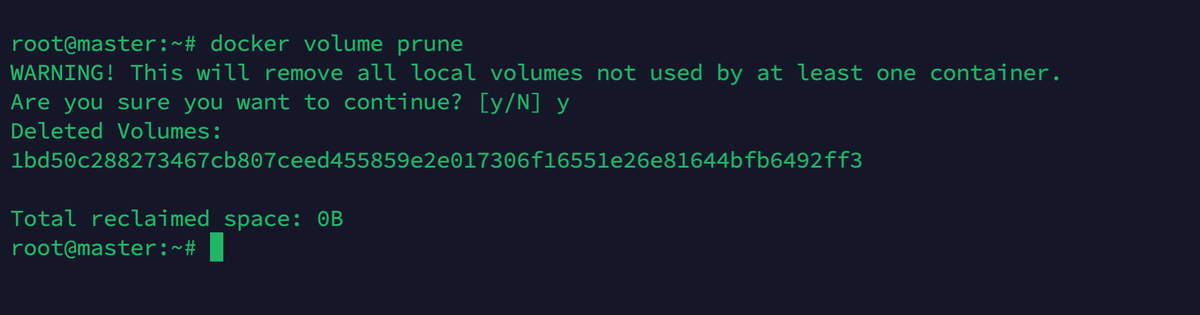
In the above screenshot, we can see that one unused volume has been removed from the server.
Note:- Run “docker volume prune –help” for more details.
How to Clean Up Docker Networks?
Docker networks are an important component of the Docker platform, allowing users to link containers together by using Docker Compose or Swarm mode.
Over time, these networks can become cluttered and disorganized, leading to performance issues and confusion. The ‘docker network prune’ command is a simple way of managing these networks more efficiently.
This command will remove all unused networks from a Docker setup. This includes networks with no containers attached and networks not currently in use.
However, before using the ‘docker network prune’ command, it is important to ensure that all necessary containers and networks are backed up. You should know that this command will permanently delete any network it runs on, so it should only be used if you’re confident that no data will be lost.
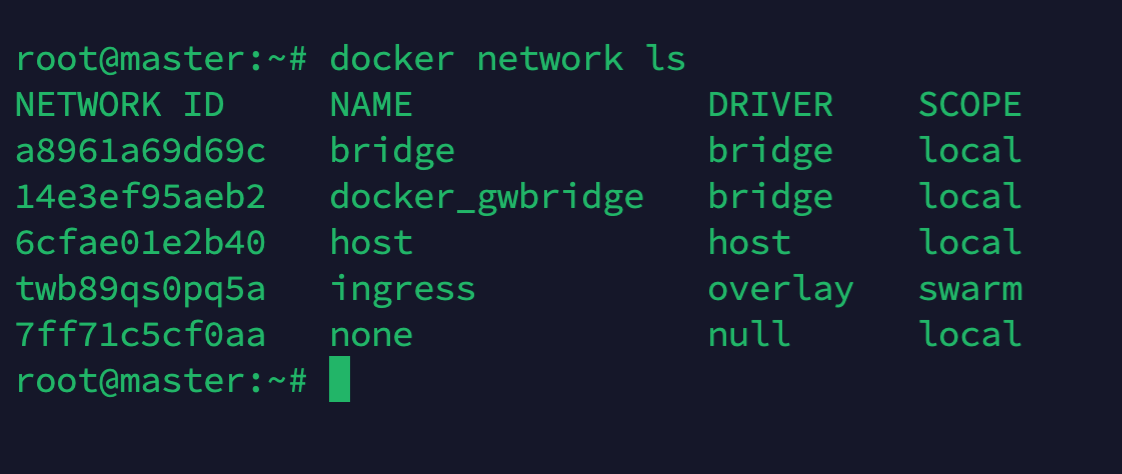
We highly recommend starting with the **docker network ls** to get a list of networks currently available on the host node.
docker network ls
Now that you have the list, you can remove unused networks from the server with the ‘docker network prune’ command.
docker network prune Note:- Run “docker network prune –help” for more options and details.

How to Clean Up Your Docker System?
While we encourage you to systematically review images, containers, and networks to identify unused and dormant components for removal, we can see that the process can take up a lot of time.
That’s why Docker provides the docker system prune, a powerful command that enables users to quickly and easily clean up their Docker environment. It removes all unused containers, images, networks, and volumes from the host machine.
This command can be run from any directory on the system, so you don’t have to navigate to the Docker home directory to execute it. However, it is important to use the command cautiously, as it can easily delete any essential resource from the host machine.
docker system prune
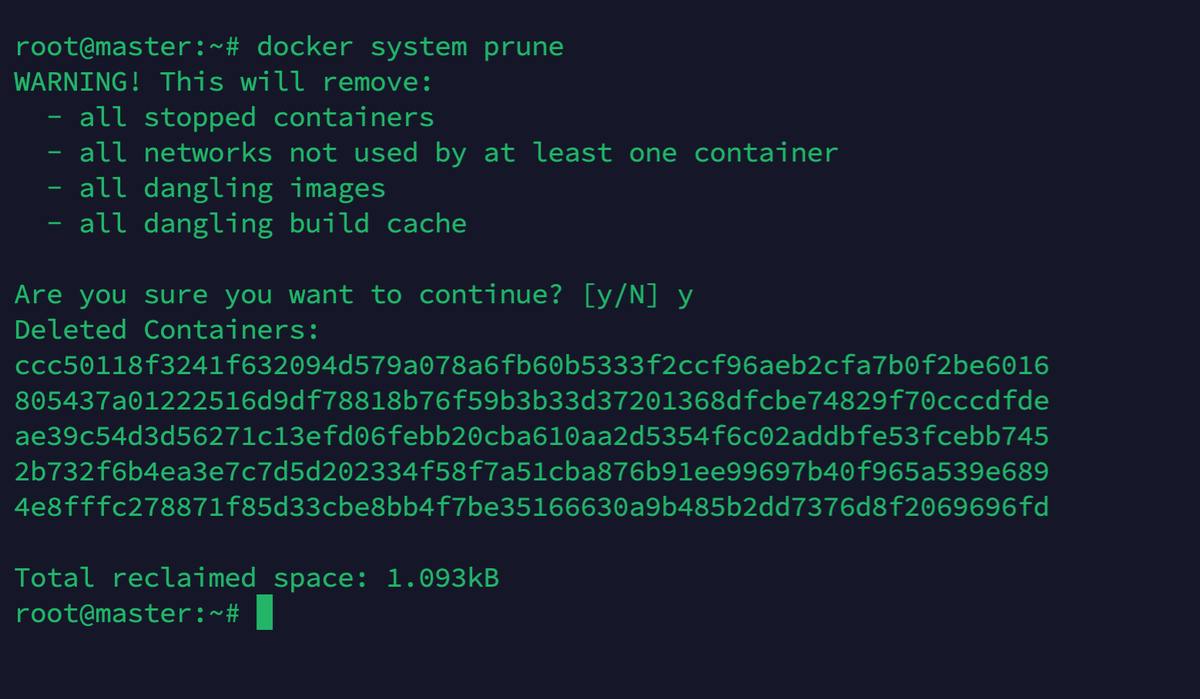
Note:- Run “docker system prune –help” for more details.
Now that you have read all about Docker prune, we recommend our Docker vs Podman comparison article that introduces an interesting Docker alternative. We also suggest our Kubernetes vs Docker article to help you pick the right platform for your containerized applications.
Conclusion
Docker prune is a powerful command that allows you to quickly and easily delete unused Docker containers, images, networks, and volumes.
It is an essential tool for keeping your Docker environment clean and organized. With the prune command, you can quickly remove unwanted resources from your system, freeing up disk space and improving performance.
You can also use the prune command to delete resources from specific projects, or you can use it to delete all Docker resources in your environment. The command is simple to use and can be used in various ways depending on what you need to do.
FAQ
Q: What is Docker?
A: Docker is an open-source platform that allows you to automate the deployment, scaling, and management of applications using containerization.
Q: What are Docker images?
A: Docker images are read-only templates that contain all the necessary files, libraries, and dependencies required to run a software application.
Q: What are Docker containers?
A: Docker containers are instances of Docker images. They provide a lightweight and portable runtime environment for running applications.
Q: What are unused Docker objects?
A: Unused Docker objects refer to Docker images, containers, volumes, and networks that are no longer being used by any running or stopped containers.
Q: How can I remove unused Docker images?
A: You can use the command ‘docker image prune’ to remove all unused Docker images from your system.
Q: How can I remove unused Docker containers?
A: You can use the command ‘docker container prune’ to remove all stopped containers and free up resources.
Q: How can I remove unused Docker volumes?
A: You can use the command ‘docker volume prune’ to remove all unused Docker volumes from your system.
Q: How can I remove unused Docker networks?
A: You can use the command ‘docker network prune’ to remove all unused Docker networks from your system.
Q: How can I remove all unused Docker objects at once?
A: You can use the command ‘docker system prune’ to remove all unused Docker images, containers, volumes, and networks from your system in one go.
Q: How can I clean up my Docker environment?
A: To clean up your Docker environment, you can use a combination of commands like ‘docker system prune’, ‘docker container prune’, ‘docker image prune’, ‘docker volume prune’, and ‘docker network prune’ as per your requirement.
Q: Is it safe to prune Docker components?
A: It is generally safe to use the docker prune command to remove unused containers, images, networks, and volumes. The docker prune command will only remove resources not currently used by a running container. However, as with all operations involving the deletion of data and resources, users should exercise caution when using this command.
Q: What is the difference between prune and remove in Docker?
A: The prune and remove commands are two of the most commonly used docker commands. They are both used to delete resources such as containers, networks, and images. However, they differ in how they work and the results they produce. The docker prune command deletes all unused resources from a system. It will not delete any running containers or the images associated with them. This is a great command to use if you are looking to free up disk space and reclaim resources. The docker remove command, on the other hand, is used to delete specific resources. This could be a single container, an image, or a network. It will delete all of the specified resources, including any running containers associated with them. This command should be cautiously used as it can leave your system in an unintended state.
Q: How to remove all data from docker?
A: Removing all data from Docker can be done in a few simple steps. It is important to note that this process will delete all stored images, containers, networks, and volumes associated with Docker on your system. First, make sure you are using the latest version of Docker by running the command “docker –version”. Then, remove all unused data using the “docker system prune” command. This will delete all images, networks, and containers not used in the past week. You can also use the “docker system prune -a” command to delete all unused data, regardless of when it was last used. Finally, if you want to remove any no longer needed volumes, use the command “docker volume prune”. This will delete volumes not associated with a container or image in the local Docker environment.
Q: How do I prune all docker (docker prune all)?
A: To prune all docker resources, you must use the docker system prune command. This command will go through your system and remove all containers, images, networks, and volumes that are not currently in use. It will also reclaim disk space by removing any dangling images or building cache.
To run the docker system prune command, open a terminal window and enter the following command:
$ docker system prune -a
You can add additional flags to your command to limit the scope of the prune. For example, you can choose to prune only containers by adding the –containers flag:
$ docker system prune -a --containers
Once you’ve entered the command, docker will begin to remove all unused data and reclaim disk space. You should always review the command output before proceeding to ensure nothing important is removed.
Q: Explain what the “docker prune all images” command does.
A: The docker prune all images command is used to remove any unused images from local storage. Unused images are those that are not associated with any running containers or tagged with a repository. Any dangling (unused) images will be deleted, and their space will be freed up. This command will also delete any stopped containers and networks that are no longer in use. This command is beneficial for freeing up disk space and keeping your system efficient.
Ameya Barwe
Team Lead & Senior Systems Administrator
Ameya Barwe is a Team Lead and Senior Systems Administrator at RedSwitches, where he has spent over four years running Linux hosting operations and leading the systems team. His background spans project management, technical support, and hands-on Linux and Unix administration, with a focus on keeping infrastructure fast, stable, and secure across AWS and Google Cloud.

Ubuntu vs Linux: Key Differences Explained
Linux is the kernel, while Ubuntu is a complete operating system built on it. This guide breaks down their key differences, use cases, and when to choose each.

Reduce Docker Image Size: Best Practices to Slim Your Images
Docker image size can become a serious issue as you add more code to the image. Learn how to reduce Docker image size and optimize Dockerfiles for production to speed up CI/CD pipelines and improve container efficiency.

Best Linux Distros 2026, Full Guide for Beginners, Developers, Gamers & Servers
Match your hardware, workflow, and skill to the right Linux distro in 2026. Compare 23 top picks, Mint, Ubuntu, Fedora, Arch, Bazzite, covering beginners, developers, gamers, and servers.
Power Your Next Project With Bare Metal
10 min delivery, zero setup fees, and 24/7/365 human engineers across 20+ global locations.