MySQL, the world’s most widely used Relational Database Management System (RDBMS), is known for its reliability, performance, and ease of use.
As a beginner, one of the essential skills you must master is to create tables in MySQL. This is a critical operational requirement because tables are the main data storage structure in a DBMS.
In this blog, we’ll guide you through an easy process that you can use to create tables in MySQL databases.
Let’s start with an overview of tables in MySQL.
Table Of Content
- What is a MySQL Table?
- MySQL Data Types
- Prerequisites
- Step-by-Step Guide to Creating Tables in MySQL
- Conclusion
- FAQs
What is a MySQL Table?
A MySQL table is a basic structure in a database that stores data and organizes it in rows and columns. Each row in the table contains a single data item (called a record). The columns (also called cells) have the attributes of the data items.
Tables are used to group related attributes together for better data organization and access.
Theoretically, there is no limit on the number of tables you can have in a MySQL database. However, database designers try to limit the number of tables to keep data addition and retrieval within reasonable time limits.
MySQL Data Types
In SQL, data types define the nature of the data type that is stored in a particular column or variable. Each SQL data type has specific restrictions controlling the data you can store in a column.
Here is a brief overview of the most frequently used data types in SQL:
INT or INTEGER: This data type stores whole numbers, both positive and negative.
FLOAT or REAL: This data type stores floating-point numbers.
CHAR: The CHAR data type holds fixed-length character strings.
VARCHAR: VARCHAR data type stores character strings of variable length.
Date: This data type stores dates, including year, month, and day.
Time: This data type is used to store times, including hours, minutes, and seconds.
DATETIME or TIMESTAMP: This data type stores both date and time values.
BOOLEAN or BIT: This data type stores boolean values, such as TRUE or FALSE.
Blob: This data type stores binary data, such as images or documents.
DECIMAL or NUMERIC: This data type stores decimal numbers with fixed precision.
Prerequisites
Before you go ahead and create table in MySQL, you need the following:
- A server running your preferred OS (we prefer CentOS 7)
- A MySQL server installed on the server
- A user with sudo privileges
Step-by-Step Guide to Creating Tables in MySQL
Now that you know the importance of tables in MySQL databases, let’s dive into the details of how you can create table in MySQL.
Step # 1 : Connect to the MySQL Database
The first step is connecting to the MySQL database.
You can use a MySQL client such as phpMyAdmin, which provides a simple user interface to connect and manage MySQL databases.
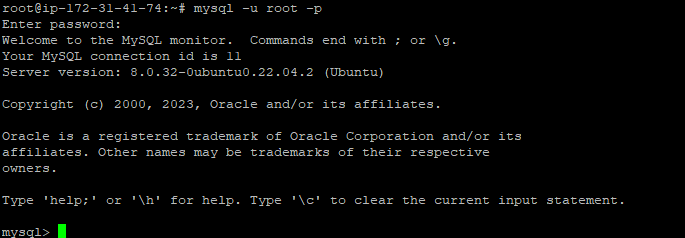
To establish a connection to the MYSQL server via the terminal, you can use the command:
# mysql -u username -p
Remember to replace “username” with your MySQL username. You’ll be prompted to enter your password. Once you’re logged in, you’ll be able to create table in MySQL.
You can see the mysql> prompt that indicates that you are now in the MySQL server CLI.
Step # 2: Create a Database
In most cases, you would have at least one database on your MySQL server.
However, since this is a beginner’s guide, we’ll start from the very beginning with creating a database because before creating a table, you need to create a database to store the table in.
You can create a database with the following command:
mysql> CREATE DATABASE <database_name>;
Replace “database_name” with the name you want to give your database.
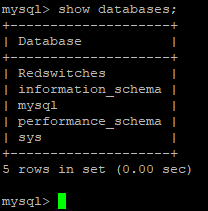
You don’t get a detailed success or failure message. That’s why, in the next step, we’ll confirm whether the database was created by displaying a list of all databases. For this, use the SHOW statement:
mysql> SHOW DATABASES;
You can see that we have a database with the name Redswitches in the list. This indicates that the database was successfully created.
Step # 3: Select the Database
Whether the database is already there or you create it yourself, you need to select it to make sure all your commands are executed on the right database.
Use the following command to switch to the desired database:
mysql> USE database_name;
Replace “database_name” with the name of your database. You’ll see a simple “Database changed” message to indicate that the command was successful.
Step # 4: Create Table in MySQL
Now that you’ve connected to MySQL, created a database, and switched to it, you can create a table.
For this, use the You can create a table using the following command:
mysql> CREATE TABLE table_name (
column1 datatype,
column2 datatype,
column3 datatype,
);
Remember to replace “table_name” with the name you want to give your table. Replace “column1”, “column2”, “column3” with the names of the columns you want to include in your table. Replace “datatype” with the data type you want for each column.
If you have more than three columns in your table, you can follow the pattern to add them.
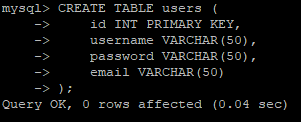
Here’s an example where we created a table named users with four columns, id, username, password, and email. All these columns have the data type VARCHAR.
mysql> CREATE TABLE users (
id INT PRIMARY KEY,
username VARCHAR(50),
password VARCHAR(50),
email VARCHAR(50)
);
Step # 5: Verify the Table
Once you’ve created a table, you can verify that the command was successful and that it indeed has all the required fields.
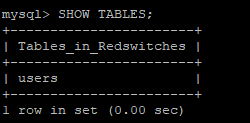
For the first part, we’ll use this command that lists down all the tables in the database:
mysql> SHOW TABLES;
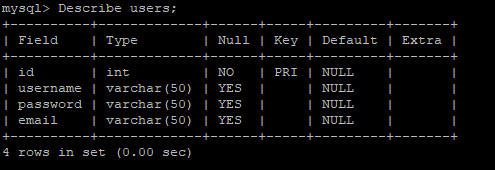
Next, we’ll verify the details of the table with the following command that lists down the details of the table users:
mysql> DESCRIBE users;
You can see the details of the table, including the column, their types, and related details.
Also Read: How To Rename a Database in MySQL: 3 Easy Methods
Conclusion
Creating tables in MySQL is an essential skill for anyone working with databases. With the step-by-step guide we’ve provided, you should be able to create tables and define their properties with ease. Remember to follow best practices, such as naming conventions and data typing, to ensure your tables are efficient and organized.
FAQ’s
Q: What is a MYSQL table?
A: A MYSQL table is a collection of all the related data structured in columns and rows.
Q: How do I create a MYSQL table?
A: To create an MYSQL table, use the CREATE TABLE statement, which comprises the table name, column name, and their respective data types, with any other pertinent details.
Q: What data type can be used in MYSQL?
A: Some common data types used in MYSQL tables include INTEGER, VARCHAR, DATE, TIME, and BOOLEAN.
Q: Can I add columns to an MYSQL table?
A: By simply using the statement ALTER TABLE, you can add a column to an existing MYSQL table.
Q: Can I delete columns to an existing MYSQL table?
A: By running the ALTER TABLE statement, you can easily delete your column from an existing MYSQL table.
Q: Can I change the name of an existing MYSQL table?
A: Yes, you can change the name of an existing table using the ALTER TABLE statement.
Q: How can I specify the primary key for an MYSQL table?
A: You can specify the primary key for an MYSQL table using the PRIMARY KEY statement.
