Python is a popular programming language because its powerful data structures, dynamic typing, dynamic binding, and other features make it suitable for open-source and proprietary corporate software development requirements.
The vast number of Python libraries and packages allows developers to take advantage of great code written by others and speed the project through the development milestones. The packages bring a mind-boggling range of pre-written functionality, from random numbers to processing images captured by system hardware.
Python provides pip, a package manager that fetches and installs packages in the Python environment. It is the most popular package manager for Python and ships with all official Python install options.
This article will cover how to install pip on Windows and how you can use this simple utility to add power to your Python projects.
Let’s start with a simple introduction to pip.
Table Of Content
- What Is pip?
- How to Install pip on Windows
- How to Verify pip Installation
- Add pip to Windows Environment Variables
- Configuring pip on Windows
- Manage Python Packages With pip
- Conclusion
- FAQS
What-Is-pip?
pip (pip installs packages) is a popular package management system that Python developers use to install and manage third-party libraries that aren’t included in the standard Python distributions.
By default, pip fetches those packages and the dependencies from the Python Package Index (PyPI), a vast online repository of libraries and packages. As you might’ve guessed, PyPI is pip’s default source for packages and dependencies.
The best thing about pip is that you can use it with any OS that supports Python. Let’s discuss the main idea of this article and see how to install pip on Windows.
How to Install pip on Windows
Installing pip in a Windows environment is pretty straightforward. Here are the significant steps.
Step # 1:Confirm that Python is Installed
Before installing pip on Windows, you must ensure that Python is installed on the server.
For this, launch the Command Prompt and run the following command:
> python --version
If you see an error message like “Python is not recognized as an internal or external command,” Python isn’t installed on the machine.
Install Python on Windows
If Python isn’t installed on your Windows system, downloading and installing a recent version from the official Python website is the first step.
Download the latest stable version of Python for Windows and follow the wizard. Once done, please verify the version using the command mentioned above.
Step # 2: Download pip with get-pip.py
Launch the Command Prompt and navigate to the folder where Python is installed using the cd command.
Then run the following command to download the get-pip.py file:
> curl https://bootstrap.pypa.io/get-pip.py -o get-pip.py
Step # 3: Start pip Installation
When the download finishes, start the install process by running the following command in the command prompt:
> python get-pip.py
Once the command finishes, pip is now successfully installed on Windows.
If you get a “file not found” error, double-check the directory path to the file. You can use the dir command to view the contents of a directory.
Please note that pip is installed by default with Python versions Python 2.7.9+ and Python 3.4+. pip also sets up virtualenv and pyvenv virtual environments during the installation process.
How to Verify pip Installation
If you need, you can verify that pip is installed correctly by running one of the following commands in the command prompt:
> pip -V
Or
> pip --version
If pip is installed correctly, you’ll see a message showing the current pip version and location on the local system.
Add pip to Windows Environment Variables
Even when pip has been successfully installed, you might get an error similar to “not on Path.” This could happen if you try to run pip from a location other than the installation folder.
Most development happens in a custom directory structure different from the pip installation folder.
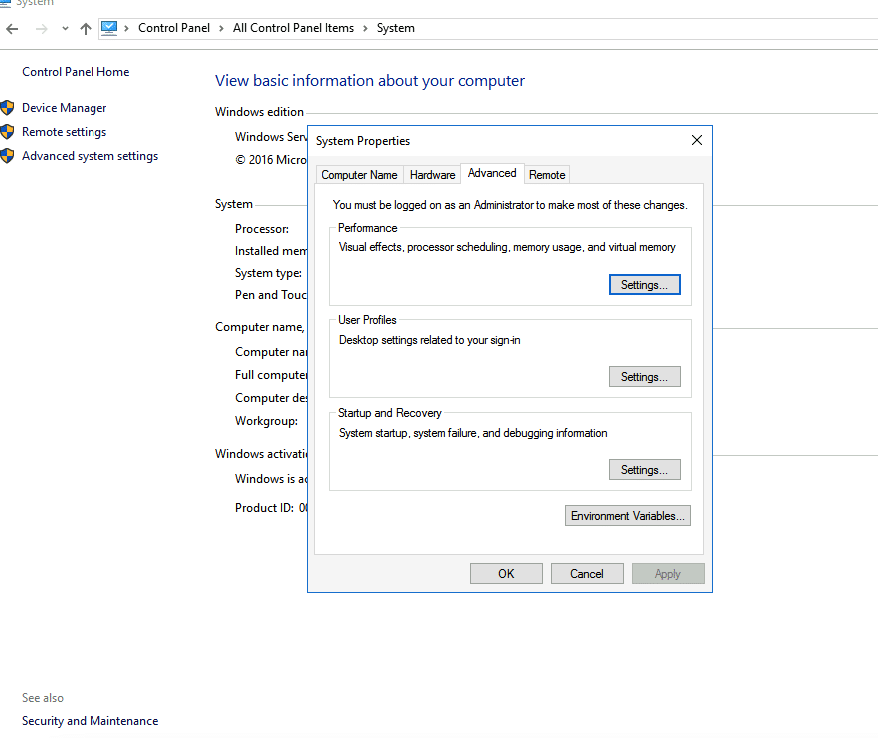
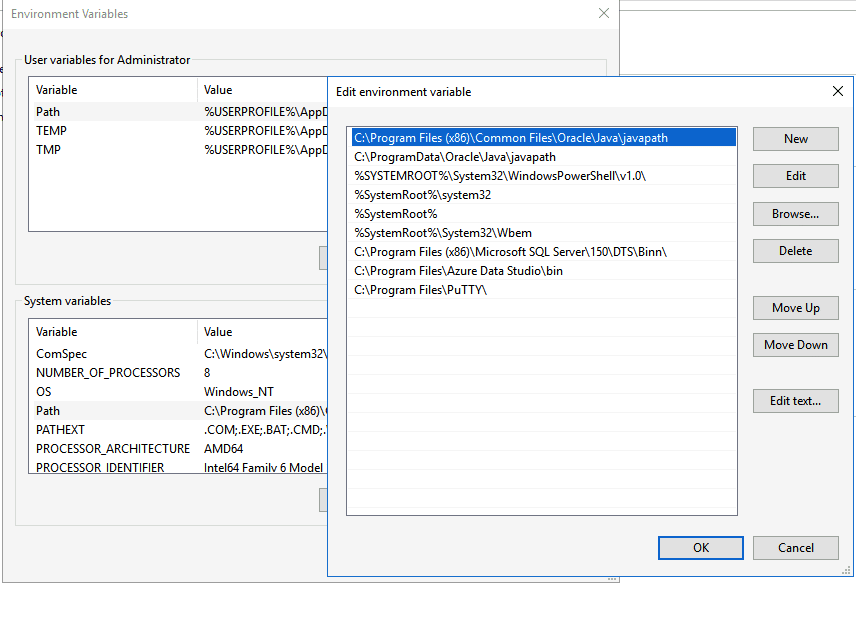
To avoid seeing this error, you need to add pip to Windows Environment Variables. For this, follow the steps:
- Open the Control Panel, select System and Security, then select System.
- Go to the end of the list and select Advanced.
- Click Environment Variables.
- In the System variables section, find and double-click the variable Path.
- Click New and add the path to the folder where you’ve installed pip.
- Click OK to confirm the addition.
Configuring pip on Windows
pip is an essential utility for Python development, and developers often need to upgrade (or downgrade) it. Let’s start with the upgrade process.
Upgrade pip on Windows
Like any other package, it’s essential to ensure that pip is up-to-date so you can benefit from the newest features and security improvements. So, to upgrade pip, launch a Command Prompt window and type in this command:
> python -m pip install --upgrade pip
This command removes the current version and installs the newest version.
Downgrade pip on Windows
Occasionally, you might find switching to an older pip version necessary, mainly due to compatibility issues. You can “roll back” and easily install a specific version.
For this, open the Command Prompt and enter this command. Remember to replace “18.0” with your preferred version number.
> python -m pip install pip==18.0
You should now have the desired version of the pip installed. Verifying with the pip -V command is always a good idea after upgrading or downgrading pip versions.
Uninstall pip on Windows
>
If you want to uninstall pip, type the following command in the Command Prompt:
> pip uninstall pip
The system will ask for confirmation and start the pip uninstall process.
Manage Python Packages With pip
Now that pip has been properly set up and working on your Windows machine, you can easily install and manage Python packages.
Install Python Packages
You can install a Python package using the following command:
> pip install <package-name>
This command will install the latest version of the package. There are scenarios where you don’t need the latest version, mainly because of compatibility issues. So, if you’re looking to install a specific version of a package, use this alternative command:
pip install <package-name==version>
View Package Information
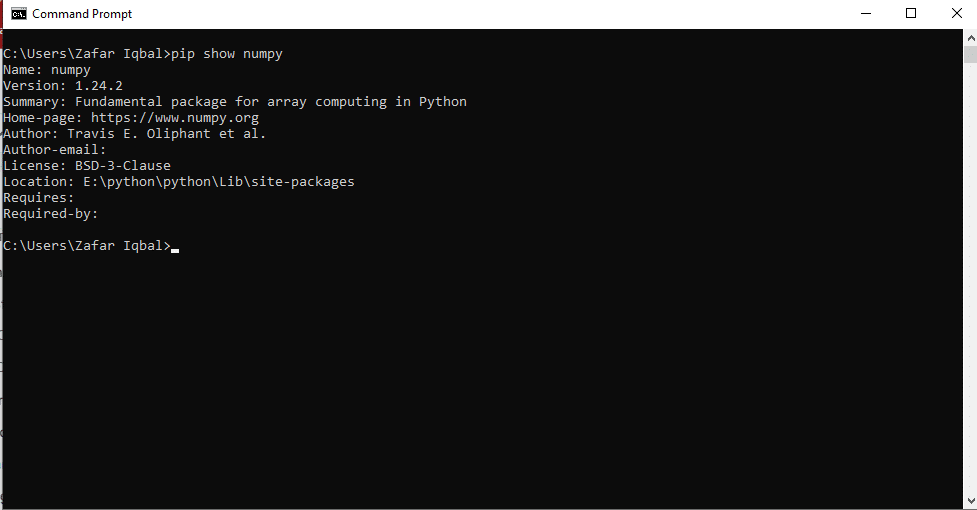
You can view the information of a particular package using the following command:
> pip show <package-name>
This command shows essential package-related information, including the version, a brief description, and any dependencies required to run the package.
Remove Python Packages
If you need to remove a package, pip offers the following command:
pip uninstall <package-name>
Also Read: How to Install Rust on Ubuntu 20.04/22.04
Conclusion
Installing PIP on Windows is an essential skill for Python developers. It opens the door to a vast ecosystem of Python packages and simplifies the management of dependencies. By following the steps outlined in this guide, Windows users can harness the power of PIP and efficiently manage their Python projects. Whether you’re a beginner or an experienced coder, PIP on Windows is valuable in your programming toolkit.
While Windows is often associated with desktop use, hosting providers like RedSwitches bring Windows Server-based solutions to the forefront, offering a seamless environment for Python and beyond, empowering developers to build and deploy with confidence.
Suppose you’re seeking a robust server infrastructure option for your Windows Server projects. In that case, RedSwitches offers the best dedicated server pricing and delivers instant dedicated servers, usually on the same day the order gets approved. Whether you need a dedicated server, a traffic-friendly 10Gbps dedicated server, or a powerful bare metal server, we are your trusted hosting partner.
FAQs
Q: How do I install PIP on Windows?
A: To install PIP on Windows, follow these steps:
1. Open a web browser and go to the official Python website.
2. Download the latest version of Python for Windows.
3. Run the installer and follow the on-screen instructions to install Python.
4. Open the command prompt by pressing Windows + R, typing “cmd,” and pressing Enter.
5. Type “python –version” to check if Python is installed correctly.
6. Type “pip –version” to check if PIP is installed.
Q: How do I upgrade PIP on Windows?
A: To upgrade PIP on Windows, you can use the following command in the command prompt:
pip install –upgrade pip
Q: How do I downgrade PIP on Windows?
A: To downgrade PIP on Windows, you can use the following command in the command prompt:
pip install pip==
Q: How can I check if PIP is installed on my Windows computer?
A: To check if PIP is already installed on your Windows computer, you can use the following command in the command prompt:
pip –version
Q: How can I download and install PIP?
A: To download and install PIP, follow these steps: 1. Open a web browser and go to the official Python website. 2. Download the latest version of Python for your operating system. 3. Run the installer and follow the on-screen instructions to install Python. 4. Open the command prompt by pressing Windows + R, typing “cmd,” and pressing Enter. 5. Type “pip –version” to check if PIP is installed. 6. download the get-pip.py file from the official Python website if PIP is not installed. 7. In the command prompt, navigate to the directory where the get-pip.py file is located. 8. Type “python get-pip.py” and press Enter to install PIP.
Q: How do I run PIP on Windows?
A: To run PIP on Windows, you must open the command prompt and execute the desired PIP command. For example, you can use the following command to install a package:
pip install
Q: What is the command to check the installed version of PIP?
A: To check the installed version of PIP, you can use the following command in the command prompt:
pip –version
Q: How do I install PIP for Python on Windows?
A: To install PIP for Python on Windows, follow these steps: 1. Download and install the latest version of Python on Windows. 2. Open the command prompt by pressing Windows + R, typing “cmd,” and pressing Enter. 3. Type “pip –version” to check if PIP is installed. 4. download the get-pip.py file from the official Python website if PIP is not installed. 5. In the command prompt, navigate to the directory where the get-pip.py file is located. 6. Type “python get-pip.py” and press Enter to install PIP.
Q: How can I manually install PIP on Windows?
A: To manually install PIP on Windows, follow these steps: 1. Open a web browser and go to the official Python website. 2. Download the latest version of PIP (get-pip.py) from the official Python website. 3. Save the get-pip.py file to a directory on your computer. 4. Open the command prompt by pressing Windows + R, typing “cmd,” and pressing Enter. 5. In the command prompt, navigate to the directory where the get-pip.py file is located. 6. Type “python get-pip.py” and press Enter to install PIP.
Q: What should I do if I already have PIP installed on my Windows computer?
A: If you already have PIP installed on your Windows computer, you can use the following command in the command prompt to upgrade it to the latest version:
pip install –upgrade pip


