How to List Docker Images
Learn how to list, filter, inspect, and clean up Docker images using essential commands. This guide covers output formatting, metadata inspection, registry access, and safe image management practices.

Docker has revolutionized how developers build, ship, and run applications.
The core part of Docker is the Docker images, which are lightweight, standalone, executable packages that include everything needed to run a piece of software.
Over time, your system can accumulate a repository of various images, versions, and orphaned layers. This makes it essential to understand how to list, filter, and clean up these images effectively.
In this tutorial, we will discuss all the primary Docker image commands you need to know to efficiently manage a Docker environment.
We’ll begin by defining Docker images. But first, here’s a quick cheat sheet for the essential Docker images commands.
Docker Image Quick Reference
| Command | Purpose |
|---|---|
| docker images | List all local Docker images |
| docker image ls | Modern syntax for listing images |
| docker image prune | Remove unused images |
What are Docker Images?
Docker images are like blueprints or templates used to create containers. They contain everything needed to run an application, including the code, libraries, settings, and tools.
- They are read-only and do not change.
- You can download them from Docker Hub or your own private registry.
- They include a snapshot of the file system and important information about how to run the app.
In short, a Docker image is a ready-made package that helps you start a container quickly and reliably.
Important Docker Image Commands
Here’s a quick reference table of commonly used Docker image-related commands.
| Command | Purpose |
|---|---|
| docker images | List local Docker images (old syntax) |
| docker image ls | List local images (modern syntax) |
| docker image list | Same as docker image ls (alias) |
| docker history | View the layer-by-layer build history |
| docker inspect | Show detailed image metadata |
| docker image prune | Remove unused (dangling) images |
Primary Commands to List Docker Images
When using Docker, knowing how to list Docker images is an essential task that you may need to execute very frequently. While many users may consider this a trivial issue, listing Docker containers help manage your environment, resources, and perform maintenance or troubleshooting tasks for efficient resource management, troubleshooting, and maintenance.
List Docker Images
This is the original and most commonly used command to list all Docker images stored on your machine.
# docker images

This command has been around since the early days of Docker and is guaranteed to work across all versions.
Now, if you want a newer, more structured way of listing containers, use the following command. This produces the exact same output as docker images.
# docker image ls

I recommend this format for scripts and automation as it promotes consistency and can be easier to integrate into automated workflows.
Alternatively, if you need a convenient alias, execute the following command:
# docker image list

Interestingly, this command is simply an alias for docker image ls. So, when you run this command, Docker actually refers to the execution pattern of the docker image ls for results. As such, while less commonly used, it is fully functional. I usually use this command in scripts for better readability and logic comprehension.
Note: All three commands return the same output, so you can use the one you’re most comfortable with.
Understanding the Command Output
When you run a Docker image listing command like docker imagesordocker image ls, you’ll see several columns in the output. Here’s what each column represents in simple terms:
REPOSITORY and TAG
- The REPOSITORY column indicates the name of the image. Think of it as the project or application that the image contains.
- TAG is the version or variant of that image. It helps differentiate between different releases, configurations, or builds of the same image.

For instance, in the above screenshot, the REPOSITORY column shows nginx, meaning the image is for the Nginx web server.
IMAGE ID
The IMAGE ID is a unique identifier assigned to every Docker image. It’s a short, hexadecimal string that helps Docker distinguish one image from another. It is useful when you want to inspect, remove, or run an image.
22bd15417453

You can use this ID in commands like:
# docker rmi 22bd15417453

CREATED
The CREATED column indicates when the image was originally built or downloaded onto your machine. This timestamp helps you understand how recent an image is and can be useful for tracking updates or identifying stale images.
SIZE
The SIZE column shows the disk space used by the image. This is important for managing your system’s storage.

These columns help you keep track of your Docker images, identify versions, and manage space efficiently.
Filtering Docker Images
Docker offers filtering capabilities that allow users to filter the output of the image listings and help find exactly what they need.
By Repository
If you want to list images from a specific repository (e.g., nginx), run the following command:
# docker image ls nginx

This displays all images with the repository name nginx.
By Dangling Status
Dangling images are unused or untagged images that can usually be cleaned up. They often result from building new images that replace older versions or from image updates. Identifying and removing dangling images is a good way to reclaim disk space.
# docker image ls -f dangling=true

This command is useful for identifying images that are often safe to delete.
By Label
Docker allows users to add custom metadata to images in the form of labels. These labels help organize images by environment, project, or development stage.
If your images have labels, you can filter them by label values.
# docker image ls –filter “label=stage=prod”
This command lists only images labeled with stage=prod
Formatting Output for Scripts and Humans
Docker provides powerful tools to customize output, examine image details, and interact with image registries. These capabilities are invaluable for both human readability and automated scripting.
To change how the output looks, use the –format option, which is great for scripts or cleaner views.
# docker image ls –format “{{.Repository}}:{{.Tag}} -> {{.Size}}”

Inspect Image Metadata
To understand how an image was built or to view its detailed configuration, Docker offers commands to inspect its build history and full metadata.
View Build History
The docker history command provides a layer-by-layer breakdown of how an image was built.
# docker history e344e5a2f13c

Replace <image_id> with the actual ID to view the image’s build layers.
Inspect Full Metadata
If you want to view the detailed information like environment variables, entrypoints, and labels, run the following command:
# docker inspect e344e5a2f13c
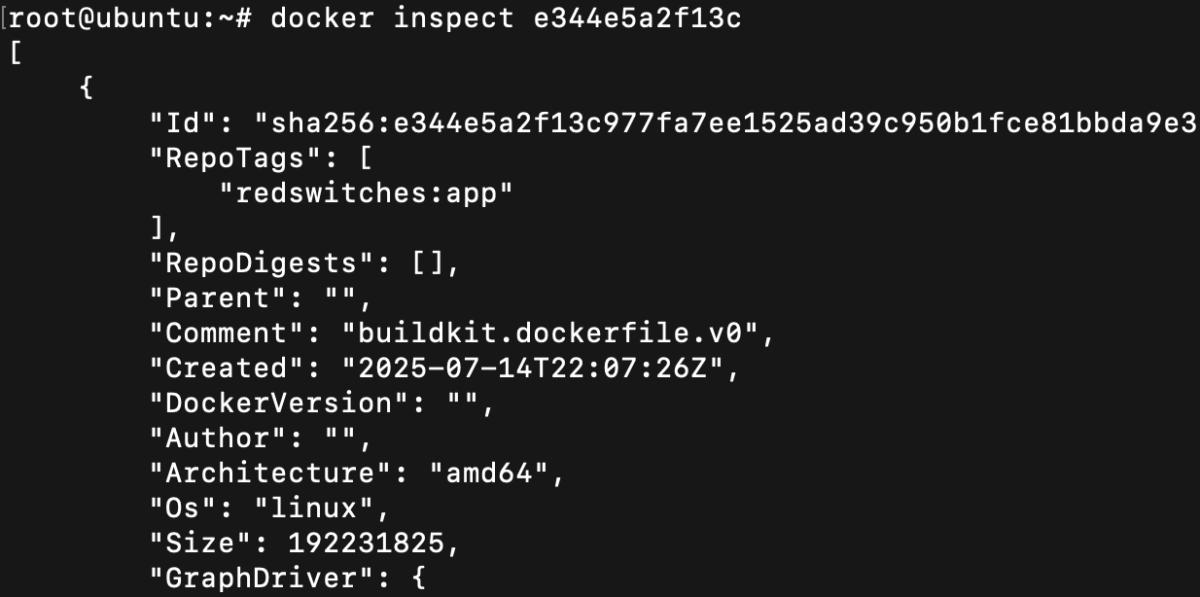
The command provides a comprehensive JSON output containing all metadata about a Docker image. I use this command to quickly check the version information to avoid compatibility conflicts
Listing Images in Registries
Interacting with Docker registries (where images are stored) is fundamental for sharing and distributing images.
Docker Hub (Public Registry)
You can’t directly list all images from Docker Hub using a CLI command. However, you can either:
Visit hub.docker.com to explore available images and repositories, or if you know the name of an image, you can download it to your local machine using the following command:
# docker pull ubuntu

Private Registry Example
If you’re using your own Docker registry, you can list all available images using a curl command.
# curlhttps://your-private-registry/v2/_catalog
Replace the URL with your actual registry address.
These commands help you manage, inspect, and work with Docker images efficiently, whether locally or in a registry.
Cleaning Up Unused Docker Images
Over time, your system may collect unused or old Docker images that take up disk space. Here’s how to clean them up safely.
Display Disk Usage
Before you start deleting anything, it is important to understand what’s consuming disk space in your Docker environment.
To check the disk usage of Docker images, containers, and volume, execute the following command:
# docker system df

This helps you see what’s taking up space before deleting anything.
Remove Unused Images
Now, to delete unused (dangling) images, use the following command:
# docker image prune
Warning: This command removes all images not associated with a container. Use with caution.
You can also apply filters to delete specific images:
# docker image prune –filter “until=24h”
I use the docker image prune command in my weekly and monthly CI/CD pipeline cleanup scripts where the command removes unused images from the process.
Troubleshooting: Image Not Showing Up
There are times when the image won’t be shown in the list. This could be for various reasons, such as failed image build or incorrect tags.
If an image isn’t listed, consider the following checks:
Ensure Docker Daemon is Running
Docker operates as a background service called the Docker daemon. If this service isn’t running, none of your Docker commands will work, and you certainly won’t see any images.
To check the status of the Docker daemon, run the following command:
# systemctl status docker

Check for Root Access / Permissions
While less common with modern Docker installations, permission issues can prevent you from seeing all Docker resources.
To rule out permission problems, run the following command:
# docker image ls
Verify the Image
If you just downloaded an image, use the grep command to confirm if it’s successful:
# docker image ls | grep ubuntu

Conclusion
Understanding the primary Docker image commands is necessary for anyone working with containerized applications. In this comprehensive guide, I covered listing and filtering to inspecting and cleaning up. I included all the necessary Docker commands for these basic daily tasks.
Remember, use filters and formatting for cleaner results in scripts, regularly clean up old or unused images to save disk space, and verify your Docker service is running if things aren’t showing up.
FAQs
Why is my Docker image not showing up in the list?
There are several reasons your image might not appear when you run docker images or docker image ls. It could be due to a failed build, incorrect tagging, using a different Docker context or registry, or simply filtering output unintentionally. Make sure the Docker daemon is running, and try docker image ls -a to list all images, including intermediate or dangling ones.
What is the difference between docker images, docker image ls, and docker image list?
All three commands serve the same purpose: they list Docker images stored locally.
docker images is the classic and widely used command.
docker image lsis the newer, structured format recommended for automation.
docker image list is a lesser-known alias of docker image ls. This is a non-standard alias
Choose the one that best suits your personal or automation needs.
How can I filter Docker image listings by repository name or label?
To filter Docker images, you can use the –filter (or -f) flag. For example:
By repository: docker image ls nginx
By label: docker image ls –filter “label=env=prod”
By dangling status: docker image ls -f dangling=true
These filters help you zero in on specific images, making image management easier and more efficient.
Why is my Docker container not starting even though the image exists?
If your Docker container fails to start despite the image being present, check the following:
Port conflicts: Another service may be using the same port (docker ps to check).
Missing dependencies: The image might rely on volumes, environment variables, or networks that aren’t set up.
Entrypoint errors: Review the image’s ENTRYPOINT/CMD with docker inspect .
Permissions: The container may lack permissions to write to mounted volumes (chmodor –user flag).
Logs: Run docker logs (or docker run –rm -it sh to debug interactively).
Pro Tip: Use docker run –rm -it bash to test the image manually before full deployment.
How do I clean up unused Docker images, containers, and volumes to save space?
Docker can accumulate unused artifacts over time. Here’s how to clean them up:
Remove stopped containers:
docker container prune
Delete dangling (untagged) images:
docker image prune
Remove all unused images (not just dangling):
docker image prune -a
Wipe volumes, networks, and build cache:
docker system prune –volumes
(Add -f to skip confirmation prompts.)
Warning: This removes all unused resources. Use docker system df first to check disk usage.
Jignesh J
Technical Writer
Jignesh is a senior server administrator at RedSwitches. He keeps everything up & running while tackling advanced server management and high-availability cluster issues. He’s a big fan of blockchain and web security. When not at his terminal, he loves to work out and is a fitness freak. If you have any support issues, contact him at [[email protected]](/cdn-cgi/l/email-protection)

Ubuntu vs Linux: Key Differences Explained
Linux is the kernel, while Ubuntu is a complete operating system built on it. This guide breaks down their key differences, use cases, and when to choose each.

Reduce Docker Image Size: Best Practices to Slim Your Images
Docker image size can become a serious issue as you add more code to the image. Learn how to reduce Docker image size and optimize Dockerfiles for production to speed up CI/CD pipelines and improve container efficiency.

Best Linux Distros 2026, Full Guide for Beginners, Developers, Gamers & Servers
Match your hardware, workflow, and skill to the right Linux distro in 2026. Compare 23 top picks, Mint, Ubuntu, Fedora, Arch, Bazzite, covering beginners, developers, gamers, and servers.
Power Your Next Project With Bare Metal
Instant provisioning, zero setup fees, and 24/7/365 human engineers across 20+ global locations.