How to Install a GUI on Ubuntu Server (A Step-by-Step Guide)
Learn how to install lightweight GUIs like Xfce or LXQt, switch back to CLI, and optimize performance. Perfect for admins balancing usability and efficiency
Ubuntu Server is a powerful, free, and open-source Linux distribution developed by Canonical. It’s designed primarily to operate without a graphical user interface (GUI). This makes it fast, efficient, and ideal for server environments.
However, if you’re new to managing servers or prefer a visual interface, adding a GUI can significantly simplify system administration and monitoring tasks.
In this step-by-step tutorial, we will discuss how to install a GUI on Ubuntu Server.
First, understand why you need a GUI on an Ubuntu server.
Why Add a GUI to Ubuntu Server?
While Ubuntu Server is designed to run without a graphical interface (GUI) for maximum efficiency and security, there are cases where installing one makes sense.
This can be for beginners learning Linux, developers that need visual tools, or administrators managing GUI-dependent applications.
However, a GUI consumes additional RAM and CPU resources and increases security risks. In many cases, a GUI is unnecessary for most server tasks, which are better handled via SSH or command-line tools.
For production environments, staying GUI-free is ideal, but if you’re using Ubuntu Server as a test machine, workstation, or training system, a lightweight desktop environment (like XFCE or LXQt) can be a practical compromise.
Always remember that the more minimal your setup, the faster and more secure your server will be.
Choosing a Desktop Environment for Ubuntu Server
Adding a desktop environment (DE) introduces a graphical interface to your Ubuntu Server. Like we said before, Ubuntu Server is designed for optimal speed, security, and efficiency without a GUI.
However, at times, users may need the visual input. In such instances, choosing the right DE can make all the difference in performance and usability.
The following are some of the top choices you can find:
GNOME(Default)
- Delivers a modern, polished look with extensive features.
- Demands significant system resources (requires at least 2GB RAM).
- Best suited for high-powered servers where a full desktop experience is essential.
Xfce(Recommended)
- Lightweight but fully functional
- Strikes an ideal balance between speed and usability.
- The preferred choice for most scenarios where a GUI is needed on a server.
LXDE(Lightest)
- Extremely fast with minimal RAM usage
- Provides the basic essentials for graphical management of server environments.
- Ideal for servers with very limited resources or older hardware.
Remember:
- The command-line interface (CLI), without any GUI, remains the fastest and most secure option.
- Install a desktop environment only if you truly need one.
- For most users, Xfce offers the best compromise between performance and functionality.
Now that you have a basic idea of why and when we need a GUI for Ubuntu servers, we are ready to go onto the details of the step-by-step process to install a GUI on Ubuntu servers.
However, before we move on to the installation part, here are the prerequisites:
The Prerequisites
Ensure you have the following:
- An Ubuntu server (Ubuntu 22.04 is used in this guide).
- A user account with sudo or root access
How to Install a GUI on Ubuntu Server (Step-by-Step)
Once your system meets the prerequisites, begin with these installation steps.
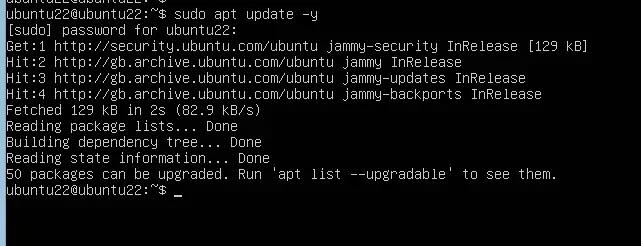
Step #1: Update Your System’s Package Index
Start by updating your system’s package index to ensure they are up-to-date.
# sudo apt update
# sudo apt upgrade -y
Step #2: Install a Desktop Environment
Choose a desktop environment (DE) that fits your needs. Here, we will demonstrate how to install GNOME and Xfce.
Install GNOME (Full Ubuntu Desktop Experience)
If you prefer the complete, feature-rich Ubuntu Desktop experience, including all its default applications and a polished interface, install GNOME.
Execute the following command to install GNOME:
# sudo apt install ubuntu-desktop -y
Install Xfce
For a lighter yet fully functional graphical environment, Xfce is the recommended choice. It provides a good balance of features, performance, and resource usage, making it ideal for most server GUI needs.
Run the following command to install Xfce:
# sudo apt install xubuntu-core -y
Step #3: Install a Display Manager
A display manager is essential for starting and managing your desktop environment. It provides the graphical login screen and handles the session after you log in.
If you installed GNOME (ubuntu-desktop), the GDM (GNOME Display Manager) will be installed by default. You don’t need to install it separately.
However, if you installed Xfce (xubuntu-core) or a similar lightweight DE, you’ll need to install a display manager like LightDM.
To set up LightDM, execute the following command:
# sudo apt install lightdm -y
Step #4: Configure the GUI to Launch Automatically
By default, Ubuntu Server boots into the command-line interface (multi-user.target). To automatically boot into your newly installed GUI, you need to change the system’s default target.
Start by checking the system’s default target, as this shows which services are launched at system bootup:
# systemctl get-default
This command should return multi-user.target, indicating a non-graphical boot. You can additionally run the following command to set the default target to graphical mode:
# sudo systemctl set-default graphical.target
Step #5: System Reboot
Once the installation and configuration are complete, restart your server to apply the changes into effect:
# Sudo reboot
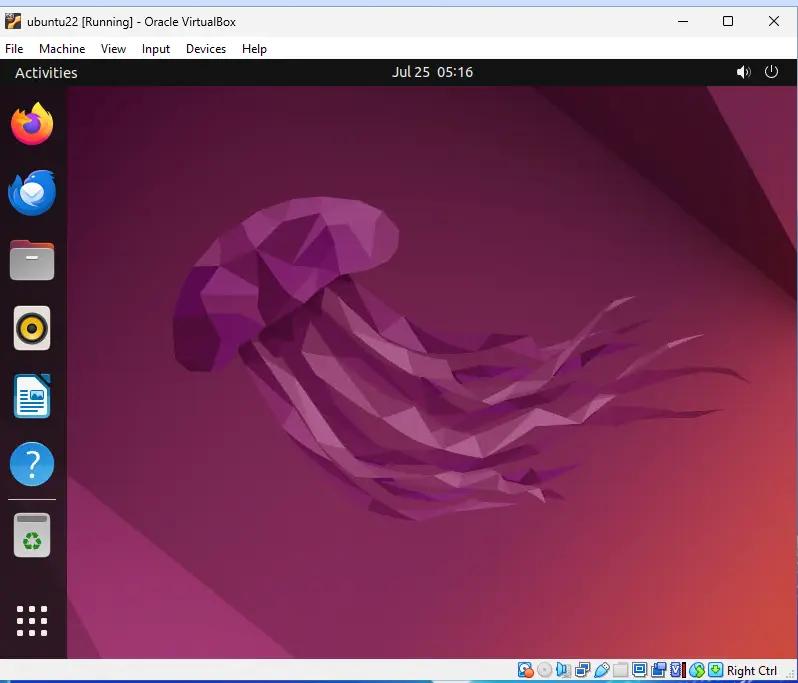
Once rebooted, you should see the login screen of the desktop environment you installed. Enter your username and password to log into your graphical desktop.
Manage the GUI
If you ever wish to revert to the non-graphical command-line interface as the default boot target, you can easily switch back.
Launch the terminal and run the following command:
# sudo systemctl set-default multi-user.target
Conclusion
While Ubuntu Server is optimized for speed, security, and efficiency without a GUI, adding a desktop environment like Xfce or GNOME can make system administration more intuitive and approachable.
FAQ
Does Ubuntu Server OS need a GUI?
No, Ubuntu Server does not require a GUI by design. It is optimized for headless operation, relying on the CLI for system administration, which reduces resource overhead and improves performance, especially in server environments. However, a GUI can be installed if a graphical environment is needed for specific applications or ease of use.
Which GUI is best for Ubuntu Server?
The best GUI for Ubuntu Server depends on your use case and system resources:
Lightweight GUIs (Recommended for Servers):
- Xfce: Fast, low-resource, and highly customizable.
- LXQt/LXDE: Extremely lightweight, ideal for minimal setups.
- MATE: A balanced option with moderate resource usage.
Full Desktop Environments (For Workstation-like Use):
- GNOME: Default Ubuntu Desktop environment (higher resource usage).
- KDE Plasma: Feature-rich but heavier than lightweight alternatives.
For most server use cases, Xfce or LXQt are recommended due to their efficiency.
What is the default GUI of Ubuntu?
The default GUI for Ubuntu Desktop is GNOME, but Ubuntu Server does not include a GUI by default. If a GUI is installed manually, GNOME can be selected, but lightweight alternatives are preferable for server environments to minimize unnecessary resource consumption.
Which GUI Uses the Least RAM?
For Ubuntu Server, lightweight GUIs are preferred to minimize memory consumption. Here are our recommendations:
- For lowest RAM usage: LXDE or LXQt (best for servers).
- For better usability with slightly higher RAM: Xfce.
How to Revert to CLI from a GUI in an Ubuntu Server Environment?
If you no longer need a GUI on your Ubuntu Server, you can disable it to return to a pure command-line interface (CLI), freeing up system resources.
Temporarily stop the GUI and boot into CLI:
sudo systemctl set-default multi-user.target
sudo reboot
To re-enable the GUI later:
sudo systemctl set-default graphical.target
sudo reboot
Additionally, you can ensure the system boots into CLI for minimal resource usage:
sudo systemctl set-default multi-user.target
Narendra Pawar
Data Center Engineer
Narendra Pawar is a Data Center Engineer with over a decade of experience in IT infrastructure, overseeing RedSwitches' Asia data center operations in India. His work spans server installation and maintenance, network administration, and 24x7 data center operations across Linux and Windows.
Ubuntu vs Linux: Key Differences Explained
Linux is the kernel, while Ubuntu is a complete operating system built on it. This guide breaks down their key differences, use cases, and when to choose each.
Reduce Docker Image Size: Best Practices to Slim Your Images
Docker image size can become a serious issue as you add more code to the image. Learn how to reduce Docker image size and optimize Dockerfiles for production to speed up CI/CD pipelines and improve container efficiency.
Best Linux Distros 2026, Full Guide for Beginners, Developers, Gamers & Servers
Match your hardware, workflow, and skill to the right Linux distro in 2026. Compare 23 top picks, Mint, Ubuntu, Fedora, Arch, Bazzite, covering beginners, developers, gamers, and servers.
Power Your Next Project With Bare Metal
10 min delivery, zero setup fees, and 24/7/365 human engineers across 20+ global locations.