Windows Command Prompt: Learn 70+ Essential Windows CMD Commands
Discover the essential Windows CMD commands with our comprehensive guide to the Windows Command Prompt. Learn how to navigate and utilize key commands efficiently.
The Windows Command Prompt, also known as CMD or Command Line Interface (CLI), is a powerful tool in the Windows operating system.
Welcome to our beginner-friendly guide on common Windows CMD commands!
If you’ve ever found yourself staring at the Command Prompt screen, wondering what to do next, you’re in the right place. The Command Prompt may seem intimidating at first, but once you get the hang of it, you’ll discover a whole new world of possibilities for managing your Windows system efficiently.
While modern graphical user interfaces have become the norm, the Command Prompt remains an essential tool for advanced users and system administrators.
These commands help to perform various tasks, automate processes, troubleshoot issues, and unleash the full potential of your Windows machine.
This article will introduce some of the most useful CMD commands. These commands cover critical scenarios, including network administration, device management, and file and data manipulation.
The Prerequisites
Before running the commands mentioned in this article, make sure you have the following:
- A system running a recent Windows version
- A user account with administrator privileges
01. arp Command
The arp (address resolution protocol) command is used to view and manage entries in the ARP cache. This cache stores tables that match IP addresses to their corresponding physical addresses.
Command Syntax
The syntax for the arp command is:
*> arp <options> <address>*
Usage
When used without parameters, the arp command displays the help window. To view the ARP cache table, execute the following command:
*arp -a*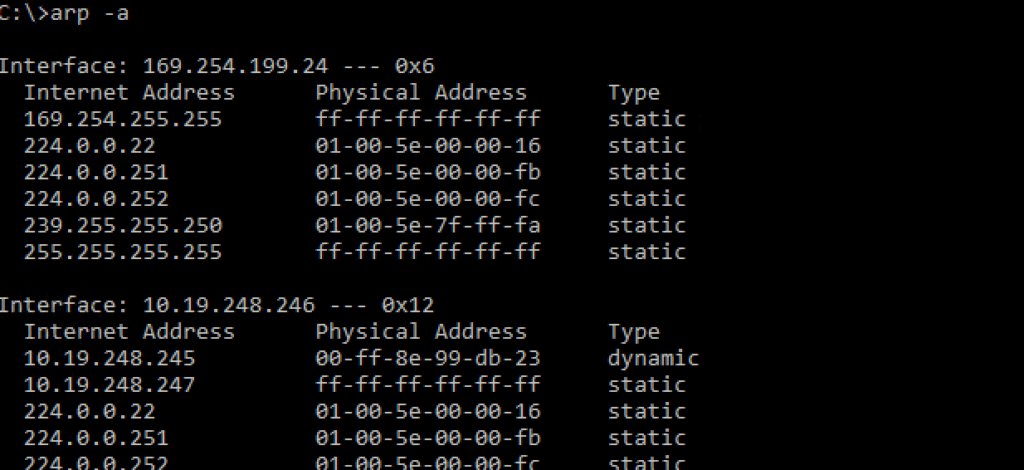
The output of the arp -a command lists all current ARP entries organized by the interface.
02. assoc Command
The assoc (association) command is used to view and manage file extension associations on the system. You can control how files are opened and handled by specifying the file extension and its associated file type.
Command Syntax
The syntax for the assoc command is:
*> assoc .<extension>=<filetype>*
Usage
When used without parameters, the command prints the current file extension associations. To view specific file associations, simply provide the file extension as an argument:
*assoc .<extension>*
The output displays the file type associated with the specified file extension.
Example
To change a file association, use the following format:
*> assoc .<extension>=<newfiletype>*
To remove a file association, add a space after the equals sign:
*> assoc .<extension>=*
03. attrib Command
The attrib (attribute) command is used to view or modify file attributes such as read-only, hidden, and system attributes.
Command Syntax
The syntax for the attrib command is:
> attrib <+ or -> <attribute>
Usage
By using the plus sign (+) or minus sign (–) followed by the attribute letter, you can set or remove file attributes. Without any options, the command shows file attributes in the current directory.

Example
To set a file with read-only (R) and hidden (H) attributes, use:
*attrib +R +H <filename>*
To remove the hidden attribute and make the file visible again, use:
*> attrib -H <filename>*
04. bcdboot Command
The bcdboot (boot configuration data boot) command is used to set up a system partition by copying Boot Configuration Data (BCD) files into an empty partition.
Command Syntax
The syntax for the bcdboot command is:
*> bcdboot <path>*
Usage
Specify the location where you want to copy the BCD files. For example, to copy the BCD files into the C:Windowsdirectory, use:
*> bcdboot C:Windows*
The output confirms the successful creation of BCD files in the specified location.
05. cd Command
The current directory location can be seen or modified with the cd (change directory) command.
Command Syntax
> cd <directory>
When used with a directory parameter, the command outputs the current working directory.
If you wish to switch to another directory, simply add the name of the directory as the parameter. For instance, to change the location to a directory named Users, you can use the following command:
cd User
As you can see, the prompt changes to reflect the successful execution of the cd command.
Switch to a Different Disk
The /d flag before the path allows you to move to a destination located on a different disk. For instance, to switch to disk G, use the following version of the cd command:
cd /d G: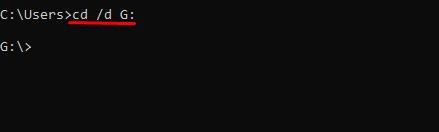
You can also use the cd command to go back to the previous directory:
cd ..This version of the cd command takes you one step up the directory tree.
The cd command is implemented with similar functionalities in almost all Linux distributions. Here’s our helpful guide to the cd command in Linux.
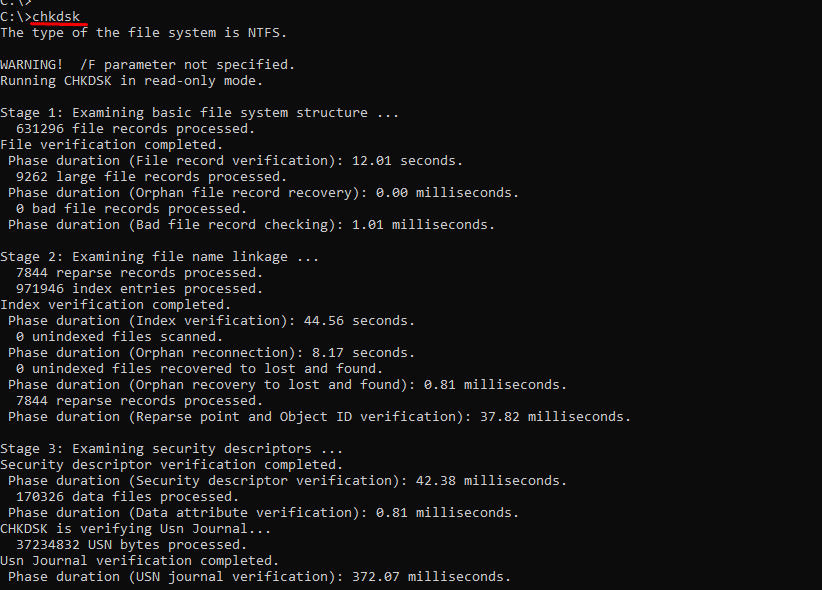
06. chkdsk Command
The main use of the chkdsk command is to scan the local file system and metadata for any potential errors.
Command Syntax
> chkdsk <volume> <options>
Note that If you use the chkdsk command without any parameters or flags, it will display the present state of the disk but doesn’t rectify any errors.
You can use additional settings, like the /f option, to fix disk errors.
chkdsk <volume> /f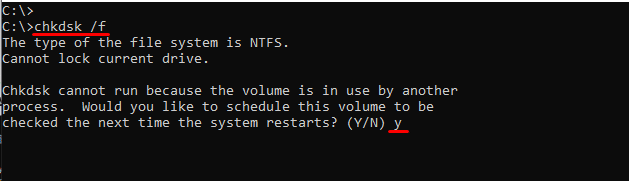
As you saw, the command makes an effort to correct disk defects. If the disk is in use by another user, the command won’t run because it could potentially disrupt the process of saving data for that user.
If you chose Y, the command would run after the next system restart. On the other hand, the system remains unaffected if you enter N.
07. choice Command
This is an interesting command where you ask a user to choose from a list of predetermined choices.
Note that if you don’t provide a list of choices, the system will simply generate two options – Y andN.
You can use the /c flag to use the command to show a list of choices. For instance, the following version displays three choices, Y, N, and C.
Command Syntax
choice /c ync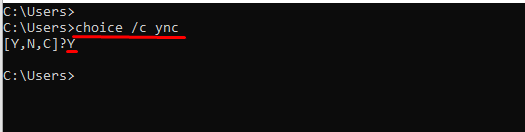
You can add additional information with the /m flag. For instance, in the following example, you can see that we combined the /c and /m flags to offer more information about the choices displayed on the screen:
choice /c ync /m "Yes, No, Continue"
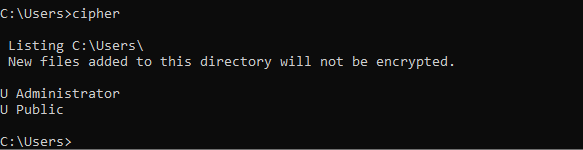
08. cipher Command
The cipher command displays and changes a file or directory’s encryption.
Command Syntax
> cipher <option> <file or directory>
When used without parameters, the command displays the encryption status for all files and directories in the current location. As you can guess, in the output, U stands for unencrypted, whereas E stands for encrypted.
Next, you can use the /e option can be used to encrypt a file in the current directory:
cipher /e <File Name>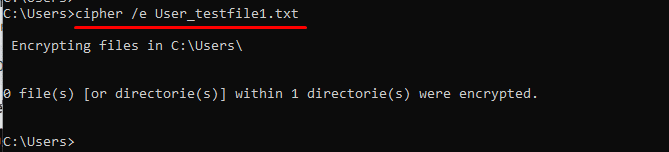
As you can see, the command encrypted the file. This can be further verified by running the command without any parameter.
The E indicates that the file has been encrypted.
09. clip Command
The clip command is your ticket to hassle-free copying in the Command Prompt. It allows you to copy the output of a command or the contents of a file directly to the clipboard.
Command Syntax
To copy the output of a command, simply pipe it to clip:
> <command> | clip
To copy the contents of a file, use redirection:
> clip < <filename>
Usage
After copying, you can paste the contents anywhere using CTRL+V or the right-click menu in CMD.
Example
To copy the current directory path, use:
> cd | clip
To copy the contents of a file named example.txt to the clipboard, use:
> clip < example.txt
10. cls Command
The cls command is your trusty tool for quick cleanup in the Command Prompt. It wipes the screen clean, leaving you with a fresh slate to work on.
Usage
Simply type cls and hitEnter to clear the screen contents. Note that the previous contents and output won’t return to the screen.
11. cmd Command
The cmd command is your gateway to launching a new Command Prompt interpreter. It allows you to run commands without disturbing your current session.
Command Syntax
To start a new instance of the command interpreter, use:
> cmd <options> <command>
Usage
Without additional parameters, cmd displays the current cmd.exe program version. You can also use it to test commands and return to the original session using the /c parameter or stay in the new session with the**/k** parameter.
Examples
To test a command and return to the original session, use:
cmd /c <command>
To run a command and stay in the new session, use:
> cmd /k <command>
12. color Command
The color command modifies the text and background colors in the terminal.
> color <background><text>
The color choices are based on hexadecimal values between 0 and f. You can run the help command to get the full list of color choices.
> help color
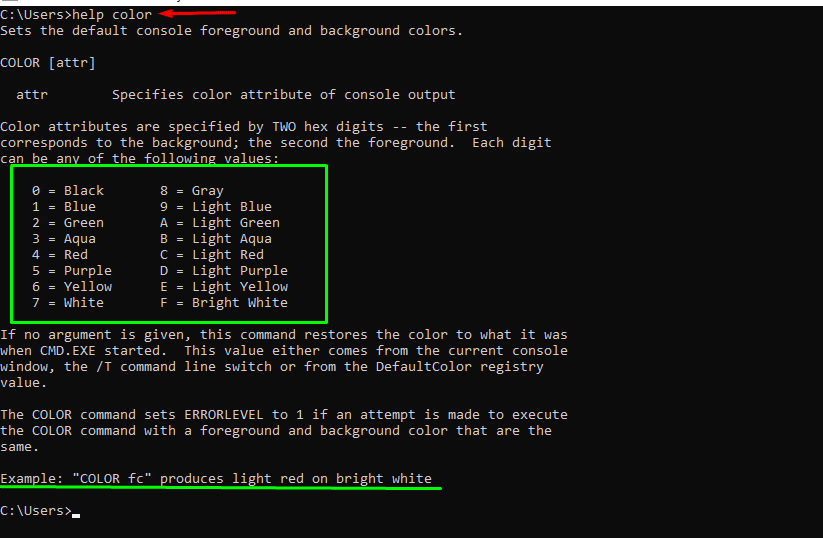
For instance, use the following command to make the background purple (5) and the typeface light green (a).
> color 5a

Run the color command without any parameters to go back to the console’s default colors.
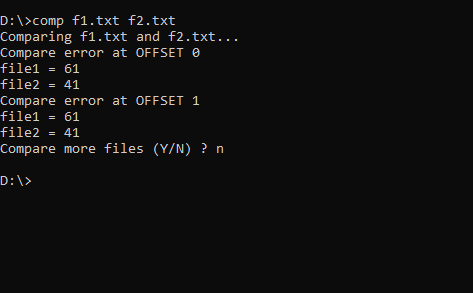
13. The comp Command
The comp (short for compare) command is used to compare the contents of two files. When two files vary, the command indicates that the contents are different.
Command Syntax
> comp <file 1> <file 2> <options>
The comp command also provides an interactive prompt to enter file names and extra options when used without any arguments.
The following screenshot shows the output when the comp command is used to compare two files, f1.txt and f2.txt.
14. compact Command
The compact command launches a built-in utility for compressing (and decompressing) files and directories.
Command Syntax
> compact <options> <file>
When used without any additional parameters, the command reports the current directory’s compression status.
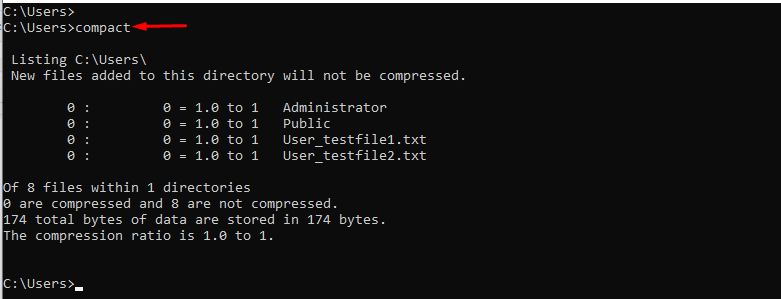
If you wish to compress a file, use the /c flag and the file name:
compact /c User_testfile1.txt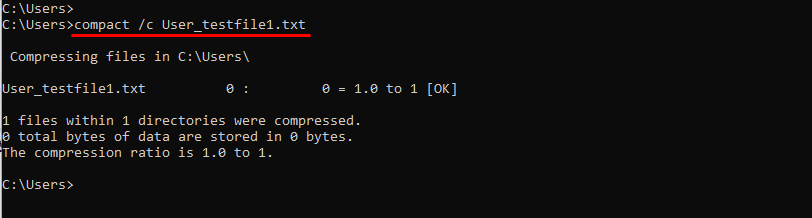
In contrast, you can use the /u argument to uncompress a file.
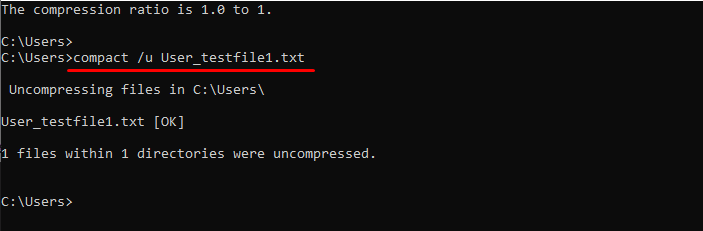
The compact command is a really simple way of compressing big files and directories to conserve disk space.
15. copy Command
The copy command is used to copy one or more files from one location to another.
Command Syntax
> copy <options> <source> <destination>
For example, try the following command to duplicate the content of one file into another at the same location:
copy User_testfile1.txt User_testfile1_copy.txt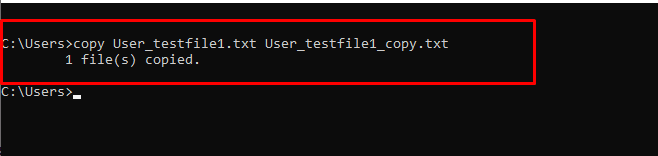
The command transfers all the contents from the source file into the new one.
16. date Command
The date command displays and changes the system’s current date.
When used without any parameters, the command prints the current date and asks if you wish to set a new date.
Command Syntax
date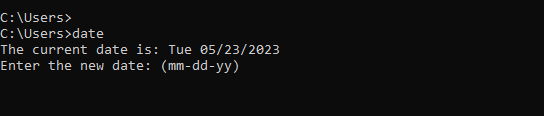
To change the system’s current date, enter the date in the format mm-dd-yyyy, or press CTRL+C to quit.
To print simply the current date without changing the system state, use the /t parameter:
date /t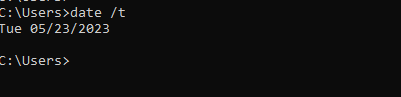
Our tutorial on the date command in Linux systems covers several critical use cases. We recommend giving it a read if you are interested in how the date command operates in a similar manner in Linux systems.
17. defrag Command
Did you know that files are stored as fragments on the disk?
The defrag command consolidates file fragments and “defrags” the disk. As a result, you’ll see a marked improvement in the system’s performance.
Command Syntax
> defrag <volumes> <options>
You can use the following version of the command to defrag the disk and optimize the disk storage structure.
defrag C: /d /g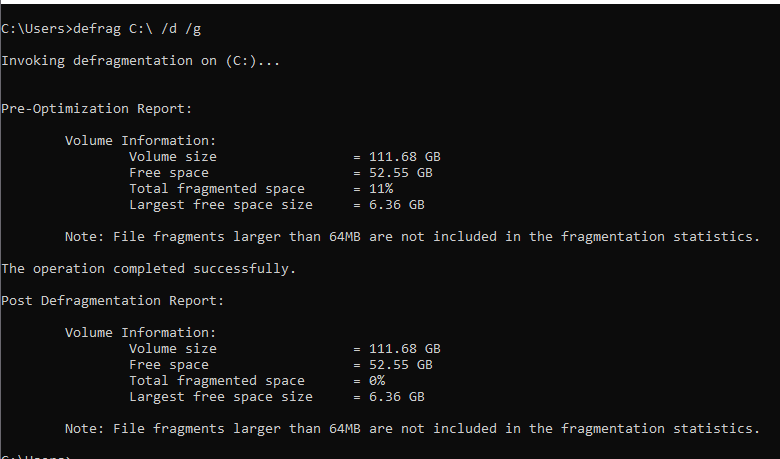
18. del and erase Commands
The del and erase commands have similar functionality in removing files permanently from the disk. We recommend you study the technical differences between deleting and erasing data from disk.
Command Syntax
del <options> <file(s)>erase <options> <files(s)>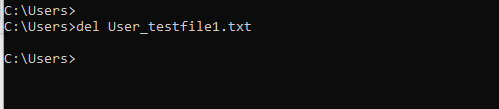
19. driverquery Command
Administrators often need to view the details of the installed device drivers and related information.
For this, you can use the driverquery command. This command works for both local and remote systems.
driverquery <options>
As you can see, when you use driverquery command without any parameters, it displays device driver information for the local computer. You can use additional parameters to format the output or run the command on a remote machine.
20. dir Command
The dir (directory) command is your go-to navigator for exploring directory contents in the Command Prompt. It displays files, subdirectories, and additional information about them.
Command Syntax
To use the dir command, follow this syntax:
> dir <drive><path><filename> <options>
Usage
When used without options, dir provides information about the current directory. To view the contents of a specific drive, simply specify the drive letter.
Example
To view the contents of the C: drive, type:
dir C: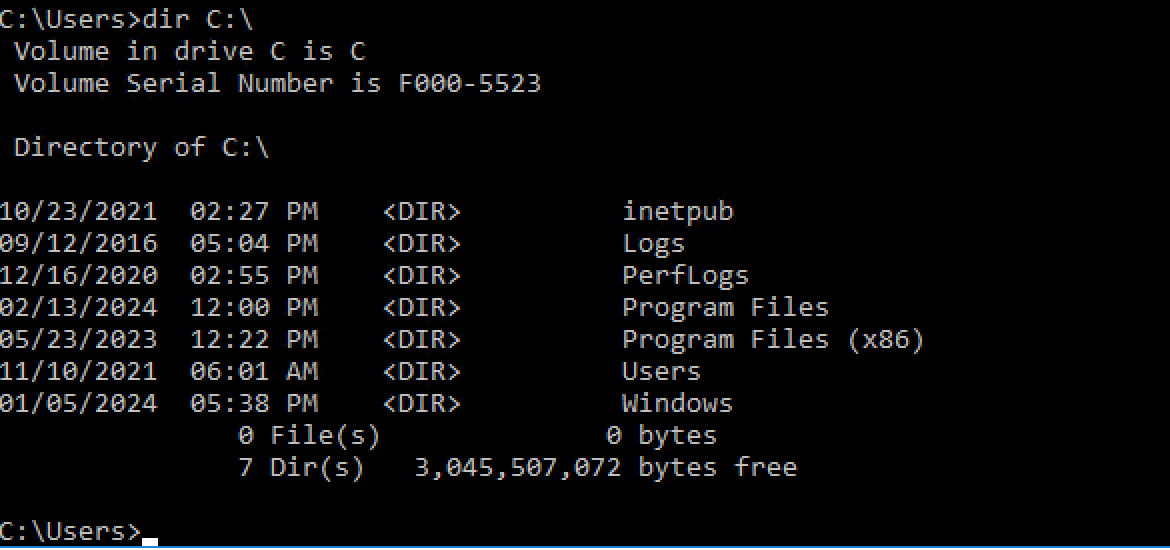
The output includes details like volume drive, serial number, modification time of directory contents, and file/directory count.
21. doskey Command
The doskey command is your command recorder in the Command Prompt. It launches the doskey.exeutility, allowing you to recall command history and create macros for quick execution.
Usage
To view command history from the current session, use:
doskey /history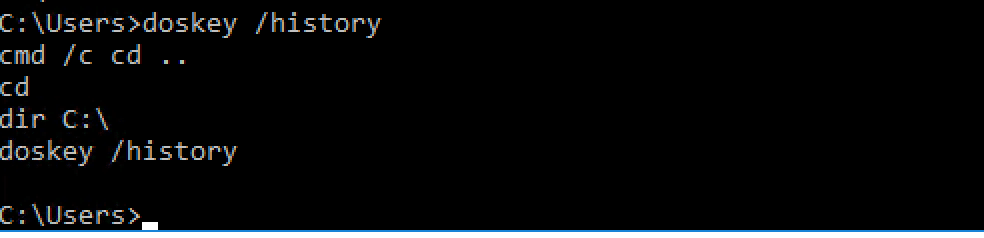
Output
The output displays all commands entered in the CMD session, listed from oldest to newest.
22. echo Command
The echo command is like your trusty messenger in the Command Prompt. It’s used to display messages on the console and adjust command settings.
Command Syntax
To use echo, simply follow this syntax:
> echo <message>
Usage
When used without any parameters, echo displays the current settings. To print a message to the screen, just specify the message within double quotes.
Example
To greet the world with a “Hello, world!” message, type:
echo "Hello, world!"
The echo command is commonly used in scripts to provide helpful information during script execution.
23. exit Command
The exit command is your escape route in the Command Prompt. It’s used to terminate the current batch script or the command interpreter session.
Usage
To exit a batch script, include the /b parameter:
*> exit /b*
Without the /b option, exit closes the command interpreter, ending the session.
24. fc Command
If you need to compare two or more files, use the fc (file compare) command. If there is a discrepancy between the files, the output prints the contents to the console.
Command Syntax
> fc <options> <file 1> <file 2>
25. find Command
You may use the find command to look for a specified string in a file and get the relevant line of text. When a match is discovered, the result is the appropriate output.
Command Syntax
> find <string> <file>
The command searches for an exact match before returning the file name and the text line containing the string. If the command can’t find the text in the file, it simply returns the filename.
26. ftype Command
This command displays and modifies the file type and extension association.
Command Syntax
> ftype <file type>=<open command>
As you can see, the command displays the programs associated with each file so that you know which file extension is set to open with which software.
If you wish to find out the current file extension and type association for a specific file type, simply add it as the parameter to the command. For instance, to find the software associated with text files, use the following command:
> ftype txtfile
27. findstr Command
The findstr (find string) command is your go-to detective in the Command Prompt. It’s akin to the find command but returns the entire line where the text is found, sans the file name. This feature makes it particularly handy in scripts where you need just the relevant line without the file name.
Command Syntax
To use findstr, use the following syntax:
> findstr <string> <file>
Usage
For instance, use the following command to find the string text in a file:
>findstr "text" <file>
If the command doesn’t yield any result, it means the string isn’t present in the file.
28. getmac Command
The getmac command retrieves all network cards’ MAC addresses from the computer or network. The command further displays the protocols related to each address.
Command Syntax
> getmac <options>
The command offers several options that let you format the output or get comprehensive information about a remote computer. For instance, use the following command to get the MAC addresses in a CSV file:
> getmac /fo csv
29. help Command
The help command acts as your virtual guidebook in the Command Prompt, offering detailed insights into specific commands. When used without parameters, it lists all available system commands.
Command Syntax
To seek help for a particular command, use this syntax:
> help <command>
Usage
For instance, to list down the options of the cd command, simply type:
> help cd
You can easily navigate to the next screen by pressing any key. Alternatively, hit CTRL+Cto make a quick exit.
For non-system commands, append /? to the command to access the help window.
30. hostname Command
The hostname command is your window into the identity of your machine in the vast digital landscape. It’s a simple command that displays the name of your computer in the Command Prompt.
Usage
To reveal the hostname of your machine, just type:
> hostname
When used with any option or flags, the output displays the hostname of your computer. Providing additional parameters will result in an error. This command is available for systems that run TCP/IP on a network adapter.
31. ipconfig Command
The ipconfig (IP configuration) command is your trusty sidekick in networking adventures within the CMD realm. It outputs a significant volume of information about the TCP/IP network configuration. In addition, you can also use it to refresh DHCP and DNS settings.
Command Syntax
To unleash the full potential of ipconfig, utilize this syntax:
> ipconfig <options>
Usage
For a basic glimpse into TCP/IP configuration across all adapters, simply type:
> ipconfig
For a comprehensive view of TCP/IP settings across all adapters, enter the following:
> ipconfig /all
The output reveals essential TCP/IP configuration details, adapter by adapter. You can also renew DHCP IP addresses, flush DNS caches, and troubleshoot DNS issues using ipconfig.
32. label Command
The label command displays, modifies, or deletes a disk’s volume label (also known as the disk name). Note that because of the impact of this command, you need administrator privileges to run it.
The label command launches a prompt to alter the name and, in the absence of any parameters, displays the label for the current drive: The command prompts you to enter a new name to replace the existing label name (or press Enter to delete the label). Press Y to accept the change or N to maintain the current name.
33. makecab Command
As the name suggests, this command creates a cabinet (.cab) file. This Windows-only archive file format supports lossless data compression and high archive integrity.
Command Syntax
> makecab <options> <source> <destination>
34. md and mkdir Commands
The mdand mkdir commands are your go-to tools for crafting new directories or subdirectories in the Command Prompt.
Command Syntax
To create a directory, use:
*> md <path>*
or
*> mkdir <path>*
Example
To make a new subdirectory called Subdir in the current location, run:
*> mkdir Subdir*
Recursive Directory Creation
These commands also enable you to create entire directory trees in one go. For instance:
*> md SubdirSubsubdir*
The command swiftly generates all intermediate subdirectories, streamlining your directory creation process.
35. mklink Command
The mklink command empowers you to build hard or symbolic links to files or directories, offering flexibility in managing your data.
Command Syntax
To create a link, use:
*> mklink <options> <link> <target>*
Example
For creating symbolic links:
*> mklink link_name example_file.txt*
For hard links:
*> mklink /h link_name example_file.txt*
For directory links:
> mklink /d Docs UserstestDocuments
The dir command showcases the links in the directory listing. You can traverse linked directories using the cd command as if they were regular directories.
36. more Command: Screen-by-Screen Viewing
The more command is a nifty Windows CMD utility designed to gracefully handle lengthy documents or command outputs, presenting them one screen at a time.
Command Syntax
To utilize more with a command, employ the pipe character:
> <command> | more <options>
Alternatively, you can use the command to display lengthy files page by page:
> more <path>
Example
For instance, to manage the output of the help cd command and view it page by page, type:
> help cd | more
Navigate through the output by pressing Enter to proceed to the next line or Space to advance to the subsequent page. To exit, simply press q.
37. mountvol Command
The mountvol command is a versatile tool for creating, removing, or displaying volume mount points, enabling seamless access to data on internal and external storage devices via the file system.
Command Syntax
To create a volume mount point, use:
*> mountvol <path> <volume name>*
Example
For instance, to list the volume name and current mount point for the C: drive, execute:
> mountvol C: /l
The output shows the GUID for the volume, serving as a unique and unchanging identifier for reference.
38. move Command: File Management Made Easy
The move command is a CMD shell gem designed for effortlessly relocating files from one place to another within the filesystem. Its straightforward syntax simplifies the process, ensuring seamless file management and relocation.
Command Syntax
To execute a move operation, use:
> move <options> <source> <destination>
Example
For instance, to rename a file named example_file.txt to file.txt, simply type:
> move example2.txt file.txt
As you can see, the move command executes the operation, renaming the file as specified. If the source and destination locations are the same but have different file names, the move command gracefully handles the renaming process.
Advanced Usage
For moving files across different locations, provide the full path to the source and destination:
> move C:UsersPublicDownloadsmy_file.txt C:UsersPublicDesktopmy_file.txt
When overwriting an existing file, the command prompts for confirmation, unless it’s used in a batch script.
39. msiexec Command: Windows Installer Wizardry
The msiexec program is your go-to wizard for managing .msisoftware packages on Windows systems. With a versatile set of options, it orchestrates installations, updates, repairs, and removals with ease.
Command Syntax
You should run the following command syntax:
*> msiexec <options> <path to package>*
Example
For instance, to perform a standard installation of a .msi package located at C:example.msi, type:
> msiexec /i "C:example.msi"
Upon execution, msiexec initiates the installation process, providing a seamless user experience. In case you need assistance with the command, msiexec opens a window displaying command information to guide you through the process.
40. msinfo32 Command
The msinfo32 command launches the System Information window that shows essential information about the system.
> msinfo32
41. mstsc Command
The mstsc command seamlessly launches the Remote Desktop Connection (RDC) program, facilitating easy access to remote machines or modifying existing .rdp files.
Command Syntax:
*> mstsc <options> <file>*
To initiate an RDC session in full-screen mode, simply type:
*> mstsc /f*
To edit an existing connection, employ the /edit parameter followed by the file name:
> mstsc /edit sample.rdp
Note: User-created .rdp files are typically located in the Documents folder by default.
42. net Commands
The net commands offer a comprehensive toolkit for managing diverse network aspects, including users and network services.
Command Syntax
*> net <subcommand> <options>*
We recommend running the command without any parameters to explore available options and their descriptions:
*> net*
To start or stop Windows services, use the following command syntax:
*> net start <service>*
or
*> net stop <service>*
For instance, run the following command to start the accounts service for user login and password requirements:
*> net accounts*
Run the following command to get help about the net command:
*> net help*
43. netstat Command
The netstat command is an indispensable tool for network administrators, providing insights into various network statistics.
Command Syntax
*> netstat <options>*
For instance, to view active TCP connections, simply type:
*> netstat*
To display all active TCP connections and listening TCP and UDP ports, add the -a option:
*> netstat -a*
We suggest using the netstat command to scan for open ports or ascertain the protocol type of a specific port.
44. nslookup Command
The nslookup is a simple tool for diagnosing the issues in DNS infrastructure. The command offers both a non-interactive and an interactive mode.
Command Syntax
> nslookup <host> <command> <options>
When you launch the command without any parameters, nslookup enters interactive mode. As you can see in the following screenshot, the command shows DNS records for a domain name.
Do you know that DNS_PROBE_FINISHED_NXDOMAIN is a common error users face while browsing the internet. Here is our tutorial on how to fix this error in Linux environments.
45. path Command
You can view the contents of the PATH environment variables with this command. This is usually a list of folders pointing to executable files.
When adding entries, use a semicolon (;) to divide each location into its own PATH entry:
> path <location 1>; <location 2>
46. ping Command
The ping command is often used as a basic tool for troubleshooting network issues and assessing connectivity with another machine by dispatching ICMP request messages.
Command Syntax
*> ping <options> <host>*
To initiate a connectivity check to a specific host, type:
*> ping <host>*
Example
Use the following command to check the connectivity of your Windows machine to the RedSwitches website:
*> ping redswitches.com*
Upon execution, the command displays reply messages along with round-trip times, aiding in the identification of connectivity and name resolution issues.
47. powercfg Command
This command launches the powercfg.exe program to manage the system’s power plans. The monitoring tool highlights the issues with a device’s battery life and energy efficiency.
Command Syntax
> powercfg <options> <arguments>
For instance, use the command with the**/list** parameter to get the details of the active power plan.
> powercfg /list
In the above screenshot, you can see that the star (*) indicates the active power plan.
48. prompt Command
The prompt command can switch the CMD prompt display with the supplied string. Note that the default prompt is the current directory location followed by the greater-than symbol (>).
Command Syntax
> prompt <string and variables>
The prompt command provides a number of options for adding unique characters or other functionality to the prompt. For instance, use the following command syntax to transform the prompt into an arrow.
> prompt --$g
HTML
The change to the standard prompt will persist throughout the command-line session. To restore the default prompt, simply enter the command without any parameters.
49. rd and rmdir Commands
The rdand rmdir commands are designed to remove empty directories from the system.
Command Syntax
To delete an empty directory, simply type:
> rd <path>
or
> rmdir <path>
Alternatively, you can add the /s parameter to use the command to delete directories containing files and subdirectories:
> rd /s <path>
Do you know that the rm and rmdir commands are implemented with similar functionality in Linux distributions? We covered the command in a detailed tutorial where we discussed how you can use the rm and rmdir commands to remove directories.
50. ren and rename Commands
The ren and rename commands facilitate hassle-free renaming of files or directories within the system.
Command Syntax
To rename a file or directory, use:
> ren <path><old name> <new name>
or
> rename <path><old name> <new name>
You can use wildcard characters for renaming multiple files at once. For example, to change all .txt files to .c files, use:
> ren *.txt *.c
Many Linux distributions offer several ways of renaming files. Similarly, you get several methods of renaming directories in Linux.
51. robocopy Command
The robocopy command offers a robust solution for copying files and directories efficiently.
Command Syntax
To initiate a copy operation, utilize:
> robocopy <source> <destination> <file> <options>
You can enhance the performance of the copy operation with the /mt parameter that enables multithreading. We also recommend using the /z parameter to instruct the command to resume interrupted command operations.
For instance, to transfer a file named newfile.txt from Documents to Downloads with multithreading and resume functionalities, type:
> robocopy Documents Downloads newfile.txt /mt /z
We recommend using this command for large file transfers where you need robust handling of interruptions.
52. route Command
This command shows the local routing table entries in the Command Prompt. You can also use the command to modify these entries.
Command Syntax
> route <options> <command> <value>
Here are the various commands you can use with the route command:
- add: Adds a route entry to the table.
- change: Modifies an entry in the table.
- delete: Removes a route from the table.
- print: Displays a route or routes.
> route print
53. schtasks command
The schtasks command facilitates scheduling system-wide operations for commands or programs. The system executes the scheduled tasks at the appointed time or at set intervals.
Command Syntax
> schtasks /<subcommand>
The command supports the following subcommands:
- change – Modifies existing properties of a task.
- create – Creates a new task.
- delete – Removes a task.
- end – Stops a program started by a task.
- query – Prints scheduled tasks on the machine.
- run – Starts a scheduled task.
> schtasks /query
We can see the task names, next run times, and task statuses in the output.
54. set Command
The set command enables users to view, assign, and remove environment variables within CMD.
Command Syntax
To set a new environment variable, use:
> set <variable>=<value>
If no additional parameters are provided, the set command displays all current environment variables.
Example
To create a new variable named “message,” input:
> set greeting="Hello, world!"
You can now add a reference to the variable with the following syntax:
> echo %greeting%
Note: These variables are session-specific and do not persist beyond the current CMD session.
55. sfc Command
Administrators can use the sfc (system file checker) command to verify and restore the integrity of protected system files.
Command Syntax
*> sfc <options> <files or directories>*
Run the following command to initiate a scan and repair operation:
> sfc /scannow
Executing sfc /scannow scans all protected system files, rectifying any discrepancies encountered.
56. shutdown Command
The shutdown command allows administrators a simple way to control the shutdown and restart processes of local or remote computers.
Command Syntax
> shutdown <options>
If you run the command without any arguments, the shutdown command simply prints the help information.
To restart the computer, employ:
> shutdown /r
Similarly, use the following command to shut down a system without subsequent restart:
> shutdown /s
You can cancel a shutdown operation with the following command:
> shutdown /a
57. sort Command
The sort command efficiently arranges the provided data. You can use a wide range of data sources, including user input and files.
Command Syntax
Enter sort without options to initiate the sort process. Next, enter each word on a separate line.
Conclude with CTRL+Z and Enter to initiate alphabetical sorting.
Using sort with Files
To sort file contents, simply execute:
> sort <file>
Note: The sorted output is displayed in the command line.
58. start Command
The start command launches a new command prompt window with specified options.
Command Syntax
*> start <title> <options>*
For instance, use the following command to open a new session with a custom title and starting path:
> start "Title" /d Path
Example
Run the following command to initiate a CMD window titled “Hello, world!” with the starting path set to C:
> start "New Window" /d C:
59. systeminfo Command
The systeminfo command retrieves comprehensive system details, including OS and hardware properties, for both local and remote machines.
Command Syntax
To display local system information, use:
> systeminfo
As you can see, executing systeminfo reveals detailed system data for the local machine.
You can customize the output by adding the following flags to the command:
> systeminfo /fo csv
60. takeown Command
The takeown command empowers an administrator to assume ownership of a file, granting full permissions.
Command Syntax
To take ownership of a specific file, use:
> takeown /f <file>
File ownership is a critical operational aspect in Linux environments. You can use several methods to discover file ownership in Linux. In fact, you can use chown (a utility similar to takeown) to change file ownership.
61. taskkill Command
The taskkill command forcefully terminates running processes or tasks on the Windows system. This is a very useful command that allows users to handle unresponsive processes.
Command Syntax
> taskkill <options> <task or process>
To end a process by its Process ID (PID), use:
> taskkill /pid <Process ID>
For instance, you can terminate a process with PID 868 with the following command:
> taskkill /pid 868
62. tasklist Command
The tasklist command displays all active processes and their memory utilization on a local or remote machine. The command is a great option for finding more information about the processes.
> tasklist <options>
Without any parameters, this command outputs a list of all active processes on the local machine.
63. telnet Command
The telnet command facilitates bidirectional CLI communication using the Telnet protocol, enabling interactive exchanges of messages.
Command Syntax
> telnet <hostname> <port>
We have a detailed tutorial on using telnet in Windows that you can refer to if you need help using the utility.
64. time Command
The time command regulates and displays the current system time. By default, it shows the current time and prompts the user to change it:
Command Syntax
To view and potentially modify the system time, enter:
> time
Use the /t option to view the time without altering it:
> time /t
65. timeout Command
The timeout command temporarily halts command line execution for a specified duration, allowing for controlled intervals between commands.
Command Syntax
To introduce a pause for a specified number of seconds, input:
> timeout /t <seconds>
For instance, to pause execution for ten seconds, execute:
> timeout /t 10
You can interrupt the countdown prematurely by pressing any key. You can use the timeout command in scripts to introduce execution pauses.
66. title Command
The title command offers a straightforward way to modify the title of the command prompt window.
Command Syntax
To change the title, input:
> title <string>
For instance, to set the title as “Hello, world!”:
*> title "New Project"*
The command prompt window’s title updates accordingly, which is useful for distinguishing between different command prompt sessions.
67. tracert Command
The tracert command is a popular networking tool to determine the route from a local computer to a specified destination.
Command Syntax
> tracert <options> <destination>
You can use the command to trace the path to a destination, utilize:
> tracert <destination>
Example
> tracert redswitches.com
In addition to domain names, you can use tracert with IP address. The output displays the hops between the source and destination, providing insights into connectivity and potential issues along the route. It is Ideal for troubleshooting network connectivity problems.
68. tree Command
The tree command shows a tree-like representation of the contents of a disk or directory.
> tree <options> <path>
69. type Command
Thetype command allows you to display the contents of a file directly within the Command Prompt without altering the text in the target file.
Command Syntax
To view the contents of a file, use:
> type <file path>
Example
For instance, to display the contents of the file named newfile.txt:
> type newfile.txt
The command prints the file’s contents in the Command Prompt, enabling convenient file previews directly within the terminal.
70. tzutil Command
The tzutil command, or time zone utility, facilitates the modification and display of the currently set time zone on the system.
Command Syntax
To display the current time zone, execute:
> tzutil /g
For example, run the following command to view all available time zones:
>tzutil /l |more
The output provides the time zone ID, allowing users to manage time zone settings effectively.
71. ver Command
The ver command is a handy utility for retrieving the exact version of the operating system.
Command Syntax
To check the operating system version, simply run:
> ver
The command promptly displays the operating system version, aiding in system identification and troubleshooting.
72. vol Command
The vol command is used to print information about a disk volume and its label.
Command Syntax
To view volume information for a specific drive, use:
> vol <drive>:
For instance, to display volume information for drive C:, execute:
> vol C:
The command outputs details about the disk volume and its label associated with the specified drive.
73. where Command
You can use the where command to search for the location of a file using a search pattern and display its location in the command line.
Command Syntax
To search for a file in a specific location or directory, use:
> where <options> <location to search> <file name>
For example, to recursively search for the file example_file.txt in the C: drive and its subdirectories:
> where /r C: newfile.txt
The command returns the file’s location path if found, aiding in file search operations.
74. whoami Command
The whoami command provides information about the current user’s domain and username.
Command Syntax
To display domain and user name information, use:
> whoami <options>
Example
For instance, to view detailed user information, including security ID, groups, and privileges:
> whoami /all
The command outputs comprehensive details about the current user, facilitating user identification and management.
75. xcopy Command
The xcopy command is used to copy files, directories, and subdirectories from one location to another.
Command Syntax
To copy contents from a source location to a destination (including the subdirectories), use:
> xcopy <source> <destination> /s /e
Example
For example, to copy files and directories from one location to another while including empty directories:
> xcopy <source> <destination> /s /e
The command copies the specified contents while preserving directory structures and prompts before overwriting any existing files with the same name.
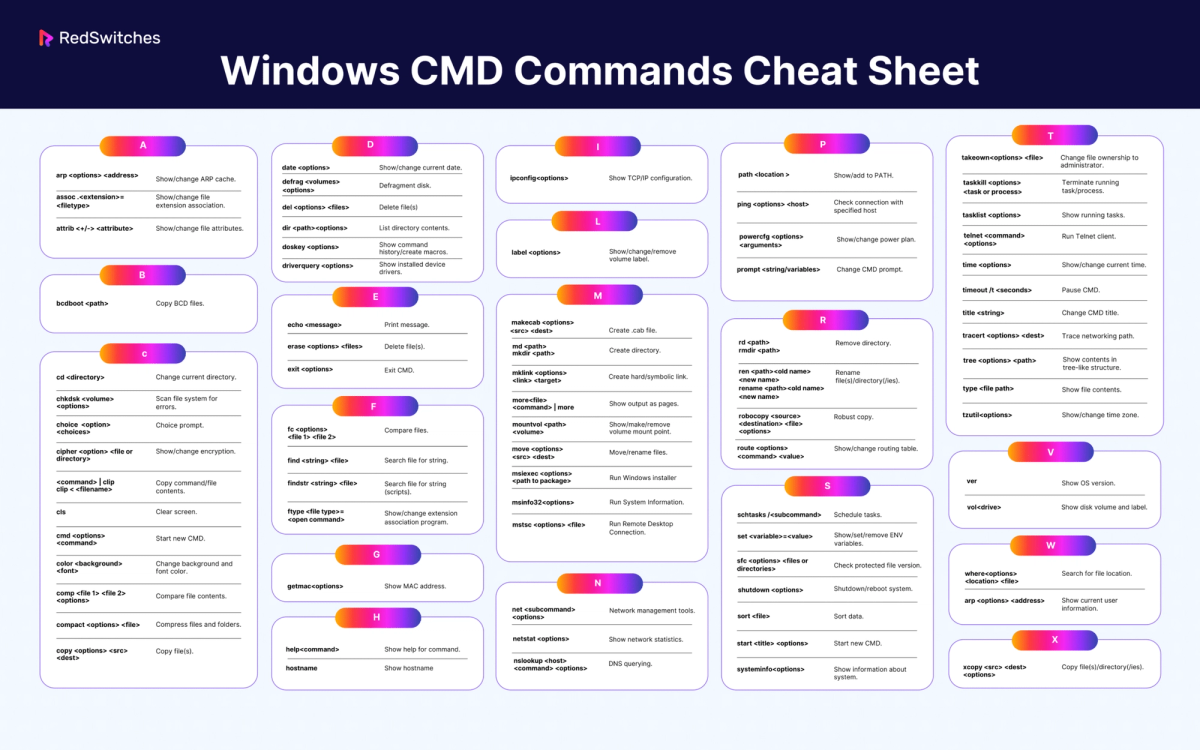
Windows CMD Commands Cheat Sheet
You can access all the commands mentioned above conveniently on a single-page cheat sheet provided in PDF format. To save this cheat sheet for future reference, simply click the “Download Windows CMD Commands Cheat Sheet” button below.
Download Windows CMD Command Cheat Sheet
Conclusion
Mastering Windows CMD commands empowers users with efficient system management and troubleshooting capabilities. From basic tasks like file management to advanced network diagnostics, these commands offer versatility and control. As you delve deeper into the world of command-line operations, consider leveraging the robust infrastructure provided by Redswitches, a leading bare metal provider. With their reliable and high-performance servers, backed by exceptional support, you can confidently explore and utilize the full potential of Windows CMD commands for your projects and operations. Unlock new possibilities and enhance your computing experience with Redswitches bare metal solutions.
FAQ’s
Q. What does Windows Command Prompt do?
Users can communicate with the operating system via text-based commands using the Command Prompt, sometimes called CMD. It offers an easy way to launch programs and carry out different operations without relying on a graphical user interface.
Q. How do I open the Command Prompt?
To open the Command Prompt in Windows, you can follow these steps:
- Press the Windows key + R to open the Run dialog box.
- Type “cmd” or “cmd.exe” and press Enter.
Alternatively, you can search for “Command Prompt” in the Start menu and click the result.
Q. What are some essential CMD commands every user should know?
There are several CMD commands that are very handy for everyday tasks. They include:
- cd: Change directory.
- dir: List files and folders in the current directory.
- mkdir: Create a new directory.
- copy: Copy files from one location to another.
- del: Delete files.
- ipconfig: Display IP configuration information.
- ping: Send a network request to a specific IP address or domain.
- tasklist: List all running processes.
- shutdown: Shut down or restart the computer.
Q. How can I get help on CMD commands?
If you need assistance with a specific CMD command, use the built-in help feature. Simply type the command followed by “/?” and press Enter. This will display detailed information about the command, including its syntax and available options.
Q. Can I customize the appearance of the Command Prompt?
Yes, you can customize the appearance of the Command Prompt to suit your preferences. Right-click on the title bar of the Command Prompt window and select “Properties.” You can modify settings such as the font, colors, and window size from there.
Q. Are there any advanced CMD commands for power users?
There are advanced CMD commands that offer additional functionality for power users and system administrators. Some examples include:
- diskpart: Manage disks, partitions, and volumes.
- sfc: Scan and repair system files.
- regedit: Access and modify the Windows Registry.
- netstat: Display active network connections and listening ports.
- robocopy: Advanced file and directory copying.
- powercfg: Configure power settings and check power usage.
Rachelle Joseph
Data Center Infrastructure & Operations Lead
Rachelle Joseph leads data center infrastructure and operations at RedSwitches, covering bare-metal deployments, networking, colocation, compliance, and capacity planning. She writes about provisioning and managing high-performance server environments from direct operational experience.

Ubuntu vs Linux: Key Differences Explained
Linux is the kernel, while Ubuntu is a complete operating system built on it. This guide breaks down their key differences, use cases, and when to choose each.

Reduce Docker Image Size: Best Practices to Slim Your Images
Docker image size can become a serious issue as you add more code to the image. Learn how to reduce Docker image size and optimize Dockerfiles for production to speed up CI/CD pipelines and improve container efficiency.

Best Linux Distros 2026, Full Guide for Beginners, Developers, Gamers & Servers
Match your hardware, workflow, and skill to the right Linux distro in 2026. Compare 23 top picks, Mint, Ubuntu, Fedora, Arch, Bazzite, covering beginners, developers, gamers, and servers.
Power Your Next Project With Bare Metal
10 min delivery, zero setup fees, and 24/7/365 human engineers across 20+ global locations.