
When working in a networked environment with many internal and external nodes, admins, and users use the ping utility to verify that a specific IP address is active and accepting incoming requests.
The Linux ping command is very versatile and comes with several options that you can use to modify the default behavior and output.
In this comprehensive tutorial, we will discuss the Linux ping command. We will look into how the utility operates. In the latter half of this tutorial, we will present 10 examples of using the ping command in investigating network issues such as host discovery and connectivity.
Let’s start with a look at how the utility works.
Table Of Contents
- How the Ping Utility Operates in Linux Environments
- An Overview of the ping Command
- 10 Examples of Using the ping Command in Linux
- The Prerequisites
- Example #1: Ping the ‘localhost’ to Verify Local Network Connectivity
- Example #2: Specify the Internet Protocol (IP) Version
- Example #3: Adjust the Time Interval Between Ping Packets
- Example #4: Modifying the Standard Ping Packet Size
- Example #5: Network Flooding to Evaluate Performance
- Example #6: How to Restrict the Number of Ping Requests
- Example #7: Suppress Output to Display Only Summary Statistics
- Example #8: Add Timestamps in the Output
- Example #9: Receive an Audible Ping Alert When a Host is Reachable
- Example #10: Display the Command Version and Exit
- Conclusion
- FAQs
How the Ping Utility Operates in Linux Environments
The Linux ping command offers a simple way of assessing network availability and host reachability. It enables users to verify the status of a server and diagnose and identify connectivity problems.
Important use cases of the ping command include:
- Verification of your internet connection.
- Verification of the status of a remote machine.
- Diagnose network issues, such as dropped packets or high latency.
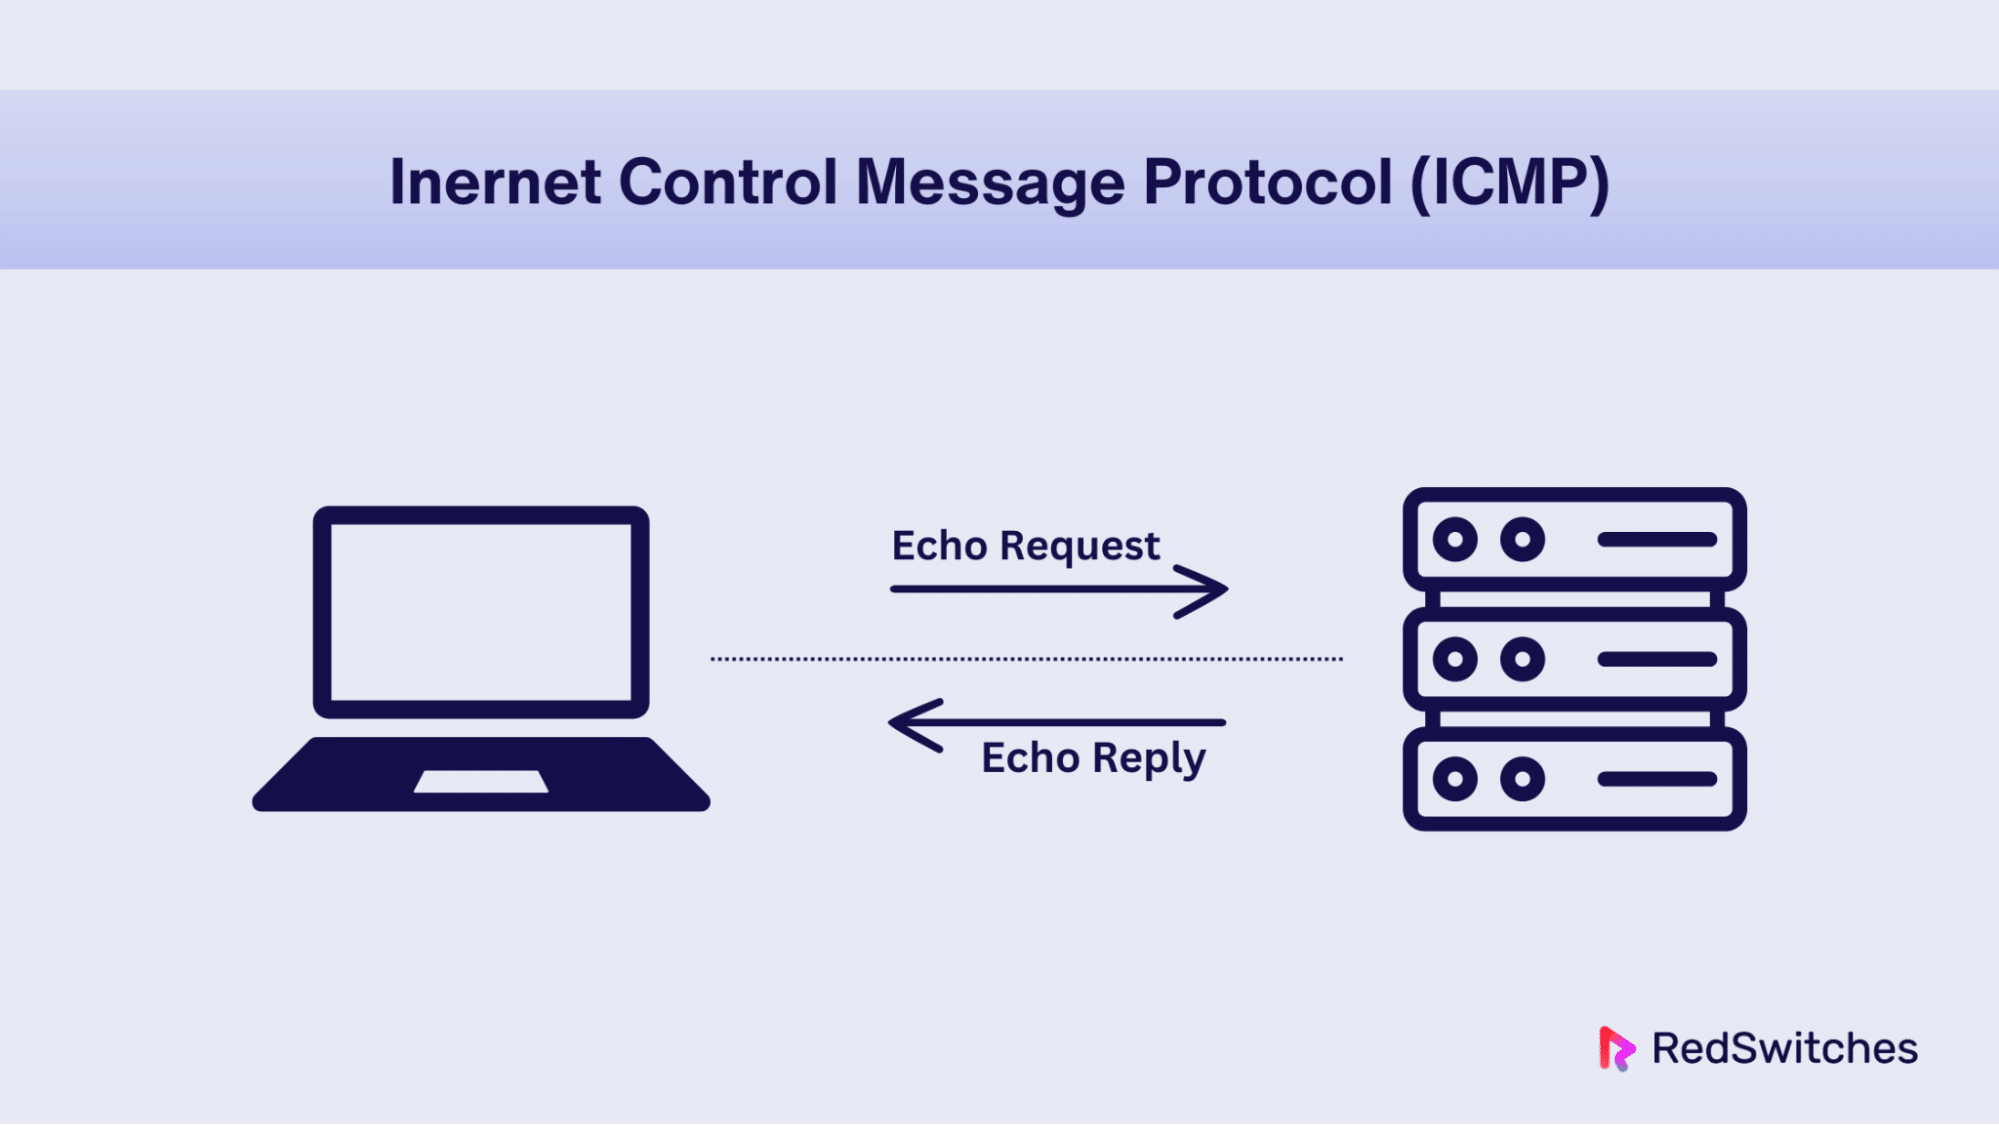
When you run the command in the terminal of your machine, the utility sends ICMP echo requests to the target and listens for a response. Upon successful connection, the target machine sends an echo reply for each request.
The output of the ping command provides the time taken for each packet to travel to its destination and return.
The default behavior of the command is to continuously send the requests and display the responses until manually interrupted. Once the command ends, you can see a summary of ping statistics.

An Overview of the ping Command
The core syntax of the ping command only needs a hostname, website name, or a specific IP address. You can choose one or more options to modify the core functionality of the following command:
# ping [option] [hostname] or [IP address]
For instance, you may use the following command to verify the status of google.com, a remote host with the following command in your terminal:
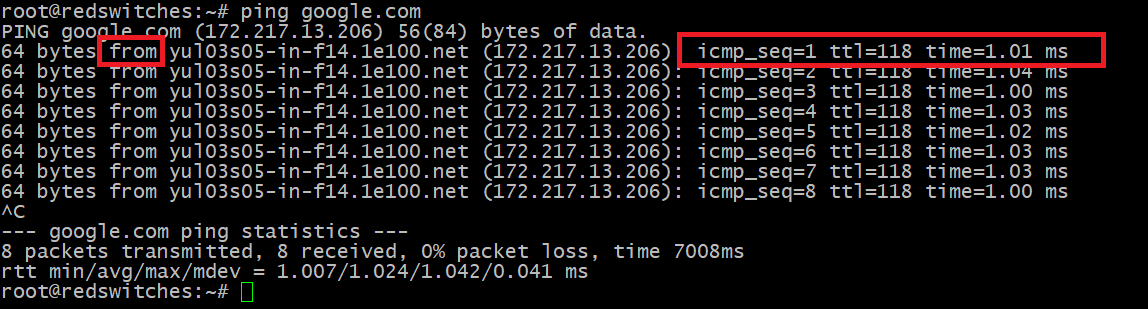
# ping google.com
The utility will continue to ping the Google server until you halt the process by pressing Ctrl + C on your keyboard.
Analyzing the Statistics of the ping Command
As you can see, a simple ping command can produce a significant volume of output in the terminal. Let’s break this output and see the four essential information items.
from: This indicates the destination and the corresponding IP address. It’s important to note that the IP address of a website may vary depending on your geographical location.
The icmp_seq=1 indicates the sequence number assigned to each outgoing ICMP packet. The number increases as the utility sends more packages.
ttl=118: Denotes the Time to Live value (the range is from 1 to 255). This value represents the number of network hops a packet can traverse before being discarded by a router.
time=1.01 ms: Indicates the duration taken for a packet to travel to the destination and back to the source, measured in milliseconds.
10 Examples of Using the ping Command in Linux
Now that you have a fair idea of how the ping utility works, let’s see how you can use it in real-world scenarios.
The Prerequisites
Before trying out the examples we will discuss below, make sure you have the following:
- A system running a mainstream Linux distribution. (Our test system has Ubuntu 18.04.2 LTS)
- A use account with root or sudo privileges
Example #1: Ping the ‘localhost’ to Verify Local Network Connectivity
If you encounter difficulties in accessing a website or a remote machine, the issue may lie in the internet connection of the local machine.
You can apply the following three ways to ping the localhost to verify your network connection.
- The fastest way is to use ping 0. Upon execution, the terminal resolves the IP address and generates a response.
- You can use ping localhost to ping the local machine. This command essentially translates to ping this computer.
- Run the ping 127.0.0.1 command. Almost all systems resolve this IP address to the local machine.
Example #2: Specify the Internet Protocol (IP) Version
You can specify the IP version in a ping command to force the utility to use the version for all pings.
For this, append -6 or -4 after the ping command and before the hostname/IP. The syntax for the ping command with IPv6 would be as follows:
# ping -6 hostname
Alternatively, for IPv4, use the following:
# ping -4 hostname
Example #3: Adjust the Time Interval Between Ping Packets
The default interval between ping requests is usually set to one second. However, you can adjust this interval by using the -i switch.
For instance, you can specify values lower than 1 to decrease the standard ping interval. Consider the following command that essentially reduces the standard interval in half:
# ping -i 0.5 google.com
Alternatively, you can increase the standard ping interval by specifying a value higher than 1.
Example #4: Modifying the Standard Ping Packet Size
The standard ping packet size is 56 bytes. Add the standard header of 28 bytes, and the total size should be around 84 bytes.
However, you can change this size in scenarios where you wish to stress-test the network or confirm if throttling is enabled. Changing the packet size is a common requirement in network performance assessments where you need to send out large packets to test various performance parameters.
We recommend using the -s option with the Linux ping command to change the default packet size. For instance, the following command increases the packet size to 1000 bytes:
# ping -s 1000 google.com
Upon executing the command, the output will reflect the changes accordingly.

Example #5: Network Flooding to Evaluate Performance
We recommend using the ping flood technique to evaluate network performance under heavy traffic load. You can apply this technique using the -f option with the standard ping command. This command syntax can rapidly transmit a large number of packets.
Note that you need root privileges to execute this command because of the possibility of abuse. So remember to include sudo before the command syntax.
# sudo ping -f hostname-IP

The output displays a dot for each sent packet and a backspace for every response received. Additionally, the statistics line presents a summary of the command’s results.
Example #6: How to Restrict the Number of Ping Requests
The default behavior of the ping command is to continue sending requests until manually interrupted. However, you can limit the number of pings using one of these two methods.
Method #1: Control the Number of ping Packets
This method automatically terminates the ping command after sending a specific number of packets.
The command syntax uses the -c option followed by the desired number. This specifies the desired number of ping requests, as demonstrated in the following example that sends two packets:
# ping -c 2 google.com

Method #2: Set a Time Limit for the Command Execution
You can halt the execution of the ping command after a designated duration. For this, add the -w option followed by the desired time interval in seconds.
For instance, use the following command to terminate the command after 25 seconds:
# ping -w 25 google.com
Example #7: Suppress Output to Display Only Summary Statistics
If you prefer not to clutter the terminal with information for each packet, utilize the -q (quiet) option that only shows a summary.
In this scenario, the ping command generates a single line containing standard details, followed by statistics at the conclusion. Consider the following command that sends out ten packages before terminating:
# ping -c 10 -q google.com

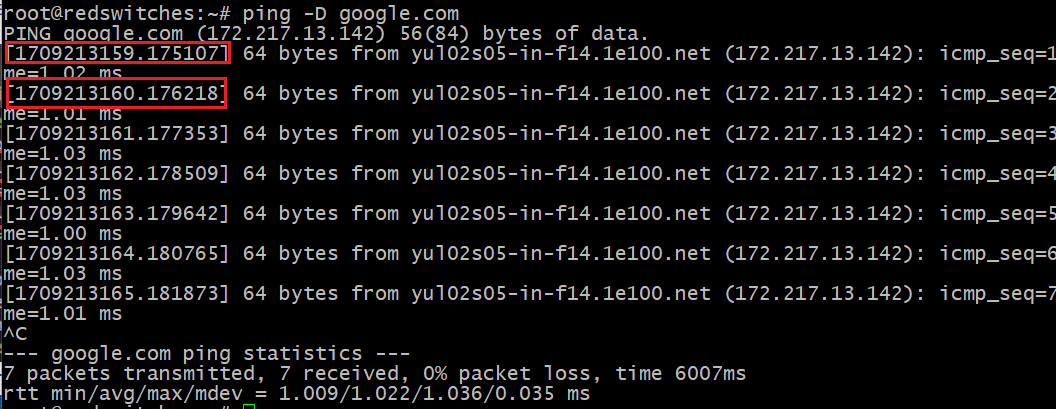
Example #8: Add Timestamps in the Output
If you wish to see timestamps for each outgoing packet, use the -D option with the ping command:
# ping -D google.com
Remember that the command displays the timestamp in the conventional UNIX format.
Example #9: Receive an Audible Ping Alert When a Host is Reachable
Sysadmins usually set the ping command and then move on to the next set of tasks. In some cases, it is easy to overlook the output in the terminal.
In these scenarios, we recommend using the -a switch that causes the system to emit a sound upon receiving a response from the target host. The command syntax in this case would be:
# ping -a google.com
Example #10: Display the Command Version and Exit
You can check the version of the ping tool on your system at any time by adding -V to the command.
# ping -V google.com

Also Read: lsof Command in Linux with Examples
Conclusion
Ping is a valuable utility for assessing network connectivity, whether you’re working with local resources or remote hosts, ensuring smooth communication across your infrastructure.
For further exploration of the myriad options available with the ping command, refer to the comprehensive manual by executing the man ping command within your terminal.
Experience seamless networking performance with RedSwitches, a leading dedicated server provider, leveraging the power of Linux utilities like ping to optimize your digital infrastructure.
So, If you’re looking for a robust server for your Linux projects, we offer the best dedicated server pricing and deliver instant dedicated servers, usually on the same day the order gets approved. Whether you need a dedicated server, a traffic-friendly 10Gbps dedicated server, or a powerful bare metal server, we are your trusted hosting partner.
FAQs
Q. What is the sudo command, and why is it important when using the ping command?
The sudo command allows users to execute commands with superuser privileges. It’s crucial when using the ping command to access network-related functionalities that require elevated permissions.
Q. How can I troubleshoot network issues using the traceroute command alongside ping?
The traceroute command is a complementary tool to ping, helping identify the network path to a target host and pinpointing potential areas of congestion or failure along the route.
Q. What is network congestion, and how does it affect ping results?
Network congestion arises when there is a high volume of data traffic, resulting in delays and potential packet loss. This congestion can impact ping results by increasing round-trip times and causing intermittent connectivity issues.
Q. Where can I configure network settings to optimize ping performance?
Network settings play a crucial role in determining ping performance. Adjustments to settings such as Quality of Service (QoS), firewall rules, and network interface configurations can help improve ping results.
Q. How do I initiate continuous ping for ongoing network monitoring?
Continuous ping, achieved by adding the -t option to the ping command, allows for persistent monitoring of network connections and can be a powerful tool for diagnosing intermittent connectivity issues.
Q. What is Packet loss, and how does it impact network performance?
Packet loss occurs when data packets traveling across a network fail to reach their destination. This loss can result from network congestion, faulty hardware, or other issues, leading to degraded network performance.
Q. What does the “Destination Host Unreachable” message indicate in ping results?
The “Destination Host Unreachable” message suggests that the target host specified in the ping command is not reachable from the current network configuration. This could be due to misconfigured network settings or connectivity issues.
Q. How can I use the ip command to manage network interfaces and configurations?
The ip command is a versatile tool for managing network interfaces, IP addresses, routing tables, and more. It provides extensive capabilities for configuring and troubleshooting network settings.
Q. Why is the sudo command frequently used when running networking commands like ping and traceroute?
The sudo command grants users elevated privileges necessary for executing network diagnostic tools and configuring network settings. It ensures proper access to system resources required for effective network troubleshooting.
