Key Takeaways
- SSL Certificate ensures website security by creating a secure link between servers and browsers.
- Over 292 million SSL certificates are used globally, indicating their rising importance in the digital world.
- SSL certificates are fundamental in protecting personal and sensitive data online.
- SSL, or Secure Sockets Layer, is essential for safeguarding personal details online building trust among users
- It encrypts data between a user’s browser and a website, making it hard for hackers to intercept.
- DV Certificates for quick domain validation, OV for organizational validation, and EV for the highest security level.
- Basic, fast to issue, ideal for encrypting web traffic, but doesn’t validate organization identity.
- Provide additional trust by verifying the organization behind the domain, suitable for businesses.
- Offer the highest security level by conducting thorough checks, which is ideal for handling sensitive transactions.
- A critical step for dedicated servers involving several stages from generating a CSR to testing the installation.
In the digital age, website security is paramount. SSL (Secure Sockets Layer) certificates are crucial in this arena. They are like digital passports that provide a secure channel between your server and the visitor’s browser. SSL certificate installation on a dedicated server can seem daunting. Especially for those not well-versed in technical jargon.
SSL certificates play a vital role in this. They create a secure link between websites and visitors. This keeps personal information safe. Recently, a report showed over 292 million SSL certificates online. This significant number shows more people are using SSL to protect their websites.
The increasing reliance on digital platforms for both personal and business activities. It has driven this surge, underscoring the need for robust security measures. SSL certificates stand at the forefront of this movement. Offering a critical layer of protection against cyber threats. And ensuring a secure and trustworthy online environment.
Table of Contents
- Key Takeaways
- What is an SSL?
- Types of SSL Certificates
- SSL Certificate Installation Instructions on Dedicated Servers
- General Requirements for SSL Certificate Installation on Dedicated Servers
- Generate a Certificate Signing Request (CSR)
- Apply for an SSL Certificate
- Validate Your Request
- SSL Certificate Installation Process
- Verify Configuration
- Restart Your Web Dedicated Server
- Automate SSL Certificate Renewal
- Redirect HTTP to HTTPS (Optional)
- Test Your SSL Installation
- Additional Notes
- Commercial vs. Free SSL Certificates
- SSL in the Cloud
- Conclusion
- FAQs
What is an SSL?
Credits: Freepik
SSL stands for Secure Sockets Layer. It’s a security technology that creates a safe link between a website and a visitor’s browser. Imagine it like a secure tunnel where all the data passing through is protected. This is important for keeping personal details, like credit card numbers and passwords, safe from hackers. A website with an SSL certificate means a trusted authority has checked and verified the site’s identity. This certificate indicates that the website is safe to use, especially for sensitive transactions. In simple terms, SSL makes a website secure for users and builds trust online.
How Does SSL Work?
SSL encrypts the data between a user’s browser and a website’s server. When someone visits an SSL-secured website, their browser requests the server’s identity. The website then sends a copy of its SSL certificate. The browser checks this certificate to make sure it’s valid and trustworthy. If so, the browser signals this to the website, and the server returns a digitally signed acknowledgment. This process establishes a secure connection, and data can be exchanged with encryption. This encryption makes it very hard for hackers to intercept or tamper with the data, like personal information or credit card details. It’s like turning readable text into complex code only the intended receiver can understand.
Also, Read Explore the Six Types of SSL Certificates for Your Website
Types of SSL Certificates
Credits: Freepik
There are different types of SSL certificates for websites. They include Domain Validated (DV) certificates, which are quick to get and show your domain is secure. Organization Validated (OV) certificates need more checks and proof that your company is real. Extended Validation (EV) certificates give the highest security and show your business is trustworthy. Each type is suited for different website needs. Understanding these helps you choose the right one for your site’s security.
Domain Validated (DV)
Domain Validated (DV) certificates are the most basic type of SSL/TLS certificate. They focus on validating just the domain name of the website. The validation process is usually quick and straightforward. It typically involves the Certificate Authority (CA) confirming that the person requesting the certificate has control over the domain. This can be done through methods like email verification to an address listed in the domain’s WHOIS record, placing a verification file on the website, or creating a DNS record. DV certificates are popular because they are fast to issue and provide essential security for encrypting web traffic. However, they don’t validate the organization’s identity behind the domain, which is something to consider based on your website’s needs.
Organization Validated (OV)
Organization Validated (OV) certificates offer higher security than DV certificates. They verify not just the domain but also the organization behind it. The process includes checking the company’s existence and identity. This makes OV certificates a good choice for businesses and organizations. They show visitors that a real, verified company runs the website. OV certificates take longer to get because of these extra checks. However, they offer more trust, especially for websites where users share sensitive information.
Extended Validation (EV)
Extended Validation (EV) certificates provide the highest level of validation and trust. They are ideal for businesses and organizations that handle sensitive transactions or personal data. The process to obtain an EV certificate is the most thorough, involving rigorous checks by the Certificate Authority. This includes verifying the organization’s legal, physical, and operational existence. EV certificates display the company’s name in the browser’s address bar, offering visible assurance to visitors about the website’s legitimacy. This higher level of validation makes EV certificates especially suitable for financial institutions, e-commerce sites, and other businesses where establishing trust is crucial.
Also Read Difference Between SSL vs TLS: 2024’s Best Internet Security Protocol
SSL Certificate Installation Instructions on Dedicated Servers
Credits: Freepik
When it comes to dedicated servers, installing an SSL certificate is critical in safeguarding your website and its users. This process might seem complex. However, ensuring secure communications between your server and visitors’ browsers is essential.
An SSL certificate on a dedicated server not only encrypts sensitive data. But also bolsters the credibility and trustworthiness of your site. This section will review the key steps and considerations for effectively installing SSL certificates on dedicated servers. Making the process accessible and straightforward even for those with limited technical background.
General Requirements for SSL Certificate Installation on Dedicated Servers
Certain key requirements must be met to install the certificate on a dedicated server. First and foremost, you need administrative access to your server. This means you should have the server’s IP address, your administrative username, and password (or SSH key) at hand. It’s also crucial to know which operating system your server is running (like Ubuntu, CentOS, etc.). And the web server software installed (such as Apache, Nginx, or IIS). Lastly, a dedicated IP address for your website is recommended for a smooth installation process. However, it’s not always necessary with modern server configurations.
Generate a Certificate Signing Request (CSR)
You’ll need to generate a Certificate Signing Request (CSR) to add an SSL certificate to your dedicated server. This is done using OpenSSL, a command-line tool available on most UNIX-like systems, including Linux and macOS. Here’s a simplified process breakdown:
- OpenSSL Command: Start by running OpenSSL. You’ll use the req utility, which is specifically for CSR generation.
- Create Private Key and CSR: The command openssl req -newkey rs2048 -keyout PRIVATEKEY.key -out MYCSR.csr is used. It instructs OpenSSL to generate a 2048-bit RSA private key and a CSR. You can replace 2048 with 4096 for a stronger key.
- Specify File Locations: The -keyout option specifies where to save your private key, and -out indicates where to save the CSR. Replace PRIVATEKEY.key and MYCSR.csr with your desired file names.
- Fill in Your Details: When you run this command, you’ll be prompted to enter details like your country code, organization name, and common name (your domain name). These details are embedded in your CSR.
- Keep Your Private Key Secure: Remember to protect your private key. If it’s compromised, the security of your SSL certificate is at risk.
This process creates two important files: your private key and your CSR. You’ll submit the CSR to a Certificate Authority when requesting your SSL certificate. For further details on this process, refer to the guide provided by SSL.com.
Also Read How To Fix the “HTTPS Not Secure” Message in Chrome
Apply for an SSL Certificate

Credits: Freepik
Once you have your Certificate Signing Request (CSR), the next step in SSL certificate installation is to apply for an SSL certificate. This is a crucial phase where you select and purchase an SSL certificate from a trusted Certificate Authority (CA). Start by researching various CAs, as they offer different types of certificates like Domain Validated (DV), Organization Validated (OV), and Extended Validation (EV) certificates. Each type has its own validation level and use case. For example, EV certificates provide the highest level of trust and are ideal for e-commerce sites.
After choosing the right certificate for your needs, visit the CA’s website to begin the application process. You will find a variety of SSL certificate options. Select the one that aligns with your requirements. You will be asked to submit your CSR as part of the application. This process can typically be done online through the CA’s website. Copy and paste the entire CSR into the CA’s application form, including the header and footer.
The pricing for SSL certificates varies. Some basic DV certificates may be free, while EV certificates are generally more expensive due to the extensive validation process they require. Make your payment as directed by the CA’s website. It’s also wise to consider the duration of the certificate. Most certificates are valid for one to two years, but longer options may be available.
After submitting your application and payment, the CA will begin the validation process. The length of this process varies depending on the type of certificate. DV certificates can be issued within minutes or hours as they require minimal validation, usually just a domain ownership check. OV and EV certificates take longer, as they thoroughly verify your organization’s identity and legitimacy. This process can take days or even weeks.
While you wait for your certificate, preparing your server for installation is a good idea. Ensure you have access to your server and are familiar with its configuration. This preparation will streamline the process once your SSL certificate is issued.
Once your application is approved and the certificate is issued, the CA will email you your SSL certificate file, often in a .crt format. Download this file, as it will be necessary for the installation process on your server. Keep it in a secure location until you are ready to install it.
Also Read: 12 Ways of Fixing ERR_SSL_VERSION_OR_CIPHER_MISMATCH Error
Validate Your Request
After applying for an SSL certificate, the next critical step in SSL certificate installation is to validate your request. This validation is conducted by the Certificate Authority (CA) to ensure the legitimacy of your SSL certificate application. The validation process varies depending on the SSL certificate you’ve applied for.
For Domain Validated (DV) certificates, the validation process is relatively simple and quick. The CA must verify that you have control over the domain for which you’ve applied for the certificate. This is usually done in one of three ways:
- Email Validation: The CA sends an email to the contact email address listed in the domain’s registration details. You need to follow the instructions in the email to prove ownership.
- DNS Record Validation: The CA asks you to create a specific DNS record for your domain. Once you add this record to your domain’s DNS settings and it propagates, the CA can verify your control over the domain.
- HTTP/HTTPS Validation: The CA provides a unique file to upload to a specified directory on your website. Once the file is accessible at the given URL, the CA confirms your domain control.
The process is more stringent for Organization Validated (OV) and Extended Validation (EV) certificates. In addition to domain control, the CA verifies the legal existence of your organization. This verification includes checking your organization’s name, location, and operational status. For an EV certificate, the CA conducts a more in-depth investigation into your company, including verifying your physical and operational existence.
You might be required to submit official documents during the OV and EV validation processes. These can include business licenses, incorporation documents, or other legal paperwork. The CA might also conduct phone calls or other forms of communication to verify the authenticity of your application and the details provided.
It’s important to respond promptly to any requests from the CA during this validation process. Any delays in providing the required information or documentation can lead to a longer validation process. Also, ensure that all your information is accurate and up-to-date to avoid unnecessary complications.
Once the validation process is complete, the CA will issue your SSL certificate. The time taken for this process can range from a few minutes to several weeks, depending on the type of certificate and the speed of your responses during the validation process. Keep in close contact with the CA during this period and be ready to provide any additional information they might require to expedite the process.
Also, Read Learn How To Use Certbot With NGINX In Under 10 Minutes
SSL Certificate Installation Process
Credits: Freepik
After your SSL certificate request is validated and the certificate is issued, the next step is ssl certificate installation on your server. This process varies slightly depending on your server’s operating system and the web server software you’re using. However, the general steps are as follows:
First, you’ll receive your SSL certificate from the CA, typically via email. This certificate file is usually in .crt or .pem format. Download and save this file on your server. It’s important to note where you save it; you must reference this location in your web server’s configuration.
Next, access your server’s control panel or log in via SSH for manual installation. Locate the server block in your web server configuration file. This is where you’ll need to specify the path to your SSL certificate file and its corresponding private key file. The private key is the one generated when you created your CSR.
For Apache servers, edit the ssl.conf file or the specific configuration file for your website. You’ll need to add or update the SSLCertificateFile and SSLCertificateKeyFile directives with the paths to your certificate and private key files, respectively. For Nginx, the directives are ssl_certificate and ssl_certificate_key in the server block of your site’s configuration.
After updating the configuration file, testing the configuration for any errors is essential. On Apache, you can use apachectl configtest, and for Nginx, use nginx -t. If the test is successful, restart your web server to apply the changes. The commands for restarting generally are systemctl restart apache2 for Apache and systemctl restart nginx for Nginx.
Verify Configuration
Once you are done with your SSL certificate installation, verifying the configuration is a critical next step to ensure everything is working correctly. This involves a few key actions to confirm that your website is securely accessible via HTTPS.
Start by visiting your website using a web browser. Type in your website’s URL with the ‘https://’ prefix. Look for the padlock icon next to the URL in the address bar. This icon signifies a secure connection, indicating that your SSL certificate is working. If you receive any security warnings, or if the padlock icon is not present, your installation may have issues.
To delve deeper, you can use online SSL verification tools. These tools scan your website’s SSL setup and report errors or misconfigurations. They check for certificate validity, expiration dates, and whether the certificate chain is complete and installed. These tools often provide detailed insights and suggest fixes for any detected problems.
Another important aspect is to ensure that all web pages on your site are correctly redirected to HTTPS. You can check this by accessing your website using the ‘http://’ prefix. If everything is configured correctly, your site should automatically redirect to the secure ‘https://’ version.
Testing your website on different web browsers and devices is also advisable. Different browsers may handle SSL certificates differently, so ensuring a consistent and secure experience across all platforms is crucial.
For a more technical verification, you can use command-line tools like OpenSSL. With OpenSSL, you can connect to your server and retrieve the SSL certificate to verify its details. This method is particularly useful for checking the certificate directly from the server and ensuring it is being served correctly.
Lastly, don’t forget to check your website’s functionality. Ensure that all pages, scripts, and resources load correctly over HTTPS. Sometimes, mixed content issues can arise where certain elements are loaded over an insecure HTTP connection. These issues need to be addressed to ensure complete website security.
Restart Your Web Dedicated Server
Credits: Freepik
After successfully installing the SSL certificate and verifying the configuration. The final step is to restart your dedicated web server. This step is crucial as it applies the changes made during the ssl certificate installation. The method to restart your server depends on the server software you’re using. For Apache, you might use a command like sudo systemctl restart apache2; for Nginx, it could be sudo systemctl restart nginx. Restarting ensures that your server starts using the new SSL configuration. Allowing secure connections through HTTPS. It’s a simple yet vital step to activate your SSL certificate effectively.
Automate SSL Certificate Renewal
To ensure uninterrupted website security, automating the renewal of your SSL certificate is essential. SSL certificates have a limited lifespan, and manual renewal can be a hassle. For SSL certificate installation platforms like Let’s Encrypt, you can use tools like Certbot for automation. Certbot can be configured to renew the certificate before it expires automatically. For other CAs, check if they offer an auto-renewal option or set up a reminder system to renew your certificate manually. Automating or keeping track of the renewal process helps maintain continuous website security without the risk of your SSL certificate expiring.
Redirect HTTP to HTTPS (Optional)
Credits: Freepik
After completing the ssl certificate installation, consider redirecting all HTTP traffic to HTTPS. This ensures that visitors always connect to the secure version of your site. You can set up this redirection in your server’s configuration file. For Apache, this involves editing the .htaccess file, and adding rules to redirect HTTP requests to HTTPS. For Nginx, you’ll modify the server block in the configuration to include a redirect directive. Implementing this redirect enhances security and helps maintain the trust of your visitors. By ensuring they always have a secure connection to your site.
Also Read 5 Website Security Best Practices For Businesses
Test Your SSL Installation
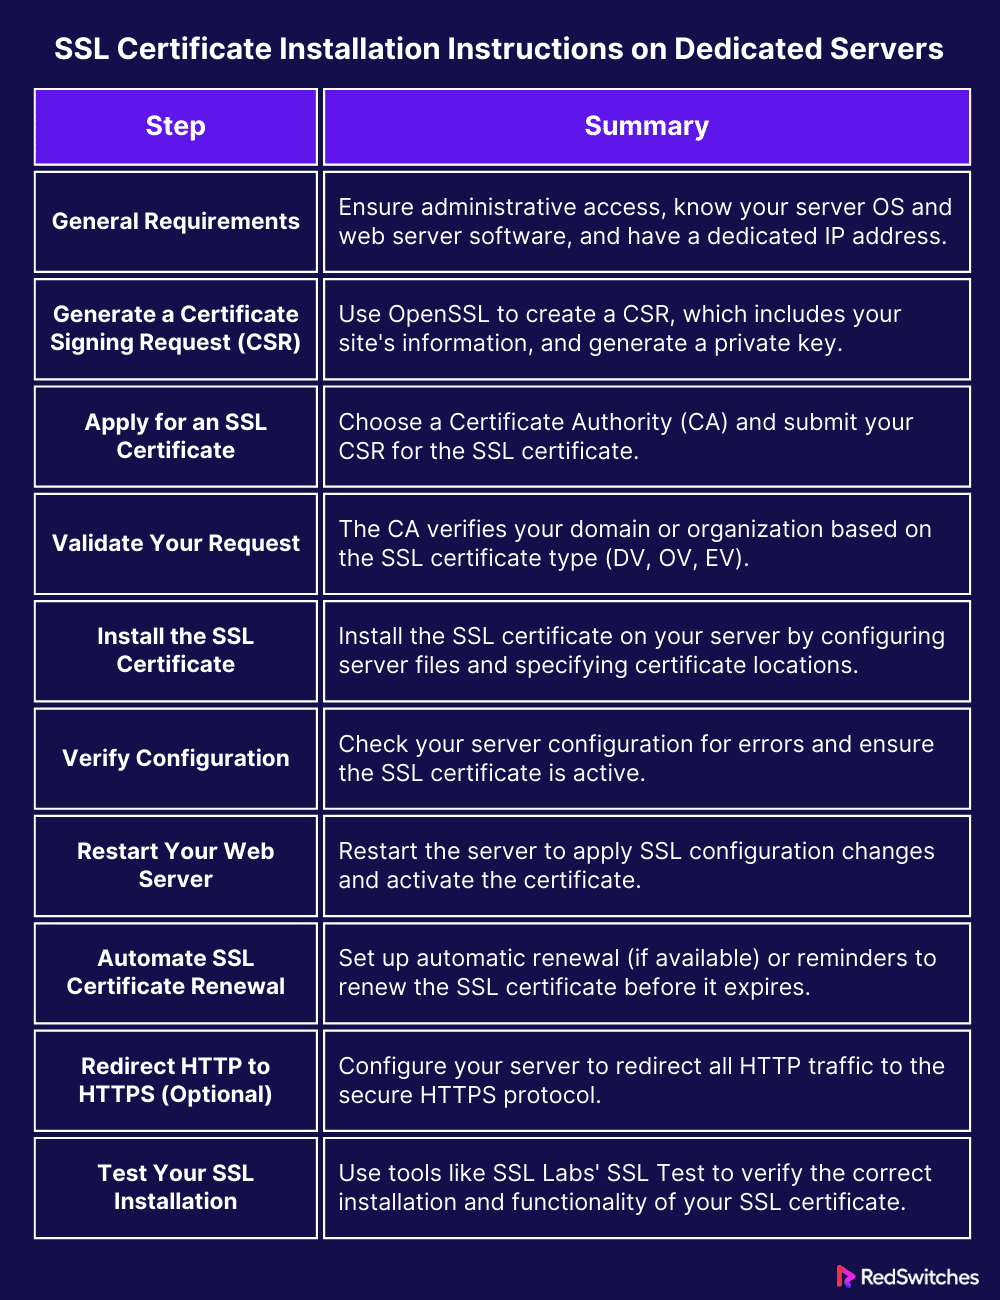
After completing the SSL certificate installation and any necessary configuration changes. Testing your website to ensure the SSL certificate is functioning correctly is essential. You can start by visiting your website using https:// to see if the secure connection is established without any errors. Look for the padlock icon next to the URL, indicating a secure connection. Use online tools like SSL Labs’ SSL Test for a more comprehensive test. This tool checks your SSL configuration for common vulnerabilities and provides a detailed report. This helps you confirm that your SSL certificate is correctly installed and functioning as intended.
This table provides a concise overview of the steps involved in SSL certificates installation on dedicated servers.
Additional Notes
When in the process of SSL certificate installation on dedicated servers, keep these additional points in mind:
- Private Key Security: Safeguard your private key. If compromised, it can undermine your website’s security.
- Regular Updates: Regularly update your web server software. This is to support the latest SSL protocols and security features.
- Compatibility Checks: Ensure your SSL certificate is compatible with major web browsers to avoid security warnings for visitors.
- Backup Configuration: Always back up your server configuration before making changes. This helps in quick recovery in case of errors.
- Follow CA Instructions: Adhere to the specific guidelines. Provided by your Certificate Authority during each step of the SSL installation process.
- Monitor Website Performance: After SSL implementation. Monitor your website’s performance and resolve any SSL-related issues promptly.
- Compliance and Legal Considerations: Be aware of any industry-specific compliance requirements related to SSL/TLS that may apply to your website.
Also Read How To Resolve The Cloudflare Error 522 [8 Easy Solutions]
Commercial vs. Free SSL Certificates
In the digital age, website security is a top priority. SSL certificate installations are at the forefront of this security. They create a secure connection between a website and its visitors. There are two main types: commercial and free SSL certificates. Each has its own set of features and limitations.
Commercial SSL Certificates
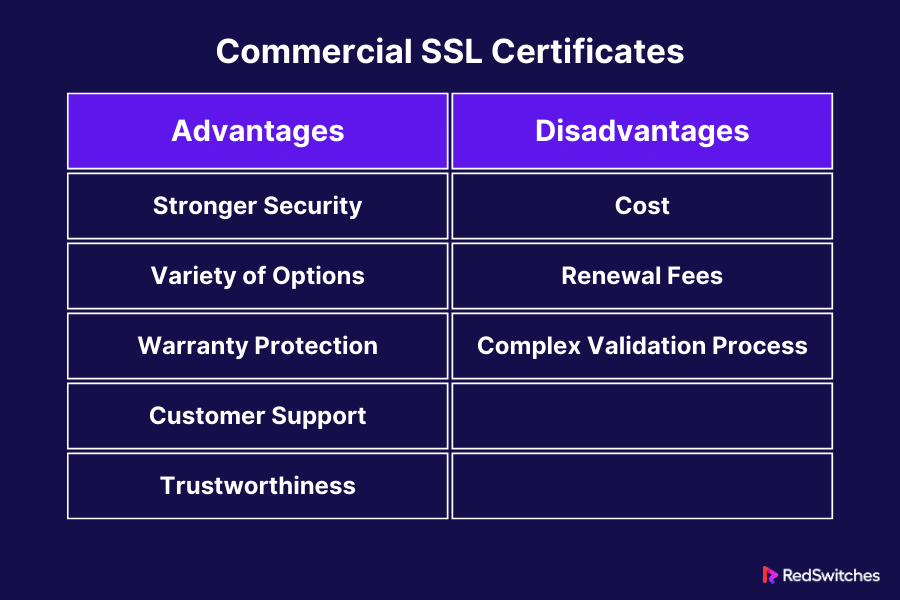
Commercial SSL certificate installations are paid versions provided by trusted certificate authorities.
Advantages
- Stronger Security: Commercial SSL certificate installations offer robust encryption, securing user data effectively.
- Variety of Options: Different types, including Extended Validation (EV) and Organization Validation (OV) certificates, provide more trust indicators.
- Warranty Protection: They come with warranties. If something goes wrong due to the certificate, the warranty covers losses.
- Customer Support: Paid certificates often include dedicated support, helping with installation and troubleshooting.
- Trustworthiness: Commercial SSL certificate installations often include trust seals, boosting customer confidence.
Disadvantages
- Cost: They can be expensive, with prices varying based on the type and level of security.
- Renewal Fees: Annual renewals are often required, adding to the cost.
- Complex Validation Process: Obtaining commercial SSL certificate installations, especially EV or OV, can require extensive documentation.
Free SSL Certificates
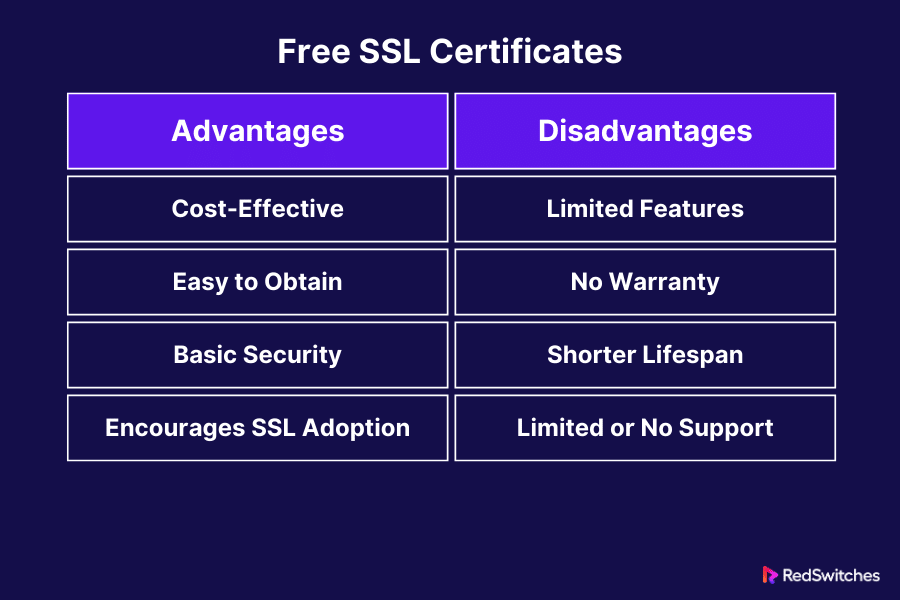
Free SSL certificate installations are no-cost alternatives, providing basic security features.
Advantages
- Cost-Effective: Ideal for personal blogs or small websites with budget constraints.
- Easy to Obtain: Free SSL certificate installations can often be issued and installed quickly.
- Basic Security: Free SSL certificate installations provide basic encryption, which is adequate for websites not handling sensitive transactions.
- Encourages SSL Adoption: Their availability has led to more SSL websites, improving internet security.
Disadvantages
- Limited Features: They lack advanced features like EV or OV, which are important for businesses.
- No Warranty: No compensation for damages if the SSL fails.
- Shorter Lifespan: They often have a shorter validity period, requiring more frequent renewals.
- Limited or No Support: Support is typically community-based, which might not be sufficient for complex issues.
Also, Read How to Fix Cloudflare Error 521 in 7 Easy Ways
Comparison
The choice between commercial and free SSL certificates depends on various factors.
For Business Websites
Business websites, especially those handling sensitive data, should consider commercial SSL certificates. The enhanced security features, customer trust, and support are crucial for maintaining a professional online presence.
For Personal or Small Websites
For personal blogs or small informational websites, a free SSL certificate can be adequate. It offers basic encryption, which is sufficient if the site doesn’t handle sensitive transactions.
User Trust and Brand Image
Commercial SSL certificates, particularly EV certificates, display the business name in the address bar. This feature significantly boosts user trust and brand image. Free SSL certificates do not offer this level of validation.
Cost-Benefit Analysis
For businesses, a commercial SSL certificate’s cost can be justified by its enhanced security and trust. However, for non-commercial or small websites, the benefits of a free SSL certificate often outweigh its limitations.
Whether commercial or free, SSL certificate installations are vital to website security. The choice between them should be based on the website’s purpose, the type of information it handles, and the level of trust it seeks to establish with its users. While commercial SSL certificates offer enhanced security and trust indicators, free SSL certificates provide a cost-effective solution for basic encryption needs.
SSL in the Cloud

Credits: Freepik
In cloud computing, SSL (Secure Sockets Layer) is critical in safeguarding data. It ensures the secure transmission of information between cloud services and users. Understanding SSL’s role in this environment is vital as more businesses migrate to the cloud.
How SSL Works in the Cloud
- Data Encryption: SSL encrypts data sent between the cloud server and the client, protecting it from unauthorized access.
- Authentication: SSL certificates authenticate a cloud service’s identity, ensuring users connect to the legitimate service.
- Secure Connections: It establishes a secure connection for various cloud-based applications and services.
Benefits of SSL in the Cloud
- Enhanced Security: Provides robust encryption, protecting sensitive data in the cloud.
- Trust and Confidence: Users feel more secure knowing their data is encrypted, boosting trust in cloud services.
- Compliance: Many industries require data encryption for compliance. SSL helps in meeting these regulations.
Challenges and Considerations
- Managing Certificates: Managing SSL certificates across multiple services in cloud environments can be complex.
- Performance Impact: Encryption and decryption processes can impact cloud service performance.
- Costs and Resources: Implementing SSL, especially in large-scale cloud environments, can involve additional costs and resources.
Cloud Service Providers and SSL
Most cloud service providers offer SSL as part of their services. They manage SSL implementation, ensuring secure connections for users.
SSL in the cloud is essential for securing data and maintaining trust in cloud computing. As cloud usage grows, the importance of SSL in ensuring safe, encrypted data transmission cannot be understated. Despite challenges, its benefits in security and compliance make it an indispensable part of cloud technology.
Conclusion
We’ve explored the steps and types of SSL certificates for dedicated servers. From understanding general requirements to the final testing of your SSL installation, each step is crucial for secure and trusted web interactions. Whether it’s a DV, OV, or EV certificate, your choice impacts your site’s security and credibility.
Need expert help with SSL certificate installation? RedSwitches offers comprehensive solutions tailored to your needs. Secure your site confidently and ensure the best protection for your users with RedSwitches. Start now and take a step towards enhanced website security!
FAQs
Q. How do I add SSL to my dedicated server?
To add SSL to your dedicated server, purchase or obtain an SSL certificate from a trusted Certificate Authority (CA). Generate a Certificate Signing Request (CSR) on your server and submit it to the CA. After validation, the CA will issue the SSL certificate, which you install on your server. Finally, configure your server to use the SSL certificate and restart the server to apply changes.
Q. How do I install an SSL certificate on my server?
Installing an SSL certificate involves several steps. Access your server’s configuration files after obtaining your SSL certificate from a CA. Input the paths to your SSL certificate and private key files in these configuration files. Make necessary adjustments to enable HTTPS and secure connections. Save the changes and restart your web server to apply the new settings.
Q. How to install SSL certificate on RDS server?
To install an SSL certificate on a Remote Desktop Services (RDS) server, you first need to obtain a valid SSL certificate. Import this certificate into the server’s certificate store. Then, configure the RDS environment to use the imported certificate for secure connections. This often involves using the Remote Desktop Session Host Configuration tool or similar settings in your server’s management console.
Q. How to install SSL on server hostname?
Installing SSL on a server hostname requires configuring your web server to use an SSL certificate for that specific hostname. After obtaining the SSL certificate, edit your web server’s configuration file to specify the hostname and point to the SSL certificate files. Ensure that the SSL settings are properly set for the hostname in question, then restart your server to apply these changes.
Q. What is an SSL certificate?
An SSL certificate is a digital certificate that authenticates the identity of a website and encrypts information sent to the server using SSL/TLS technology.
Q. How do I generate a CSR for an SSL certificate on my Apache server?
You can generate a CSR (Certificate Signing Request) using OpenSSL by running the command: openssl req -new -newkey rs2048 -nodes -keyout yourdomain.key -out yourdomain.csr.
Q. What is an intermediate certificate and why do I need to install it?
An intermediate certificate is a subordinate certificate issued by the trusted root certificate authority. It ensures the validity of your SSL certificate and needs to be installed to establish the chain of trust.
Q. How do I install an SSL certificate on my Microsoft IIS (Internet Information Services) server?
You can install an SSL certificate on your Microsoft IIS server by importing the certificate and private key using the Internet Information Services (IIS) Manager.
Q. What is a private key and how is it used in SSL certificate installation?
A private key is a cryptographic key used to decrypt encrypted data. It is generated along with the CSR and needs to be kept secure as it is paired with the SSL certificate for secure communication.
Q. How can I manually install an SSL certificate on my server?
You can manually install an SSL certificate by uploading the certificate files (such as .crt and .key files) to your server and configuring the web server (e.g., Apache, Microsoft IIS) to use the certificate for secure connections.
Q. What is the process for installing an SSL certificate on a Microsoft Exchange server?
To install an SSL certificate on a Microsoft Exchange server, you need to generate a CSR, request the SSL certificate from a Certificate Authority, and then import the certificate into the Exchange management console.
Q. What are the primary and intermediate certificates when installing an SSL certificate?
The primary certificate is the SSL certificate issued for your domain, while the intermediate certificate is the certificate chain that links your SSL certificate to the trusted root certificate authority. Both are needed for a complete SSL installation.
Q. Can you provide SSL certificate installation guides for the Apache web server?
Yes, comprehensive SSL certificate installation guides are available for configuring SSL/TLS on Apache web servers. These guides provide step-by-step instructions for different versions of Apache.
Q. What is the importance of installing the root and intermediate certificates and SSL certificates?
Installing the root and intermediate certificates and the SSL certificate is crucial as it establishes a chain of trust from the root certificate authority to your SSL certificate, ensuring that web browsers and devices trust the certificate.
