For many dedicated server admins, keeping track of their server’s SSL and TLS certificates is a tedious chore. If they don’t set up monitoring alerts, they might not be notified about soon-to-be-expiring and expired certificates.
This poses a severe problem in NGINX server administration because expired SSL and TLS certificates are more than just a minor annoyance. They can seriously affect website SERP rankings and open up loopholes in server security.
As a result, admins need a way to automate installing and renewing SSL certificates so that they can dedicate more time to critical activities.
Table Of Content
- Enters Certbot on NGINX
- How Does Certbot NGINX Typically Work?
- Configure NGINX
- Certificate Renewal
- How to Install Let’s Encrypt Certificate on NGINX and Ubuntu 22.04
- Renew a TLS/SSL Certificate With Certbot
- Conclusion
- FAQs
Enters Certbot on NGINX
The NGINX Certbot combines two popular tools: NGINX and Certbot.
NGINX is a widely used open-source web server. At the same time, Certbot is a free, open-source software tool designed to automate obtaining and renewing SSL/TLS certificates from the Let’s Encrypt certificate authority.
When combined, Certbot NGINX simplifies obtaining and installing SSL/TLS certificates for NGINX servers. It automates the certificate issuance and renewal process, allowing you to secure your website with HTTPS without manual intervention.
How Does Certbot NGINX Typically Work?
After that brief introduction, let’s go into the details of how Certbot NGINX works in a typical server setup.
Let’s start with the installation.
Install Certbot NGINX
The good thing is that you can install both NGINX and Certbot on your server.
Begin by installing the NGINX web server on your server. The installation process may vary depending on your operating system, and we suggest checking out the official documentation for instructions.
Next, install Certbot, an excellent tool for obtaining and managing SSL/TLS certificates from Let’s Encrypt. The Certbot website provides OS-specific instructions, and we highly recommend following the appropriate process to install Certbot on your server.
Generate the Certificate
Certbot interacts with the Let’s Encrypt systems to generate SSL/TLS certificates for your domain(s). During the process, it verifies domain ownership and initiates the certificate issuance process.
Let’s look at this process in a bit more detail.
Run Certbot
Start by running the Certbot command with the appropriate options and arguments. Certbot will initiate contact with Let’s Encrypt to generate the certificates.
Domain Validation
Certbot verifies your ownership of the domain(s) you’re using Certbot to request certificates. It does this through automated challenges, such as placing a file on your web server or modifying DNS records.
Certificate Issuance
Once domain ownership is verified, Let’s Encrypt issues the SSL/TLS certificates for your domain(s). Certbot saves these certificate files on your server.
Configure NGINX

Once the certificate files are on the server, Certbot automatically updates NGINX configuration to include the newly generated SSL/TLS certificates and configures the server to use HTTPS. Usually, this is a three-step process.
Automatic Configuration
Certbot automatically updates the NGINX configuration files to include the SSL/TLS certificates and configure NGINX to use HTTPS.
Virtual Host Configuration
Certbot creates or modifies each domain’s virtual host configuration file, adding the necessary SSL/TLS directives and specifying the path to the certificate files.
Reload NGINX
After the configuration changes, Certbot instructs NGINX to reload its configuration to apply the changes. This requires a service restart. After the service reloads the new configurations, NGINX can listen for HTTPS requests using the obtained certificates.
Certificate Renewal
Certbot sets up automated tasks to periodically check for expiring certificates and automatically renew them. This ensures that your website maintains a valid SSL/TLS certificate. This process involves:
Certificate Expiration
Certbot sets up automated renewal tasks to check for expiring certificates. It runs in the background and periodically checks the certificate expiration dates.
Renewal Process
If a certificate is nearing expiration, Certbot automatically renews it by contacting Let’s Encrypt and requesting a new certificate.
Configuration Update
After the certificate is renewed, Certbot updates the NGINX configuration files with the new certificate files. This results in a smooth transition without service interruptions.
Reload NGINX
Certbot triggers NGINX to reload the configuration. This applies the renewed certificate to the server.
Certbot NGINX greatly simplifies managing SSL/TLS certificates for NGINX servers. It handles the certificate generation, installation, and renewal tasks, allowing you to focus on other aspects of server and website management.
With HTTPS becoming a standard website requirement, NGINX Certbot makes it easy to secure your NGINX server with trusted SSL/TLS certificates.
How to Install Let’s Encrypt Certificate on NGINX and Ubuntu 22.04
After this detailed look, let’s discuss installing the Let’s Encrypt certbot on an Ubuntu server. But first, check out the prerequisites of the process.
Prerequisites:
The prerequisites include the following:
- An Ubuntu 22.04 server.
- A registered domain with A records added for testdomain.com and www.testdomain.com
The Need for snapd for Package Management
We highly recommend using Certbot’s snap package for installation. Nearly all Linux distributions support snap packages, but you need snapd to manage snap packages.
On Ubuntu, snapd is a package management tool and the runtime environment for Snaps.
Snaps are containerized software packages containing all the dependencies and libraries required to run an application. They are intended to function with various Linux distributions while providing a safe and isolated application environment.
Snapd is responsible for installing, managing, and upgrading Snaps on an Ubuntu system. It operates in the background and provides the infrastructure to manage Snap packaging, distribution, and execution.
Users can use the snap command line tool to work with Snaps and execute tasks, including installing, updating, and deleting programs.
Step # 1: Install snapd
Start by installing snapd on your Ubuntu server with the following command:
# snap install core; snap refresh core

Step # 2: Install Certbot
Now, we will install Certbot using the snap package. For this, use the following command:
# snap install --classic certbot

Next, link the files with the following command:
# ln -s /snap/bin/certbot /usr/bin/certbot
Step # 3: Check NGINX Configuration for the Concerned Domain
The NGINX configuration must allow Certbot to locate the proper server block to configure SSL automatically. It does this by requesting a server name directive corresponding to the domain for which you request a certificate.
You can refer to the configuration file below, which is default located at /etc/nginx/sites-available/ with the name testdomain.com
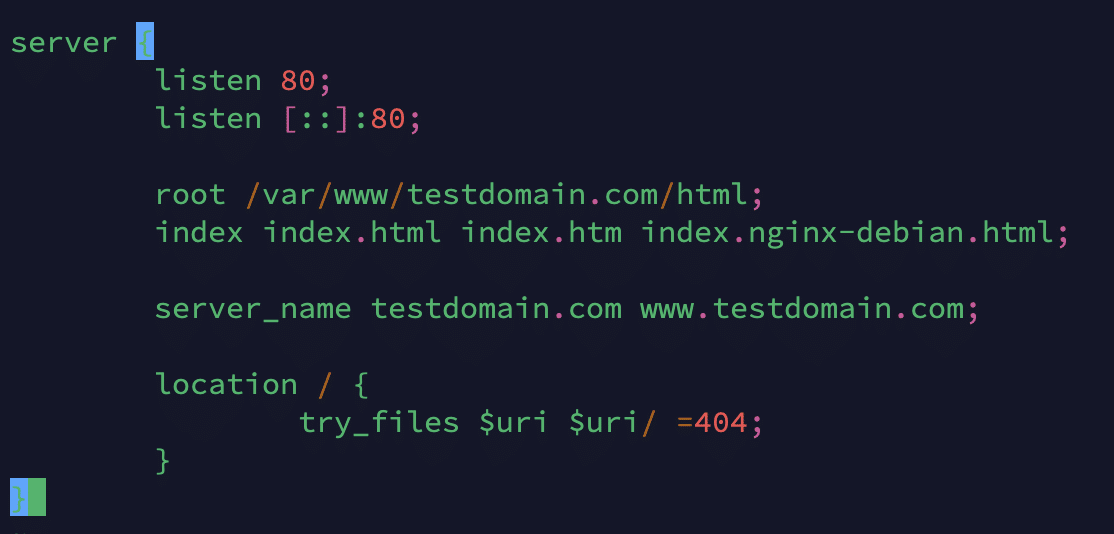
Next, let’s activate the file by building a link from it to the directory sites-enabled, which NGINX reads from when it starts up.
# ln -s /etc/nginx/sites-available/testdomain.com /etc/nginx/sites-enabled/
Once the site is enabled, you can verify the syntax of the configuration file with the following command:
# nginx -t
Once you get the all-clear message, restart the NGINX service with the following command:
# systemctl restart nginx
or
# service nginx restart

Step # 4: Generate a Certificate for a Domain
Use the following command to use Certbot to generate a certificate for the target domain (testdomain.com in this example)
# certbot --nginx -d testdomain.com -d www.testdomain.com

Note: Remember to replace “testdomain.com” with your registered domain name.
When you run the command, you will be asked to enter your email address and confirm your acceptance of the terms of service. You should then see a message stating the procedure was successful and indicating where your certificates are kept.
We run certbot with the -d option and the –nginx plugin to specify the domain names we want the certificate to be valid.
Now that your certificates have been downloaded, installed, and loaded, NGINX will automatically reroute all incoming web requests to https://.
Take a look at your browser’s security indicator after reloading your website for further confirmation.
Step # 5: Verify the Certificate
Now, let’s verify that the certificate is in active use. For this, run the following command:
# systemctl status snap.certbot.renew.service

Renew a TLS/SSL Certificate With Certbot
After installing the certificate, let’s now check out how Certbot NGINX is a great option for auto-renewing the TLS/SSL certificates. Here’re the steps of the process.
Step # 1: Run the Certbot Command to Renew the Certificate
Start by running the following command to start the process;
# certbot renew
Certbot will check the certificates installed on the system and renew any certificates close to expiration.
If you have multiple certificates, Certbot will attempt to renew all of them. During the process, if Certbot finds a certificate that’s not due for renewal yet, it will skip it.
Step #2: Certbot Manages the Renewal Process
Certbot carries out several actions to renew the certificates that are getting close to expiry.
Certbot will contact the Let’s Encrypt certificate authority to determine whether or not the certificate needs to be renewed. If the certificate is about to expire, Certbot will request an automatic renewal.
After successful renewal, Certbot will update the renewed certificate files on your server. The new files will replace the old certificate files in the specified locations.
Please remember that Certbot may need to restart your web server to ensure the new certificates take effect. This is usually done automatically, but you may have to restart the web server manually if it doesn’t happen.
Once you get the indication that Certbot has completed the renewal process, we highly recommend testing web server settings to confirm that the new certificates are in use and the server is still operational.
Step #3: Simulate Certificate Renewal Process
You can test the certificate renewal process by simulating the process without making any actual changes. For this, you can use the --dry-run option:
# certbot renew --dry-run
During the dry run process, the process informs you of any issues you might encounter during an actual run. As an aside, Let’s Encrypt will notify you via email at the address you provided if the automated renewal process ever fails.
Conclusion
NGINX Certbot is a powerful tool that streamlines the process of getting, installing, and renewing Let’s Encrypt SSL/TLS certificates for NGINX web servers.
It automates the certificate administration process, making it simple to protect your websites using HTTPS. Certbot NGINX considerably simplifies SSL/TLS certificate management, minimizing manual input and maintaining the continuous availability of secure HTTPS connections. It handles the repetitive tasks associated with certificate issues and renewal,
At RedSwitches, we take server security very seriously. In addition to helping our customers maintain their HTTPS connectivity, we offer bare metal servers with an arsenal of security measures to safeguard your NGINX servers.
Eager to learn more? Contact us today.
Frequently Asked Questions (FAQs)
Q-1) Does Certbot handle certificate renewals automatically?
If you don’t supply a unique authorization script, certificates obtained manually cannot be renewed automatically with the Certbot renewal process. On the other hand, certificates obtained using a Certbot DNS plugin can be automatically renewed.
Q-2) Can I use Certbot with an already installed NGINX setup?
Yes, you can use Certbot with an already installed version of Nginx. Certbot will automatically identify and change your Nginx configuration files to enable HTTPS during the configuration process.
Q-3) How frequently do I need to renew the certifications I acquired with Certbot?
Let’s Encrypt certificates are valid for 90 days. Certbot creates automatic renewal jobs that run regularly to check for expired certificates and renew them as needed. Certbot’s renewal job should be conducted at least twice daily to guarantee timely renewal.
