Learn How To Fix 502 Bad Gateway Error in NGINX
Read about the reasons behind the 502 Bad Gateway in NGINX error and learn six unique ways you can fix this issue from breaking the user experience.
502 Bad Gateway is an error website visitors see relatively rarely. However, since it can prevent the users from interacting with the website or the hosted application, website owners should make rectifying this error their top priority.
This error typically occurs when a server acting as a gateway or proxy receives an invalid response from an upstream server. Since NGINX is a popular proxy server, users often see error messages like “502 Bad Gateway” and the active NGINX version.
The NGINX 502 Bad Gateway is a common issue website visitors encounter. There are several possible causes for this error and several solutions. This post will examine the most likely reasons and how site owners and developers can resolve the error.
Let’s start with a short introduction to the error.
What Does the Error Code 502 Bad Gateway in NGINX Mean?
502 Bad Gateway indicates that the server you are trying to reach has encountered an error while communicating with another server. This occurs when one server serves as a proxy to receive data from other servers in the setup. The 502 error occurs when a server returns an error when attempting to connect to another server.
The exciting aspect of this discussion is the several ways to indicate that a 502 error has occurred. Here’re a few ways you’ll find this error being mentioned on various websites:
- 502 Bad Gateway NGINX
- HTTP 502
- HTTP Error 502 – Bad Gateway
- 502 Service Temporarily Overloaded
- Temporary Error (502)
- 502 Bad Gateway
- 502 Proxy Error
- Error 502
As with the 404 Not Found error, developers can customize the appearance of the 502 error page to match the current website design.
Before going into the probable reasons for the 502 Bad Gateway error in NGINX, let’s discuss PHP-FPM and its role in NGINX performance.
What is PHP-FPM & How Does It Work?
PHP applications deployed on a server use PHP-FPM (PHP-FastCGI Process Manager) as a tool for handling web requests. When combined with NGINX, PHP-FPM can make websites run faster and use fewer resources for responding to requests.
If you use PHP-FPM, PHP works as a separate service, and the web requests are handled through a TCP/IP port. NGINX only handles HTTP requests in this configuration, while PHP-FPM reads PHP code. This arrangement ensures a faster response by distributing the workload over two services.
Now that you have a good idea about the 502 Bad Gateway error in NGINX, let’s discuss why this error occurs.
The Top Six Possibilities Behind 502 Bad Gateway in NGINX (And How to Fix Them)
Here’re the six reasons users might encounter the 502 Bad Gateway error.
Reason # 1: NGINX is Not Running

If you receive a “502 Bad Gateway” error, first, you should check whether NGINX is up and running. Here’s how you can debug this problem:
Examine the NGINX Status
Start by confirming that NGINX is up and operating. For this, launch the terminal and enter the following command:
$ sudo service nginx status or systemctl status nginx
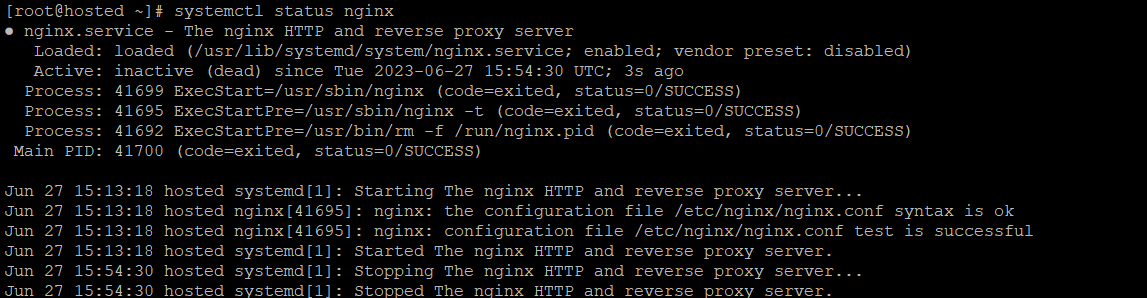
As you can see, this command will display the NGINX web server’s current status. If it isn’t running, you’ll see a message saying that NGINX isn’t running.
If that’s the case, you can try restarting it with the following command that restarts NGINX and attempts to bind it to the designated ports:
$ sudo service nginx restart
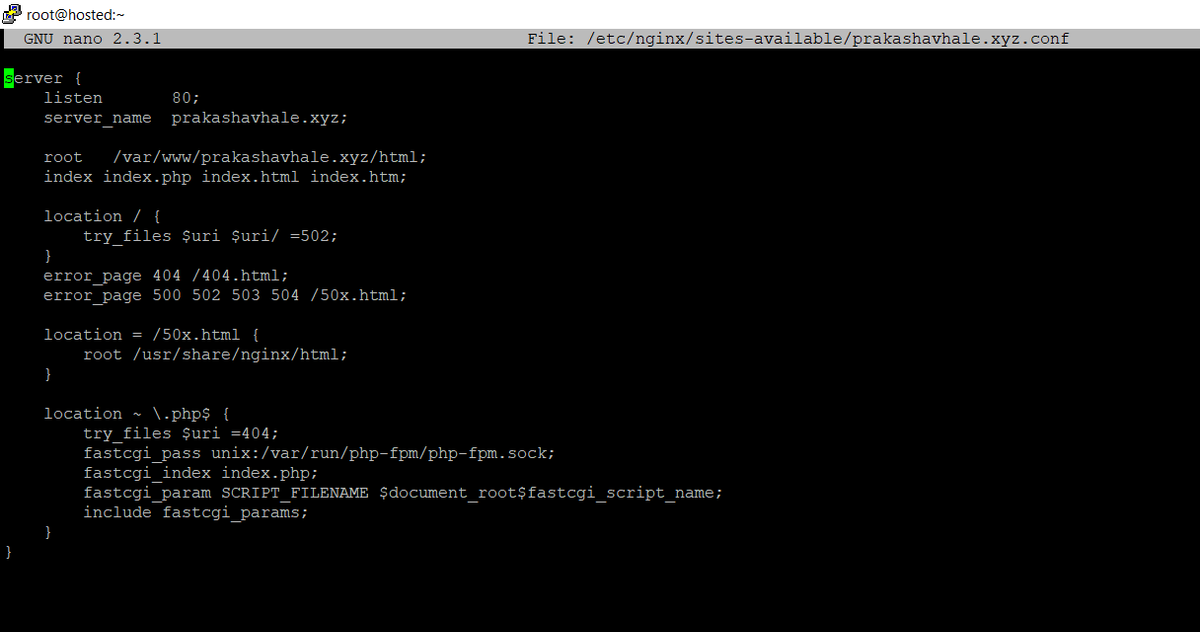
Examine the NGINX Configuration
An error in the NGINX configuration file can likely stop it from functioning correctly. To verify this, use the following command to verify the configuration syntax:
$ sudo nginx -t

This command checks the NGINX configuration file for syntax issues. If there are any errors, it will specify the exact problem.
You can rectify the mistakes by editing the configuration file (/etc/nginx/nginx.conf or /etc/nginx/conf.d/*). If the syntax is okay, you will see a similar message:

Check the Port Bindings
If NGINX is working correctly, you should next check that NGINX is bound to the adequately designated ports. NGINX listens on port 80 for HTTP and port 443 for HTTPS by default.
Open the NGINX configuration file (/etc/nginx/nginx.conf or /etc/nginx/conf.d/*) and look for the listen directives within the server blocks. Here you should check that the ports are correctly specified.
Check for Conflicting Services
If NGINX does not start because of port conflicts, the main reason is that another service may be already mapped to the same port. You can use the following command to identify any conflicting services:
$ sudo netstat -tuln | grep LISTEN

This command displays all the services currently listening on specific ports. Look for any services that use ports 80 or 443. If you discover any conflicts, you must stop or adjust those services to free up ports for NGINX.
Examine the NGINX Error Logs
When investigating the 502 error, the NGINX logs can help determine what went wrong with the reverse proxy server. Typically, error logs are stored at /var/log/nginx/error.log. We recommend examining these log files for any error messages that may point to the source of the problem.
Examine The System Resources
Verifying that your server has sufficient resources (CPU, RAM, and disc space) to support NGINX operations is always a good idea. Insufficient resources can prevent NGINX from booting up or cause it to crash. We recommend using system monitoring tools or command-line utilities such as htop to examine resource consumption.
Reason # 2: PHP-FPM Isn’t Working
If you’re getting a 502 Bad Gateway error because NGINX and PHP-FPM aren’t “cooperating”, you can troubleshoot the problem by doing the following:
Examine the NGINX and PHP-FPM Configurations
Start by checking that NGINX and PHP-FPM are both correctly configured and functioning.
Open the NGINX configuration file (/etc/nginx/nginx.conf or /etc/nginx/conf.d/*) and verify that the location block for PHP scripts is correctly set up. It should have directives like fastcgi_pass, which points to the PHP-FPM socket or address and port, and fastcgi_param parameters. Similarly, review the PHP-FPM configuration file (/etc/php-fpm.conf or /etc/php-fpm.d/www.conf) to ensure all settings are correctly set up.
Check the Status of PHP-FPM
Check to see if PHP-FPM is currently operational.
For this, launch the terminal or command prompt and type the following command:
$ sudo service php-fpm status

This command displays PHP-FPM’s current status. If it isn’t up, you’ll receive a message that PHP-FPM isn’t running.
Restart NGINX and PHP-FPM
If NGINX and PHP-FPM are running but not communicating correctly, you can try restarting both services.
To restart them, use the following commands:
$ sudo service nginx restart $ sudo service php-fpm restart
Examine the Socket or Address and Port Settings
Check that the fastcgi_pass directive in the NGINX configuration file is correctly pointing to the PHP-FPM socket or IP and port.
Here’s what a properly formatted directive looks like: fastcgi_pass unix:/run/php/php7.4-fpm.sock;
If you use a TCP address and port, it should appear like this:
fastcgi_pass 127.0.0.1:9000;
Check that the socket or address and port correspond to the PHP-FPM settings. After modifying the configuration, remember to restart both NGINX and PHP-FPM.
Examine PHP-FPM Error Logs
PHP-FPM logs provide essential insight into any PHP script execution issues. Typically, the log file is located in /var/log/php-fpm.log.
Examine the log file for error messages that may illuminate the problem. While you’re at it, we suggest checking NGINX’s error log (/var/log/nginx/error.log) for any relevant error messages.
Examine the File Permissions
An overlooked reason behind PHP-FPM and NGINX-related issues is misconfigured file permissions.
You should confirm that the PHP files and directories have the necessary permissions and ownership so that NGINX can access them and PHP-FPM can execute them. Typically, PHP files should be readable by the NGINX user, and folders should have appropriate execution rights. Use the chown and chmod commands to change ownership and permissions, if necessary.
Test Configurations With a Simple PHP Script
Write a simple PHP script (we highly recommend printing info.php) to test NGINX and PHP-FPM operations. For this, we suggest the following:
<?php phpinfo(); ?>
Put this line in a file named info.php and save the file in the web root directory (for example, /var/www/html). Now, visit it using your browser (for example, http://your-domain.com/info.php).
If you can see the PHP information page, the NGINX, and PHP-FPM are working successfully together. If not, it could point to a problem with PHP-FPM settings or communication between NGINX and PHP-FPM.
Reason # 3: The PHP-FPM Timeout Has Expired
The error “The PHP-FPM timeout has expired” usually means that a PHP script executed by PHP-FPM took longer to complete than the timeout value mentioned in the config file.
When PHP-FPM receives a request to execute a PHP script, a worker process is launched to fulfill the request. PHP-FPM terminates the process and returns the timeout error if the script execution exceeds the timeout setting defined in the PHP-FPM configuration.
You can resolve this problem by taking the following steps:
Increase the Value of the Timeout
In the PHP-FPM configuration file (typically /etc/php-fpm.conf or /etc/php-fpm.d/www.conf), change the request_terminate_timeout setting directive.
We suggest increasing the value of request_terminate_timeout to allow PHP scripts to run for extended periods.
For instance, in the following example, the timeout is set to 300 seconds (5 minutes):
request_terminate_timeout = 300s
We suggest adjusting the value to meet the needs of your application.
Restart PHP-FPM Service
If you change the PHP-FPM configuration file, you must restart the PHP-FPM service to implement the modifications.
The command may differ depending on your operating system and how PHP-FPM is installed. Here is an example of the restart commands:
$ sudo [systemctl](https://www.redswitches.com/blog/restart-nginx-web-server/) restart php-fpm
Improve Your PHP Code
If your PHP script takes too long to execute, you may need to optimize your code to improve its execution time frame. You should focus on finding and optimizing bottlenecks like database requests, intensive computations, or inefficient algorithms.
Check for Resource Constraints
Executing PHP scripts requires server resources. Time-out errors might also occur when a script gets stuck while waiting for the resources to continue execution.
As such, you should ensure that your server has sufficient resources to handle PHP script execution.
Reason # 4: NGINX Requests Denied by the Firewall
If you receive a “502 Bad Gateway” error in NGINX and think that the firewall is blocking requests, try the following ideas to troubleshoot the problem:
Examine the Firewall Rules
Start by checking the firewall rules to ensure it is not blocking inbound requests to NGINX.
Depending on your firewall solution ( iptables, UFW, or Firewalld), the rule syntax about port 80 for HTTP or port 443 for HTTPS might differ. You should check and allow inbound traffic to NGINX, and modify the rules accordingly.
Temporarily Disable the Firewall
As a first step in troubleshooting, temporarily disable the firewall and see if the 502 Bad Gateway error persists. This helps you narrow down the firewall as the source of the problem.
However, you should re-enable the firewall immediately to maintain security.
Examine the Firewall Logs
Check the firewall logs to see whether entries are linked to disallowed requests. In addition, firewall logs can give information about blocked traffic and the reasons for denials. The location of the firewall logs differs depending on the firewall solution. We suggest checking /var/log/iptables.log, /var/log/ufw.log, and /var/log/firewalld.log for the logs.
Allow NGINX Through the Firewall
We recommend allowing NGINX through the firewall to eliminate firewall-related causes of the NGINX 502 Bad Gateway error.
Start by configuring the necessary rules to allow NGINX through the firewall. Make changes to the firewall rules to allow inbound connections on the NGINX ports 80 and 443. The particular instructions or configuration procedures vary depending on the firewall solution.
Here are a couple of examples:
iptables
Use the following commands to whitelist ports 80 and 443 in iptables:
$ sudo iptables -A INPUT -p tcp --dport 80 -j ACCEPT $ sudo iptables -A INPUT -p tcp --dport 443 -j ACCEPT
UFW (Simplified Firewall) Use the following commands to whitelist ports 80 and 443 in UFW:
$ sudo ufw allow 80/tcp $ sudo ufw allow 443/tcp
Firewalld Use the following commands to whitelist ports 80 and 443 in Firewalld:
$ sudo firewall-cmd --add-service=http --permanent $ sudo firewall-cmd --add-service=https --permanent $ sudo firewall-cmd --reload
Test Connectivity
After modifying the firewall rules and validating the NGINX configuration, see if you can connect to NGINX.
Use programs such as Telnet or curl to verify connectivity locally and from remote systems. For example, to test NGINX’s response, use the following command:
# curl -I http://localhost/
If the connection is successful and the expected response is received, the firewall rules allow traffic to the NGINX reverse proxy server.
Reason # 5: A Domain Name is Not Permitted
If you get a “502 Bad Gateway” error message in NGINX with the message “A domain name is not permitted,” it usually means that NGINX received a request for a domain name not configured or allowed in the configuration file.
You can troubleshoot this problem by doing the following:
Check the server_name Directive
Start by checking the server_name directive to see if the domain name causing the problem is included in the directive block. The path should be: /etc/nginx/sites-available/domainname.conf
For example, server_name example.com www.example.com;
If the domain name is missing or incorrect, add or change the server_name directive.
Examine DNS Resolution
Check that the domain name correctly resolves to the NGINX server’s IP address. You can do DNS lookups with tools like nslookup or dig to ensure the domain name resolves to the correct IP address. Here’s a sample lookup command:
# nslookup example.com
If the domain name does not resolve correctly, you may need to adjust your DNS configuration or contact your DNS provider.
Reason # 6: Bugs In Web Applications
Errors at the application level can (rarely) cause the 502 Bad Gateway error.
If your web server logs contain loading errors similar to the following, the application code may be incompatible with the server version and configuration.
[notice] child pid xxxxx exit signal Segmentation fault (11)
You must examine your application’s software needs and re-configure the services to meet the requirements.
Conclusion
The 502 Bad Gateway in NGINX error usually happens when NGINX runs as a reverse proxy and can’t connect to services on either side of the server setup. This error could occur because of a server crash, a network error, a problem with the NGINX setup, or domain-related issues. Here at Redswitches, we offer The perfect platform for setting up NGINX as a Reverse Proxy server.
Optimizing a reverse proxy can make it run faster and handle calls more efficiently. Remember that the right configurations and optimizations may differ based on how you use the system and what you expect from the NGINX server. Redswitches is a one-stop solution for all of your website hosting needs.
FAQs
Q. What does the NGINX 502 Bad Gateway error indicate?
The 502 Bad Gateway error means an upstream server sent no or malformed response to the NGINX server in a reverse proxy server role. It usually happens when NGINX can’t connect to the backend server or when the backend server gives an invalid or unexpected response.
Q. Can too much traffic cause a 502 Bad Gateway?
Too much traffic can overwhelm the backend servers or the proxy infrastructure, causing the 502 Bad Gateway problem. In these situations, you may need to optimize your server resources, change timeouts, or use load balancers to handle the extra traffic.
Q. Can DNS problems result in a 502 Bad Gateway error?
Yes, a “502 Bad Gateway” error can be caused by trouble with DNS resolution. Ensure that the upstream server’s IP address can be found by resolving the domain name used in the NGINX setup.
Q. Can a PHP-FPM misconfiguration cause a 502 Bad Gateway error in NGINX?
A 502 Bad Gateway problem in NGINX can happen if PHP-FPM is set up incorrectly. To avoid these errors, ensure that NGINX is set up correctly to talk to PHP-FPM using the correct socket, address, and port. Check the PHP-FPM configuration file (php-fpm.conf or www.conf) to ensure it conforms to the proper NGINX configuration settings.
Prakash Avhale
System Administrator
Prakash Avhale is a Linux System Administrator at RedSwitches with more than ten years of hands-on experience keeping web hosting infrastructure running. His work spans the full stack of server operations, from diagnosing kernel-level issues and configuring hardware RAID to managing cPanel, WHM, and Plesk and virtualization with Proxmox and VMware ESXi.

Sons Of The Forest Dedicated Server Setup Guide 2026
Set up a Sons of the Forest dedicated server in 2026 with SteamCMD, UDP ports 8766, 27016, 9700, config files, Windows, Linux Docker, backups, and fixes.

Soulmask Dedicated Server Setup: The Ultimate Guide 2026
Set up a Soulmask dedicated server in 2026 with SteamCMD, Windows/Linux app IDs, ports, Docker notes, GameXishu.json, backups, and fixes.

Bannerlord Dedicated Server Setup Guide 2026
Set up a Bannerlord dedicated server in 2026 with SteamCMD, auth token, port 7210, config files, Linux/Windows steps, and fixes for visibility or join issues.
Power Your Next Project With Bare Metal
10 min delivery, zero setup fees, and 24/7/365 human engineers across 20+ global locations.