Encountering the DNS PROBE FINISHED BAD CONFIG error message in your web browser can be frustrating.
This error usually indicates a problem with the configuration of the Domain Name Server (DNS) servers. DNS enables your browser to find and access websites by translating domain names into IP addresses.
In this context, this error means that your browser could not resolve the domain name to an IP address, potentially due to DNS configuration issues, network issues, or problems with the DNS server settings.
In this guide, we will discuss this error and then go into the details of the possible causes. Finally, we will discuss 10+ solutions you can apply to fix this error.
Table Of Contents
- What is DNS_PROBE_FINISHED_BAD_CONFIG Error?
- Possible Causes For The DNS_PROBE_FINISHED_BAD_CONFIG Error
- The DNS_PROBE_FINISHED_BAD_CONFIG Error: How to Fix It?
- The Prerequisites
- Fix #1: Restart Your System and Router
- Fix #2: Flush the DNS Cache
- Fix #3: Change the DNS Servers
- Fix #4: Check Your Firewall and Antivirus Software
- Fix #5: Update Network Drivers
- Fix #6: Release and Renew IP Address
- Fix #7: Check for Malware
- Fix #8: Reset Network Settings
- Fix #9: Contact Your ISP
- Fix #10: Update Your Web Browser
- Fix #11: Turn off Browser Extensions and/or the Proxy Server
- Fix #12: Delete Browser Cache
- Fix #13: Remove Temporary Files
- Fix #14: Fix Misconfigured Host Files
- Conclusion
- FAQs
What is DNS_PROBE_FINISHED_BAD_CONFIG Error?
The DNS_PROBE_FINISHED_BAD_CONFIG error is a common issue users encounter while browsing the internet.
This error typically indicates a problem with the DNS configuration on the user’s device or within their network. DNS is an essential internet service that converts domain names that humans can read (such as www.example.com) into IP addresses that computers can use to connect to a specific machine on the internet.
Possible Causes For The DNS_PROBE_FINISHED_BAD_CONFIG Error
Before going into the solutions, let’s briefly discuss what causes this error:
Incorrect DNS Configuration
DNS resolution problems may arise if the device’s or network router’s DNS settings are inaccurate or have been altered.
ISP DNS Issues
Sometimes, the default DNS servers provided by the Internet Service Provider (ISP) might be down or experiencing issues.
Network Configuration Issues
You may face DNS resolution issues because of incorrectly configured network settings, including IP addresses, subnet masks, and default gateways.
Firewall or Security Software
Occasionally, security software (such as IDS) or the system firewall might block DNS queries or interfere with name resolution.
Router-level Issues
The router on your network or subnetwork may impact DNS operations because of out-of-date firmware or improper table configurations.
Temporary Glitches
In rare cases, temporary problems with intermediate hoops and DNS servers can also cause DNS errors.
The DNS_PROBE_FINISHED_BAD_CONFIG Error: How to Fix It?
Now that you know what causes the issue, let’s discuss several fixes you can apply to resolve this error and restore the browsing experience.
The Prerequisites
Before applying the fixes we will discuss in this guide, make sure you have the following:
- A reliable internet connection.
- Terminal or command line access.
- A user account with root, sudo, or Administrator privileges.
We will now mention the solutions for the DNS_PROBE_FINISHED_BAD_CONFIG error. While you can apply each fix independently, we suggest using the following as a checklist to troubleshoot and resolve the error.
Fix #1: Restart Your System and Router
The easiest fix for the error is to simply restart the device and the router. For this, follow these steps:
- Unplug your router and turn off your computer.
- Wait for 60 seconds.
- Restart your computer and router and verify that the problem has been resolved.
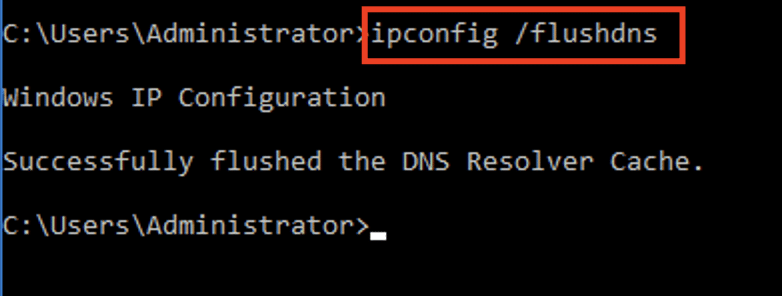
Fix #2: Flush the DNS Cache
Flushing the DNS cache removes all the stored DNS lookup information, forcing the computer to request new information. This renews the local DNS lookup database, resolving the DNS errors:
Windows
Open the Command Prompt as an administrator, type ipconfig /flushdns, and then press Enter.
macOS
Open the Terminal and type sudo dscacheutil -flushcache; sudo killall -HUP mDNSResponder. Press Return to execute the command.

Linux
Launch the Terminal and type sudo systemd-resolve –flush-caches or sudo /etc/init.d/dns-clean start or systemctl restart nscd, depending on your Linux distribution.
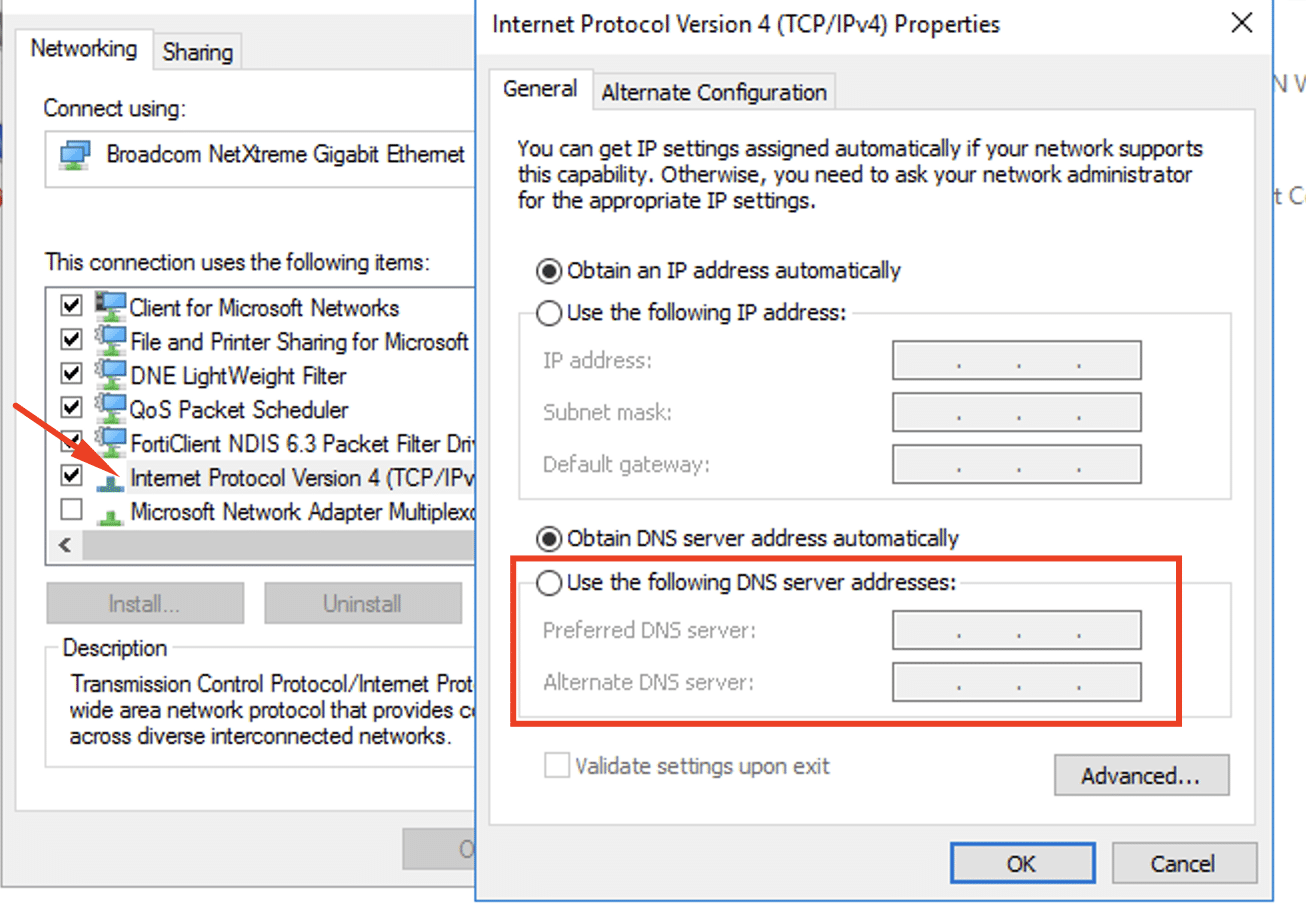
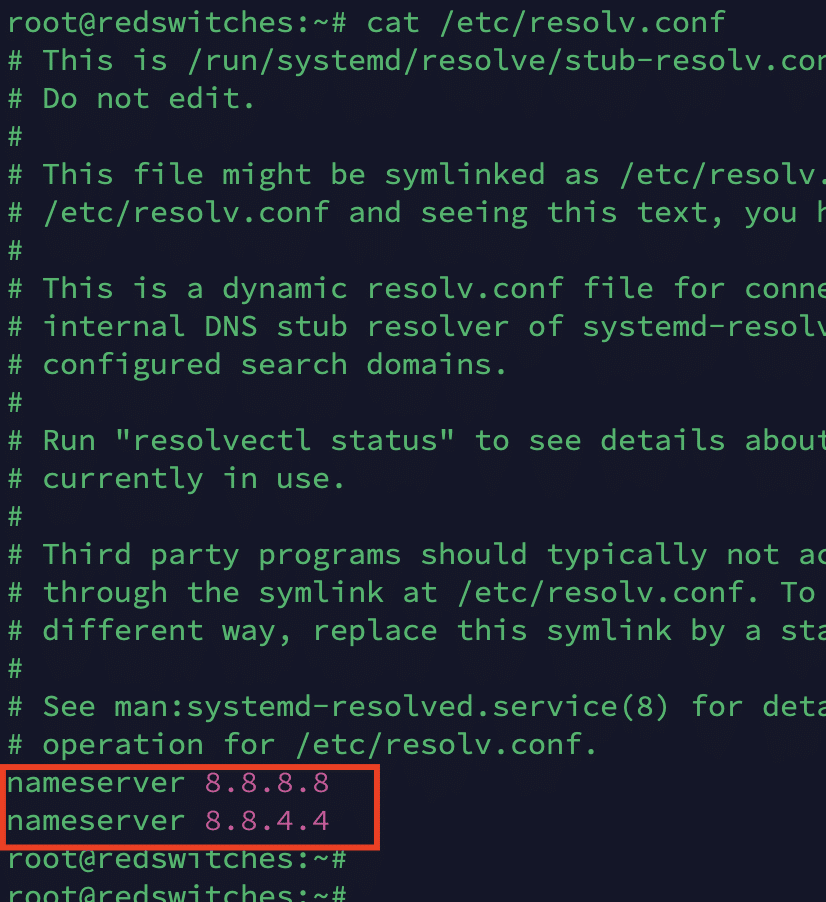
Fix #3: Change the DNS Servers
If you think your current DNS servers are the culprit, we recommend switching to a more reliable public DNS server to resolve the issue. Here are the steps of the process:
- Go to your system’s network connection properties.
- Find the IPv4 configuration.
- Switch to a public DNS server for the preferred DNS server addresses. Google DNS (8.8.8.8 and 8.8.4.4) and Cloudflare DNS (1.1.1.1 and 1.0.0.1) are popular choices.
- Save the changes and restart your active network connection.
Windows
Go to the IPv4 properties and add the desired DNS server information to the window:
Linux
Use the cat command to view the DNS server information in the /etc/resolv.conf
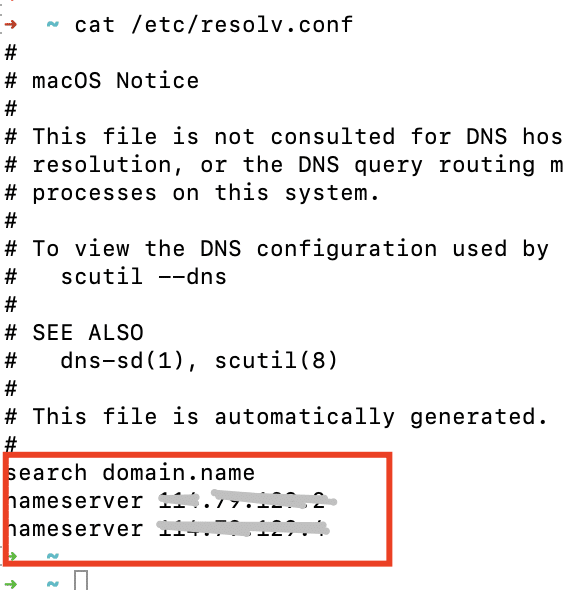
macOS
Launch the Terminal and run the cat /etc/resolv.conf command to view the DNS server details.
Fix #4: Check Your Firewall and Antivirus Software
Some DNS queries can trip off the security software and cause the firewall to block legitimate DNS traffic. You can fix this problem by following these general steps:
- Temporarily disable the firewall and antivirus to see if the problem goes away.
- If the issue is resolved, adjust the basic settings to allow DNS traffic and then re-enable the firewall options and antivirus.
Windows
Go to the Windows Firewall settings and turn off the firewall.
Ubuntu
On Ubuntu systems, the default firewall is Uncomplicated Firewall (UFW). You can run the following command to temporarily disable the firewall:
# systemctl disable ufw

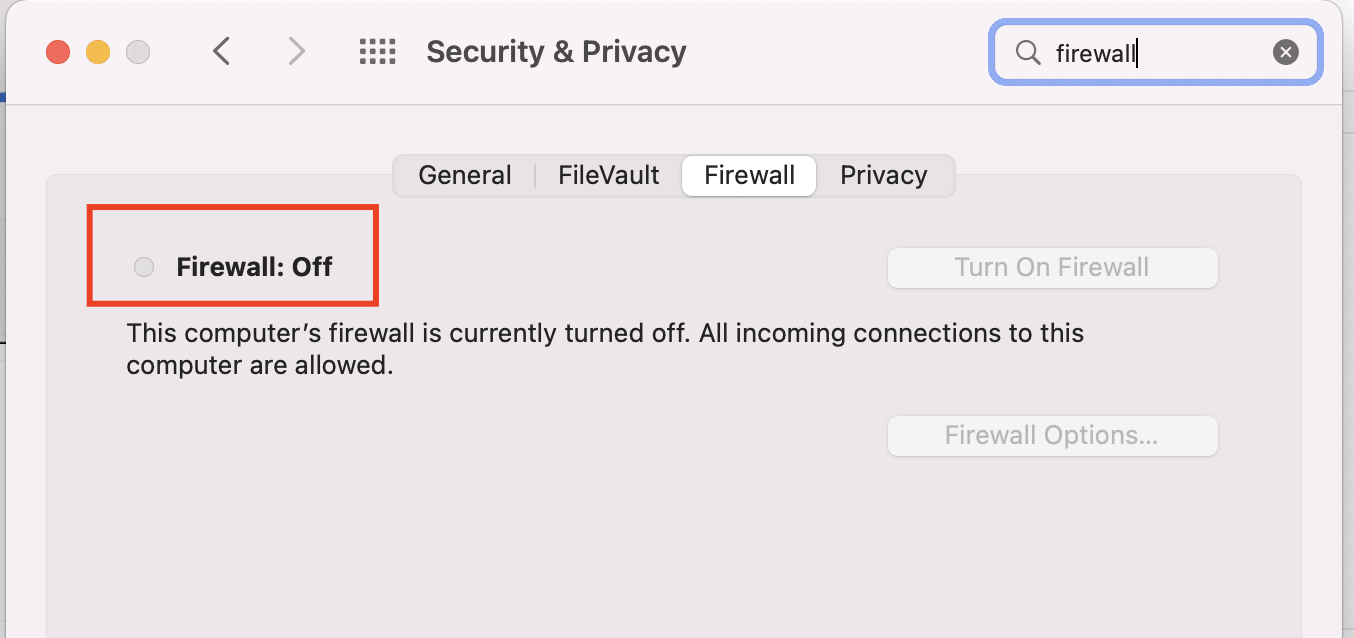
macOs
Go to Security & Privacy and search for firewall.
Fix #5: Update Network Drivers
Outdated network drivers can cause connectivity issues. If you haven’t updated these drives on your system, we recommend the following steps:
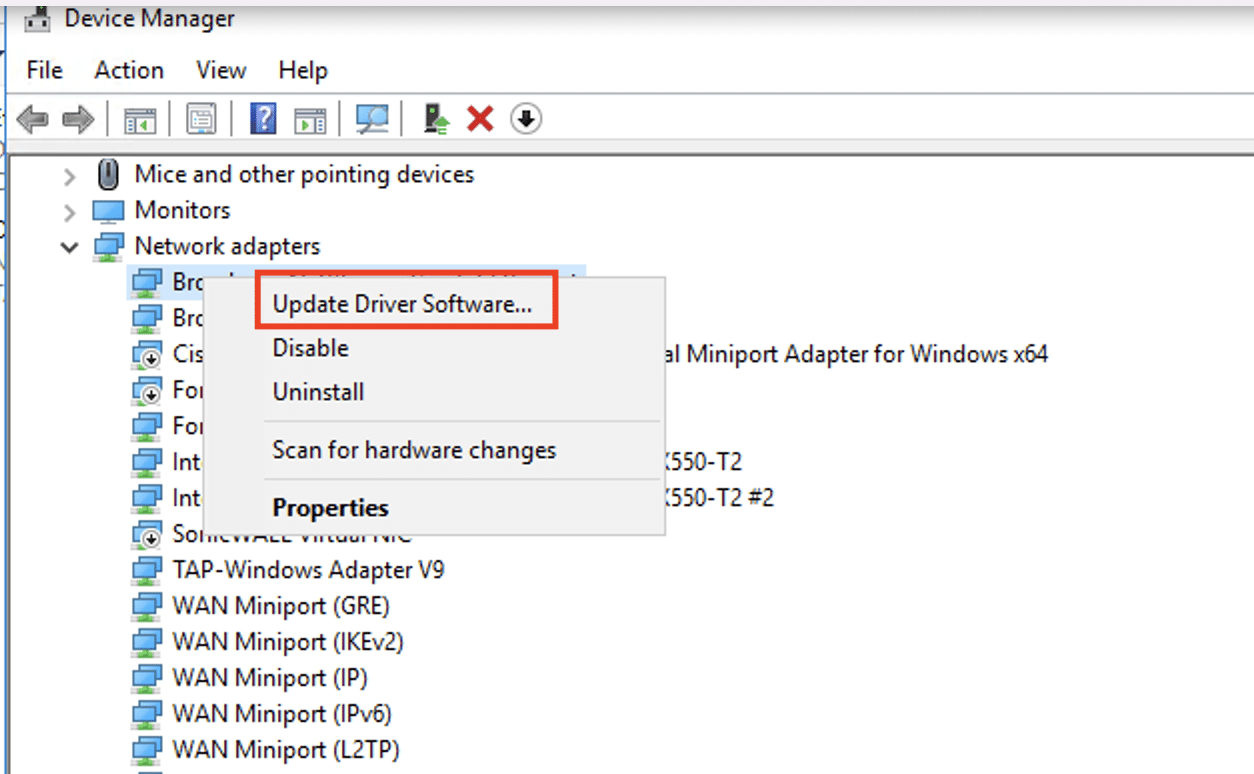
Windows
- Click the Start menu, put Device Manager into the search bar, and then hit Enter.
- Locate and select the Network adapters option.
- Use the Update driver option when you right-click on each driver to update them.
- When the process finishes, restart the system to ensure the new drivers are in use.
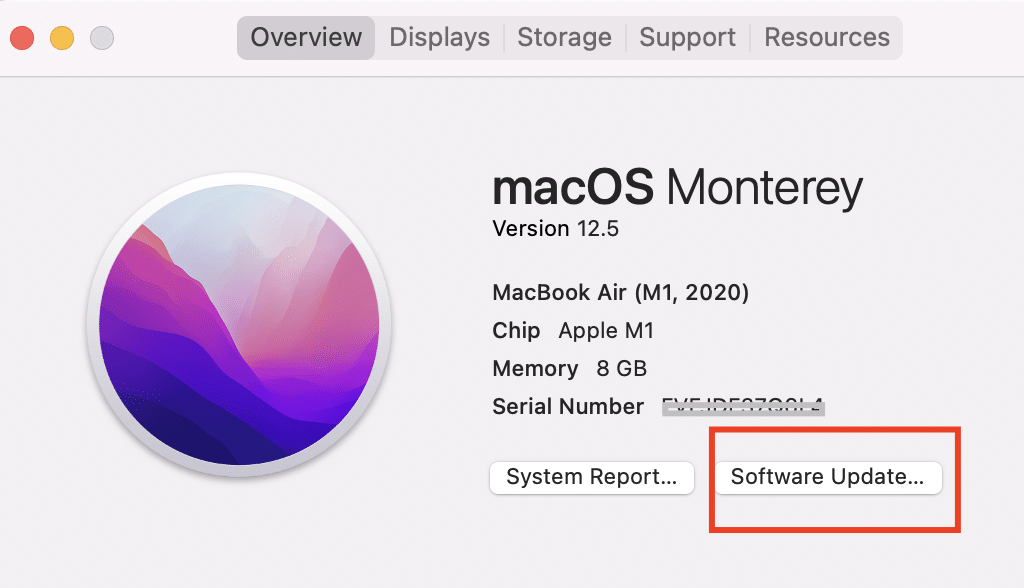
macOS
- Navigate to the Apple menu
- Choose Software Update under About This Mac
- If you see the Update option, you need to update the system. Alternatively, check the OS information to see if you need to update your system.
Linux
- Launch the terminal.
- To verify the network hardware details, execute this command:
# lshw -class network
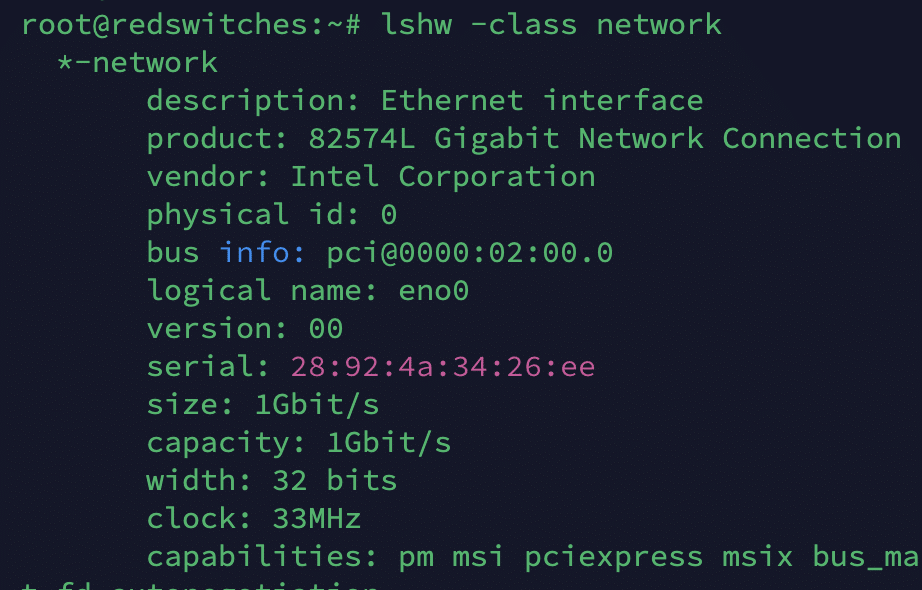
- Use the driver name to locate the appropriate library after verifying the driver’s name and version:
# apt search <driver name>
4. Update the driver to the most recent version (if needed) after verifying the preferred driver version. Run the following command to pull the appropriate package:
# apt install <package name>
Fix #6: Release and Renew IP Address
A simple solution to the DNS_PROBE_FINISHED_BAD_CONFIG error is to renew the system’s IP address. The process differs a bit on each OS:
Windows
Open the Command Prompt as an administrator and type ipconfig /release followed by ipconfig /renew.
macOS and Linux
Launch the Terminal and execute the appropriate commands for your system:
sudo dhclient -r, followed by sudo dhclient.
Fix #7: Check for Malware
Browser errors are a typical indicator of malware infection. Some malware can modify or corrupt DNS settings or otherwise interfere with network traffic.
We recommend running a full system scan with a reputable antivirus program to check for and remove any malware.
Fix #8: Reset Network Settings
In some cases, the system’s network settings are so corrupted that you need to completely reset them to fix the issue.
The reset process removes all network configurations, including saved Wi-Fi networks and passwords. The steps of the reset process are as follows:
Windows
- Go to Settings > Network & Internet > Status > Network reset.
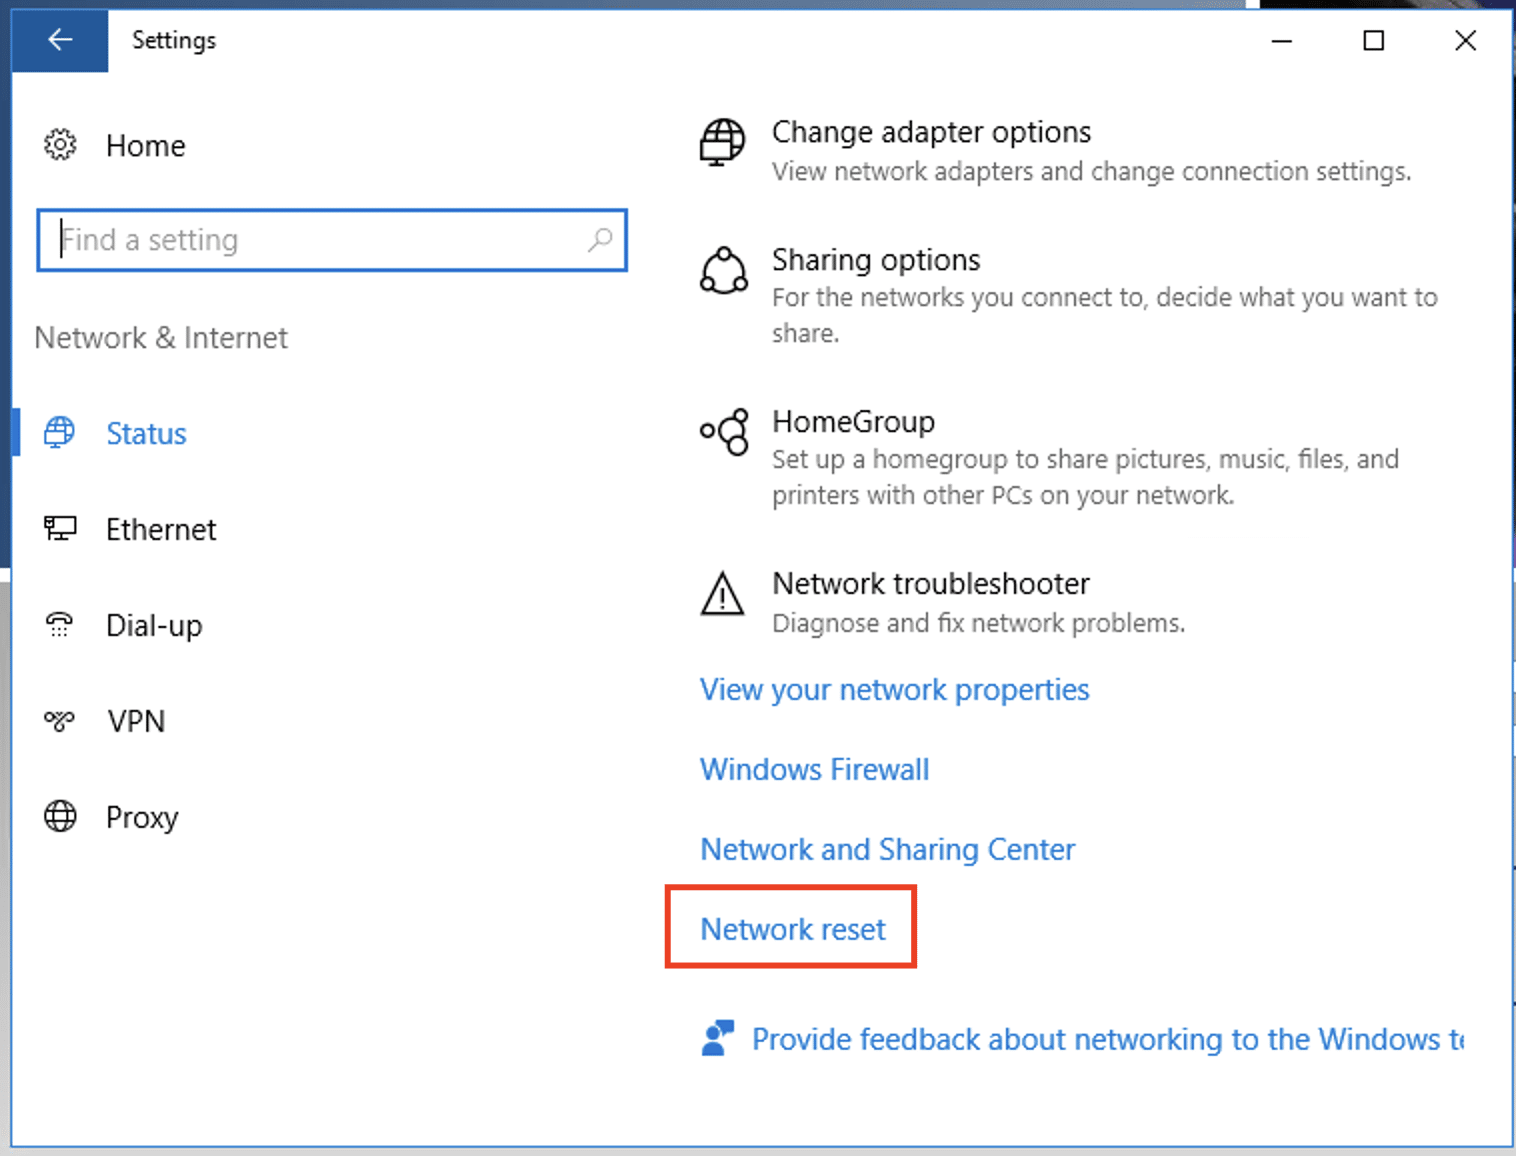
macOS
Go to System Preferences > Network, select your network, and use the – button to remove it. Next, add it again with the + button.
Linux
The network setting reset process varies by distribution. However, it generally involves deleting and re-adding network connections through the network manager.
Fix #9: Contact Your ISP
If none of the above steps work, there might be an issue with your Internet Service Provider’s network. Contact your ISP to report the issue and seek further assistance.
Fix #10: Update Your Web Browser
Using an older browser version can mean that your DNS configuration is outdated. This leads to the DNS_PROBE_FINISHED_BAD_CONFIG issue. As such, updating the browser might be a great approach to fixing this problem.
We will demonstrate the update process on Google Chrome. However, note that the process would be similar for other popular browsers.
- Launch the browser.
- Click the three dots in the upper right corner, and then choose Settings.
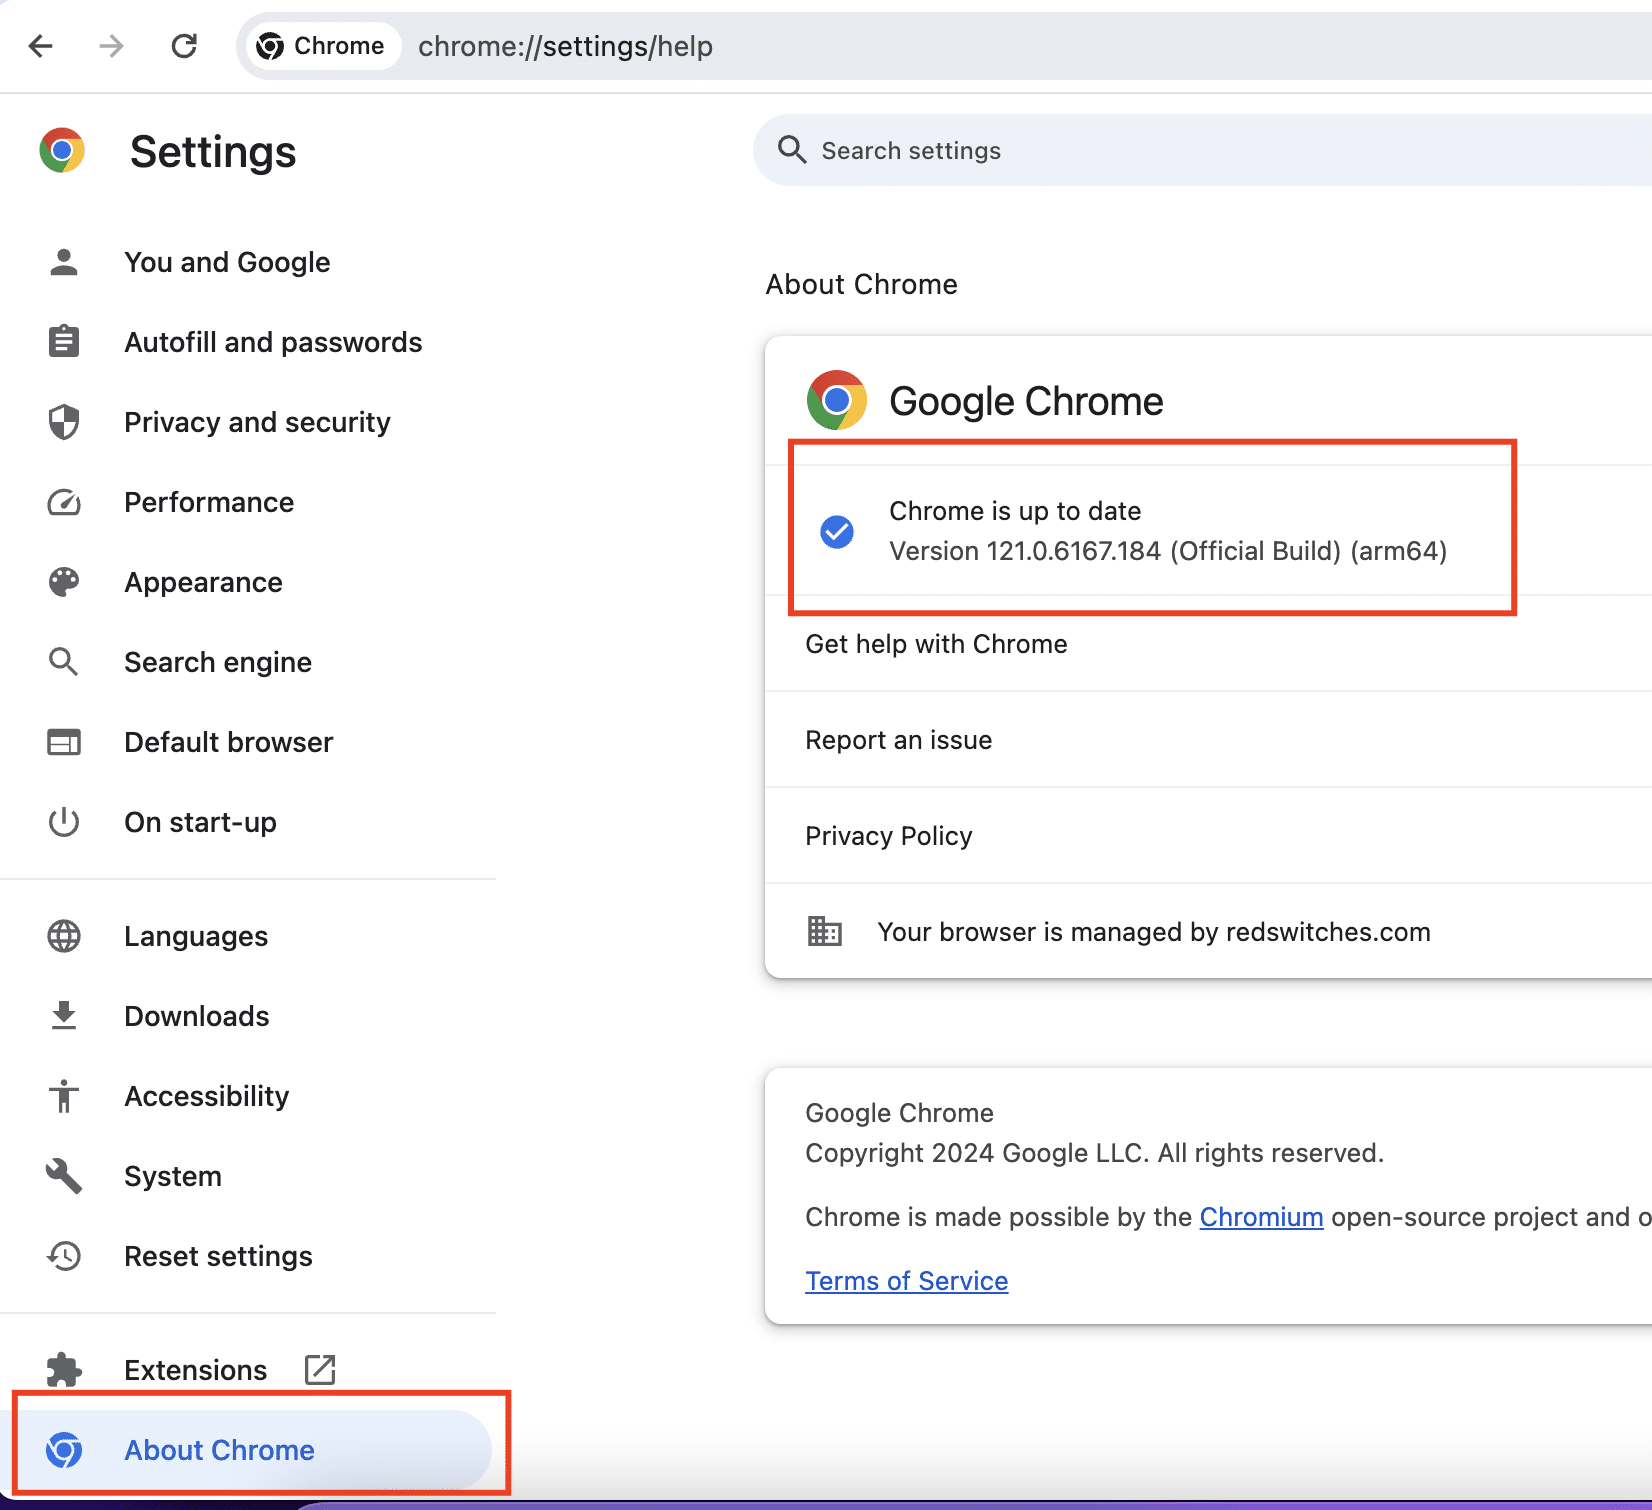
- Select About Chrome. If the browser version is out of date, you will see the update notification.
Fix #11: Turn off Browser Extensions and/or the Proxy Server
Browser extensions usually have access to the browser’s network settings. That means that a malfunctioning browser extension can cause the DNS_PROBE_FINISHED_BAD_CONFIG error.
Similarly, conflicts with network settings or proxy settings and browser extensions can interfere with how the DNS information is set up. Disabling browser extensions and Proxy Server add-ons is a simple way of fixing this problem.
We recommend the following steps as a general process for disabling or deleting extensions from the Chrome browser:
1. Open your browser and select the three-dot menu.
2. Select More Tools > Extensions.
3. Click the Off button to disable the extensions or Remove button to remove them.
The steps listed below can be used to disable the proxy server in the Chrome browser on Windows and macOS:
- Click the three-dot menu when the browser is open.
- Choose the Settings menu item.
- Select the System area from the menu on the left. Next, select Open your computer’s proxy settings.
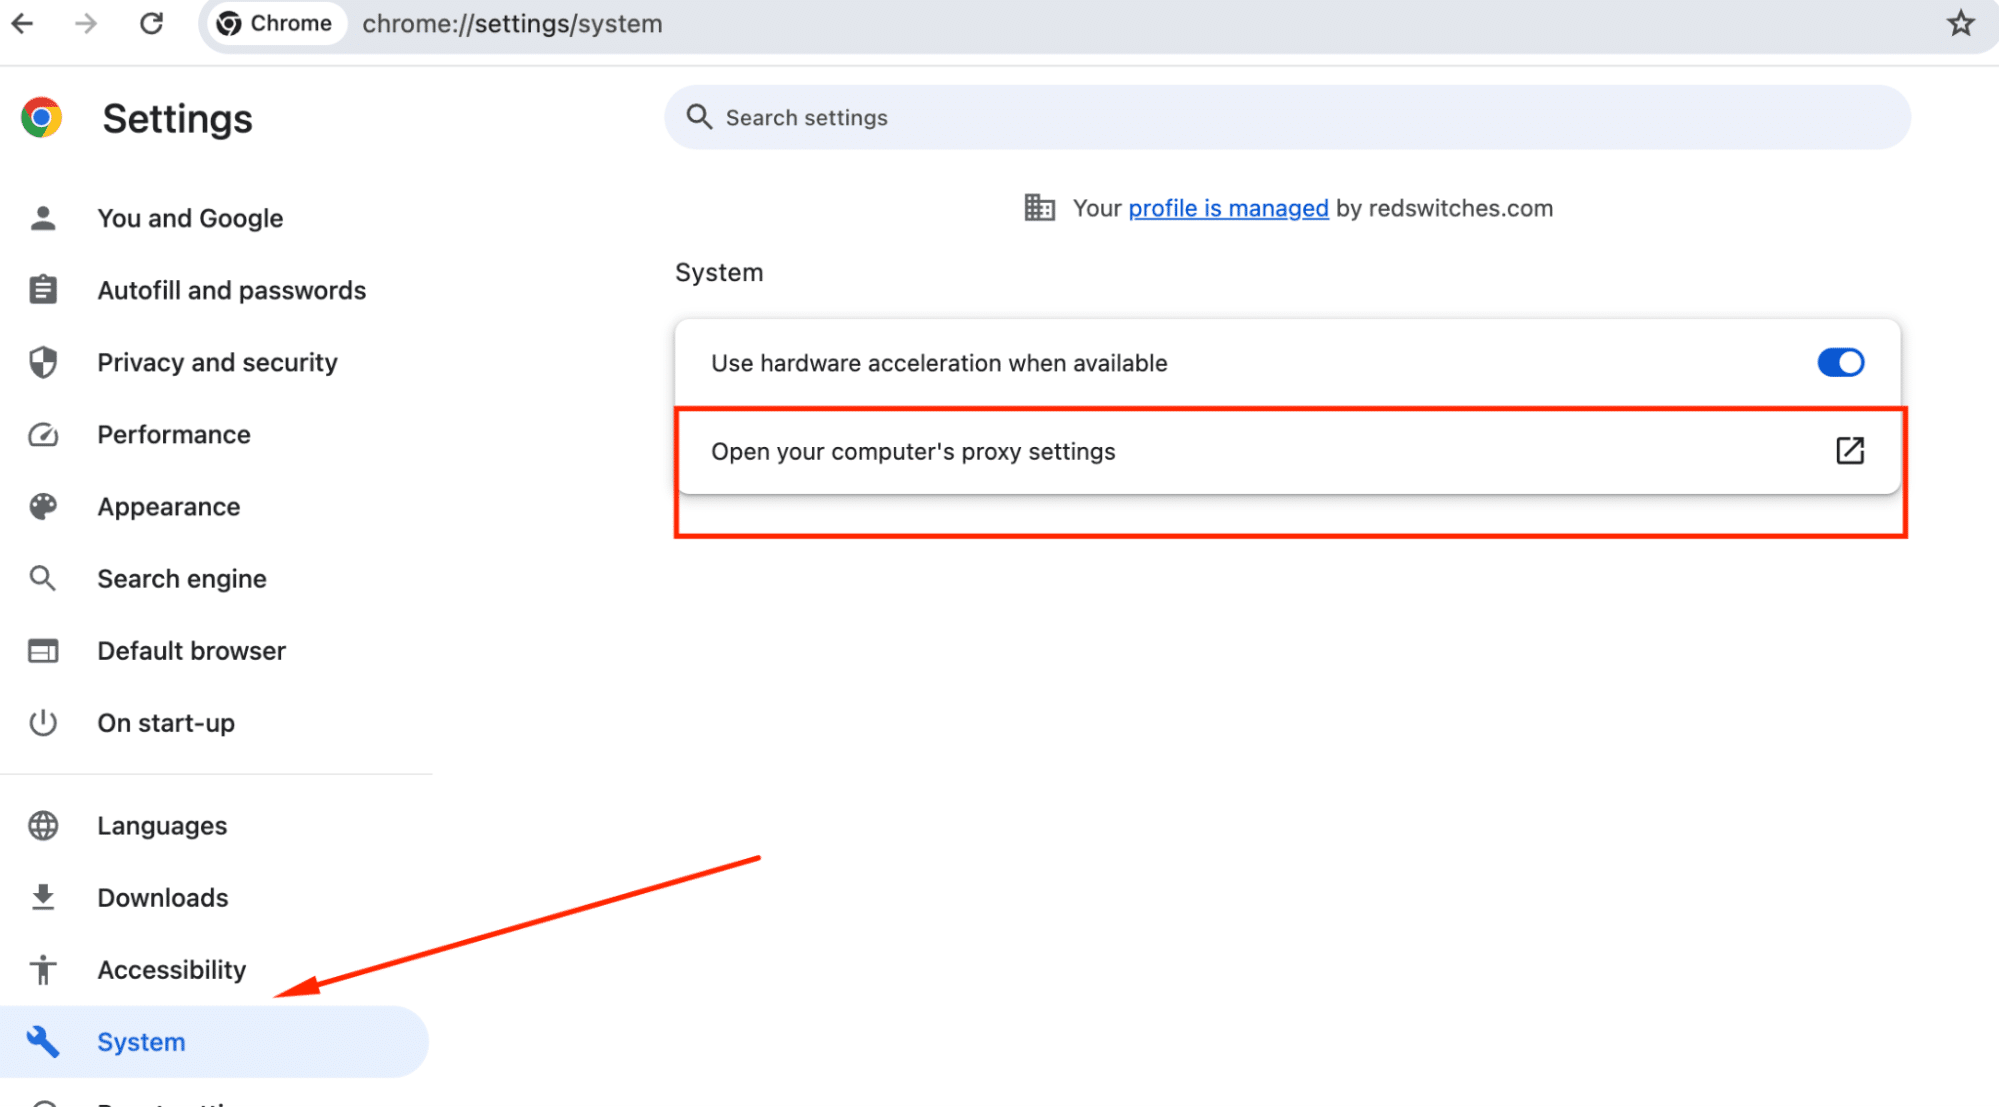
- You can now disable the proxy server by going to the relevant proxy settings in your operating system.
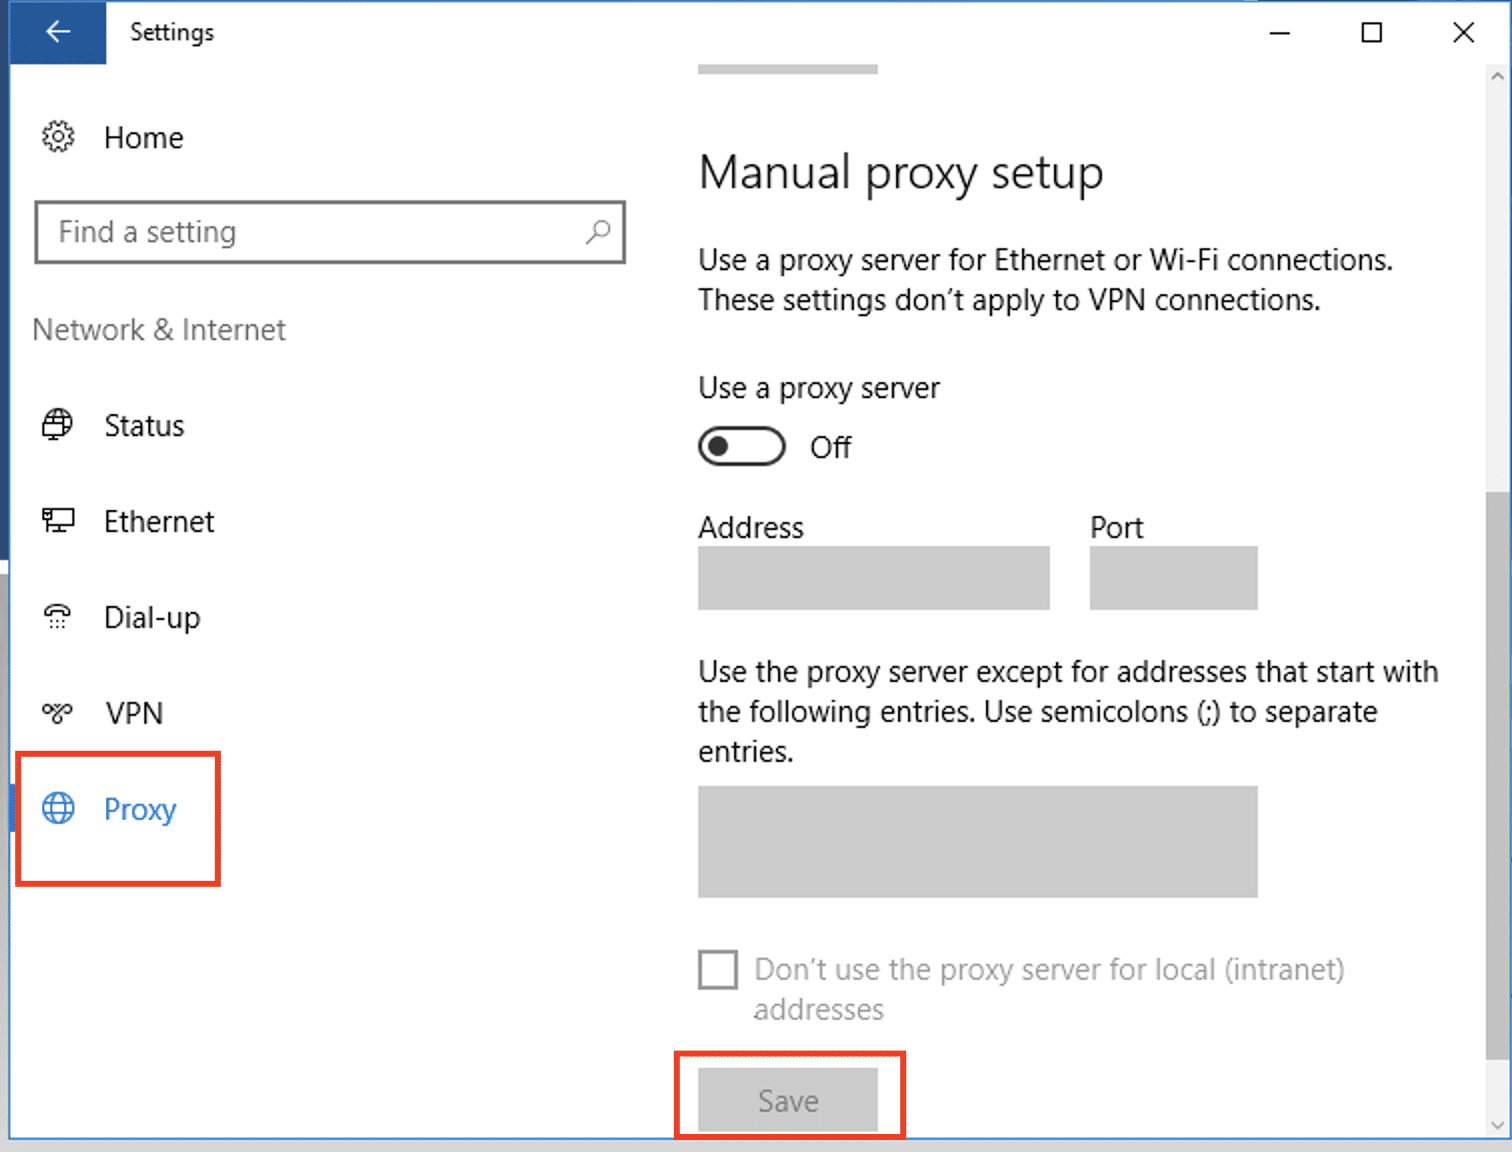
Windows
- Navigate to Network and Internet > Proxy from the Start menu.
- Toggle the Proxy server settings toggle key to disable the desired proxies.
- Press the Save icon.
macOS
- Use the Apple menu to navigate to the Connection settings page and pick the Proxies option.
- Uncheck every proxy-related option.
- Hit the OK button.
Fix #12: Delete Browser Cache
The web browser saves data in its cache (in addition to the local storage) to enhance and speed up the user experience. You may see DNS error messages as the browser cache expires.
You can resolve many DNS errors, including DNS_PROBE_FINISHED_BAD_CONFIG, by clearing browser cache.
Cleaning Google Chrome Browser Cache
- Launch a new Chrome tab.
- Proceed to the following location: chrome://settings/privacy
- Click the Clear Host Cache button in the DNS tab next to the Host Resolver Cache.
- Try restarting the browser and using your browser to look up a website to see if that resolves the issue.

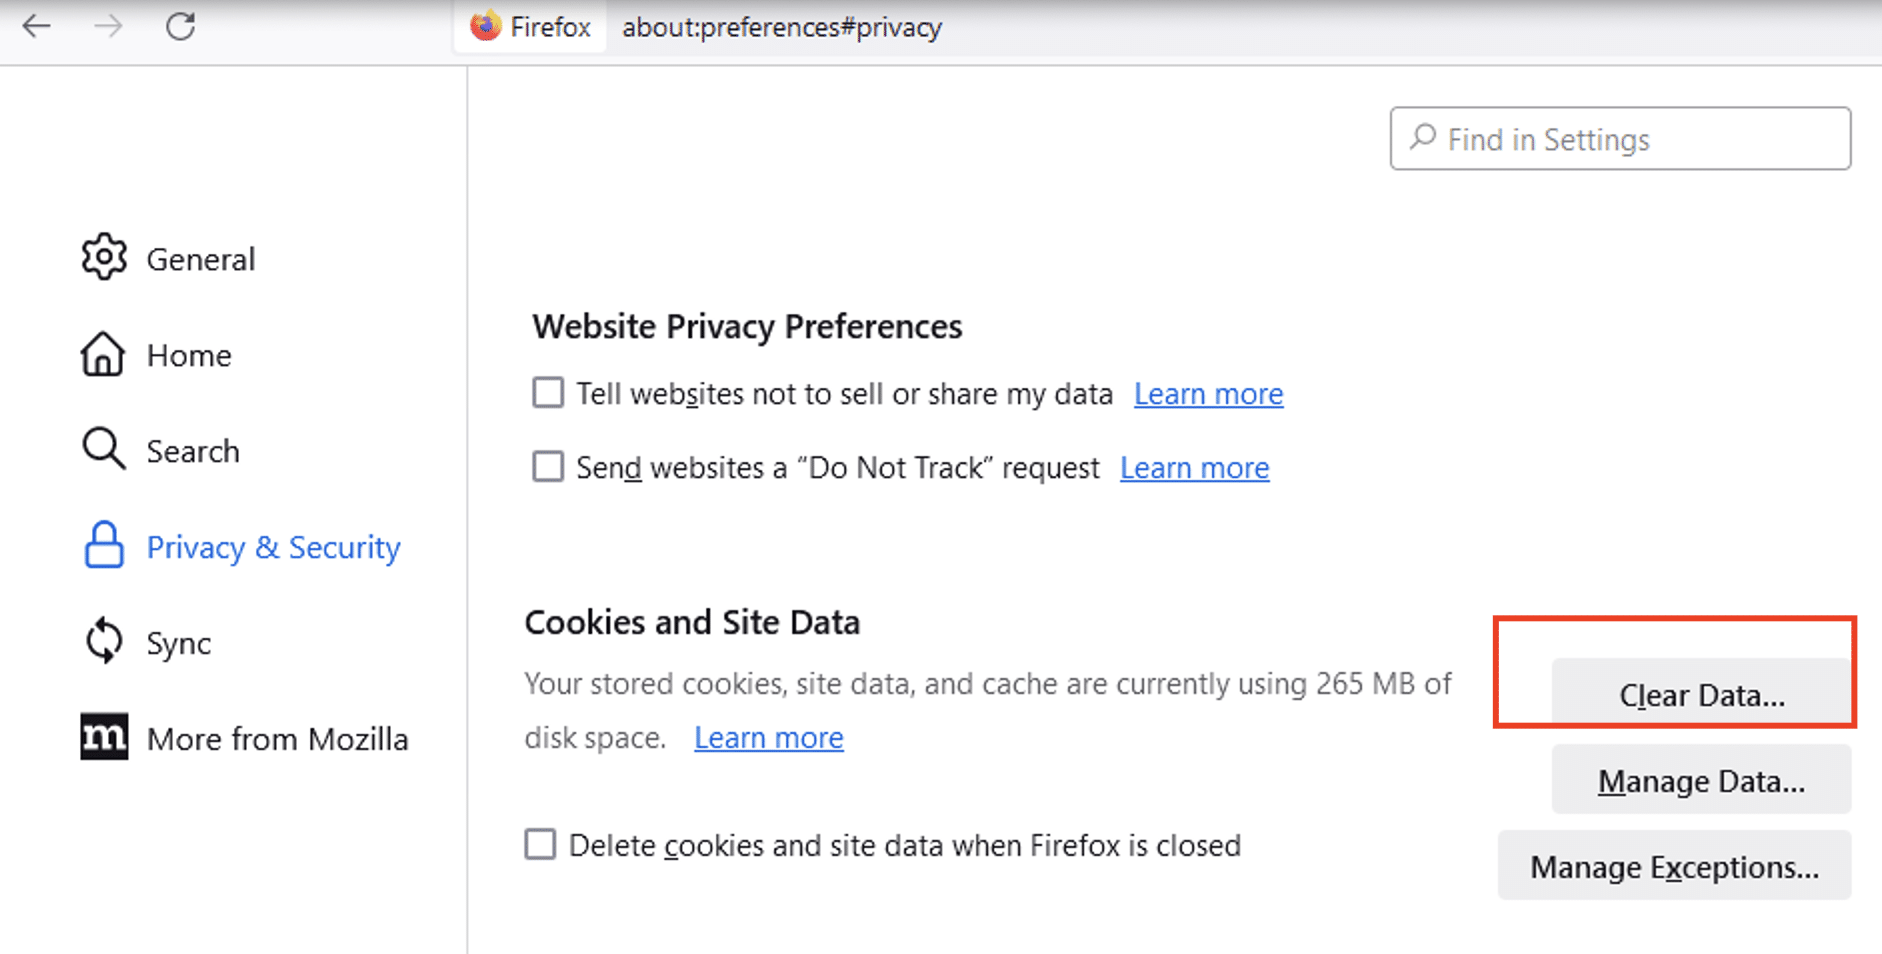
Deleting the Cache in the Firefox
- Launch Firefox and open a new tab.
- Using the address bar, type the following address: about:preference#privacy
- Click the Clear DNS Cache button.
Cleaning the Cache in Safari
- Click Settings.
- Select Advanced from the menu and check the box next to Show Develop menu in menu bar.
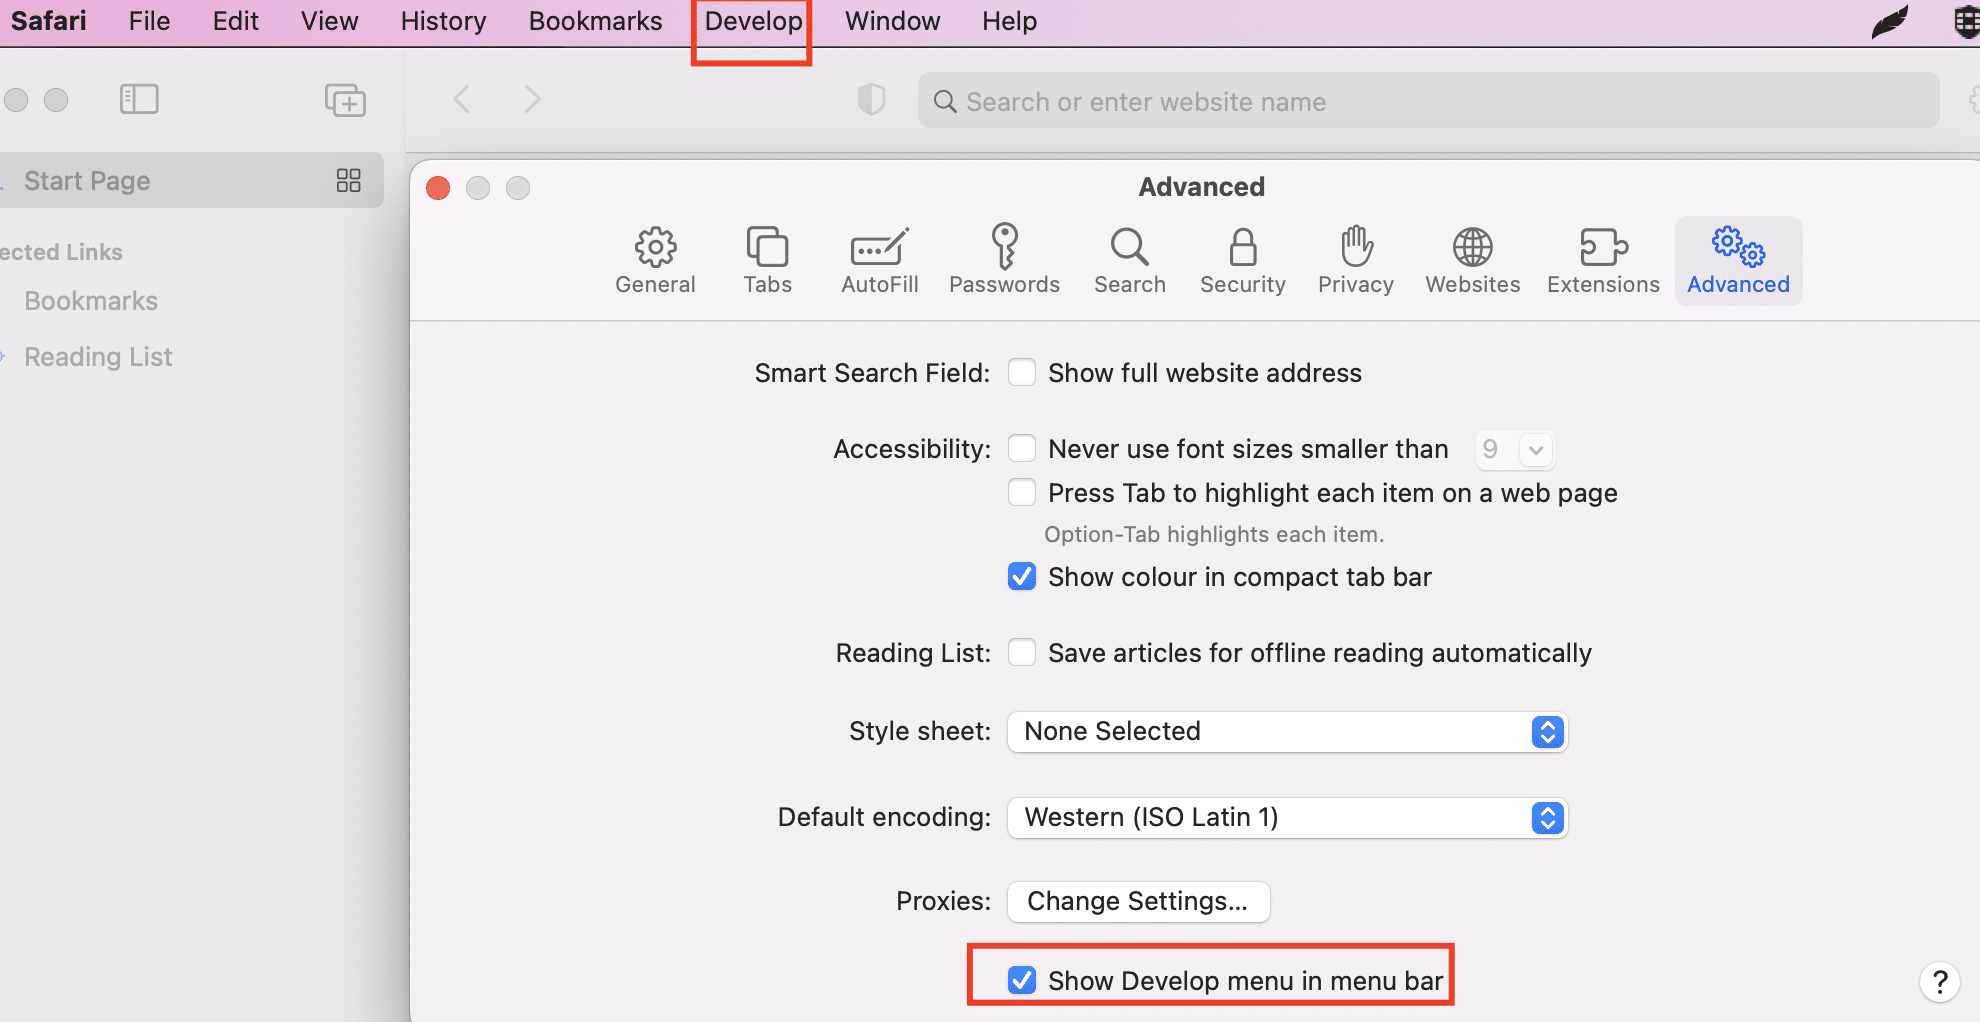
Click Develop and then select Empty Caches from the list.
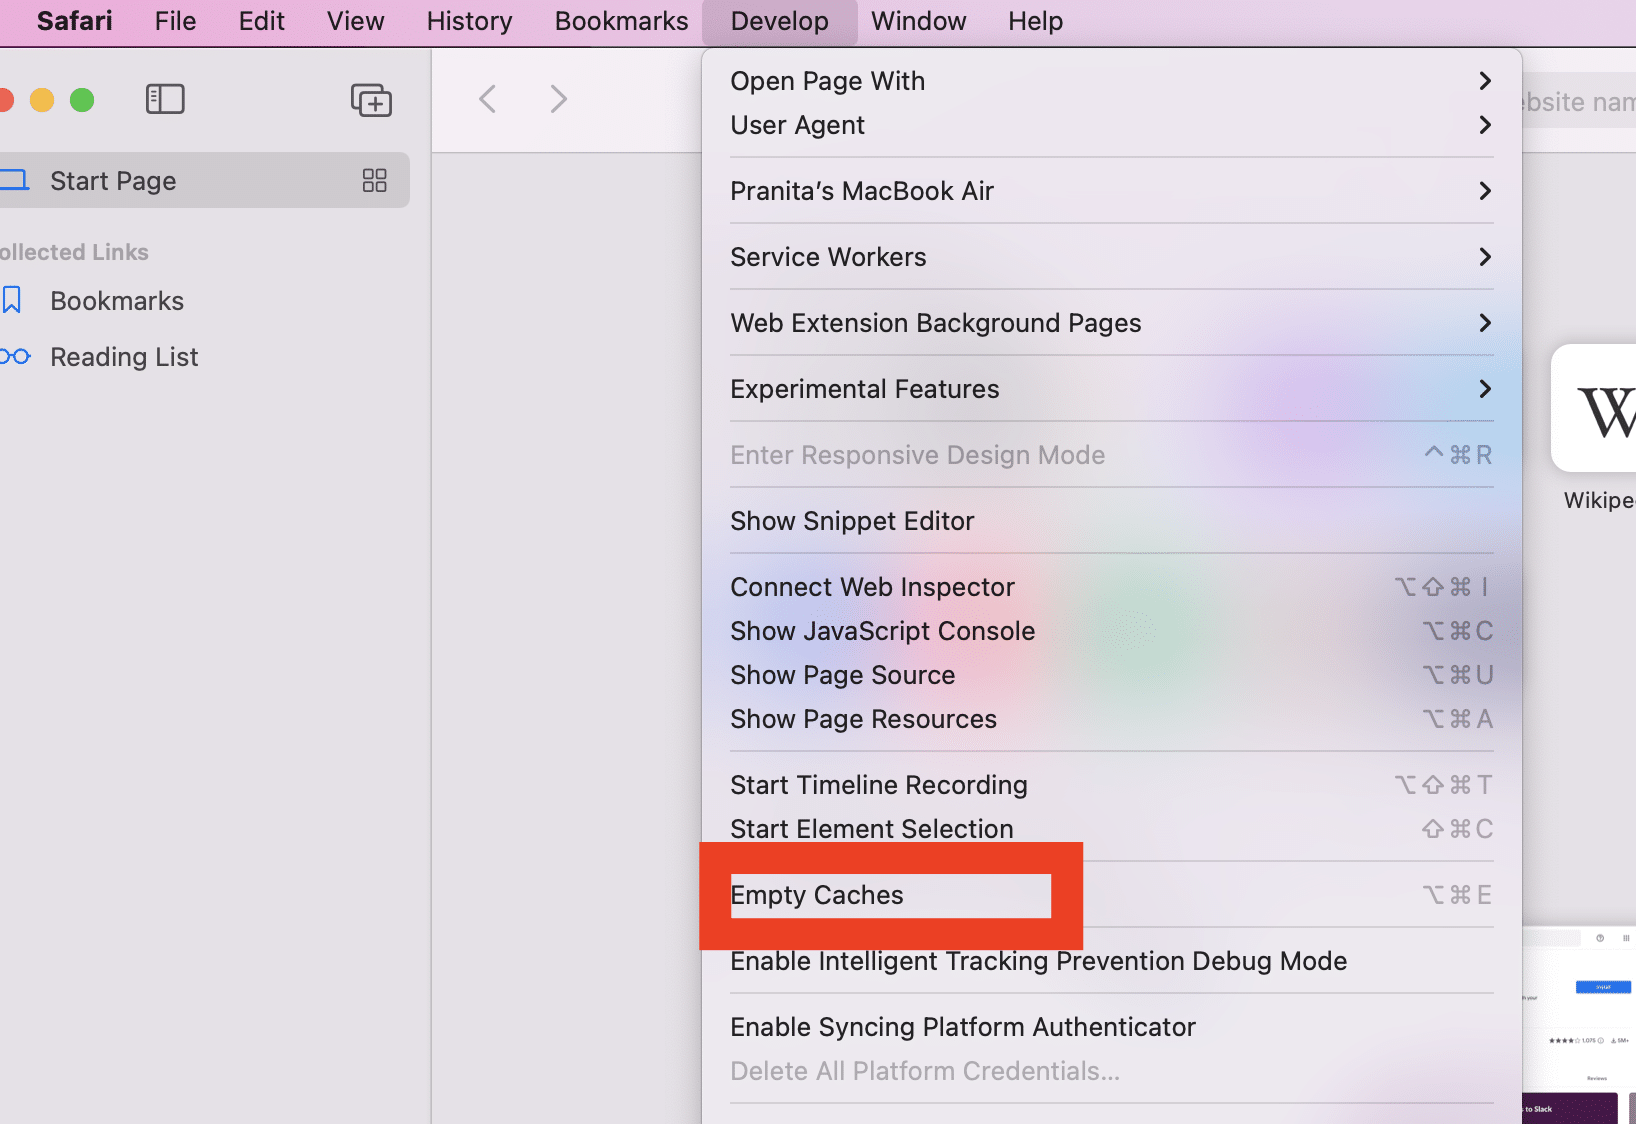
- Restarting your browser will make the changes take effect.
Fix #13: Remove Temporary Files
Temporary data, including cookies, browsing history, and bookmarked websites, is stored in temporary files that the OS and the browser maintain on the disk.
Over time, this data may cause conflict with cached DNS records and cause the DNS_PROBE_FINISHED_BAD_CONFIG error, especially if this data gets corrupted or expired.
Removing temporary files from the operating system is a simple solution to this issue.
Windows
Method 1
Use the storage options to delete temporary files.
- Enter storage in the search bar of the Start menu.
- Choose Temporary Files from the storage page after clicking Storage settings in the search results.
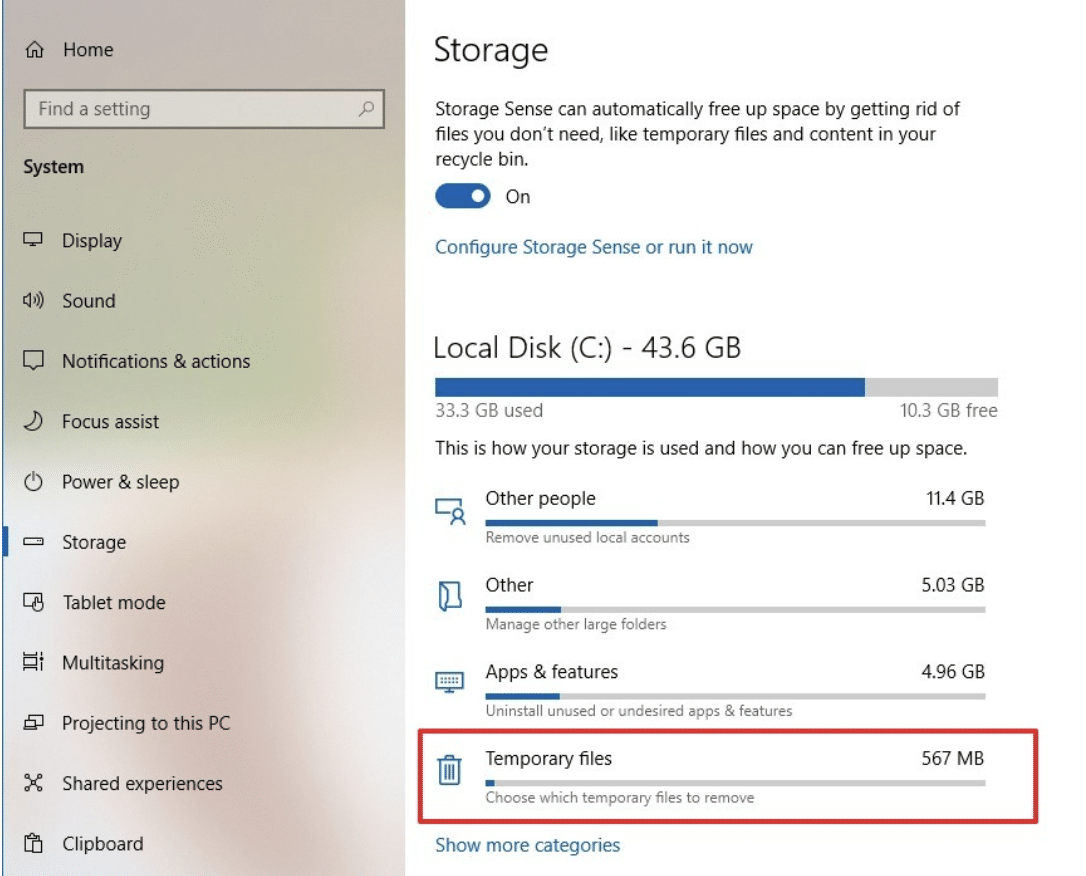
- Click the Remove files button after selecting the file type you wish to remove.
Method 2
Eliminate temporary files manually.
- To open the Run app, launch the Start menu and type run into the search field.
- Enter %temp% in the Run app dialog box and then click OK.
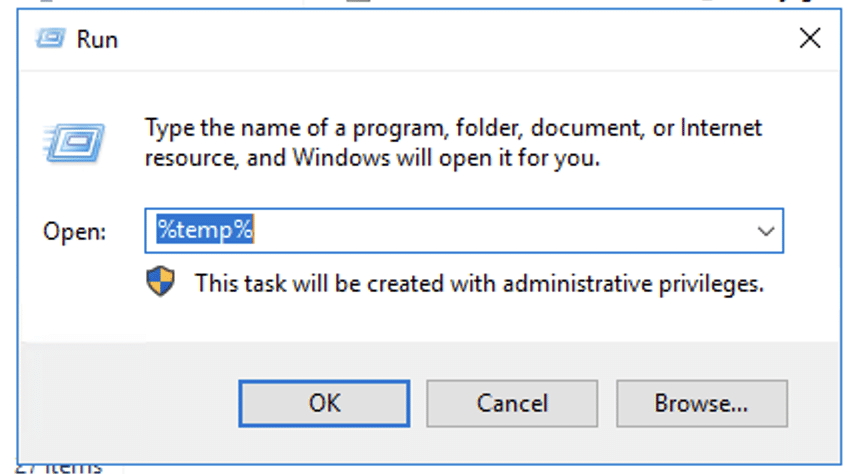
You can choose which files and folders to remove by opening the temp directory in Windows Explorer. You can remove files by right-clicking on them and using the drop-down menu’s Delete option.
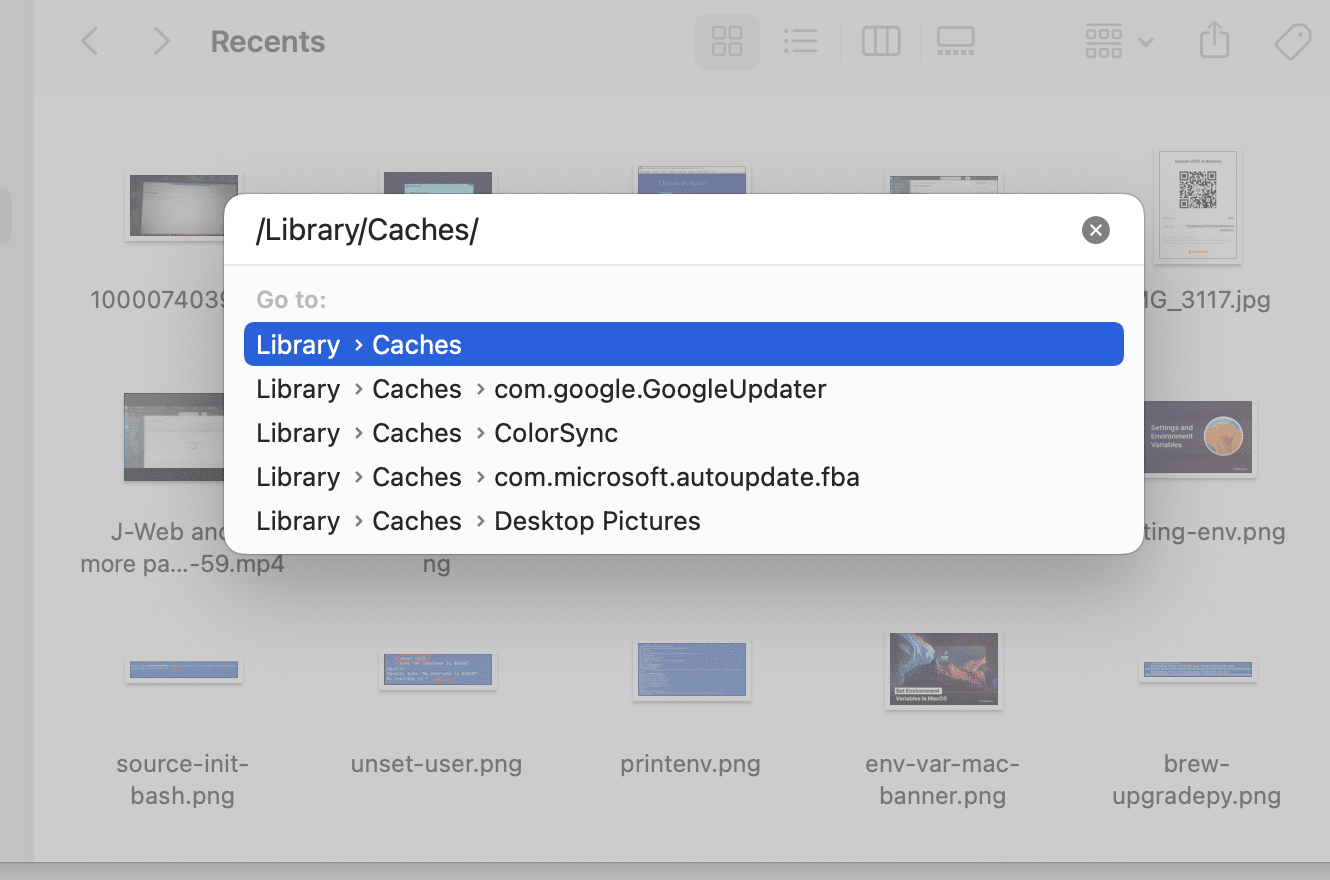
macOS
- Click the Dock menu to open Finder.
- Press CMD+Shift+G to open the search bar.
- Type /Library/Caches into the search field and hit Return.
- This will show all of the temporary files and caches, which you may move to the Trash to remove.
Linux
In Linux, temporary files are stored in the /tmp and /var/tmp directories. In the terminal, use the following commands to remove temporary files:
# rm -r /tmp/*
All temporary files and folders in the /tmp directory are removed with this command.
Use the following command to find and remove every regular file (not folders) in the /tmp directory:
# find /tmp -type f -delete
Fix #14: Fix Misconfigured Host Files
IP addresses and domain names are mapped via the Hosts file. Problems in setting up the Hosts file, including incorrect entries, may result in issues with domain resolution and network connectivity.
We’ll walk you through troubleshooting the Hosts file on Linux, Windows, and macOS:
Open Notepad with administrator rights when using Windows. (You can choose “Run as administrator” by right-clicking the Notepad.)
Windows
- Open the Hosts file, usually located at C:\Windows\System32\drivers\etc\hosts
- Make sure there are no mistakes in the Hosts file (The format for each line should be IP_address Hostname).
- Save the file.
- Start the Command Prompt with administrator rights.
- Clear the DNS cache with ipconfig /flushdns
macOS
- Open the Terminal.
- Use a text editor such as vi or nano to edit the Hosts file. We suggest the vi /etc/hosts
- Look over the entries in the Hosts file and make any necessary corrections. After saving the file, close the text editor.
- Delete the DNS cache with the dscacheutil -flushcache command
Linux
- Launch the Terminal and open the Hosts file.
- Examine the file’s entries and make any necessary corrections.
- After saving the file, close the text editor.
- If needed, clear the DNS cache with the sudo sh -c ‘echo 1 > /proc/sys/vm/drop_caches’
Conclusion
Resolving the DNS_PROBE_FINISHED_BAD_CONFIG error requires a methodical troubleshooting approach considering various potential causes such as browser issues, security software conflicts, problematic plugins, DNS misconfigurations, corrupted files, browser cache, or internet settings errors.
By taking steps like flushing DNS caches, checking proxy settings, temporarily disabling the security software, updating plugins, and ensuring correct DNS configurations, users can address this error and restore internet connectivity. Patience and persistence are key in troubleshooting, as thorough examination of each possible cause leads to resolution.
To find the best bare metal servers for your needs, consider exploring the offerings from RedSwitches. If you’re looking for a robust server for your Linux projects, we offer the best dedicated server pricing and deliver instant dedicated servers, usually on the same day the order gets approved. Whether you need a dedicated server, a traffic-friendly 10Gbps dedicated server, or a powerful bare metal server, we are your trusted hosting partner.
FAQs
Q. What is DNS_PROBE_FINISHED_BAD_CONFIG error?
DNS_PROBE_FINISHED_BAD_CONFIG error is a common error message that indicates a conflict with DNS records, usually caused by incorrect network configurations or issues with the DNS provider.
Q. How can I fix the DNS_PROBE_FINISHED_BAD_CONFIG error?
You can fix the DNS_PROBE_FINISHED_BAD_CONFIG error by changing your DNS settings, specifically by changing the DNS server to a public DNS server or resolving any conflicts with DNS records.
Q. What are the common error messages associated with the DNS_PROBE_FINISHED_BAD_CONFIG error?
Common error messages related to DNS_PROBE_FINISHED_BAD_CONFIG error include issues with the current internet connection, broken web server, corrupted files in the browser cache, and DNS cache.
Q. Can a broken web server cause the error?
Yes, a broken web server can be one of the causes of the DNS_PROBE_FINISHED_BAD_CONFIG error, along with other factors like incorrect network configurations and service network problems.
Q. How does the DNS cache affect the error?
The DNS cache in the browser can sometimes hold outdated or incorrect information, leading to the DNS_PROBE_FINISHED_BAD_CONFIG error. Clearing the browser cache can help resolve this issue.
Q. Is it necessary to change my DNS to fix the DNS_PROBE_FINISHED_BAD_CONFIG error?
Changing your DNS settings, such as switching to a different DNS server or protocol version 4 (IPv4), can often resolve the DNS_PROBE_FINISHED_BAD_CONFIG error caused by conflicts with DNS records.
Q. How important is the current network connection in resolving the error?
The quality and stability of your current network connection play a significant role in resolving the DNS_PROBE_FINISHED_BAD_CONFIG error. Ensure you have a stable and strong internet connection.
