Mention control panels and most of us instantly think of cPanel.
It is a very popular choice and is often used by hosting providers that offer shared hosting solutions.
However, you can find control panels that are more user-friendly and easier to use on your Ubuntu 22.04 LTS server. CyberPanel is one such management panel that you should consider exploring.
CyberPanel is an open-source web hosting control panel. It manages several services like websites, email, DNS, and databases. This panel comes with a range of features, including one-click SSL certificate installation, automatic backups, one-click installation for WordPress/Joomla/Magento, etc.
This article will guide you through installing CyberPanel on your Ubuntu 22.04 LTS server. Whether you’re a seasoned sysadmin or a newbie, these step-by-step instructions will help you set up CyberPanel easily.
So, let’s get started and see how to install CyberPanel on your Ubuntu server.
But first, let’s discuss CyberPanel in a bit more detail.
Table Of Content
- Introducing CyberPanel
- CyberPanel is Available in Two Flavors
- What is LSCACHE used in CyberPanel?
- CyberPanel Server Setup Requirements
- Install CyberPanel on Ubuntu 22.04 LTS Server
- Step # 1: Update System Packages
- Step # 2: Install the Dependencies
- Step # 3: Download and Install CyberPanel
- Step # 4: Carry Out Initial Configuration
- Step # 5: Select the Appropriate CyberPanel Version
- Step # 6: . Install Full Service
- Step # 7: Choose Local or Remote MySQL Setup
- Step # 8: Select CyberPanel Version
- Step # 9: Set a Password for CyberPanel
- Step # 10: Install the CyberPanel Memcached PHP Extension
- Step # 11: Install CyberPanel Redis PHP Extension
- Step # 12: Finalize the Installation
- Allow CyberPanel Ports Through the Firewall
- Access CyberPanel
- Access the OpenLiteSpeed
- Conclusion
- FAQ
Introducing CyberPanel
CyberPanel is an open-source web hosting control panel that provides a robust and comprehensive graphical user interface (GUI) to manage websites, email accounts, databases, FTP accounts, and more. It has become increasingly popular among system administrators, developers, and web admins due to its ease of use and rich feature set.
CyberPanel supports a preinstalled stack consisting of Linux, LiteSpeed, MariaDB, and PHP. This stack offers a great foundation for popular web applications like WordPress and Joomla that you can install with just a click.
Security is built into CyberPanel, thanks to the support for Let’s Encrypt SSL certificates and enabling secure HTTPS connections to your website.
<strongid=”2″>CyberPanel is Available in Two Flavors
CyberPanel comes in two versions that support two different implementations of the LiteSpeed cache optimization solution.
The first version comes with OpenLiteSpeed, that’s free and open-source, making it an excellent choice for users who want to run their web server without purchasing a license. It offers basic features like SSL support, Multi-PHP support, built-in caching, and more.
The second version, the Enterprise edition, is CyberPanel’s paid version. It offers advanced features like LSCache for WordPress, HTTP/2 support, and server-level access control. It also includes additional security features such as malware scanning and two-factor authentication.
What is LSCACHE used in CyberPanel?
LSCACHE is a caching system used in Cyberpanel. It helps users to improve the performance of web pages and applications.
It decreases website load time by caching static content, including HTML, CSS, JavaScript, and images, into server memory. This reduces the number of requests that are forwarded to the server and helps reduce latency.
This also helps reduce bandwidth usage by reusing cached content. Furthermore, it can also be used as a reverse proxy to reduce load on the server.
CyberPanel Server Setup Requirements
CyberPanel is a free control panel for VPS and dedicated server environments. It is designed to offer a modern, user-friendly interface with powerful features so users can manage their websites and servers.
To set up CyberPanel, your server must meet the following requirements:
-
- Ubuntu 22.04 LTS x64 Server.
- 2GB of RAM or higher.
- 2 CPU cores or higher.
- 20GB of storage space or more.
- A static IP address.
After fulfilling the above prerequisites, it’s time to go into the details of installing CyberPanel on an Ubuntu server.
Install CyberPanel on Ubuntu 22.04 LTS Server
Here’re the steps you need to follow to install and set up CyberPanel on the Ubuntu server.
Step # 1: Update System Packages
The first step is to log in to your server using an SSH client such as PuTTY and update the system packages:
sudo apt-get update && sudo apt-get upgrade
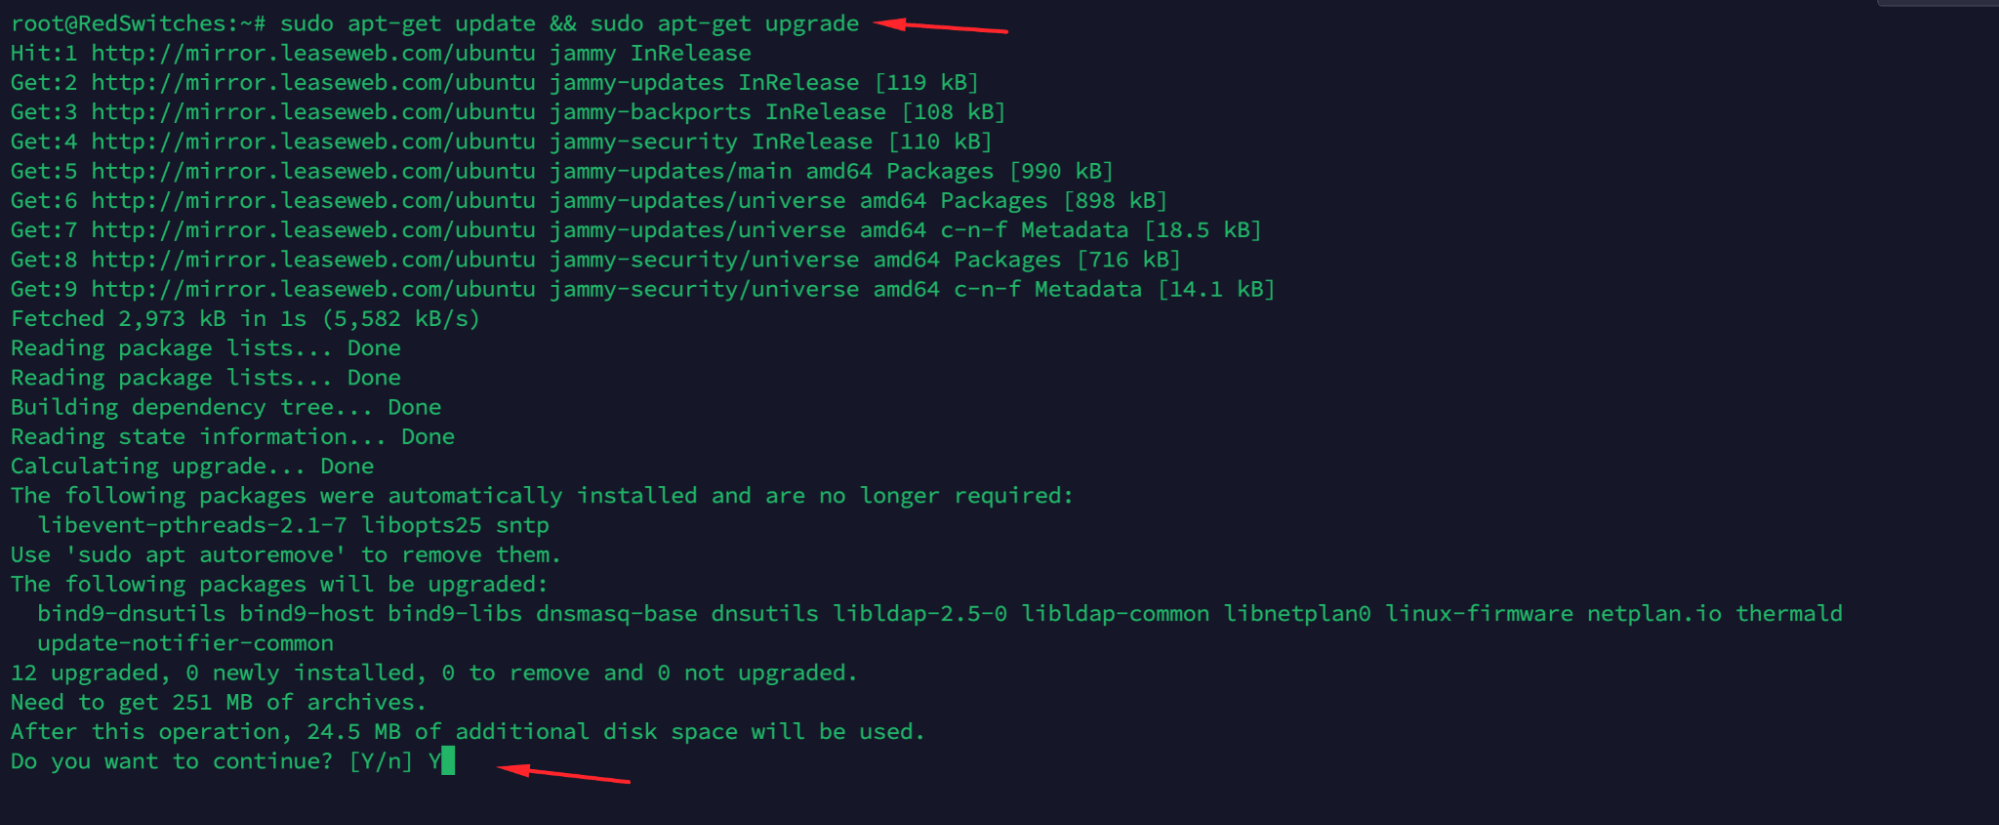
Once prompted, press Y to proceed further with the upgrade.
Step # 2: Install the Dependencies
Use the following command to install the CyberPanel dependencies:
sudo apt-get install python3 python3-dev python3-pip wget unzip rsync net-tools curl libssl-dev
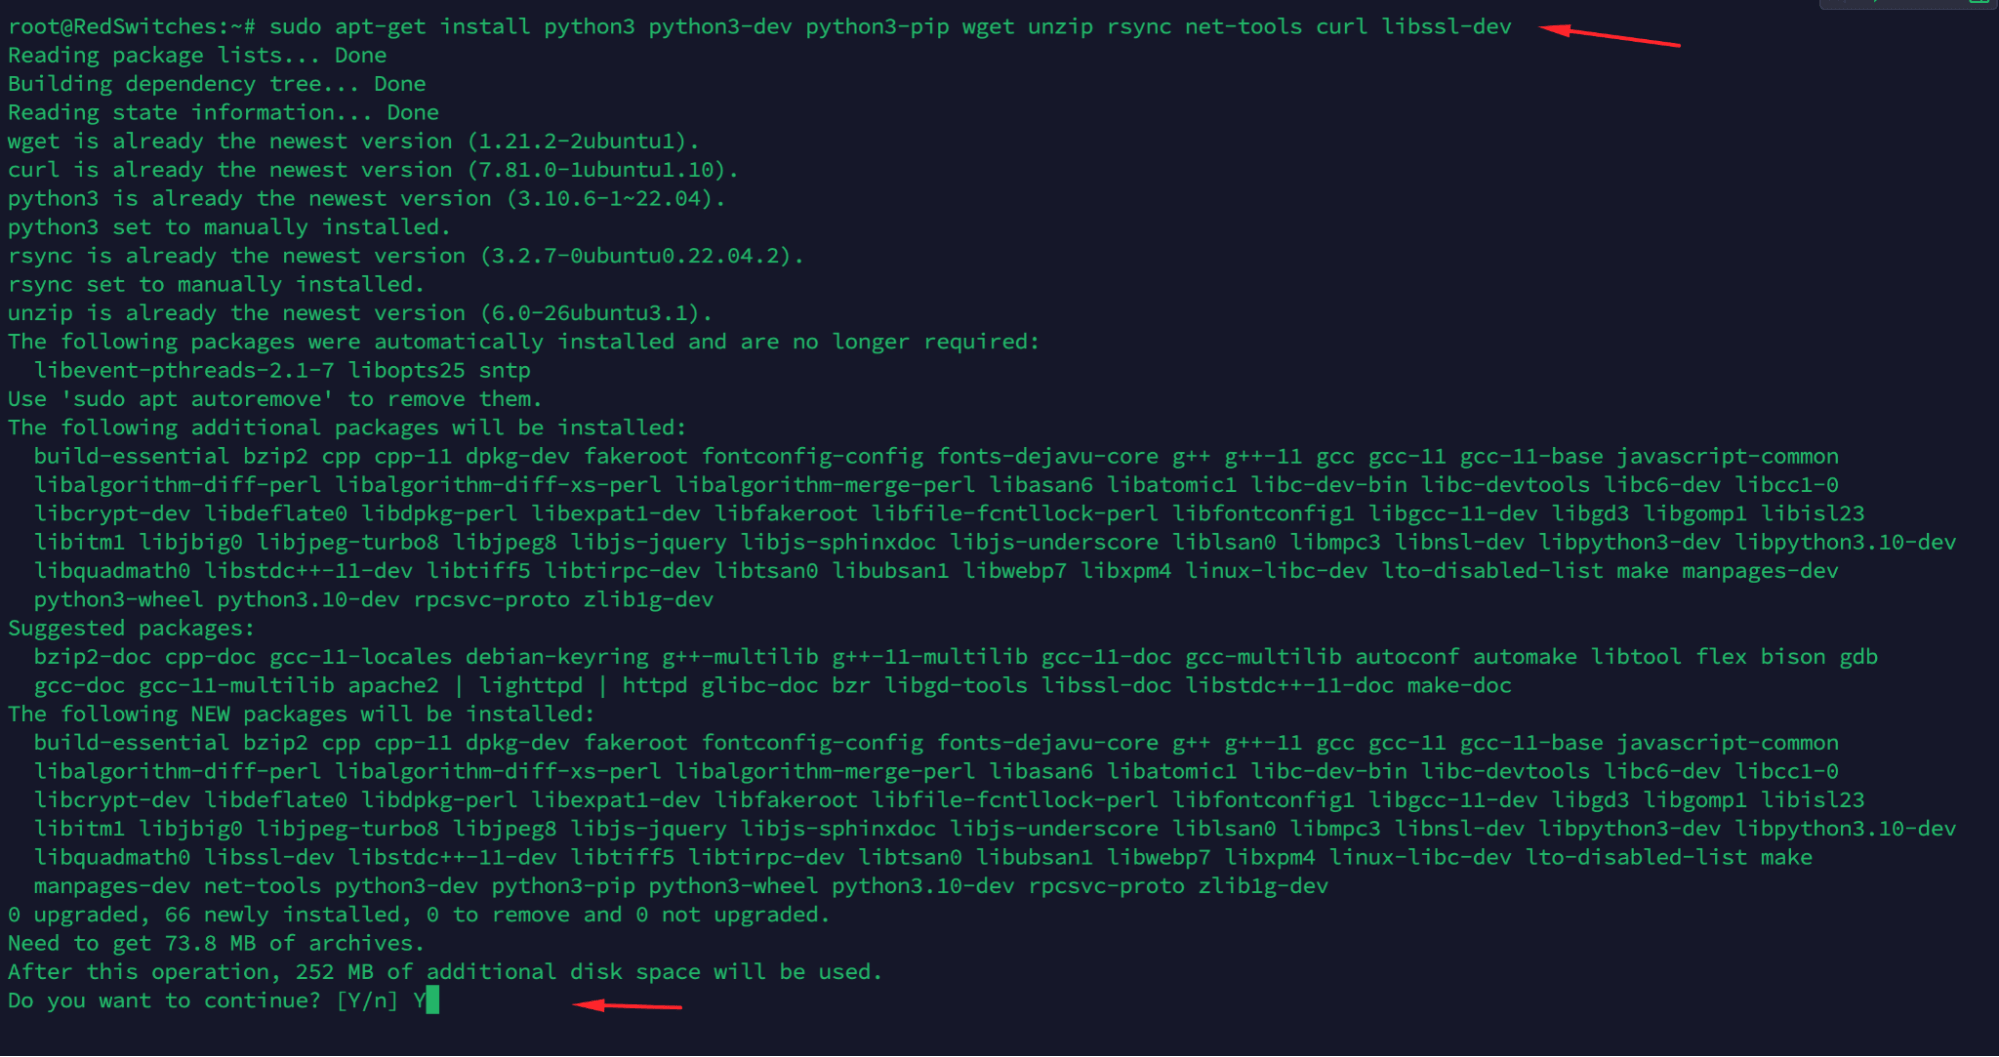
Once prompted, then Press Y to proceed further with the installation.
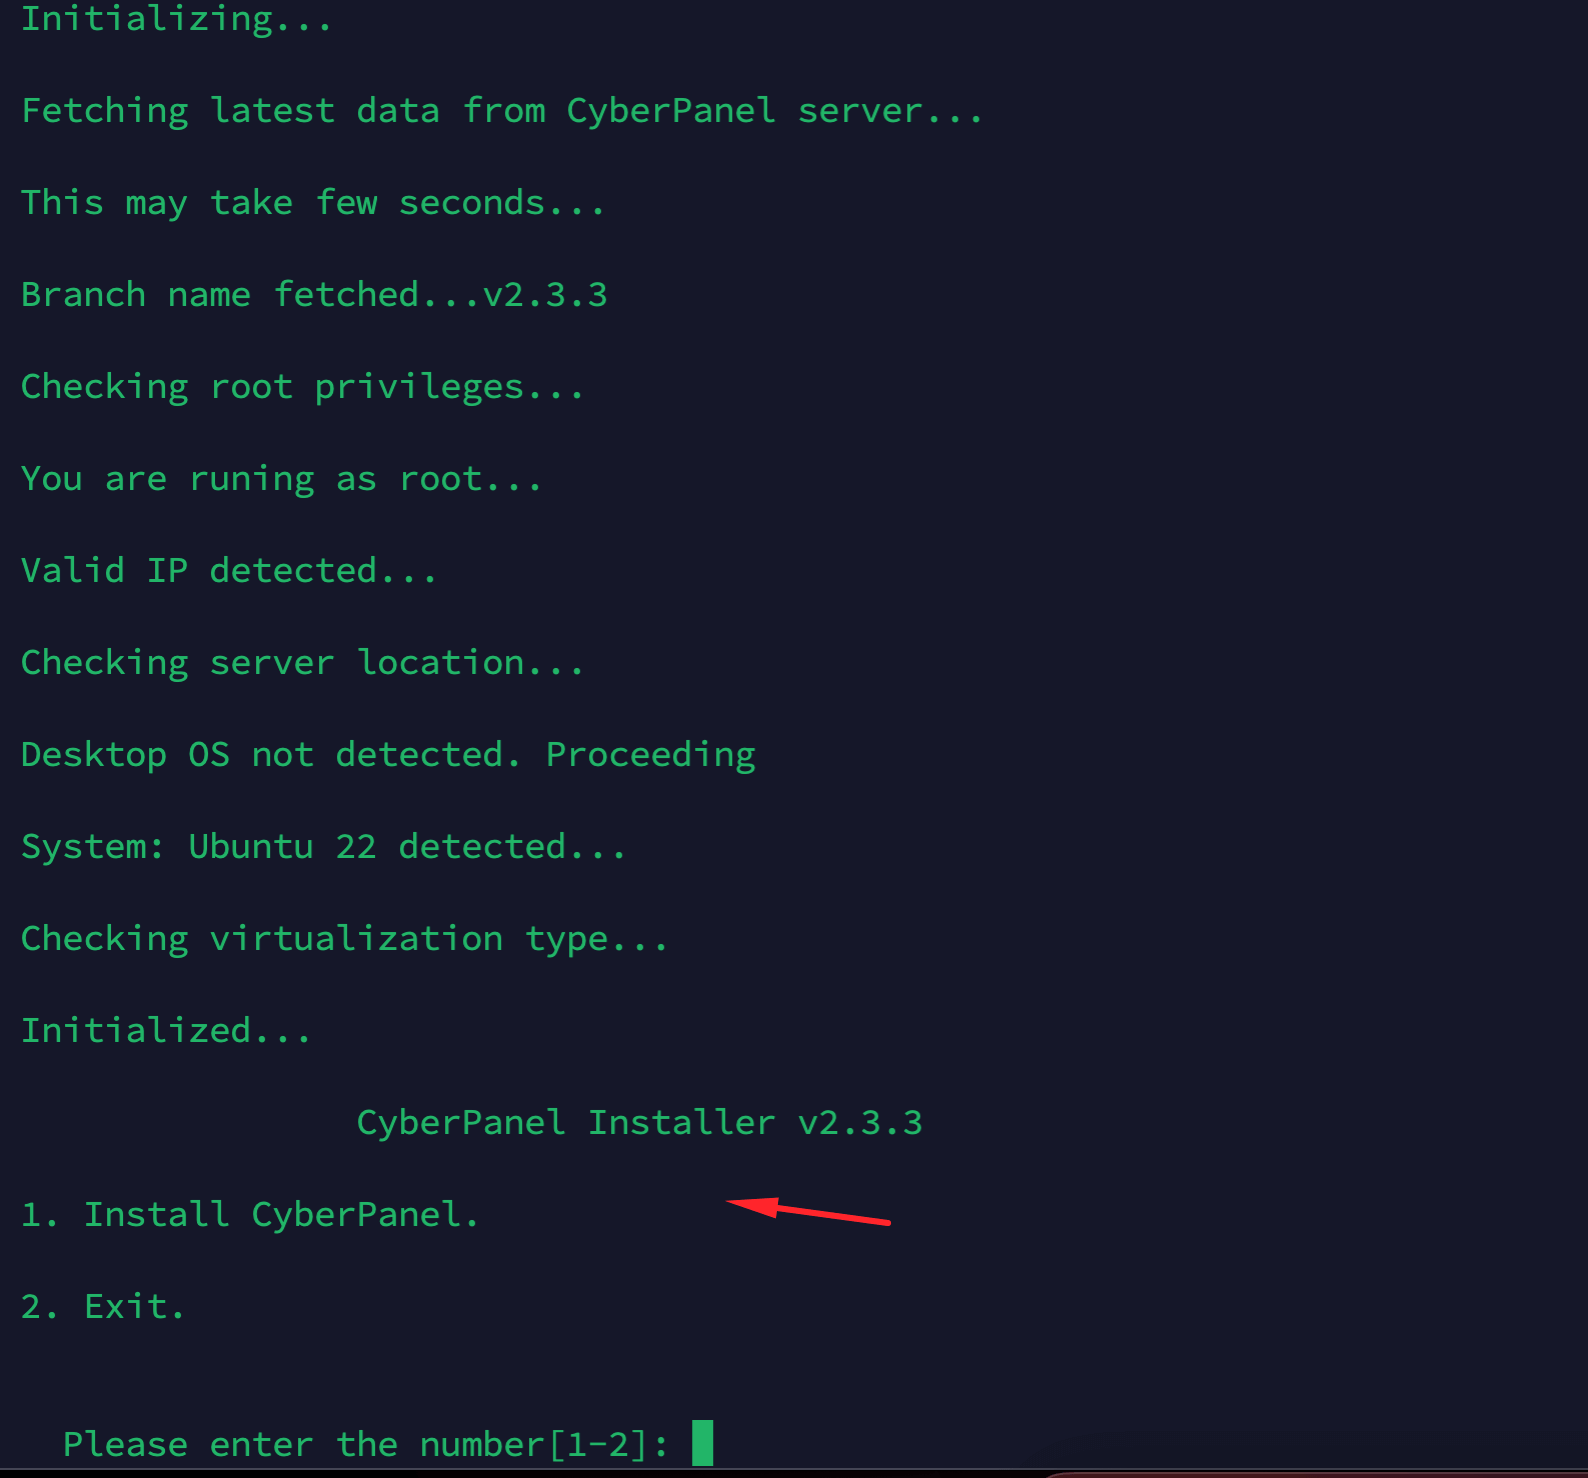
Step # 3: Download and Install CyberPanel
The following script will connect to the official website and download the latest version.
sh <(curl https://cyberpanel.net/install.sh || wget -O - https://cyberpanel.net/install.sh)
Since you’re logged in as a root user, the script checks the system compatibility and hardware resource requirements after downloading the files.
Step # 4: Carry Out Initial Configuration
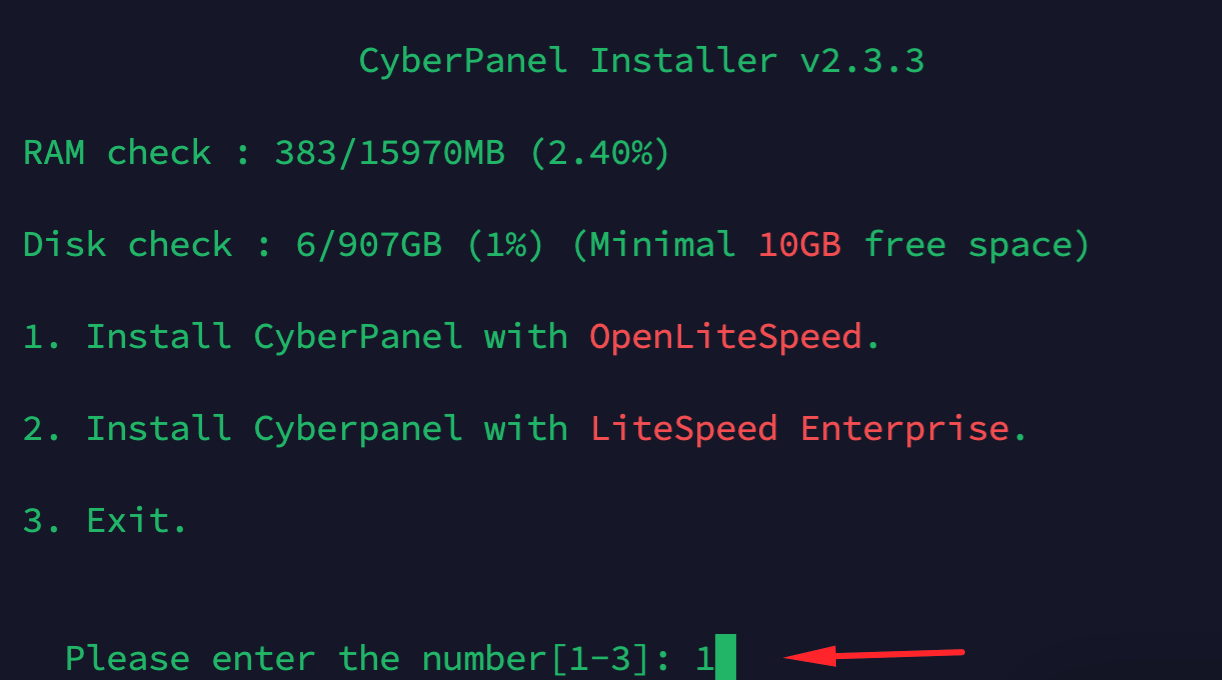
Next, the installer will ask you to choose appropriate options to proceed with the installation.
You can select option “1” to install the CyberPanel control panel on your server. If you want to exit the installer, select option “2”.
Step # 5: Select the Appropriate CyberPanel Version
In the next step, the text-based installer will ask you to select a version for your CyberPanel installation. You can select “OpenLiteSpeed” or “LiteSpeed Enterprise” as per your choice.
Step # 6: Install Full Service
In this step, select the Full service for CyberPanel for your Ubuntu 22 server, including PowerDNS, Postfix, and Pure-FTPd.
Press Y to continue.

Step # 7: Choose Local or Remote MySQL Setup
Now you‘ll see an interesting choice related to MySQL database server.
CyberPanel works equally well with local and remote MySQL servers, and you can choose the scenario that works with your server infrastructure.
So, if you’re currently using a separate MySQL server, you can select the option “Y” so that the installer will not install MySQL service on your server.
If you want to install MySQL server on the same server, you can select the option “N” and proceed further. The default installation option is “No,” so you can proceed further if you don’t want to install a local MySQL server.

Step # 8: Select CyberPanel Version
The installer offers you a chance to select a specific version or just install the latest version.

Step # 9: Set a Password for CyberPanel
The default password for Cyberpanel installation is 1234567. As you can see, this is pretty weak. CyberPanel allows you to set a stronger password for your installation.
For this, enter “s” and enter a strong password twice.

Step # 10: Install the CyberPanel Memcached PHP Extension
Memcached is among the most popular PHP extensions. It is a high-performance, distributed memory caching system that speeds up web applications by reducing the load on the database.
It can be used for object, database, and page caching. RedSwitches recommend you install this extension during CyberPanel installation.

Step # 11: Install CyberPanel Redis PHP Extension
Redis is another powerful tool for optimizing website performance.
The CyberPanel Redis extension allows developers to store and retrieve data from Redis, an in-memory data structure store. The extension offers many key benefits, including improved scalability, lower latency, and better resource utilization. RedSwitches recommend you install this extension on the server during the CyberPanel installation.

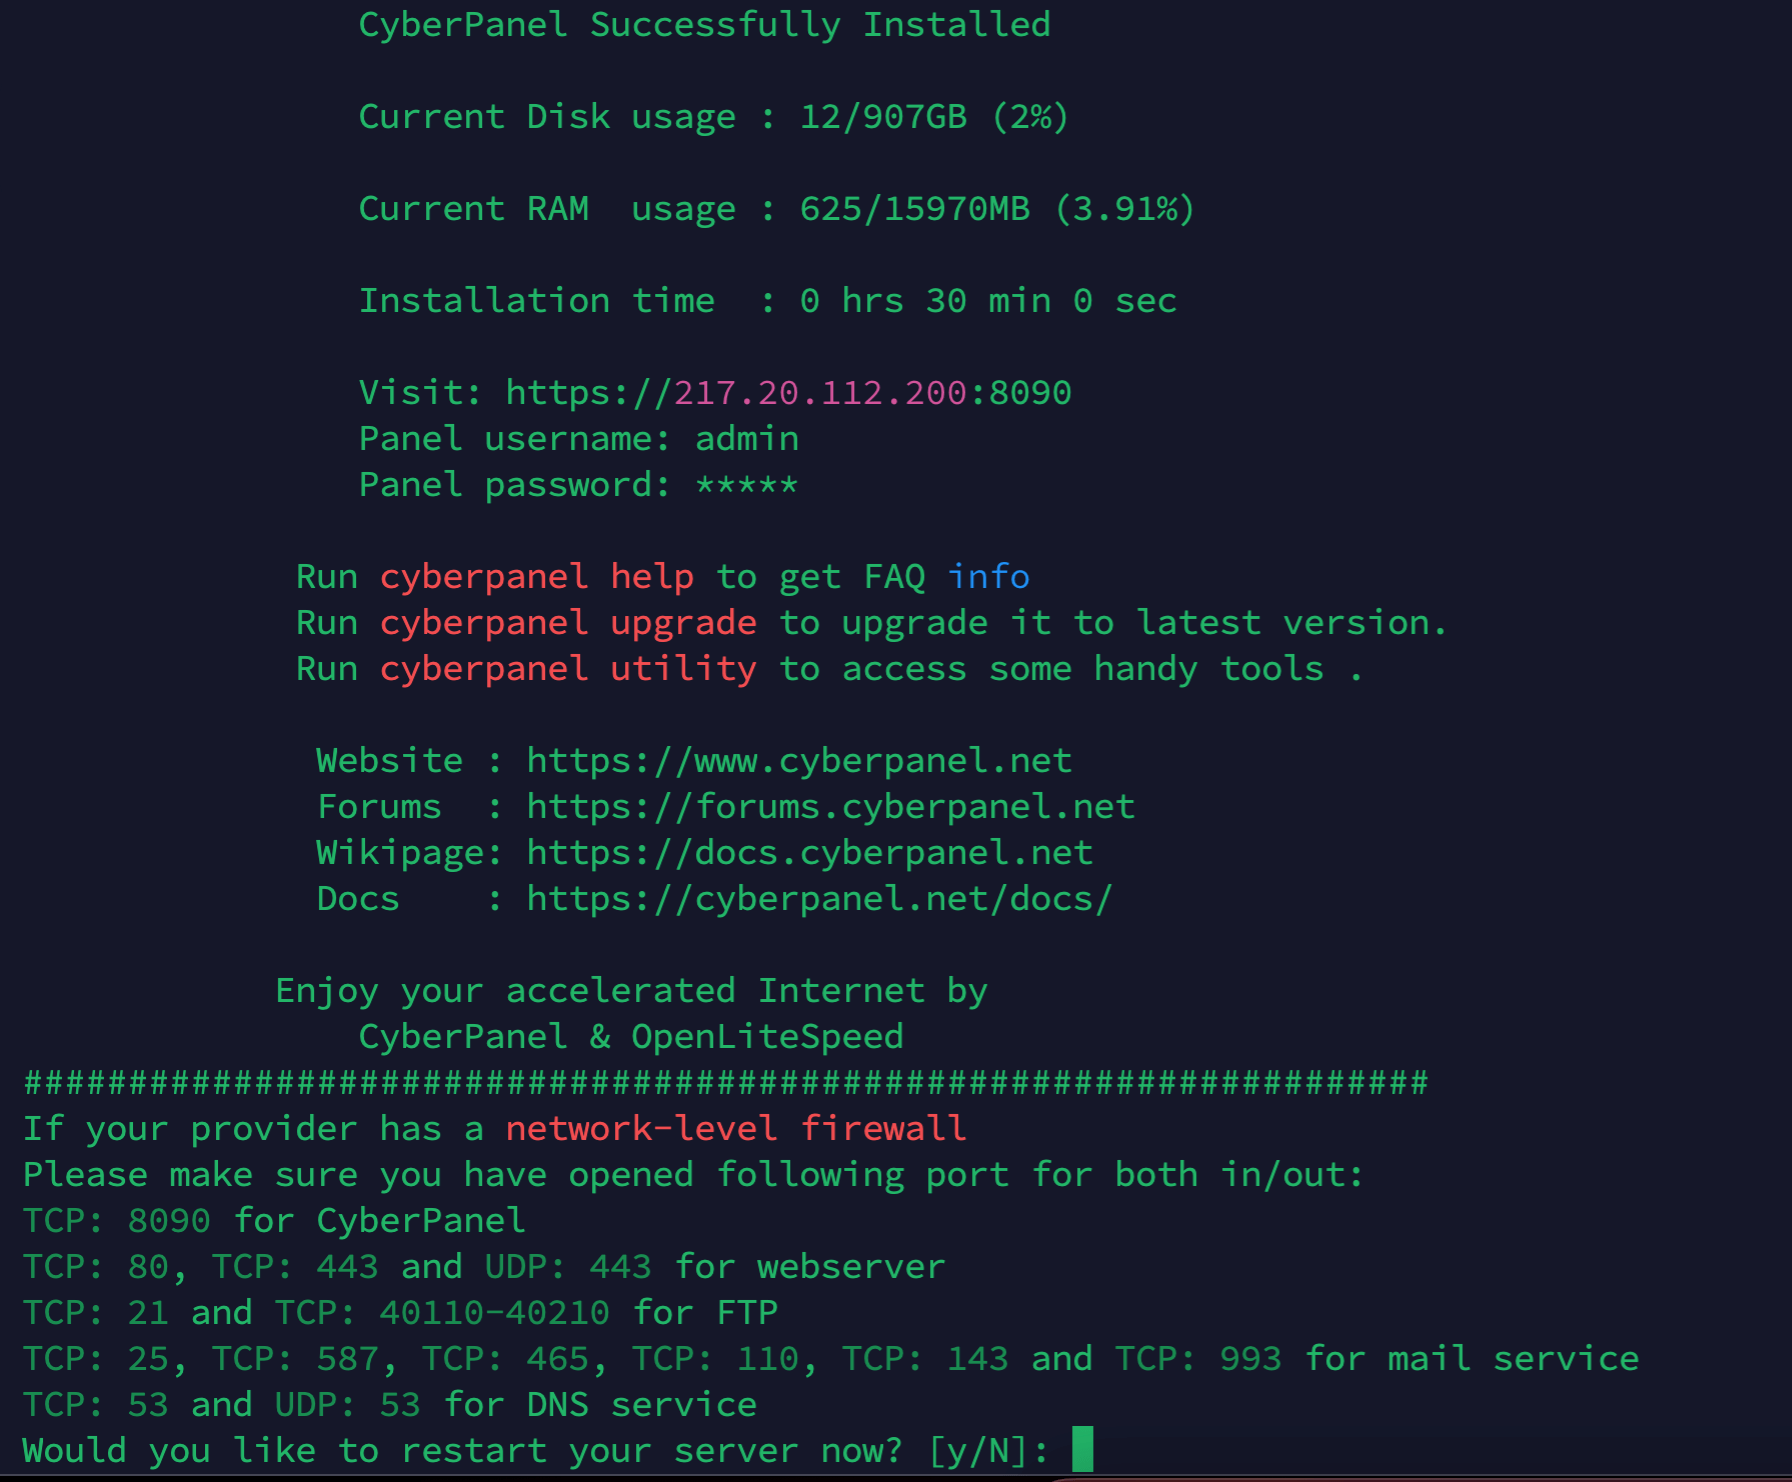
Step # 12: Finalize the Installation
Finalize the installation by going through the rest of the steps and finalize the process.
After this, access CyberPanel from your web browser. To do this, open a new tab and enter the IP address of your server, followed by port number 8090.
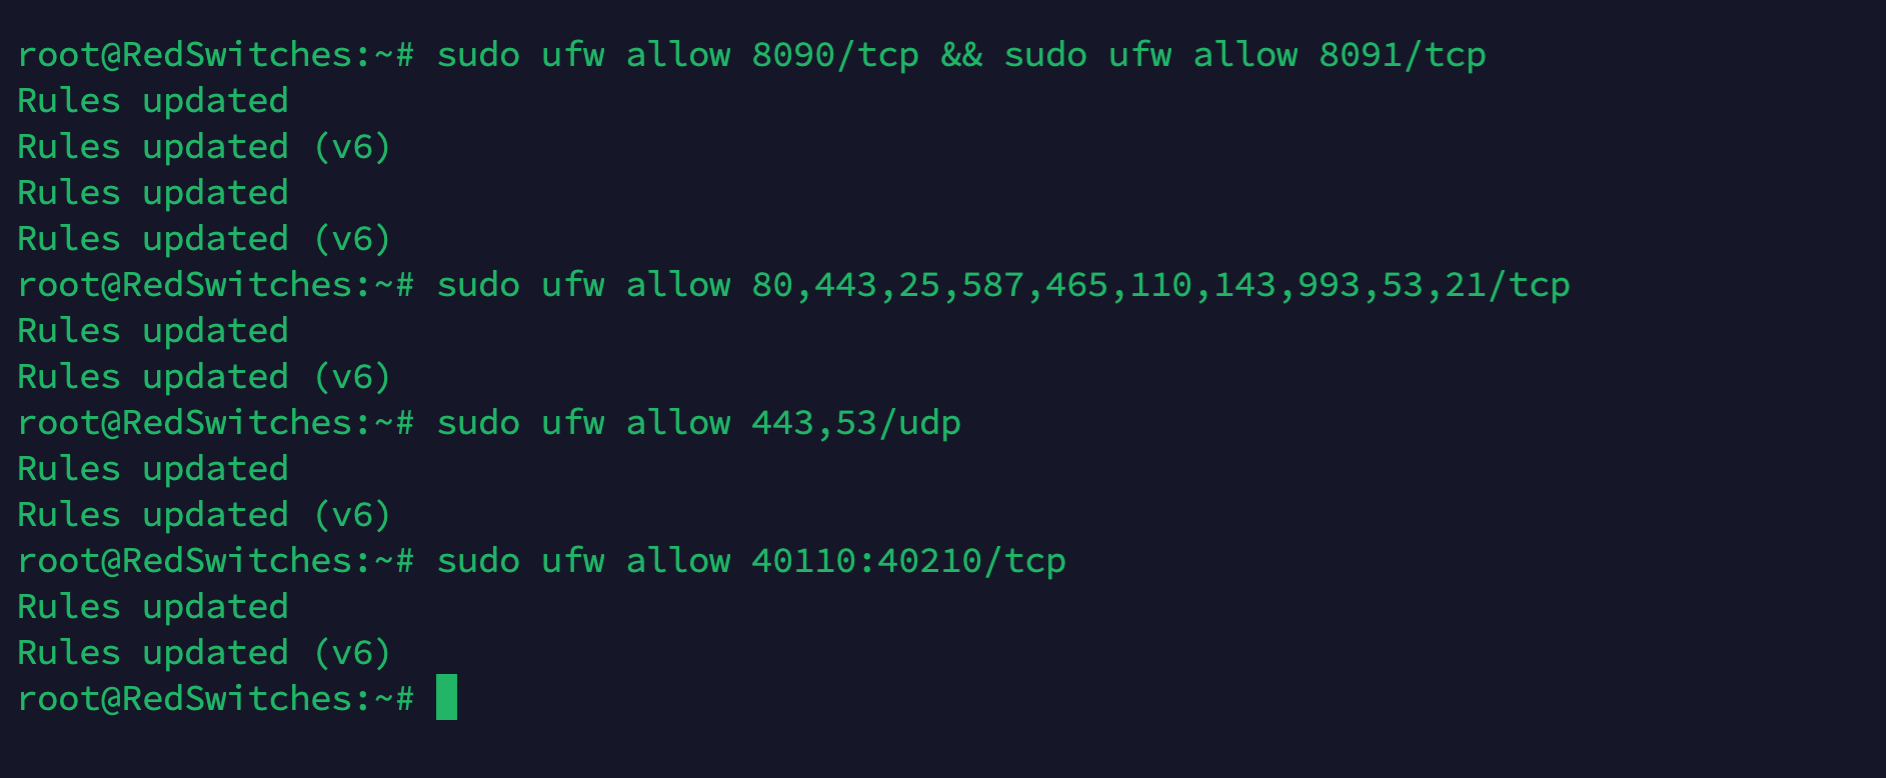
Allow CyberPanel Ports Through the Firewall
After the installation. The next step is to allow CyberPanel ports through the firewall.
It is important to ensure that the proper ports are whitelisted on the server’s firewall. By default, CyberPanel operates on port 8090 (HTTP) and 8091 (HTTPS). It is highly recommended that these ports are opened (whitelisted) to ensure users can access the control panel securely.
Use the following command to open these ports in the firewall.
sudo ufw allow 8090/tcp && sudo ufw allow 8091/tcp

sudo ufw allow 80,443,25,587,465,110,143,993,53,21/tcp

sudo ufw allow 443,53/udp

sudo ufw allow 40110:40210/tcp
Once these ports are opened, users should be able to access the CyberPanel control panel from any web browser.
IMPORTANT: If your server is behind RedSwitches’s hardware firewall, you may need to configure it differently to open the necessary ports. We highly recommend contacting our support through a ticket or email, or chat.
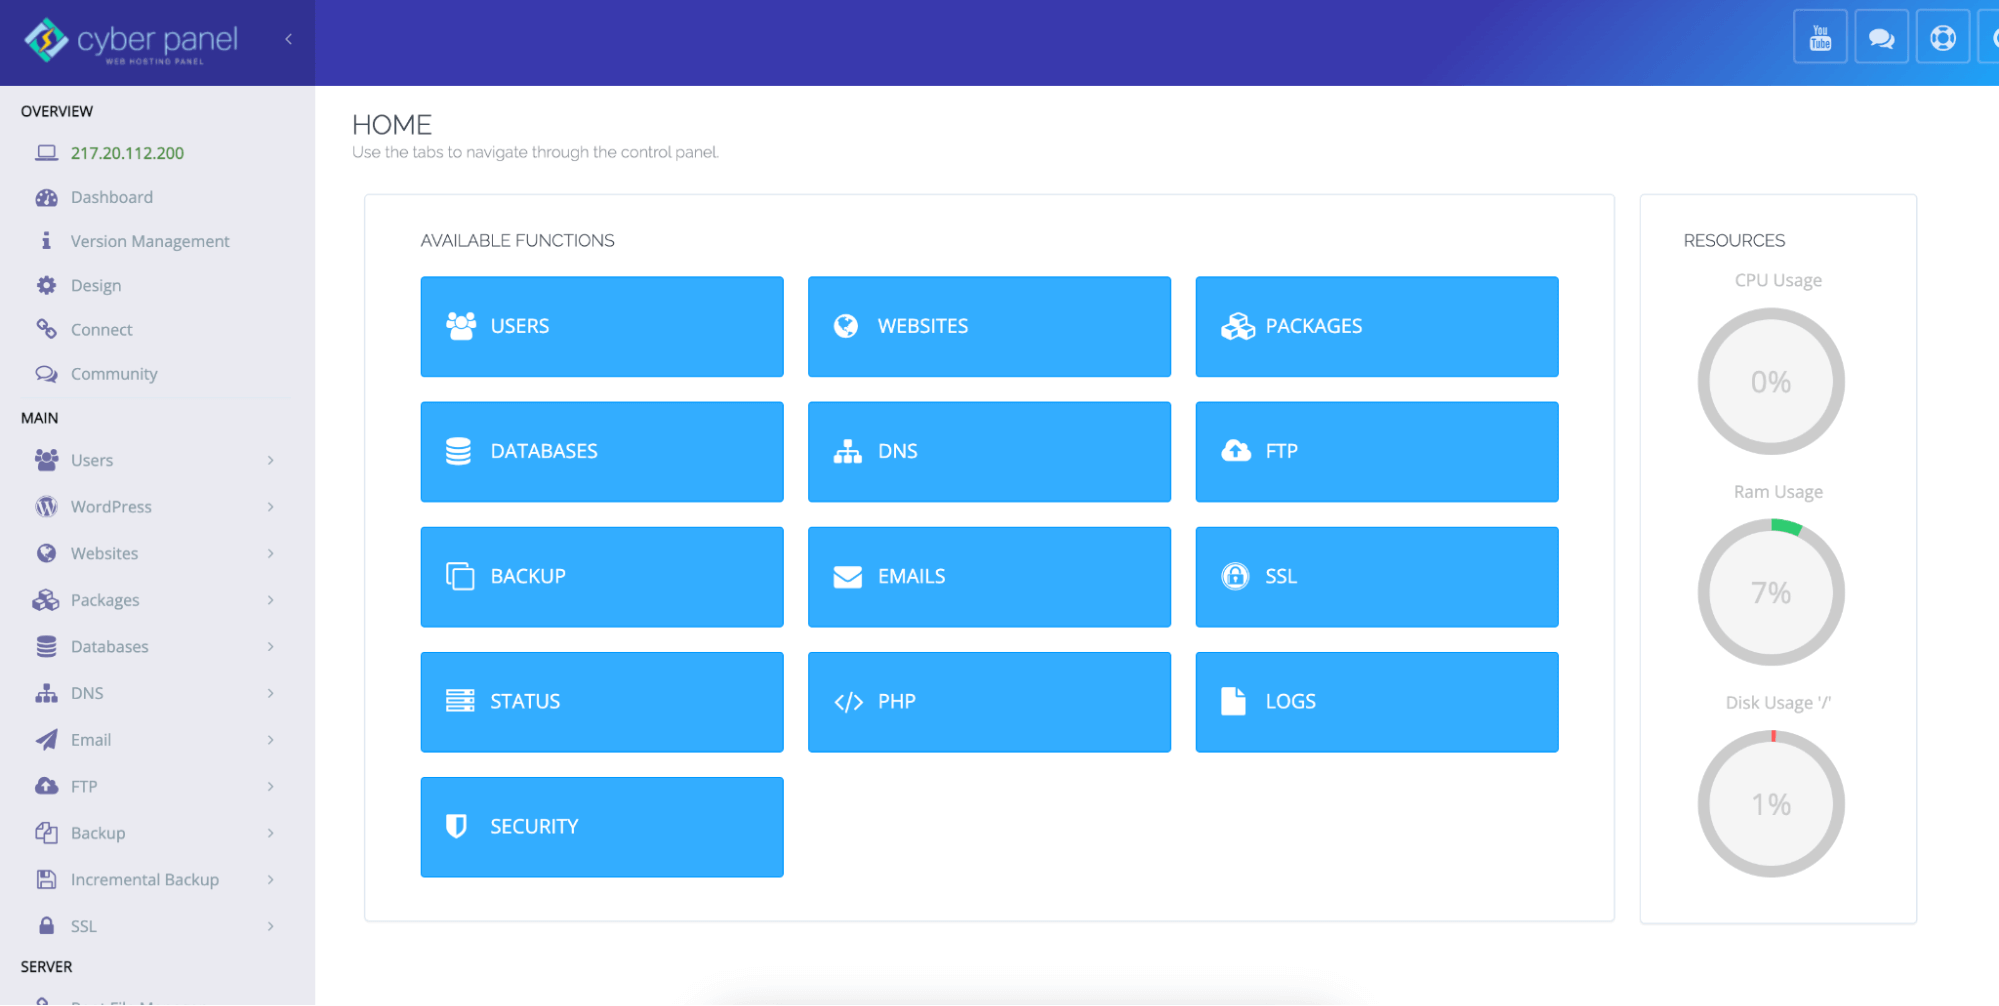
Access CyberPanel
Once you’ve accessed the CyberPanel login page, you can use the default credentials to log in.
First, enter “admin” as your username, and then type the password that you entered during the installation process.
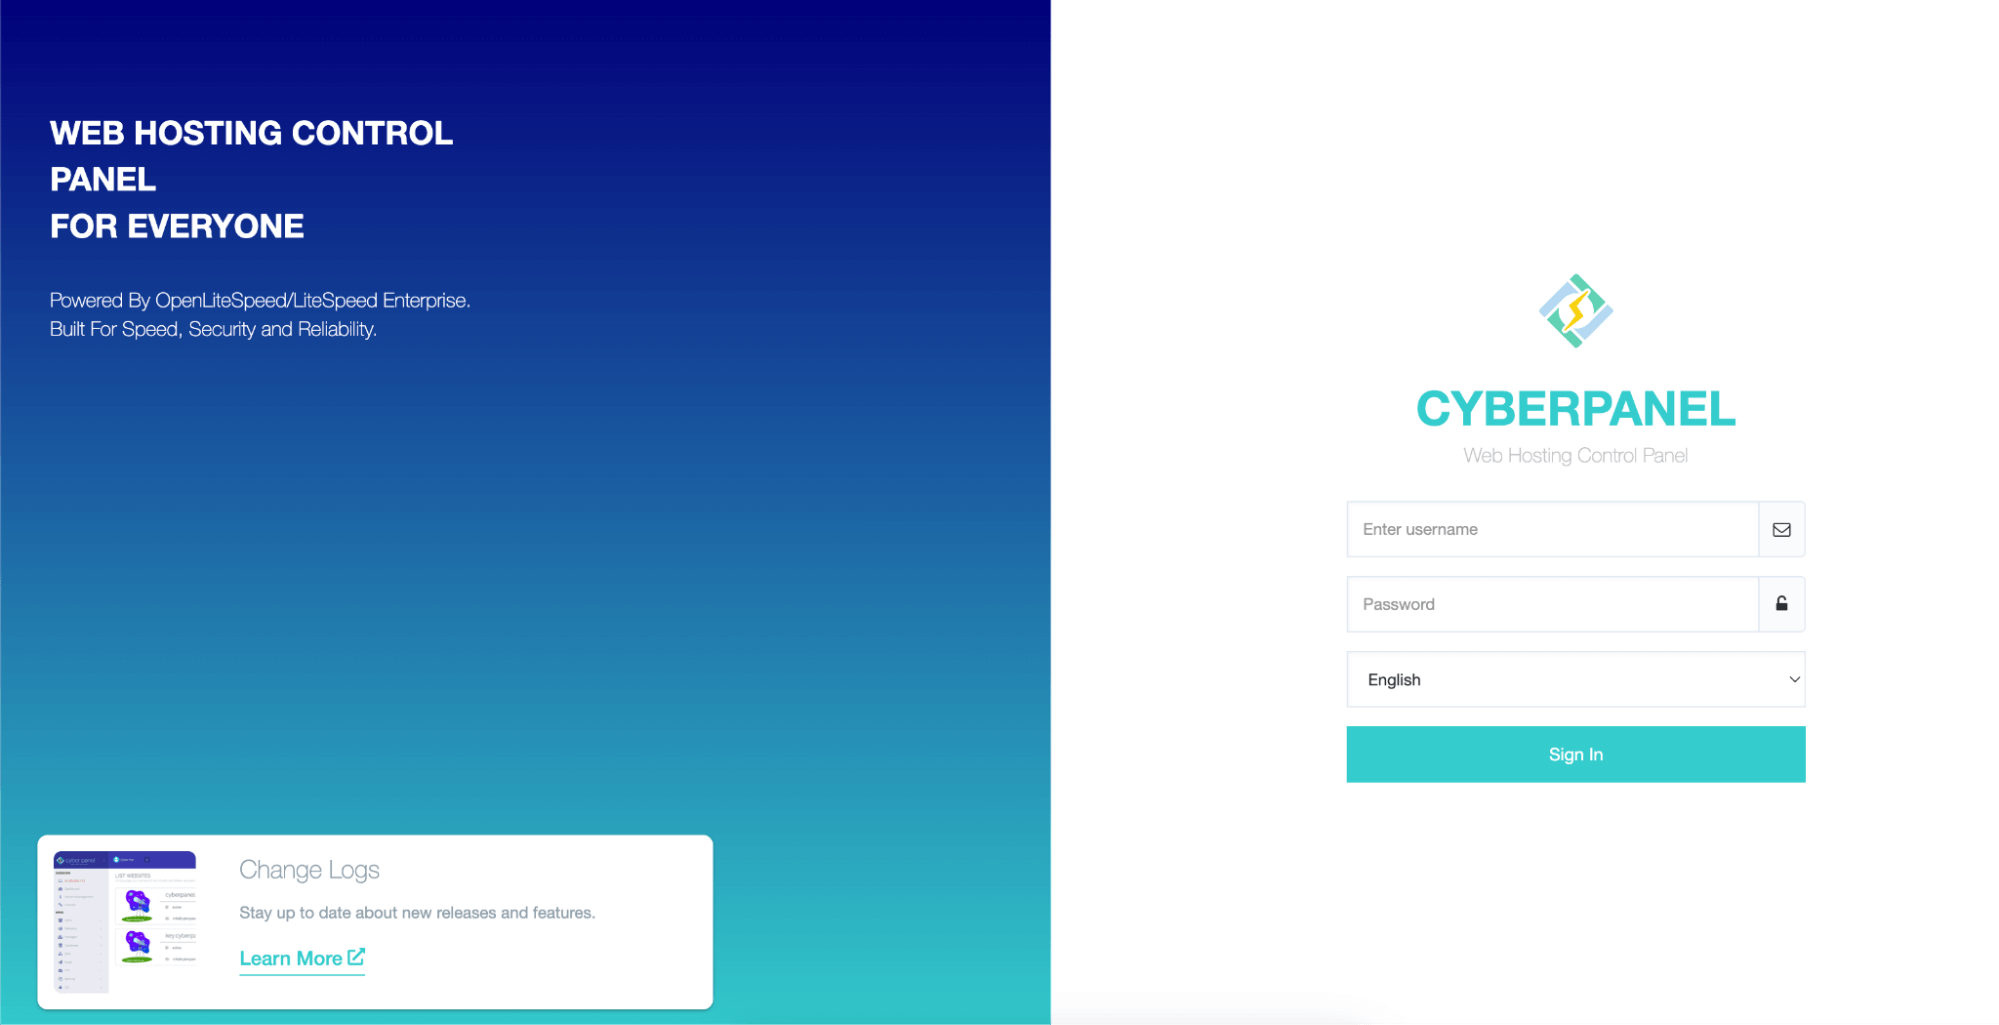
After logging in, you can start configuring and managing your web hosting environment through CyberPanel’s control panel.
Start by creating an account, setting up DNS records, and installing applications.
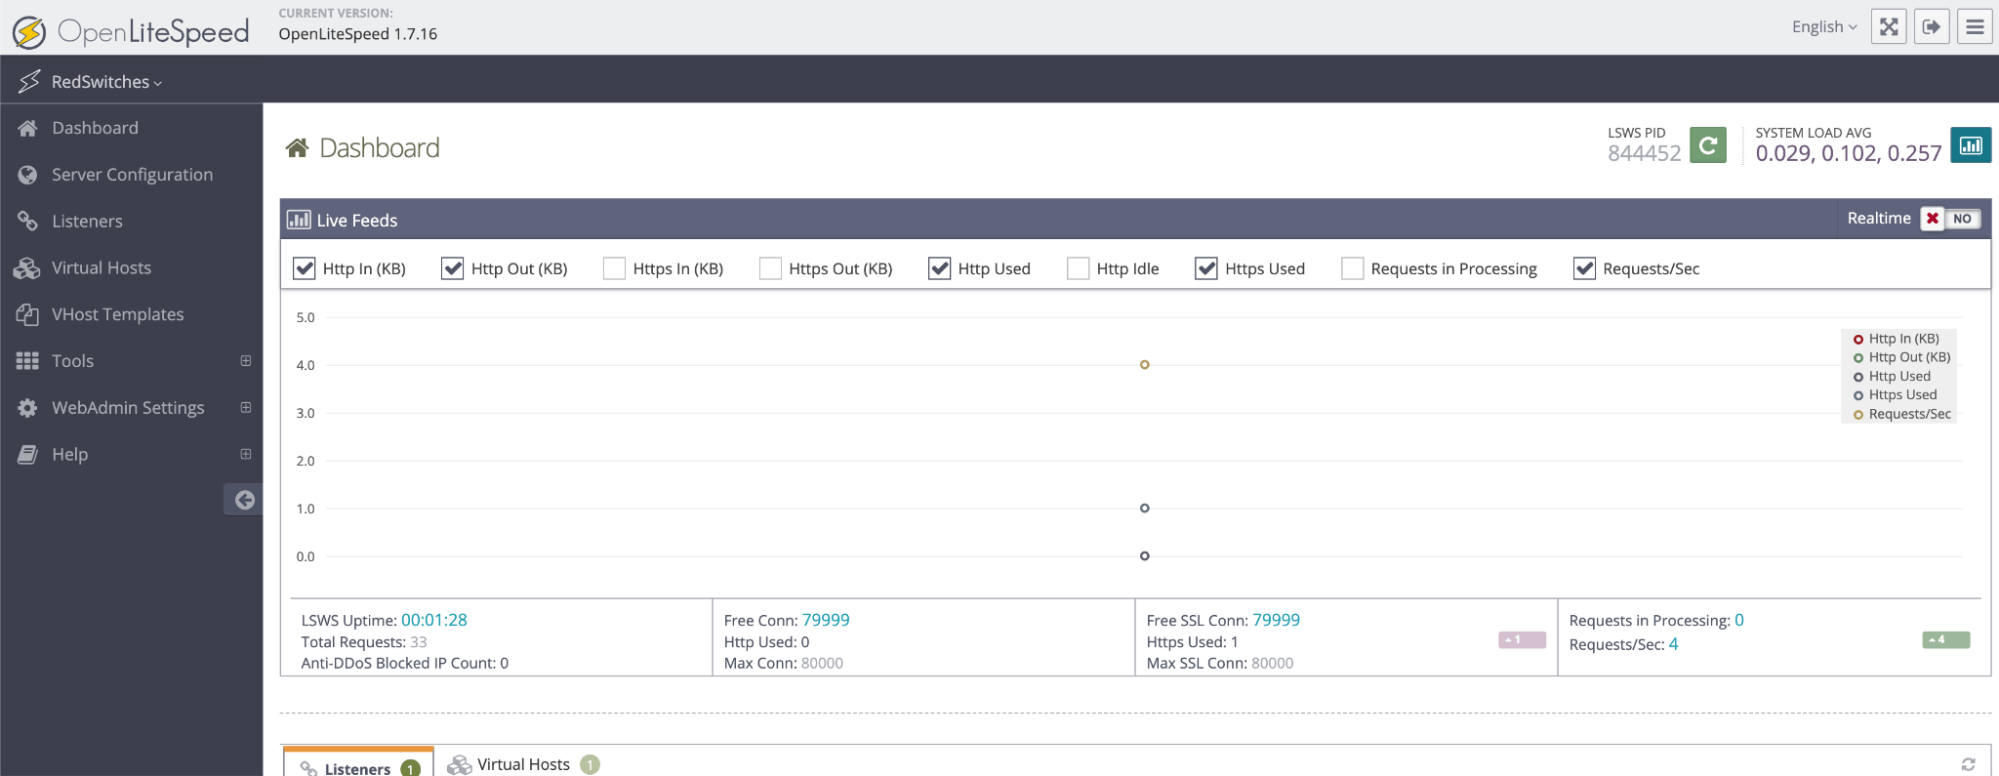
Access the OpenLiteSpeed
Once you have successfully installed CyberPanel on your Ubuntu 22.04 LTS server, you can access the OpenLiteSpeed web server at the following URL:
http://your-server-ipaddres:7080
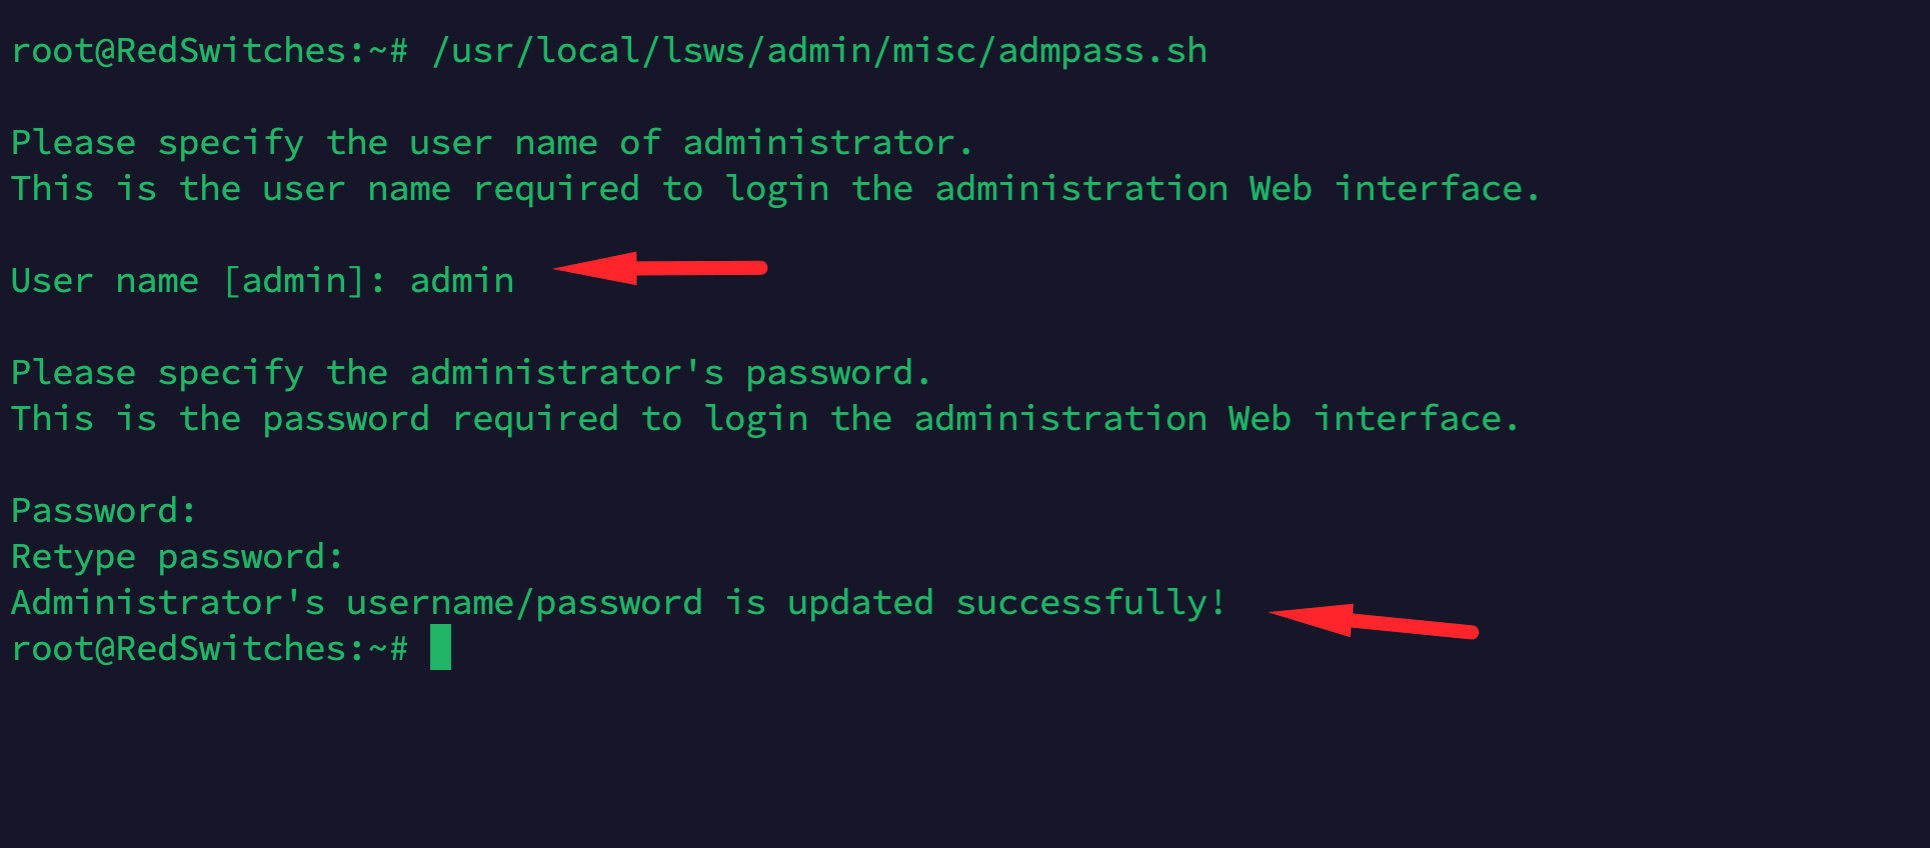
If you’re unsure about the password, run the following command to reset the OpenLiteSpeed panel password:
/usr/local/lsws/admin/misc/admpass.sh
Conclusion
Congratulations! You’ve successfully installed CyberPanel on your Ubuntu 22.04 LTS server. Now you can easily start using CyberPanel to manage your web hosting environment. If you ever have issues or questions about using CyberPanel, contact their customer support team for assistance.
FAQ
1. What other operating systems does CyberPanel support?
→ CyberPanel is an open-source tool that supports various operating systems, including Ubuntu 22.04 LTS Server, CentOS 7/8, CloudLinux 7/8, Red Hat Enterprise Linux 6/7/8, Debian 9/10, and OpenSUSE 15.2.
2. What is a better control panel than CyberPanel?
→ When it comes to web hosting control panels, several options are available on the market. CyberPanel is a free and easy-to-use control panel, but other options may be better suited for certain users depending on their needs.
For those looking for a more robust solution, cPanel is one of the most popular web hosting control panels available. It offers a wide range of highly customizable features, making it ideal for larger businesses and organizations.
Plesk is another popular web hosting control panel that provides many features and flexibility. It can be used to manage multiple websites on the same server and configure email accounts, databases, and more.
Finally, Webmin is an open-source web hosting control panel with many advanced features. It is a great option for those who need access to more powerful tools and want to customize their environment.
3. What is the most stable CyberPanel version?
→ The most stable version of CyberPanel currently available is 2.2.6. This version provides a range of new features and improvements, making it one of the most reliable options for web hosting control panels. It also offers improved security, faster performance, and an enhanced user experience.
