Every business application needs a database to store data and deliver/retrieve capabilities to application processes.
While there are several popular options, MySQL remains a widely recognized open-source relational database management system (RDBMS) used for creating, storing, and retrieving data. It is integral to several popular stacks, including LAMP and LEMP.
As developers add new features, you must install the latest MySQL version on your server. This is a critical step in optimizing your stack and ensuring the business applications can leverage the latest database features.
How to install MySQL on Ubuntu 20.04 is a crucial skill for developers and sysadmins.
This tutorial will guide you through the process of installing the latest MySQL version in an Ubuntu environment. We’ll begin by adding the MySQL software repository, followed by installing the MySQL package on the server.
Let’s start with the prerequisites of the process.
Table Of Contents
Prerequisites
- A device with Ubuntu 20.04
- An account that has sudo privileges
- Terminal access
Install MySQL on Ubuntu 20.04
You need the MySQL Server package to install the MySQL database server and client on Ubuntu 20.04. Here are the steps of the process:
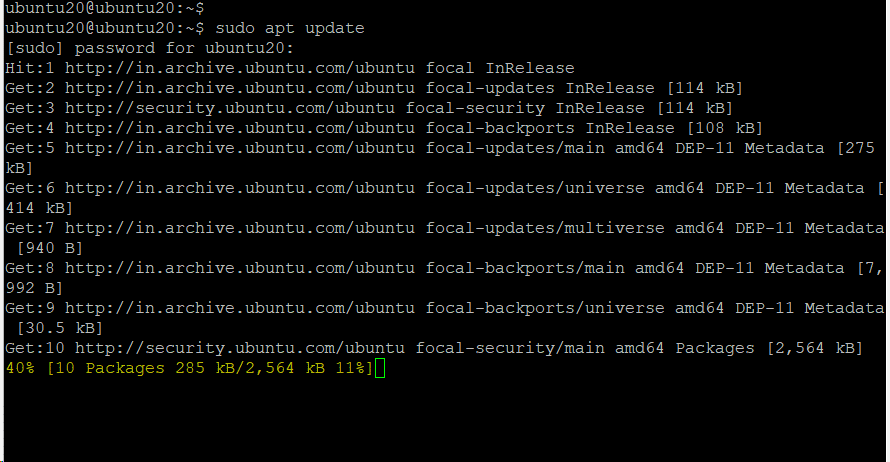
Step #1: Repository Update
Make sure you are installing the most recent version of MySQL by updating the system package repository.
Start by entering the following command into the terminal. Note that you will need to enter the admin password to initiate the process:
#sudo apt update
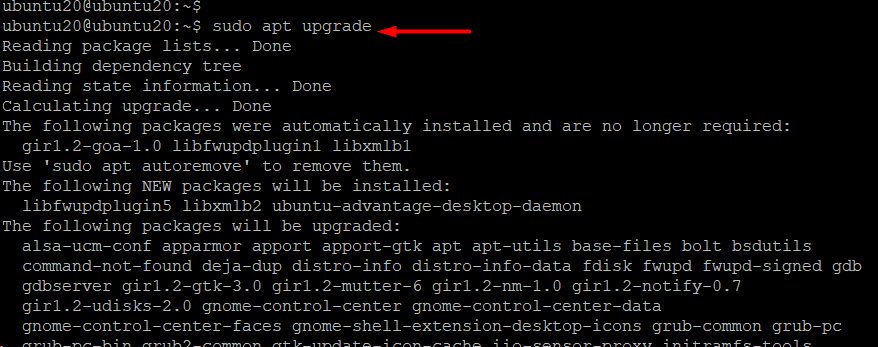
Next, run the following command to upgrade the system’s package index. When asked to proceed with the upgrade, type Y and press ENTER.
#sudo apt upgrade
Step #2: Install MySQL
After the package repository has been successfully updated, use the following command to install the MySQL Server. Press ENTER after selecting Y to proceed with the installation when prompted:
#sudo apt install mysql-server
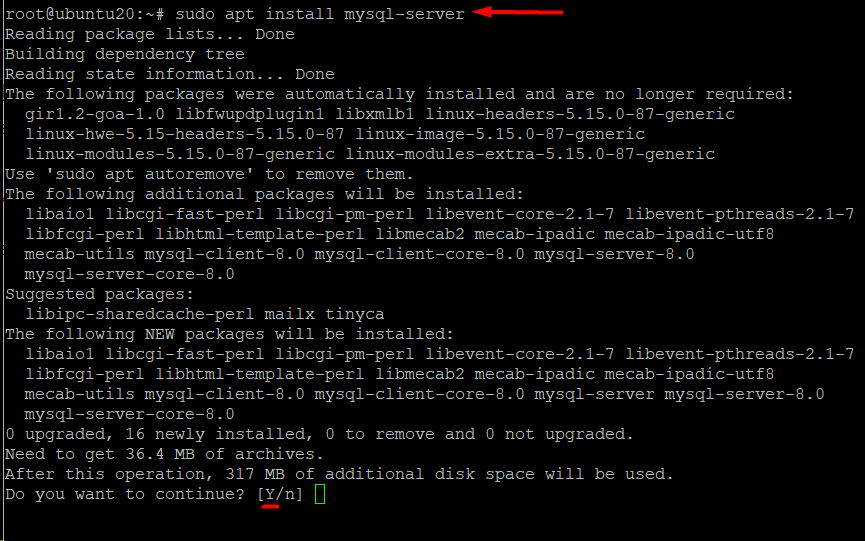
During the command execution, the system will download MySQL packages and install them on the system.
Step #3: Verify MySQL Installation
Once the installation finishes, you should verify the installation by checking the version information. For this, run the following command in the terminal:
#mysql --version

Step #4: Secure the MySQL Installation
Out of the box, MySQL is not very secure. So, after the installation, the first order of business is to secure the database.
MySQL provides a dedicated security script to set up the database security. Run the following command to initiate script execution:
#sudo mysql_secure_installation
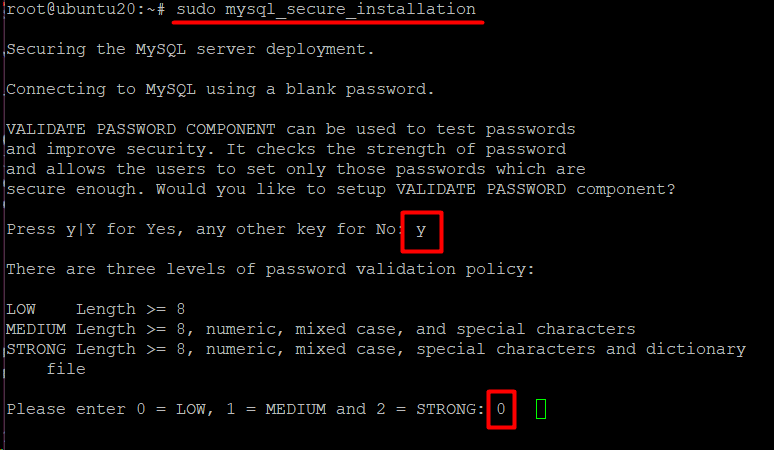
Type in the password for the root user and select Y to configure the VALIDATE PASSWORD component. This component checks whether the new password is sufficiently strong.
You can select one of the three levels of password validation:
- 0. Low: A password with a minimum of eight characters.
- 1. Medium: A minimum of eight characters that should contain special, mixed-case, and numeric characters.
- 2. Strong: A minimum of eight characters, including special, numeric, and mixed case characters; the password is then compared to a dictionary file.
Note that this password strength will be required for all user passwords.
After that, the script asks you to input your password again for confirmation. While you are configuring a password for the root user, it’s important to note that this user does not need to undergo password authentication during the MySQL login process.
The program calculates how strong your password is and asks for confirmation before continuing. To change the password, press any key or press Y if you’re happy with the current one.
After that, the script requests the following security options features:
- Remove anonymous users?
- Disallow Remote root login?
- Remove the test database.
- Reload privilege tables now?
We recommend entering Y for these questions.
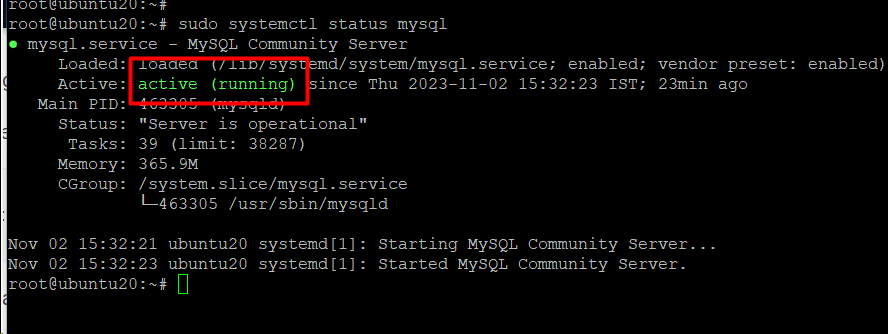
Step #5: Verify That the MySQL Service is Functional
At this point, you have a secure MySQL installation on your server. In most cases, the MySQL service should be running automatically. We recommend checking the MySQL service status by executing the following command:
#sudo systemctl status mysql
If the MySQL service is up, you’ll see the active status in green:
Step #6: Log in to MySQL Server
Finally, run the following command to log in to the MySQL server:
#sudo mysql -u root
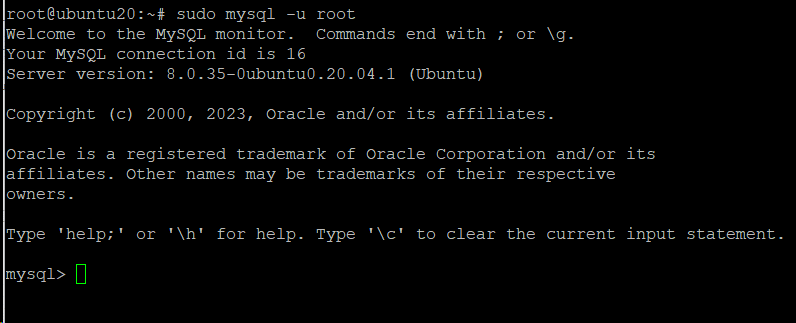
You can see that the prompt changes from the terminal to the MySQL shell. You can now create databases, run queries, and check out your newly configured MySQL system.
Also Read: How To Rename a Database in MySQL: 3 Easy Methods
Also Read: 3 Simple Methods to Delete Duplicate Rows in MySQL Database
Conclusion
In this tutorial, we demonstrate how to install MySQL on Ubuntu 20.04. We explained how to set up MySQL, protect it, and begin utilizing it for your business requirements. Because of its stability and performance, MySQL is a perfect choice for various applications, from small projects to enterprise-level systems. Keeping your MySQL installation up to date is essential to preserving the availability and security options of your data. With MySQL installed, your Ubuntu 20.04 system is ready for efficient database management and utilization.
If you’re looking for a robust server for your projects, RedSwitches offers the best dedicated server pricing and delivers instant dedicated servers, usually on the same day the order gets approved. Whether you need a dedicated server, a traffic-friendly 10Gbps dedicated server, or a powerful bare metal server, we are your trusted hosting partner.
FAQs
Q. What is MySQL, and why would I want to install it on my Ubuntu 20.04 server?
Data may be managed and stored for a variety of applications using MySQL, an open-source relational database management system. You can set up a database server for web applications, content management systems, and more by installing it on Ubuntu 20.04.
Q. How do I check if MySQL is already installed on my Ubuntu 20.04 server?
You can use the command prompt mysql –version to check if MySQL is installed. If it’s not installed, this command will return an error.
Q. What is the difference between MySQL and MariaDB, and how do I choose between them for installation?
MariaDB is a fork of MySQL and is largely compatible with MySQL. Both are excellent choices, and you can choose either based on your specific requirements and preferences. In most cases, MariaDB is a suitable replacement for MySQL.
Q. Can I install MySQL on Ubuntu 20.04 without using the APT package manager?
While it’s possible to install MySQL manually, using APT is recommended as it simplifies the process, handles dependencies, and ensures you receive updates and security patches.
Q. How do I secure my MySQL installation after installing it on Ubuntu 20.04?
After the installation, you should immediately execute the mysql_secure_installation script to initiate the database security process. It outlines how to eliminate anonymous users, set a root user password, and more.
Q. Are there graphical tools available to manage MySQL on Ubuntu 20.04?
Yes, several graphical tools, such as phpMyAdmin and MySQL Workbench, make it easier to manage MySQL databases through a user-friendly interface.
Q. Can I install specific versions of MySQL on Ubuntu 20.04, or is it always the latest version?
The version of MySQL available through the default Ubuntu repositories is typically the latest stable version at the time of the Ubuntu release. If you need a specific version, you might need to use MySQL’s official repository or a PPA.
Q. Is it necessary to install MySQL on the same server as my web application, or can I use a separate database server?
You can install MySQL on a separate server to optimize resource allocation, improve security, and facilitate scaling. This is a common practice for larger applications.
Q. Can I use MySQL on other Linux distributions besides Ubuntu 20.04?
Yes, MySQL is available and can be installed on various Linux distributions, including CentOS, Debian, and more, following similar installation procedures.
Q. What should I do if I encounter errors during the MySQL installation process?
If you encounter errors, carefully review the message, check your commands for typos, and refer to the MySQL documentation and relevant online resources for troubleshooting assistance.
