In today’s digital age, the demand for powerful and efficient server solutions is skyrocketing, driven by the expanding universe of online businesses, gaming, and resource-intensive applications. Among the frontrunners in this realm are dedicated servers, and the spotlight has recently been on “V Rising Dedicated Servers.” As revenue in the web hosting market is projected to soar to US$124.80bn in 2023 and anticipate a staggering growth rate of 22.55% by 2028, reaching a market volume of US$345.00bn, understanding the intricacies of such dedicated server configurations and their benefits becomes paramount.
Developed by Stunlock Studios, V Rising has captured the gaming community’s attention with its innovative blend of action, role-playing, and strategic elements within a dark, immersive world. While the game offers an extensive range of experiences, utilizing a dedicated server can elevate this further, offering heightened control, stability, and performance metrics.
This comprehensive guide is invaluable for configuring a v rising dedicated server, elucidating the technical steps and advantages accompanying such an investment.
Table of Contents
- What Is a V Rising Dedicated Server?
- V Rising Dedicated Server Benefits
- Steps For V Rising Dedicated Server Configuration
- Conclusion
- FAQs
What Is a V Rising Dedicated Server?
V Rising, developed by Stunlock Studios, has quickly become a staple in vampire RPGs, offering players an immersive world replete with action, strategy, and multiplayer interaction. While the game is engaging, the difference between a good and excellent gaming experience often concerns server quality.
A V Rising dedicated server is a specialized hosting solution to optimize your multiplayer gaming experience. Unlike shared or cloud-based servers, a dedicated server focuses all its resources on V Rising alone, ensuring faster load times, reduced latency, and unparalleled gameplay stability.
This server type isn’t just an add-on but a vital component for those serious about enhancing their V Rising experience.
V Rising Dedicated Server Requirements
Setting up a dedicated server for V Rising promises a new echelon of gameplay, one where lag is minimized and customization reigns supreme. However, to unlock this potential, there are critical requirements to meet. This section aims to outline these essentials in detail.
Hardware Selection: The Bedrock of Your Server
Before even diving into software specifics, the first order of business is deciding where you’ll host your server.
- Separate Machine: Using your primary gaming PC might seem convenient, but it could be better. A separate or secondary computer ensures that gameplay and server management don’t fight for the same resources.
- Internet Connection: A robust internet connection isn’t just a nice-to-have; it’s essential. While your server can be robust, if players connecting to it have weak internet, the gameplay experience will suffer.
Official Specifications: Adhering to Developer Guidelines
Stunlock Studios has set stringent requirements for hosting a dedicated server, which must be addressed.
- Operating System: Windows 10 is the go-to operating system as mandated by the developers.
- Disk Space: No skimping here; you’ll need at least 5GB of free disk space to run the server smoothly.
- Processor: A Quad-core processor isn’t just a recommendation—it’s a requirement for stable server operation.
- Memory: With 16 GB of RAM being the bare minimum, anything less could lead to a server crash, irrespective of the workarounds you may try.
Essential Know-How for Configuration
You’ll also need additional information and preparation to set up the server.
- Machine Specifications: Familiarize yourself with the hardware specifications of the machine you’re using. This helps in ensuring compatibility with the official requirements.
- Server Machine IP: Your server’s machine IP address is crucial for configuration and allowing other players to connect to your server.
With these requirements in place, you’re well on your way to offering a stellar V Rising gameplay experience. While some shortcuts may seem tempting, meeting these standards ensures a smoother, more enjoyable gaming environment for everyone involved.
V Rising Dedicated Server: Top Security Features

Credit: VRising
In a digital landscape where security threats are more prevalent than ever, choosing the right hosting solution for your v rising hosted server is critical. Beyond the primary advantages like reduced latency and customizable settings, dedicated servers offer a robust line of features that promise a secure and optimized gaming experience. Let’s explore these features in depth.
Robust Security: Safeguarding Your Gaming Realm
Security isn’t just a buzzword; it’s a foundational element of any server hosting solution.
- Inherent Security: Dedicated servers are inherently more secure than public servers, where your data mingles with that of countless other players. Since resources and data aren’t shared, unauthorized access is minimized.
- Security Add-Ons: Many providers offer additional security features that can either come as part of the initial package or be added for nominal fees. Features like firewalls or VPNs can significantly enhance the security of your dedicated server.
Versatility and Customization: Your Server, Your Rules
One of the undeniable perks of having a dedicated server is its freedom.
- Game Rules Customization: You have the power to define game rules, player capacity, and more, ensuring that the server caters to your specific needs.
- Community Building: With control over who joins your server, you can build a community that shares your interest in the gameplay and your approach to in-game interactions.
Investing in a vrising dedicated server goes beyond just enhancing gameplay. With features like robust security and versatile customization options, it provides a holistic and secure environment that lets you focus on what matters most—the game.
V Rising Dedicated Server Benefits
Navigating the dark, fantastical realms of V Rising is an experience that can either be incredibly immersive or frustratingly lackluster—the difference often lies in the quality of your server. Dedicated servers are not just a luxury but an investment that offers palpable returns in performance, security, and customization. Below, we examine the benefits of choosing a dedicated server for your V Rising gameplay.

Credit: Unsplash
High Availability: The Assurance of Uninterrupted Gameplay
- Zero Downtime: One of the standout features of dedicated servers is their commitment to keeping your game online. The hosting services meticulously plan any required maintenance during off-peak hours, minimizing interruptions to your gaming sessions.
- Automatic Failover: Unexpected hardware failures are a gamer’s worst nightmare. However, dedicated servers usually come with automatic failover mechanisms, switching your game to backup hardware when any issues are detected. This translates to an almost seamless gaming experience, even during unforeseen contingencies.
Full Customization: Crafting the Perfect Gaming Environment
- Control Over Settings: A dedicated server is like having a private playground. From setting player limits to defining game rules, you can adjust the game accordingly.
- Mod Support: The days of being confined to vanilla gameplay are long gone. With extensive mod support, you can easily incorporate new elements into the game, enriching the experience for everyone on the server.
Global Datacentres: Bringing the World Together in One Game
- Reduced Latency: Geographical distances become less of a concern with dedicated servers. You have the option to choose a data center located closest to you, substantially lowering latency issues.
- Multi-Region Support: Friends in different countries? No problem. With a range of global data centers, players can connect to your server almost anywhere without unbearable lag.
Storage Space: A Library for Your Expanding World
- Ample Storage: Gone are the days when you had to worry about running out of space for new game mods, community creations, or updates. Dedicated servers often come with generous disk space, offering ample room for all your storage needs.
- Data Backup: No one wants to lose their hard-earned progress. Providers often incorporate automatic data backup solutions, ensuring your game and community data remain safe and sound.
Trusted Security: A Fortress for Your Virtual World
- Advanced Security Protocols: The inherent design of dedicated server offers robust security. But it doesn’t stop there; you also get access to advanced features like firewalls and data encryption to shield your server from external threats.
- Regular Updates: Keeping your virtual world secure is a continuous process. Providers regularly roll out security patches and software updates to fortify your server against emerging cyber threats.
Steps For V Rising Dedicated Server Configuration
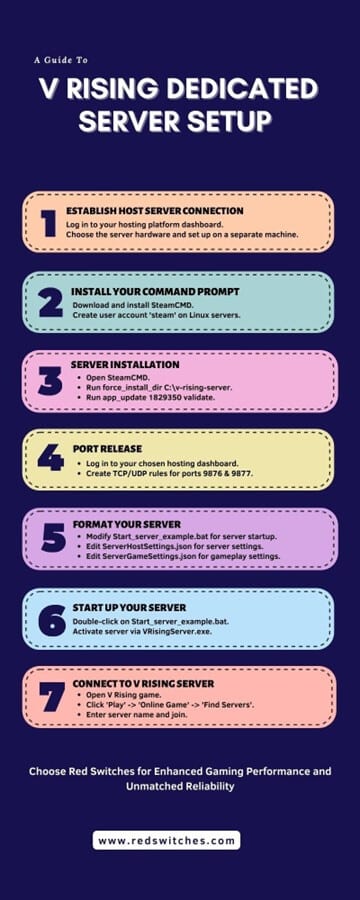
Embarking on the journey of v rising dedicated server setup? The process may seem daunting, but with the proper guidance, you’ll find it more straightforward than expected. This section is your step-by-step roadmap, detailing the essential tasks to go from zero to hero in your dedicated server v rising configuration journey.
Whether you’re a tech-savvy veteran or a newcomer eager to elevate your V Rising experience, these guidelines will ensure you navigate the setup process confidently and precisely. So grab your notepad (or open a new tab) because it’s time to delve into the nuts and bolts of V Rising’s dedicated server configuration.
1. Establish Host Server Connection
Before delving into game rules or tackling server customization, the first and foremost task is establishing a stable connection with your host server. Consider this the digital equivalent of laying the cornerstone for a building; get this right, and everything that follows becomes exponentially easier. This step sets the stage for all future activities related to your V Rising dedicated server. Below, we’ll outline what this entails, from the basics of server choice to the nuances of IP configurations.
Selecting the Right Hosting Provider: Choose Wisely
- Research: The market is flooded with hosting options, each with pros and cons. Before making a choice, spend some time researching different providers. Ready to unlock unparalleled performance and reliability for your V Rising server? Refrain from settling for less when you can have the best. Explore Red Switches’ Dedicated Server Hosting solutions today and elevate your gaming experience to new heights.
- Location: Choosing a server geographically close to most of your players can significantly reduce latency. Many providers offer a range of data centers across the globe. Want to make an informed decision when choosing a dedicated server for your V Rising game? Look no further! Take your expertise to the next level by reading our essential blog: A Comprehensive Guide to Choosing The Right Dedicated Server.
- Hardware: It’s not just about location and price. Ensure the server’s hardware specifications meet or exceed the recommended guidelines set forth by Stunlock Studios.
IP Configuration: Know Your Numbers
- Static vs Dynamic IP: A static IP address is more reliable for server hosting as it doesn’t change over time. If your ISP doesn’t provide a static IP, there are services to overcome this limitation.
- port forwarding: To allow other players to connect to your server, you must configure port forwarding on your router. This process varies by router model, but you’ll generally need to forward the TCP and UDP ports that V Rising uses.
Test the Connection: A Necessary Safety Measure
- Ping Test: Once you’ve set up your server and configured the IP, perform a ping test to ensure data is sent and received without issues.
- Trial Run: Before inviting the world into your virtual empire, conduct a trial run with a few trusted friends. Their feedback on performance and connectivity can be invaluable.

Credit: Unsplash
2. Install Your Command Prompt
So, you’ve successfully established a connection with your host server. Great! Now, it’s time to roll up your sleeves and dive into the second crucial step: installing your Command Prompt interface.
In the V Rising dedicated servers world, SteamCMD is often the tool of choice for this purpose. Think of it as the command center from which you’ll control virtually everything about your server. It’s like the MS-DOS prompt from Windows 3.1 days but laser-focused on your server’s needs. Let’s break down this step into digestible parts to ensure you get it right.
Choosing Your Platform: Windows or Linux?
Before we dig into the installation process, you must decide which operating system will host your server. The perspective differs slightly depending on whether you use a Windows or Linux machine.
- Windows: Often considered more user-friendly, especially for those unfamiliar with command-line interfaces.
- Linux: Offers a robust and flexible environment but may have a steeper learning curve for newcomers.
Downloading SteamCMD: The How-To
Windows Users
- Create a dedicated folder for SteamCMD, like D:\steamcmd.
- Download the SteamCMD for Windows package.
- Open the zip file into the folder you created.
Linux Users
- First, create a user account named Steam. Note: Operating SteamCMD as the root user is a security risk and is highly discouraged.
- Navigate to the home folder of this user.
- Depending on your Linux distribution (Ubuntu, CentOS, etc.), download the SteamCMD package using your package manager. For example, sudo apt installs steamcmd for Ubuntu/Debian users.
Initial Setup: Permissions and Security
Linux Users
- Create a symbolic link for the SteamCMD executable: sudo ln -s /usr/games/steamcmd /home/steam/steamcmd
- Add the necessary dependencies, especially if you are running a 64-bit machine. Depending on your distribution, this may require adding multiverse or contrib and non-free repositories.
Windows Users
- No special permissions or dependencies are usually needed, but always check the documentation to make sure.
Running SteamCMD: Your First Interaction
Once you’ve got SteamCMD installed, it’s time to fire it up.
Windows Users
- Open Command Prompt and navigate to your SteamCMD folder: cd C:\steamcmd
- Start SteamCMD by simply typing steamcmd into the prompt.
Linux/macOS Users
- Open a terminal and navigate to where you’ve installed SteamCMD.
- Run the SteamCMD shell script: ./steamcmd.sh
- On the first run, SteamCMD will update itself and provide a Steam> prompt. You can then log in anonymously or with a specific Steam account (note: creating a separate Steam account just for your dedicated servers is recommended for security reasons).

Credit: Unsplash
Installing your Command Prompt via SteamCMD is like setting up the cockpit of a plane. This is where you’ll control everything, from server updates to game mods. Are you looking to deepen your understanding of dedicated server hosting in gaming? Take advantage of our insightful blog: A Comprehensive Guide To Dedicated Server Hosting For Gaming.
3. V Rising Dedicated Server Installation
Having laid the groundwork by establishing a stable server connection and setting up your Command Prompt via SteamCMD, you’re now ready for the exciting part—installing the V Rising dedicated server itself. Let’s get started.
Initiating SteamCMD: Booting Up Your Command Center
Before making any headway with the installation, you’ll need to launch the SteamCMD interface you previously installed.
Launching SteamCMD:
- Simply open your command prompt and navigate to the folder where SteamCMD is located. Run it by typing steamcmd if you’re using Windows or ./steamcmd.sh for Linux/macOS.
Designating an Installation Directory: Picking the Perfect Spot
Where you install your V Rising server application is critical. Think of it as picking a plot of land for building a house; you want it accessible but secure.
- Creating a Directory: Within the command line prompt, make a directory where you’ll store your V Rising server application. A directory like C:\v-rising-server is usually recommended for its straightforwardness.
- Setting the Directory: Use the command force_install_dir C:\v-rising-server to specify this as your installation directory.
Logging Into Steam’s Public Servers: The Gateway to Your Installation
Before downloading the V Rising server software, you must authenticate your session with Steam’s servers.
- Anonymous Login: Use the command login anonymous to log in without requiring a Steam account. This command ensures you’re connected to Steam without tying the session to personal account details.
The Actual Installation: The Moment of Truth
Now that everything else is set up, it’s time to get to the heart of the matter—installing the V Rising server software.
- Finding the App ID: Every game on Steam has a unique App ID, and for V Rising, it’s 1829350. This is like the server’s fingerprint, unique and critical for the installation.
- Installing the Server: Run the command app_update 1829350 validate. The validate parameter checks the integrity of the server files, ensuring that you’re getting a complete and uncorrupted installation.
This third step is your main event, the cornerstone that transforms your dedicated machine into a bona fide V Rising server. The steps may appear technical, but remember, each command is a piece of a puzzle, leading to a seamless and immersive V Rising experience.
4. Port Release
You may jump into the game after the server software is installed. But hold on! An essential step that’s often overlooked but critical for your server to function as intended is Port Release. The process can be intimidating but fret not. Let’s break down how to configure port forwarding, explicitly using the Liquid Web dashboard as an example.
Accessing Your Dashboard: Entering the Control Room
- Dashboard Login: The first thing to do is log in to your dashboard. This is your server’s control panel and starting point for most administrative tasks.
- Server Selection: Navigate through the menu to find the hosted server list. Click on the specific server you’re using for V Rising.

Credit: Unsplash
Navigating to Network Settings: Where the Magic Happens
- Finding Network Settings: Once you’re within your server’s dashboard, you’ll see an option for Network Settings. This is where you’ll be setting up port forwarding.
- Firewall Policies/Settings: Under Network Settings, locate and click on the Firewall Policies or Settings menu. This is your portal to control what can and can’t interact with your server.
Creating Rules: Unveiling the Gateway
- Searching for ‘Incoming’: Within Firewall Settings, look for an option labeled ‘Incoming.’ This controls what outside data is allowed into your server.
- Rule Creation: You’ll need to create two rules. One for the game port, which is generally TCP/UDP 9876, and another for the query port, which is generally TCP/UDP 9877. These ports are your gateways for the game’s data and server queries.
5. Format Your V Rising Dedicated Server
Now, it’s time to personalize your server’s format. Think of this as decorating your new home to your taste. This step is about creating a gaming experience that mirrors your vision. The control is in your hands, from defining your server name to setting gameplay conditions. Let’s explore how to manipulate some critical files to format your V Rising server.
Configuring the Startup File: Start_server_example.bat
- Locating the File: You’ll find this .bat file in the root folder of your installation directory, which you set up in earlier steps.
- Defining Parameters: This file is essentially your server’s startup blueprint. Here, you’ll choose a name for your server and specify the memory state. You can also define where your server’s memory logs will be stored.
Fine-Tuning Your Server Settings: ServerHostSettings.json
- Locating the File: Navigate to the subfolder VRisingServer_Data\StreamingAssets\Settings within your installation directory.
- Modifying Server Settings: This .json file is like your server’s identity card. Here, you’ll define your server name, tweak port settings, and even set the maximum number of players who can join your server.
Personalizing Gameplay: ServerGameSettings.json
- Locating the File: This .json file is in the same Settings subfolder as the ServerHostSettings.json.
- Modifying Gameplay Settings: While the previous .json file was about the server, this one is all about the gameplay. Here, you can modify the game mode, set it to PvE or PvP, change clan sizes, and adjust game features like health modifiers.
6. Start Up Your Server
The finish line is in sight! You’ve meticulously prepped your V Rising server, configuring everything from network ports to gameplay settings. The thrilling final act comes: starting up your server and bringing your digital playground to life. This is the moment where all your careful planning and diligent setup coalesce into a living, breathing V Rising world. Let’s walk through this simple yet monumental step.
Initiating the Batch File: Your Server’s Starter Key
- Locating the .bat File: Revisit your installation directory, where you’ll find the .bat file we discussed in Step 5, aptly named Start_server_example.bat.
- Starting the .bat File: Simply double-click on this file to open it. This action initializes your configured server parameters and prepares your server for its grand opening.
Launching the Server: The Final Countdown
- Finding VRisingServer.exe: Inside the .bat file interface, you’ll find an executable named VRisingServer.exe.
- Server Activation: To bring your server online, double-click on VRisingServer.exe. This is the master switch that turns all your hard work into a live server where players can join and experience the V Rising universe as you’ve designed it.
7. Connect Your Dedicated Server to a V Rising Server
While the earlier steps were akin to building a ship, think of this stage as the ship’s maiden voyage, setting sail into the sea of online gaming. The wait may be tantalizing as the V Rising server menu loads, but once it’s ready, your adventure begins. Let’s look at how you can link your dedicated server to the V Rising game server and finally enjoy the fruits of your labor.
Navigating to the Game Menu: Your First Stop
- Accessing V Rising: Startup V Rising on your computer and wait as the game menu loads. Patience is vital; loading times can vary.
- Select Play: Once the menu is fully loaded, click the ‘Play’ option to access the gaming modes.
Finding Your Server: The Digital Treasure Hunt
- Choosing Online Game: In the following menu, select ‘Online Game’ to browse the list of available servers.
- Display Options: You’ll have an option to ‘Show All Servers and Settings.’ Click on that to display a comprehensive list of servers.
Making the Connection: Finalizing the Link
- Server Search: You’ve personalized your server with a unique name. Now’s the time to type that name into the search bar and find your realm amidst the sea of servers.
- Joining the Game: If you’ve set up a password for added security, enter it now. Once that’s done, click ‘Join Game’ to initiate the connection.

Credit: Unsplash
Conclusion
Embarking on the journey of setting up a V Rising dedicated server is thrilling, but choosing your hosting platform can make or break the experience. That’s where Red Switches comes in. Offering managed cloud solutions based on their Bare-Metal Cloud Platform, Red Switches ensures that your server meets and exceeds expectations in performance and reliability.
Don’t leave your V Rising server experience to chance. Choose a partner that can elevate it to professional standards. Explore Red Switches’ tailored solutions now and take your gaming experience to the next level. Make the switch today!
FAQs
Q. What is the best server setting for V Rising?
The “best” settings depend on your specific needs and preferences. However, a balanced combination of settings for PvP/PvE modes, clan sizes, and health modifiers generally provides an engaging gaming experience.
Q. What is V Rising?
V Rising is a popular survival game where players take on the role of a vampire lord and explore a dark and dangerous world.
Q. What is a dedicated server?
A dedicated server is a type of server that is exclusively used by one individual or organization. It provides more power, control, and resources compared to shared hosting.
Q. Why would I want to set up a V Rising dedicated server?
Setting up a dedicated server for V Rising allows you to have complete control over your gaming experience. You can customize server settings, play with friends, and avoid any potential issues with lag or overcrowded public servers.
Q. What are the server requirements for running a V Rising dedicated server?
To run a V Rising dedicated server, you will need a powerful server machine with sufficient CPU, RAM, and storage capacity. The exact requirements may vary depending on the number of players and mods you plan to use.
Q. How do I find a server host for my V Rising dedicated server?
There are several server hosting providers available that offer dedicated server packages specifically designed for hosting V Rising servers. You can compare different providers based on cost, features, and customer reviews to find the best option for your needs.
Q. How do I set up a V Rising dedicated server?
To set up a V Rising dedicated server, you will need to follow the instructions provided by the game developer. This usually involves downloading and configuring a dedicated server application, adjusting server settings, and setting up port forwarding if necessary.
Q. How do I configure the server settings for my V Rising dedicated server?
The server settings for your V Rising dedicated server can be adjusted by modifying a settings file. You can specify various parameters such as game rules, player limits, server name, and more. Each setting is usually listed on a separate line in the file.
Q. Can I run a V Rising dedicated server without a dedicated server hosting provider?
Yes, it is possible to run a V Rising dedicated server on your own hardware or virtual machine. However, this requires technical knowledge and expertise in server administration, as well as a stable internet connection.
Q. How do I start my V Rising dedicated server?
To start your V Rising dedicated server, you will need to run the dedicated server application on your server machine. Once the server is running, players can join by connecting to your server’s IP address and the specified port.
Q. How do I connect remotely to my V Rising dedicated server?
To connect remotely to your V Rising dedicated server, you can use remote desktop software or SSH to access the server machine’s command line interface. From there, you can manage and monitor the server as needed.
Q. How do I find and join V Rising dedicated servers?
In the game menu, there is usually an option to browse or search for available servers. You can filter the server list based on different criteria, such as location, player count, and server name. Once you find a server you want to join, simply click on it and follow the instructions to connect.
