The modern ZIP format we’re all familiar with is a lossless (no loss of information when the archive is unzipped) archive that has become an integral component of many applications. From email clients to chat applications, you can find ZIP under the hood, compressing data for faster transmission and storage.
Since archiving is an important element in file and directory management, every user should know how to zip a file in Linux environments. That’s the topic of this tutorial.
We’ll discuss how to use the zip utility to create archives, the various options you can use to optimize the experience, and how to encrypt a zip file.
Let’s start with a quick introduction to the zip utility and then go into the details of using the utility to compress files.
Table Of Contents
A Short Introduction to the zip Utility
The zip utility in many Linux distributions allows users to compress files into a more compact archive file format.
Based on Phil Katz’s PKZIP software from the 1990s, the zip utility is used as the basic component for various compression tools. You can also pipe the output of various commands to this utility to compress it into a ZIP archive.
When executed in the terminal, the zip command compresses all files and directories in the current directory into a single file.
The utility can compress files to varying compression ratios based on the selected compression levels. The default compression level provides a balanced ratio, and users can utilize flags like -r to compress recursively or -q (quiet) to suppress information in the standard output. Similarly, use the -x option to exclude a file and the -e option to encrypt the compressed data.
You can use the unzip command with various options to uncompress the data for decompressing.
Why Should You Zip a File in Linux
While there are many advantages to zipping files, the following four are perhaps the most prominent on the list:
-
-
- Space Conservation: Compressing files reduces their size, freeing up disk space.
- Faster Transfer: Smaller file sizes mean quicker uploads, downloads, and transfers. This solves a critical issue in the UX of many applications.
- Organized Sharing: Zipping allows multiple files to be bundled together in a single archive. Users can use these archives to share multiple files in one go.
- Enhanced Security: The core zip utility and the applications built on top of this utility allow password protection and encryption, ensuring that only intended recipients can access the archive’s contents.
-
An Explanation of ZIP Compression Levels (0-9)
The zip utility provides a range of compression levels designated by numbers between 0 and 9. These levels allow users to balance compression speed and the resultant archive file size.
Level 0 – No Compression: At this level, the files are simply stored in the archive without any size reduction.
Level 1 – Fastest Compression: The compression is very fast at this level, but the archive has a relatively low compression ratio. This is suitable when speed is more crucial than the final file size.
Levels 2 to 8: These are intermediate compression levels. As the levels (number) increase, the compression ratio improves at the cost of a slower compression speed.
Level 9 – Maximum Compression: The archive has the highest compression ratio at this level, resulting in the smallest possible archive. However, depending on the original file sizes, creating the archive can take a long time. This level is Ideal for scenarios where minimizing file size is the only requirement and time isn’t a constraint.
Examples of zip Commands for Different ZIP Compression Levels
For this demonstration, consider a directory named data. Here’s how you might compress it at different levels to prioritize speed or the final archive size:
No Compression
$ zip -0 -r data_uncompressed.zip data/
Fastest Compression
$ zip -1 -r data_fast.zip data/
Maximum Compression
$ zip -9 -r data_max_compressed.zip data/
How to Zip a File in Linux
Now that you have a working knowledge of the zip utility and the technical details of the process, let’s see the utility in action. We’ll start with the prerequisites and then go into the basic command syntax.
Prerequisites
Before diving into the process of zipping files in Linux, consider the following prerequisites and considerations:
-
-
- Command-Line Basics: Familiarity with the Linux command-line interface is beneficial. Most operations regarding file compression and decompression are done through terminal commands.
- File Permissions: Ensure you have the necessary permissions to access and modify the files and directories you intend to zip. You can check the file permissions using the ls -l command if unsure. You’ll have the necessary permissions for most operations if you’re operating as the root user or using the sudo command.
- Zip Utility: Some Linux distributions come with the zip utilities pre-installed, while others might require manual installation.
-
Verify if zip Is Installed
Before working with the utility, confirming that the zip utility is installed on your Linux system is a good idea.
For this, use the which command in the terminal, which will show the location of the zip executable if it’s installed.
$ which zip
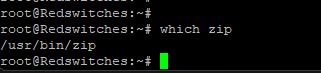
If zip is installed, the command will return the path to the zip executable. If it’s not installed, there will be no output, indicating the utility is not found on your system.
Install the zip Utility on Your System
If zip is not installed, you can usually install it using your system’s package manager. For example, on Ubuntu and other Debian-based systems, you can install it with:
$ sudo apt install zip
On CentOS and similar RHEL-based systems, you can use:
$ sudo yum install zip
After installation, use the zip command again to verify that the zip utility is now available on your system.
The Basic Usage of the zip Utility
The zip utility is a powerful file archiver in all mainstream Linux distributions. The basic syntax is:
$ zip [output_filename.zip] [input_file]
If you have multiple files, the syntax will be:
$ zip [output_filename.zip] [input_file1] [input_file2] ...
Zip a Single File in Linux
Here’s the command to zip a single file called document.txt in your current directory. Note that the command compresses the file to an archive named document.zip.
$ zip document.zip document.txt
Zip Multiple Files in Linux
You can easily bundle multiple files into a single ZIP archive file. This is efficient for compressing multiple files in a single archive and helps maintain file integrity during transfers across different operating systems.
Consider the scenario where you have three files in the current directory: document1.txt, image.jpg, and report.pdf. Use the following command to compress all these files into a single zip archive named files.zip:
$ zip files.zip document1.txt image.jpg report.pdf

The zip Command Options
The zip command in Linux provides a multitude of options that allow users to create and manage zip archives with precision. You can combine various flags with the zip command to cater to more advanced use cases. For instance, you can use the -q flag for less verbose output during the zipping process.
Here’s a rundown of some of the most commonly used zip command options:
-r: Recursively Zip Directories
$ zip -r archive_name.zip directory_name/
-e: Encrypt the zip Archive With A Password
$ zip -e secure.zip file.txt

-u: Update Existing ZIP Archive With Newer Files
$ zip -u existing_archive.zip updated_file.txt

-d: Delete Files From A ZIP Archive
$ zip -d archive_name.zip file_to_remove.txt
-m: Move The Specified Files Into The ZIP Archive (Delete The Original Files After Adding Them To The Archive)
$ zip -m archive_name.zip file_to_move.txt
-f: Freshen The ZIP Archive (Updates Only Modified Files)
$ zip -f archive_name.zip
-t: Set a Date and Only Include Files Newer Than The Specified Date
$ zip -t 2023-01-01 archive_name.zip directory_name/
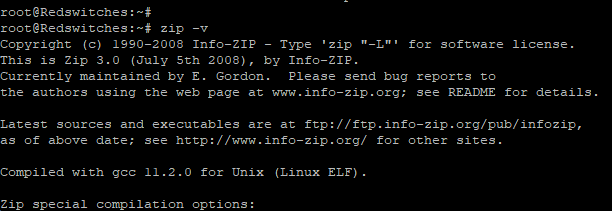
-v: The Verbose Mode Displays Detailed Information
$ zip -v
List ZIP File Contents
Typically, you would use the -l option with the unzip command to list the contents of a ZIP file.
However, you can also try the -sf option. The full command would look something like:
$ zip -sf archive_name.zip

Replace archive_name.zip with the name of your ZIP file. This command will then list the contents of archive_name.zip. We recommend referring to the official manual pages (man zip or zip –help) for specific options for the installed zip utility.
Add Specific File Types to the ZIP Archive
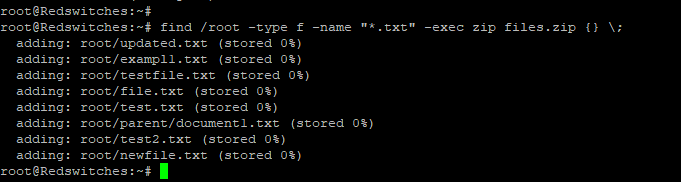
You can combine find with the zip command to add specific file types to a ZIP archive in Linux. For instance, you can add all text or image files to a ZIP archive.
Let’s say you want to add all text files (with the .txt extension) from a specific directory to a ZIP archive:
$ find /path/to/directory -type f -name "*.txt" -exec zip archive_name.zip {} \;
Here’s a breakdown of this command:
-
-
- find /path/to/directory: This is the starting directory where the find command will begin its search.
- -type f: This option specifies that we’re looking for files, not directories.
- -name “*.txt”: This option specifies the pattern for file names. In this case, the command should look for all files ending with .txt.
- -exec zip archive_name.zip {} \;: This part of the command uses the -exec option to execute the zip command for each file found by the find command. {} is a placeholder for the found file, and \; marks the end of the -exec command.
-
When executing the command, remember to replace /path/to/directory with the path you want to search in and archive_name.zip with the name you want to give to your ZIP archive.
If you want to add a different type of file (e.g., .jpg for image files), you can replace “*.txt” with “*.jpg” in the -name option.
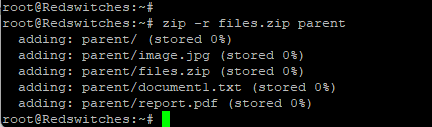
Recursively Zip a Directory
When you must zip a directory that contains sub-directories and multiple files, the zip command’s recursive option is crucial for getting the best mix of speed and low archive size. This recursive compression compresses all the files in the sub-directories and the files in the main directory. Note that the ZIP archive maintains the original directory structure.
A typical syntax for recursive compression is:
$ zip -r [output_filename.zip] [directory_name/]
Suppose you have a directory named project_files, which contains multiple files and sub-directories. You can use the following command to compress the entire directory into a zip archive named project_archive.zip:
$ zip -r parent.zip updated.txt

Upon extracting parent.zip using appropriate decompression tools, you’ll find the updated.txt directory with its original structure and content intact.
This recursive zipping feature is especially useful for backing up or transferring a whole project or directory structure between systems or users.
Delete Files From A ZIP Archive
Let’s run through a typical scenario where you need to delete files from a ZIP archive:
List the Files in the ZIP Archive
Use the -sf option to list the contents of the ZIP archive:
$ unzip -sf archive_name.zip
Replace archive_name.zip with the name of your ZIP archive. Review the list to identify the files you want to remove.
Delete the Desired File from the ZIP Archive
Use the zip command with the -d option followed by the ZIP archive name and the name of the file (or files) you want to delete:
$ zip -d archive_name.zip file_to_delete.txt
Replace archive_name.zip with the name of your ZIP archive and file_to_delete.txt with the file you wish to remove from the archive.
If you have multiple files to delete, you can specify them one after the other:
$ zip -d archive_name.zip file1.txt file2.jpg folder/file3.doc
This command will remove the specified files from the ZIP archive. Always ensure you have backups of important data before making modifications.
Encrypt a Zipped File
Security is always a major concern, especially when sharing or storing sensitive data. The zip command provides an option for encrypting the contents of an archive to eliminate unauthorized access to the compressed files.
The zip utility offers the -e flag to encrypt a zipped archive:
$ zip -e -r secured_data.zip data/
Upon executing the command, you’ll be prompted to enter a password. This password will be required to decrypt and access the zipped file’s contents. Ensure you choose a strong password and remember it. If you misplace this password, you cannot access the encrypted zip archive.
Conclusion
How to zip a file in Linux is a critical aspect of system maintenance. You can use the zip utility and related tools such as gzip and 7-zip to compress files. This allows you to create archives on your system without opting for third-party tools that can a add processing burden on your servers.
RedSwitches offers the best dedicated server pricing and delivers instant dedicated servers, usually on the same day the order gets approved. Whether you need a dedicated server, a traffic-friendly 10Gbps dedicated server, or a powerful bare metal server, we are your trusted hosting partner.
FAQs
Q. What is the primary purpose of zipping a file?
Zipping a file compresses its size, making it easier to share, transfer, and store. Additionally, zipping allows for bundling multiple files or directories into a single archive file.
Q. Are zip and gzip the same thing?
No, while both are compression tools, zip can archive multiple files into a single .zip file, while gzip compresses individual files into a .gz format. Their methods and functionalities vary.
Q. Can I zip entire directories?
Yes, using the -r (recursive) option with the zip command, you can zip entire directories along with their contents.
Q. How can I view the contents of a zipped file without unzipping it?
Use the “-l” option with the unzip command. This lists the contents of the zip file without actually extracting them.
Q. Is there a way to add comments to my zip archive?
Yes, the “-z” option allows users to add a comment to a new or existing zip archive.
Q. How can I ensure my zipped files maintain their original file integrity?
The best practice is to verify the contents after unzipping. Additionally, use reliable compression tools and methods and avoid interrupting the zipping or unzipping process.
Q. I want to see the compression details when zipping. How can I do that?
Use the -v option with the zip command. This provides a verbose output, showing the compression details.
Q. Is there an open-source alternative to zip on Linux?
Yes, 7-zip is a popular open-source alternative that can handle .zip files and other formats.
