Ask any server admin, and you’ll find out that remotely accessing servers is essential to their job.
Virtual network computing (VNC) allows server admins and support engineers to manage servers, infrastructure components, and user machines from a central location. This simple idea now forms the basis of an industry projected to raise $2.8 billion in 2023.
From a technical standpoint, VNC has completely changed how server admins connect to and manage Ubuntu servers and remote computers. Suppose a server has an active VNC server and allows connectivity to VNC-specific ports. In that case, an admin can connect to the server from anywhere and carry out tasks as if physically working on the server machine.
This tutorial will guide you through installing a VNC server on Ubuntu. We’ll also discuss how to secure the VNC server on Ubuntu and remotely access and control your Ubuntu system’s graphical desktop environment.
Let’s start with a brief overview of how VNC works and its benefits for remote server and desktop management for Ubuntu servers.
Table Of Content
- How Does the VNC Model Work?
- Prerequisites
- Install VNC Server on Ubuntu
- Configure the VNC Server Desktop Manager on Ubuntu
- Conclusion
- FAQS
How Does the VNC Model Work?
A VNC server on Ubuntu uses a Remote Frame Buffer (RFB) protocol to remotely access and control computers and servers that support compatible protocols. VNC protocols operate on a client/server model that uses the TCP/IP stack to function. In this model, the VNC server is installed on the target machine (Ubuntu, in this case). This server is accessed using a VNC client software that the admin uses to access the Ubuntu machine via the VNC server.
Using this operating model, the VNC server (on the Ubuntu machine) essentially sends the entire desktop environment of the Ubuntu server to the VNC client so that the admin can control the desktop environment of the Ubuntu server from their machine. This includes sending the keyboard and mouse events to the VNC server and changing the settings of the machine hosting the VNC server.
Benefits of Using VNC Server on Ubuntu Machines
Let’s now discuss the benefits VNC servers on Ubuntu brings to business operations and server management. Note that these benefits extend to all major use cases of VNC software.
- Easily access and manage the operations of a server or user machine without requiring physical access.
- No need to worry about OS-related restrictions because all popular OS support VNC protocol.
- The VNC protocol can efficiently run on low-specification devices because it consumes low bandwidth. That’s why VNC connections work on unreliable connections.
- Admins can share the target system’s environment with other authorized users. This dramatically increases collaboration and has a positive impact on productivity.
- End-to-end encryption ensures complete security for information transmitted using the VNC protocols.
Prerequisites to Setting Up VNC Server on Ubuntu
Now that you have a theoretical aspect of VNC operations let’s discuss the prerequisites for installing a VNC server on a Ubuntu machine. Here’s what you’d need:
- An Ubuntu machine with a stable internet connection.
- A non-root user with sudo privileges.
- Access to a terminal or similar command line interface on the Ubuntu machine.
Install VNC Server on Ubuntu
Let’s start the process of setting up a VNC server on Ubuntu.
Step # 1: Update System Packages
Start by updating the system packages to ensure you have the latest versions. This also avoids conflicts that could cause problems with the VNC server setup process.
For this, launch the terminal and execute the following command that will update the system’s package database:
# sudo apt update -y
Step # 2: Install VNC Server on Ubuntu
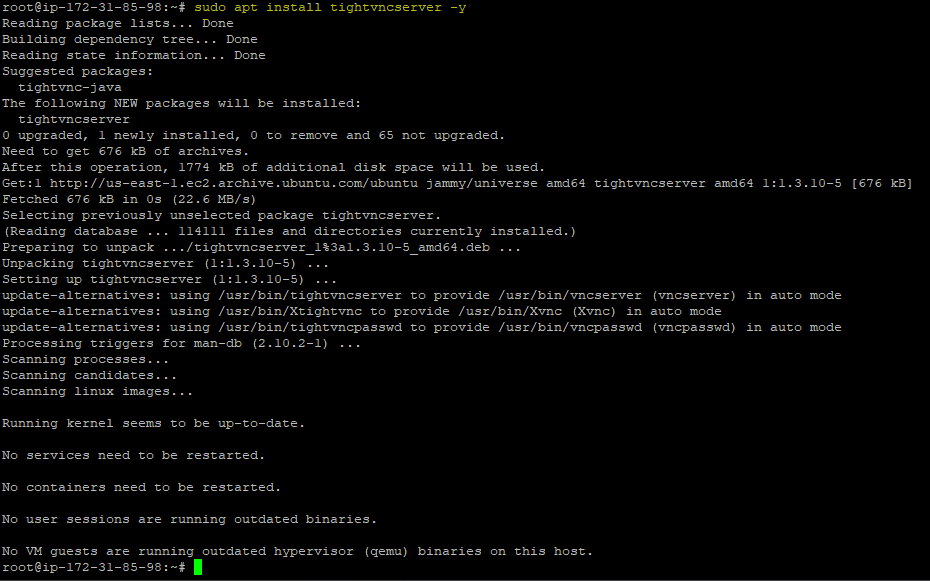
The next step is to install the VNC server on the Ubuntu machine. For this, run the following command in the terminal that would install the TightVNC server:
#sudo apt install tightvncserver -y
Wait for the installation to finish, and you’d see the specifics of the process in the terminal.
Step # 3: Start the VNC Server on Ubuntu
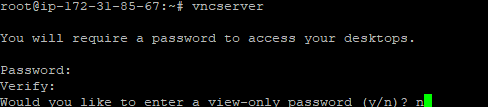
Once the installation is complete, you should know that the VNC server doesn’t start automatically. You need to initiate the VNC server manually with the following command:
# vncserver
The VNC server will prompt you to establish a view-only password. This feature enables users to observe your VNC session without controlling it.
We highly recommend setting a view-only password at this stage. Simply enter ‘n’ and press the Enter key.
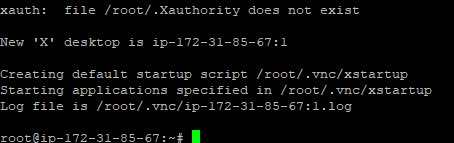
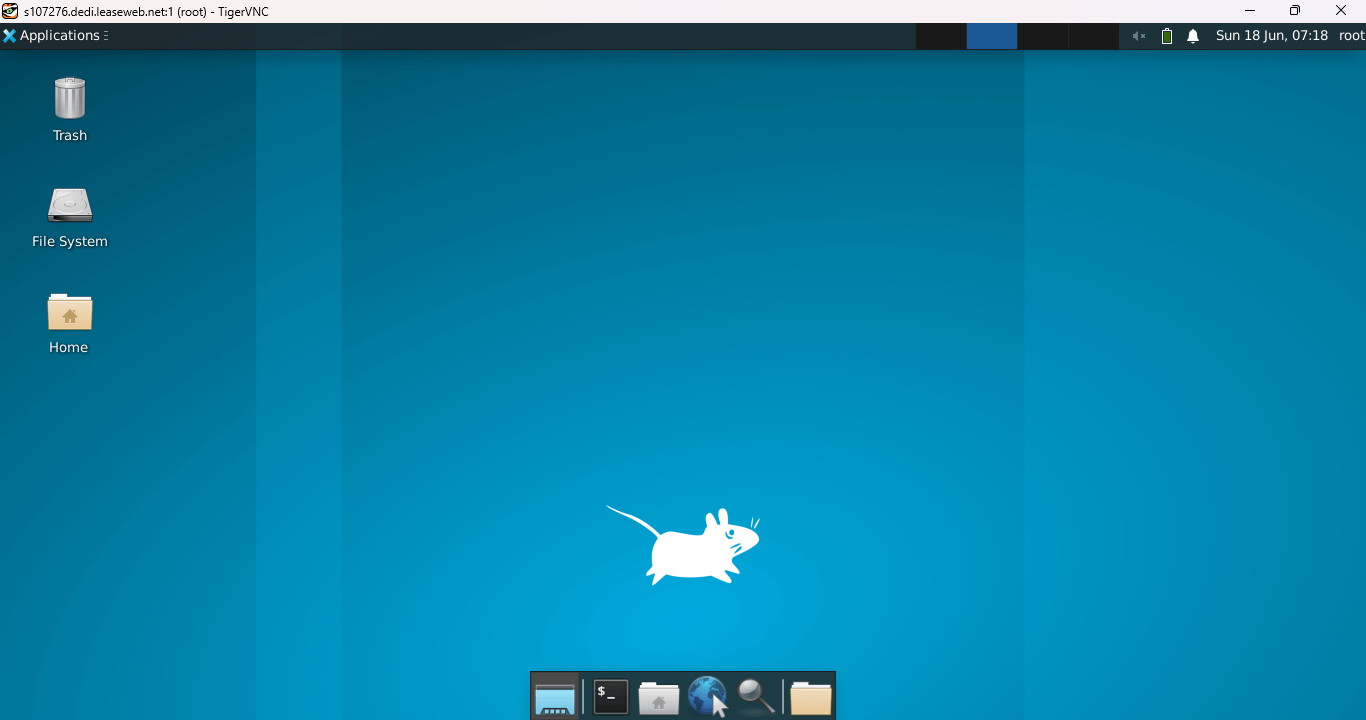
The VNC server will initiate, and you can observe the output in the following screenshot. The VNC server generates a startup script called “.vnc/xstartup” within your home directory.
Configure the VNC Server Desktop Manager on Ubuntu
Now that you have a functional Ubuntu VNC server, you need to carry out one more step before you can use it. For instance, you need to specify the default desktop environment for your VNC server to launch upon logging in.
We highly recommend exiting all VNC server instances (especially the default VNC server instance running on port 5901) before making any changes. For this, use the following command:
# vncserver -kill :1
You need to ensure the default VNC server configuration file remains unchanged. This step is important because you’d need the backup to restore the file to its original state. So, create a backup of this file by running the following command:
# mv ~/.vnc/xstartup ~/.vnc/xstartup.bak
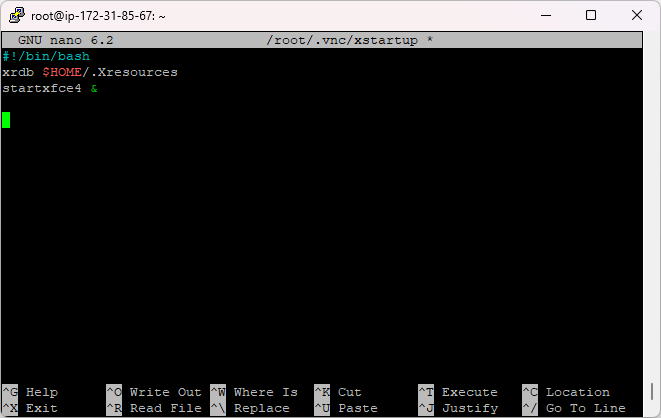
Next, you need to open the ~/.vnc/xstartup file for editing. In this demonstration, we will use the Nano text editor.
# nano ~/.vnc/xstartup
Once the file is open, add the following lines to it:
#!/bin/bash
xrdb $HOME/.Xresources
startxfce4 &
Let’s break down each line and explain its purpose:
#!/bin/bash: This is called a shebang and specifies the interpreter, which in this case is the Bash shell.
xrdb $HOME/.Xresources: This line loads the X resources database file (.Xresources) for the current user. X resources allow you to customize the behavior and appearance of X applications.
startxfce4 &: This line starts the XFCE desktop environment. The ‘&’ symbol at the end runs the command in the background, allowing the VNC server to continue running and accept incoming connections.
The file should look similar to the following screenshot:
After saving the file, you need to make the xstartup file executable. The following command grants the file owner (that’s you) permission to execute the file.
# chmod +x ~/.vnc/xstartup
Securing Ubuntu VNC Server Access
By default, the VNC server allows incoming connections from any host, which poses a security risk.
To enhance the security of your VNC connection, you can utilize an SSH tunnel. The SSH tunnel establishes a secure connection between your local computer and the Ubuntu VNC server. This eliminates the need to open additional ports on your firewall for VNC server connectivity.
Here are the steps to follow for using SSH with the VNC server:
Start by initiating a VNC server instance on your server using the following command. This command binds the VNC server instance to the server’s loopback interface, limiting connections to the local system and effectively restricting access from other sources.
# vncserver -localhost
After starting a VNC server instance, open a new terminal window and create an SSH tunnel to the remote Ubuntu VNC server using the following SSH command.
# ssh -L 5901:localhost:5901 -C -N -l [your_username] [remote_server_ip]
Explanation of the command:
-L 5901:localhost:5901: Specifies the local port forwarding configuration. It forwards connections from your local machine’s port 5901 to the remote server’s localhost on port 5901.
-C: This flag enables compression for improving performance over slow connections.
-N: This flag instructs SSH not to execute any remote command (vital for security).
This command will establish the SSH tunnel, enabling secure communication between your local machine and the remote Ubuntu VNC server.
When connecting to the server for the first time, SSH will prompt you to confirm the host’s fingerprint. Type “yes” and press Enter to proceed.
Next, provide the password for your user account when prompted, and press Enter. You mustn’t close the terminal window because this will terminate the SSH tunnel.

Now, launch your preferred VNC viewer on your computer. In the address text box at the top, enter “localhost:5900”, and press Enter.
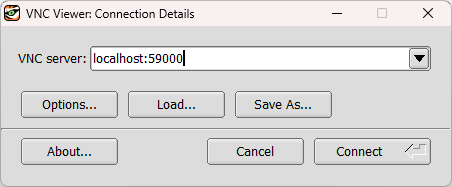
Type in your VNC password into the authentication prompt and click OK. Once connected, you can securely access and interact with your VNC desktop environment.
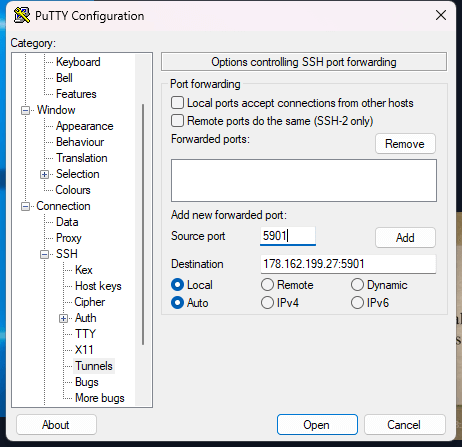
Set Up SSH Tunneling Using PuTTY
If you’re using Windows, you can configure SSH tunneling via the PuTTY SSH client.
Follow these steps for using PuTTY:
Launch PuTTY and enter the server’s IP address in the “Host name or IP address” field.
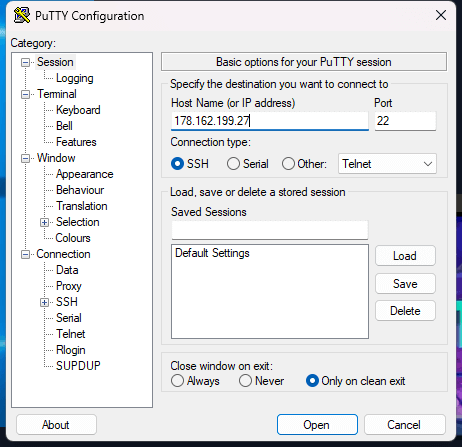
Next, configure the settings by following these steps:
- Open the Connection menu.
- Locate and expand the SSH section.
- Choose the Tunnels option.
- In the Source Port field, enter the VNC server port (5901).
- In the Destination field, input “server_ip_address:5901” (replace “server_ip_address” with the actual IP address of the server).
- Click the Add button to add the configuration.
Setting Up Ubuntu VNC Server as a Service
The VNC server on Ubuntu does not include a built-in daemon. You must start the VNC server instance whenever you want to access the remote desktop.
This can get tedious very quickly, especially when you need to access a remote desktop several times a day.
You can overcome this situation by configuring the VNC server as a service. This allows it to start at system startup automatically. Follow these steps to enable the Ubuntu VNC server to auto-start.
Before proceeding further, terminate any currently running VNC server instances with the following command:
# vncserver -kill :1
Now, execute the following command to generate a new systemd unit file and open it for editing in the Nano text editor. You can choose any name for the unit. For instance, let’s name it “atavncserver.service”.
# sudo nano /etc/systemd/system/atavncserver.service
Next, copy the following code and paste it into the file. Remember to replace every occurrence of “USERNAME” with the actual username.
[Unit]
Description=VNC Server
After=syslog.target network.target
[Service]
Type=forking
User=USERNAME
PAMName=login
PIDFile=/home/USERNAME/.vnc/%H:1.pid
ExecStartPre=-/usr/bin/vncserver -kill :1 > /dev/null 2>&1
ExecStart=/usr/bin/vncserver :1 -geometry 1280x800 -depth 24 -nolisten tcp -localhost
ExecStop=/usr/bin/vncserver -kill :1
[Install]
WantedBy=multi-user.target
To adjust the color depth and screen resolution, modify the values of the -depth and -geometry parameters, respectively. In this example, the color depth is set to 24 bits, and the resolution is set to 1280×800 pixels.
Next, run the following command to reload the systemd service manager configuration. This step essentially adds the service you created to the available service list.
# sudo systemctl daemon-reload
Now that the system recognizes the new “atavncserver” service, execute the following command to enable the service:
# sudo systemctl enable atavncserver.service
Start the VNC server instance as a service by running this command:
# sudo systemctl start atavncserver
Note that you won’t get any information about the success or failure of the service startup. You need to check the status of the service and determine if it has started successfully with the following command:
# sudo systemctl status atavncserver
You now have an Ubuntu VNC server service that automatically runs at startup. As a service, you can now use the systemctl command to start, stop, reload, and restart it as needed.
Conclusion
This guide explains how to provision an Ubuntu VNC server. We showed how to install TightVNC, configure the server, establish a secure SSH tunnel, and connect to your VNC desktop.
Additionally, you learned how to turn the VNC server into a service for automatic startup. This allows for easier remote management of Ubuntu servers through a graphical interface.
Now, if you use Ubuntu for your projects, RedSwitches offer reliable bare metal servers that you can customize to fit your needs. Our support is available round the clock, and you can contact them via phone, email, or support ticket to get your issues resolved in priority.
FAQS
Q-1) What is a VNC server?
A. A VNC (Virtual Network Computing) server is software that allows remote access to a desktop environment on a server. It enables users to view and control the server’s desktop from a remote location.
Q-2) Why would I use a VNC server?
A. A VNC server provides a convenient way to manage a server through a graphical interface, making it easier for users who are more comfortable with visual navigation than the command line. It allows for remote desktop access, making server administration more accessible.
Q-3) How do I install a VNC server on Ubuntu?
A. To install a VNC server on Ubuntu, you can follow the steps outlined in this guide. It involves installing the TightVNC server, configuring it, setting up an SSH tunnel for secure connections, and connecting to the VNC desktop using a VNC viewer.
Q-4) How can I secure my VNC connection?
A. To secure your VNC connection, we highly recommend using an SSH tunnel. This creates an encrypted connection between your local computer and the VNC server, ensuring the data remains secure.
Q-5) Can I automate the startup of the VNC server?
A. Yes, you can automate the VNC startup by configuring it as a service using systemd. This allows the VNC server to start automatically during system boot.
