
The DNS cache on your system may get corrupted due to various reasons, such as network attacks or malware infections. When this occurs, the cache might not be able to map IP addresses for commonly visited websites properly.
For instance, instead of reaching www.facebook.com, your browser might redirect you to an IP address linked to a malicious website that an attacker has manipulated in your computer’s DNS records. A spike in the occurrence of 404 is another common indicator of a corrupted DNS cache.
Resolving these issues is a simple process of flushing the DNS cache to eliminate any corrupted DNS lookup information from the system. As a result, the system will fetch updated data from the designated DNS servers during the next lookup request.
In this tutorial, we will take a close look at the step-by-step instructions on how to flush DNS on macOS, Windows, and Linux systems. We will focus on the process of “flush DNS mac” so that macOS users can benefit from the DNS flush process.
Let’s start with a short overview of DNS cache and its role in name resolution.
Table Of Contents
- What is the DNS Cache?
- How to Flush the DNS Cache in Windows
- How to Flush DNS Cache in Linux
- How To Flush DNS Cache in macOS
- Conclusion
- FAQs
What is the DNS Cache?
As you browse the Internet, your computer’s OS (Linux, macOS, and Windows) keeps track of website addresses and corresponding IP addresses in a database called a DNS cache.
In practical terms, this cache is like a memory bank that helps your computer load websites faster because it can get the corresponding IP addresses. So, instead of querying the DNS servers every time you enter a web address in the browser, it just checks the cache for the IP address and relevant information, such as:
- The information about the resource
- The type of record
- The name of the record
- TTL(Time to Live)
- The class
- The length of the resource data
Now that you know how DNS cache works and why it’s important for a smooth browsing experience, let’s see how to fix the DNS cache issues.
How to Flush the DNS Cache in Windows
We will use Windows 10 for this demonstration. However, you can apply these steps to all current Windows versions with slight changes.
Here are the steps of the process of flushing the DNS cache in Windows 10:
- Open the Start Menu and type Command prompt.
- Right-click on Command Prompt and choose Run as Administrator from the right panel.
 In the Command Prompt, enter ipconfig /flushdns and hit Enter.
 - The process of flushing the DNS cache is super quick. Once it’s done, you’ll get a message confirming that the DNS Resolver Cache has been cleared.
 In the Command Prompt, enter ipconfig /flushdns and hit Enter.
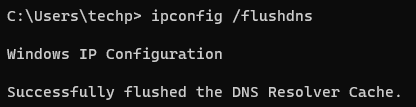
At this point, the DNS cache on the Windows 10 computer is all fresh and empty. Now, when a user enters a website address in the browser, the system will ask the DNS servers for information. This information will also be added to the DNS cache for accurate IP name mapping.
How to Flush DNS Cache in Linux
Various Linux distributions may employ different DNS services, and some, such as Ubuntu, may not have a default DNS service at all.
As a result, you should check the specific DNS service utilized by your Linux distribution and whether it is enabled by default. Examples of such services include Name Service Caching Daemon (NCSD), dnsmasq, and BLIND.
Regardless of your distribution, the general process of flushing the DNS cache in Linux consists of running the relevant command(s) in the terminal.
We will now cover five ways to flush DNS cache in Linux. You should choose the method that corresponds to your distribution’s system configuration. If you’re not sure which method to use, check which DNS resolution system your system is using and then use the appropriate method for that system.
Method #1: Clear DNS Cache Using systemd-resolved
This method works for Debian-based distributions that use systemd as the main system configuration management utility.
Follow these steps for flushing the DNS cache:
- Launch a terminal session.
- Run the following command to flush the DNS cache:
# sudo systemd-resolve --flush-caches

Method #2: Flush the nscd (Name Service Cache Daemon) DNS Cache
If your Linux distribution uses nscd for name resolution, run the following steps for flushing the DNS cache:
- Open a terminal.
- Run the following command to flush the DNS cache:
# sudo service nscd restart
Method #3: Flush the dnsmasq DNS Cache
Some Linux distributions use dnsmasq as a lightweight DNS forwarder and name resolver. Restarting the dnsmasq service is a simple way of flushing the DNS cache.
If you have dnsmasq on your system, run these steps:
- Open a terminal.
- Run the following command to restart the dnsmasq service:
# sudo service dnsmasq restart
Method #4: Use the resolvconf Command
Some FreeBSD-based distributions use resolvconf as the main utility for managing the name server information. This utility also maintains the DNS cache on the system. For flushing the DNS cache, follow these steps:
- Open a terminal.
- Run the following commands to flush the DNS cache:
# sudo resolvconf -d
# sudo service networking force-reload
Method #5: Use the NetworkManager Utility
Originally developed by Red Hat, many Linux distributions use NetworkManager as the high-level network interface configuration utility.
For flushing the DNS cache, follow these steps:
- Open a terminal.
- Run the following command to restart the NetworkManager service:
# sudo service NetworkManager restart
How To Flush DNS Cache in macOS
The following table provides a compilation of commands to clear the DNS cache in popular macOS and Mac OS X versions. You can conveniently copy and paste these commands directly from the table into your terminal.
| Mac OS X or macOS Version | Terminal Command |
| Mojave (version 10.14) High Sierra (version 10.13), Sierra (version 10.12) Mountain Lion (version 10.8) Lion (version 10.7) | ‘sudo killall -HUP mDNSResponder’ |
| El Capitan (version 10.11) Mavericks (version 10.9) | ‘sudo dscacheutil -flushcache’
‘sudo killall -HUP mDNSResponder’ |
| Yosemite (version 10.10) | ‘sudo discoveryutil mdnsflushcache’ ‘sudo discoveryutil udnsflushcaches’ |
| Snow Leopard (version 10.6) Leopard (version 10.5) | sudo dscacheutil -flushcache’ |
| Tiger (version 10.4) | ‘lookupd -flushcache’ |
For instance, follow these steps to clear the DNS cache on a macOS version 10.9-10.11:
Step #1: Launch the Terminal
Locate Terminal in the Applications > Utilities folder. Alternatively, use Spotlight by pressing Command + Space and then typing Terminal.
Step #2: Flush the DNS Cache
In the Terminal window, type the following command and press Enter:
# sudo dscacheutil -flushcache; sudo killall -HUP mDNSResponder
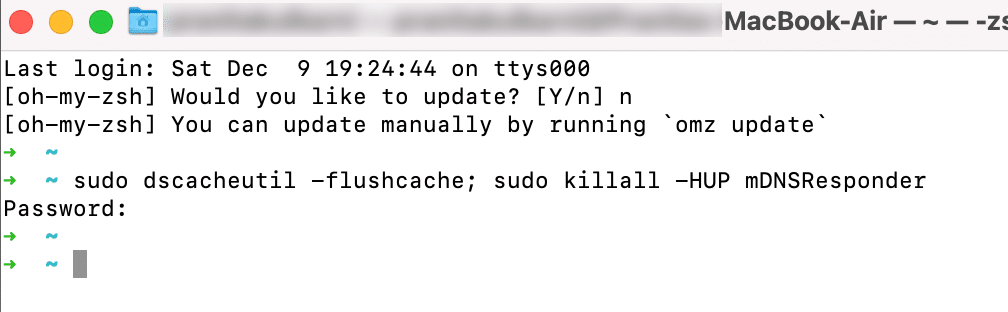
You will be prompted to enter your administrator password. Type the password and press Enter (you won’t see the password as you type it).
Step #3: Verify the Outcome
You can verify the cache has been cleared by checking if a new line appears in the Terminal, indicating that the mDNSResponder has been restarted.
Conclusion
Efficiently managing your DNS cache is essential for optimal internet performance. Whether you’re on Windows, Linux, or Mac, regularly flushing your DNS cache ensures up-to-date browsing and swift website access.
A well-maintained DNS cache is a cornerstone of effective and efficient web browsing.
As you prioritize a seamless online presence, consider exploring reliable hosting solutions like RedSwitches. Their bare metal hosting services offer robust performance and reliability, complementing your efforts to optimize and enhance your digital experience.
We help customers by offering customizable bare metal servers. If you’re searching for a reliable server infrastructure for your projects, we provide competitive, dedicated server pricing and ensure swift delivery, typically on the same day of order approval. Whether you require dedicated servers, a traffic-friendly 10Gbps dedicated server, or a high-performance instant dedicated server, we are your trusted hosting partner!
FAQs
Q. What is DNS Cache Flushing, and why is it necessary?
DNS cache flushing, a vital step in network troubleshooting, involves clearing stored website IP addresses from your computer’s DNS cache. This process is essential for resolving internet connectivity issues, improving browsing speed, and ensuring accurate website access, especially after DNS changes.
Q. How can I flush the DNS cache on Windows 10?
To flush the DNS cache on Windows 10, a common maintenance task, use the Command Prompt with administrative rights. Simply type ipconfig /flushdns and hit Enter. This action effectively resets your DNS settings, often resolving internet connection problems and speeding up domain name resolution.
Q. What are the steps to clear the DNS cache on a Mac?
Clearing the DNS cache on a Mac is crucial for resolving browsing issues. For macOS, execute sudo dscacheutil -flushcache; sudo killall -HUP mDNSResponder. This action refreshes your network settings, which is essential for maintaining optimal web performance on Apple devices.
Q. Can I flush the DNS cache in Linux?
Yes, flushing the DNS cache in Linux, necessary for network administration, varies by distribution. Use terminal commands tailored for your system, like ‘sudo systemd-resolve –flush-caches’ for systemd-based distros. This process is key to ensuring accurate DNS lookups and efficient internet usage in the Linux environment.
Q. Does flushing the DNS cache improve online security?
Flushing your DNS cache, an important security practice, can enhance online safety. It removes outdated or malicious IP mappings, protecting against cyber threats. Regular cache clearing is a proactive step in safeguarding your digital footprint and enhancing internet security on all devices.
