
Installing NGINX on Ubuntu 22.04 is often a core requirement for SaaS applications and internal projects that need a reverse proxy server.
NGINX is an open-source lightweight server that performs equally well as a web server and a reverse proxy. It also manages email protocols (IMAP, POP3, and SMTP) and inbox operations.
This versatile server package powers almost 35% of websites today. This gives you an idea of NGINX’s flexibility and customizability to your projects.
In this article, we’ll discuss how to install NGINX on Ubuntu in simple steps that you can easily follow on your Ubuntu 22.04 server.
But before that, we’ll briefly introduce NGINX so that you can understand the benefits NGINX brings to your projects.
Table Of Content
- A-Short-Introduction-to-NGINX
- Install NGINX on Ubuntu 22.04
- Manage the NGINX Process
- Setting Up Server Blocks
- Step # 1: Create the Required Directories
- Step # 2: Assign Proper Permissions
- Step # 3: Create Configuration Files
- Step # 4: Configure the Server Block
- Step # 5: Create a Symbolic Link
- Step # 6: Disable the Default Configuration
- Step # 7: Test Configuration and Restart NGINX Service
- Step # 8: Repeat for Additional Sites
- Important NGINX Files and Directories
- Conclusion
- FAQs
A Short Introduction to NGINX
NGINX, pronounced “engine-x,” is a feature-packed and lightweight web server well-known for its speed, effectiveness, and expandability. Because of its capacity to manage heavy traffic loads with minimum resource consumption, developers prefer it as the go-to option for hosting websites and serving online applications.
NGINX has an event-driven architecture that can handle multiple requests in a single thread. In contrast, Apache (its closest competitor) creates a thread for each request. As a result of this multiple requests – single thread design, NGINX maintains a sustained response performance as the volume of user requests increases. In some evaluations, NGINX outperforms Apache by a factor of 2.5 with a similar resource consumption profile.
Now that you know that NGINX is a great choice for your projects let’s see the prerequisites for installing NGINX on Ubuntu.
Prerequisites to Setting Up NGINX on Ubuntu 22.04
You need the following before you can install NGINX on your Ubuntu server.
- A server with Ubuntu 22.04
- A non-root account with sudo privilege
Install NGINX on Ubuntu 22.04
Now that you’ve fulfilled the prerequisites let’s go into the details of how you can install NGINX on your Ubuntu server.
Step # 1: Install the NGINX Package
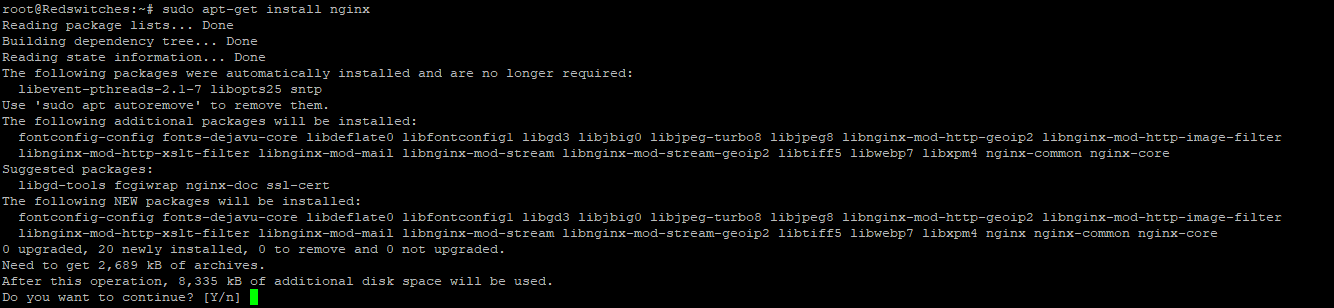
The good news is that NGINX is included in the default Ubuntu package index. So you only need to update the APT package index to get the latest NGINX package from Ubuntu’s default repositories.
Start the process by updating the APT package index with the following command:
#sudo apt update
When the command finishes, we have the latest NGINX package on the server. Next, we’ll install the NGINX server with the following command:
sudo apt install nginx
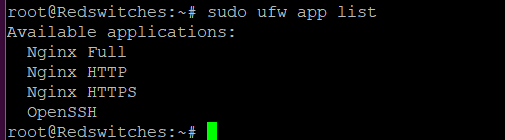
Step # 2: Check Firewall Status
Now that you have installed NGINX on the Ubuntu server, the next step is configuring the server firewall to allow traffic to the NGINX process.
Since NGINX is a popular server package, installation usually registers the NGINX service with the system’s firewall.
However, you should always verify that the NGINX service is indeed registered with the firewall and that it allows incoming traffic to the NGINX service.
For this, use the following command:
sudo ufw app list
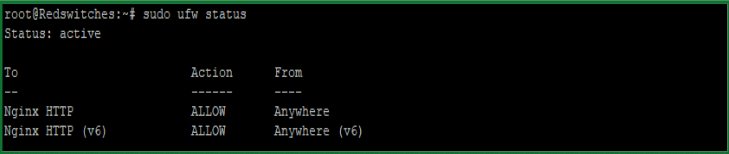
Next, get the service status with the following command that highlights the NGINX service status.
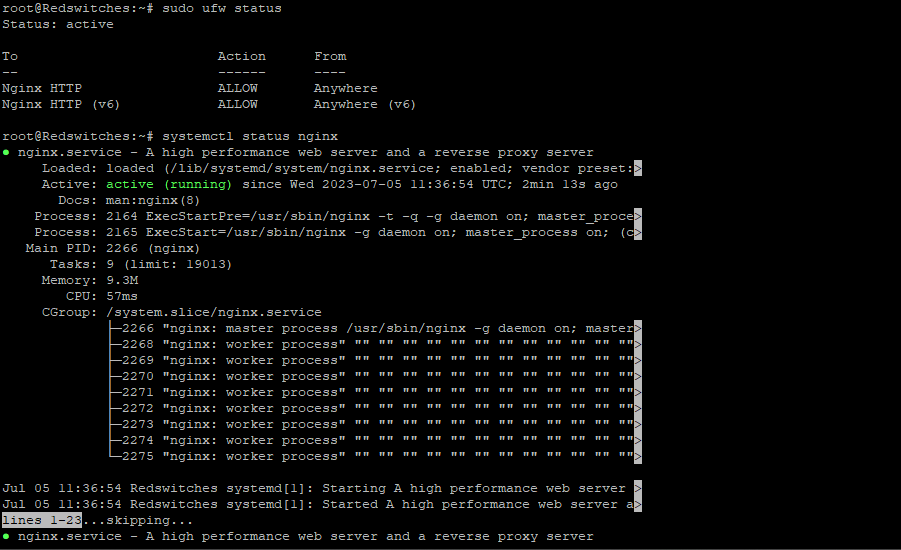
sudo ufw status
Step # 3: Check the Web Server
Ubuntu’s default behavior for starting services like NGINX during installation and server boot is relatively consistent across versions. However, in most Ubuntu installations, the NGINX web server doesn’t start automatically at the end of the installation process.
So, you need to start the NGINX service manually with the following command:
sudo systemctl start nginx
To check the status of a service managed by the systemd init system (including NGINX), use the following command:
systemctl status nginx
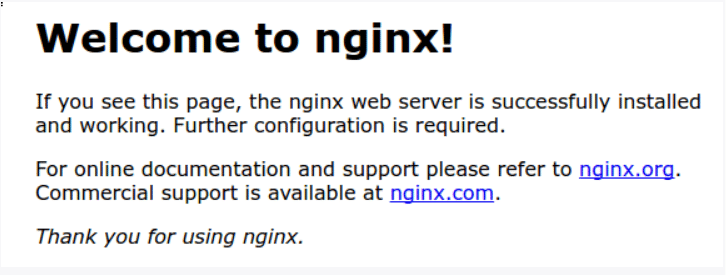
Once NGINX is installed and running on your Ubuntu server, you can access the default NGINX landing page to confirm that it works properly. For this, access the landing page in your browser by entering the following URL in the address bar:
http://your_server_ip
If you can see something similar to the following, NGINX is properly installed on your Ubuntu server.
Manage the NGINX Process
Now that you have installed NGINX on your Ubuntu server, you can manage the NGINX process to perform housekeeping and management activities.
You’ll notice that many of these commands use the systemctl command, which interacts with the systemd init system.
Check NGINX Service Status
Check the status of the NGINX service with the following command:
sudo systemctl status nginx
Start the NGINX Process
Use the following command to start the NGINX process:
sudo systemctl start nginx
Restart the NGINX Process
Use the following command to restart the NGINX process:
sudo systemctl restart nginx
Reload the NGINX Process
Use the following command to restart the NGINX process. Note that during restart, the command reloads all configurations without dropping connections.
sudo systemctl reload nginx
Enable NGINX Service on Server Boot
Use the following command to start the NGINX process when the server starts or reboots:
sudo systemctl enable nginx
Stop the NGINX Service
Use the following command to stop the NGINX service:
sudo systemctl stop nginx
Disable the NGINX Service on Server Boot
Use the following command to disable the NGINX service on server boot:
sudo systemctl disable nginx
Note that whenever you change NGINX server config files, you should always reload rather than restart the NGINX service. This refreshes the server configuration by preserving existing connections without disrupting the user experience.
Setting Up Server Blocks
Setting up server blocks (also known as “virtual hosts” and “vHosts” in other web servers) in NGINX allows you to host multiple websites or applications on the same server. Each website can have its own domain and/or IP address.
Here’s a step-by-step guide to set up server blocks in NGINX on Ubuntu:
Step # 1: Create the Required Directories
Create a directory for each website you want to host.
For example, the following commands create separate directories for two websites, example.com and another-site.com:
sudo mkdir -p /var/www/example.com
sudo mkdir -p /var/www/another-site.com
Step # 2: Assign Proper Permissions
You should ensure the NGINX user (often www-data) has the necessary permissions to access the website directories. For this, use the following commands:
sudo chown -R www-data:www-data /var/www/example.com
sudo chown -R www-data:www-data /var/www/another-site.com
Step # 3: Create Configuration Files
Next, navigate to NGINX’s sites-available directory:
cd /etc/nginx/sites-available
In this directory, create a new configuration file for each site you want to host. We recommend using the site’s domain name as the filename.
For example:
sudo nano example.com
Step # 4: Configure the Server Block
Here’s a basic server block configuration file for the example.com site.
You can use this as a template and adjust it according to your needs, and don’t forget to replace example.com with your actual domain name:
server {
listen 80;
listen [::]:80;
server_name example.com www.example.com;
root /var/www/example.com;
index index.html;
location / {
try_files $uri $uri/ =404;
}
}
When you’re finished, remember to save and close the file.
Step # 5: Create a Symbolic Link
Use the following command to create a symbolic link to the sites-enabled directory to enable the server block:
sudo ln -s /etc/nginx/sites-available/example.com /etc/nginx/sites-enabled/
Step # 6: Disable the Default Configuration
By default, NGINX comes with a default configuration file. If you don’t need it, we highly recommend disabling it to avoid any conflicts among the config files:
sudo unlink /etc/nginx/sites-enabled/default
Step # 7: Test Configuration and Restart NGINX Service
Before using the new configuration file, it is critical that you test the NGINX configuration file for syntax errors:
sudo nginx -t

If the test is successful, restart NGINX to apply the changes:
sudo systemctl restart nginx
Step # 8: Repeat for Additional Sites
Repeat steps 3 to 7 for each additional website you want to host on the same server.
Remember to update the DNS settings for each domain to point to your server’s IP address. Once the server blocks are set up, and DNS is properly configured, NGINX will route incoming requests to the appropriate server block based on the domain name in the HTTP Host header.
Important NGINX Files and Directories
Knowing the critical files and directories that contain the configuration files and related data is an important aspect of working with NGINX.
Here are the key NGINX files and directories you should be aware of:
The Main NGINX Configuration File
File path: /etc/nginx/nginx.conf
This is the main NGINX configuration file. It includes directives related to global settings, worker processes, error logging, and other essential configurations.
NGINX Sites Configuration Directory
Directory path: /etc/nginx/sites-available
This directory contains individual configuration files for each server block (virtual host) defined on the server. These files define the settings for various websites or applications hosted on the server.
NGINX Enabled Sites Directory
Directory path: /etc/nginx/sites-enabled
This directory contains symbolic links to the configuration files in the sites-available directory. NGINX stores the configuration files in this directory, and it is used to turn specific server blocks on or off.
NGINX HTML Root Directory
Directory path: /var/www/html
This is the default root directory where the web files for the default server block are stored. When you access the server’s IP address directly, NGINX serves files from this location.
NGINX Modules Directory
Directory path: /etc/nginx/modules-available
NGINX modules are installed and managed from this directory. Each module typically has its configuration file in this directory.
Nginx Logs Directory
Directory path: /var/log/nginx
NGINX stores the log files in this directory. It contains access and error logs, essential for troubleshooting and monitoring the web server.
FastCGI Cache Directory
Directory path: /var/cache/nginx
NGINX stores cached data in this directory if the FastCGI caching feature is enabled. FastCGI caching can significantly improve the performance of dynamic websites.
NGINX PID File
File path: /run/nginx.pid
This file contains the primary NGINX process’s process ID (PID). System tools and processes use this information to manage and control the NGINX process.
Conclusion
NGINX is a powerful and widely-used web server widely popular for its performance, scalability, and versatility. Developers typically use it as a reverse proxy, load balancer, and HTTP cache, in addition to its role as a web server. Its event-driven, asynchronous architecture allows it to handle many concurrent connections efficiently, making it suitable for high-traffic websites and applications.
RedSwitches offers flexible bare metal servers to help you get the most benefit from NGINX’s lightning-fast, asynchronous architecture. We help you host your applications and supercharge your websites and applications with NGINX’s versatility as a web server, reverse proxy, and load balancer.
You can reach our support engineers anytime to help set up the perfect server infrastructure for your NGINX-powered projects.
FAQs
Q. What is NGINX?
NGINX is a popular and widely-used web server software that can also be used as a reverse proxy, load balancer, and HTTP cache. It is known for its high performance and scalability.
Q. What operating systems support NGINX?
NGINX runs on various operating systems, including Linux, Windows, macOS, and Unix variants. It is most commonly used on Linux distributions for web hosting.
Q. How do I use NGINX as a web server?
A: To use NGINX as a web server, you will need to configure it to serve your web content. This involves creating configuration files and making necessary changes to them. You can find detailed tutorials on how to configure NGINX as a web server on the official NGINX website.
Q. How do I install NGINX on Ubuntu 22.04?
To install NGINX on Ubuntu 22.04, you can follow the step-by-step guide above.
Q. Can I install NGINX on Ubuntu 20.04?
Yes, you can install NGINX on Ubuntu 20.04 using the same installation process as mentioned for Ubuntu 22.04.
Q. How can I manage NGINX on Ubuntu 22.04?
To manage NGINX on Ubuntu 22.04, you can use various commands like starting, stopping, and restarting the service. For example, to start the NGINX service, you can run: sudo service nginx start
Q. What can I use NGINX for besides serving static content?
NGINX is versatile and can be used as a reverse proxy, load balancer, HTTP cache, and more. It is often employed as a front-end proxy to distribute client requests across multiple back-end servers.
Q. What is a server block in Nginx?
A server block, or a virtual host, is a configuration block in NGINX that defines settings for a specific website or application. You can set up multiple server blocks to host numerous sites on a single server, each with its domain or IP address.
Q. How do I allow NGINX in the firewall?
To allow NGINX in the firewall, you need to configure the firewall rules. You can use the command: sudo ufw allow ‘Nginx HTTP’
