
Apache is a prevalent web server that powers about 30% of the global web servers. As a web server, it sends web pages (in the form of HTML files) in response to the requests sent by the clients. It is open-source software and can be easily installed on all popular Linux distros.
Apache is an excellent choice for setting up a server for serving files via HTTP, streaming media, or a dedicated file server. Ubuntu offers a powerful platform for leveraging the flexibility of Apache because of simple installation and tight integration of the features.
This tutorial will walk you through installing the Apache web server on Ubuntu 20. We’ll also cover basic Apache configuration for better performance and a short glossary of terms you should know when working with Apache.
Table Of Content
Prerequisites to Installing Apache on Ubuntu 20
Let’s go through the prerequisites you need to fulfill before you install Apache on Ubuntu 20.
- A machine running Ubuntu 20
- Access to a sudo-enabled user account
Install Apache on Ubuntu
After fulfilling the prerequisites, let’s start with the installation process.
Update Package Base on the Server
It’s a good practice to update the local package database before installing new software to ensure you’re using the most recent version, ensuring better performance and support for the latest Apache version.
This pre-step also helps minimize the time required to update after installation and aids in the prevention of zero-day vulnerabilities caused by out-of-date software.
Start by launching the terminal and enter the following command:
# apt-get update
This will launch the native package manager to review the current packages and download updates. Let the package manager complete the update process.
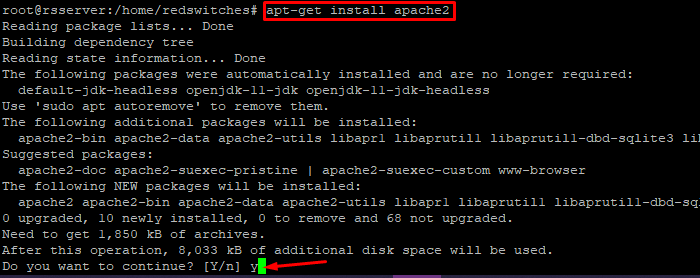
Step # 1: Install Apache
Now, to install the Apache package on Ubuntu 20, use the following command:
FAQ#apt-get install apache2
When the process asks for confirmation, provide it and let it finish the installation process.
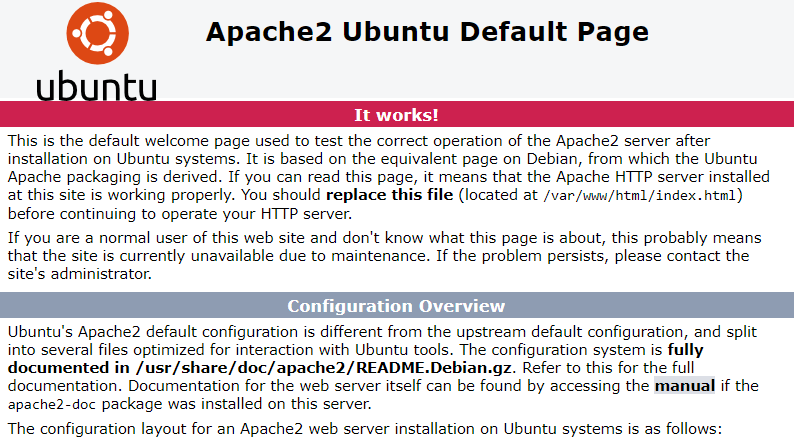
Step # 2: Verify Apache Installation
To ensure Apache is installed correctly, use a web browser and enter the server IP in the following format:
http://local.server.ip (your server IP)
If you see the Apache welcome page, you can rest easy that Apache is properly up and running on your Ubuntu 20 machine.
Step # 3: Configure Your Firewall For Apache Connections
After installing Apache on Ubuntu 20, the final step is configuring UFW, Ubuntu’s system firewall, to allow traffic to the server. Apache generally uses port 80 for communication.
Start by viewing the UFW application profiles with the following command:
# ufw app list
You can see the available application profiles in the terminal.

Next, allow standard web traffic on port 80 by running the following command:
# ufw allow 'Apache.'
![]()
To confirm that the changes are in place, check the UFW status:
# ufw status

As you can see, UFW allows the Apache server to receive traffic from all sources.
Configuring Apache on Ubuntu 20
After installation, you should focus on configuring Apache to ensure you can use it for your projects.
Having control over a web server is essential for smooth operations. We’ll now discuss four basic operations you’d frequently execute when working with your Apache server.
Start Apache Server
Start the Apache server with the following command:
# systemctl start apache2.service
Stop Apache Server
Stop a running Apache server with the following command:
# systemctl stop apache2.service
Reload Apache Server
You must reload the Apache service when you change anything in the Apache server configuration files to ensure the changes take effect.
# systemctl reload apache2.service
Use the following command to restart the Apache server.
# systemctl restart apache2.service
Apache Configuration Files, Directories, and Modules
Now that you’ve installed Apache, there are a few more things you should be aware of before publishing data online. This mainly involves working with folders and configuration files.
Directories
Apache, by default, generates a document root directory at /var/www/html after installation.
Apache can distribute files stored in this directory over the network.
So if you plan to use Apache to server documents, copy them to this directory. Similarly, if you plan to use a content management system like WordPress, you should deploy it in this directory.
If you wish to serve multiple websites from your Apache server, you should create a separate subdirectory for each site under this directory.
Configuration Files
Apache maintains an error log at /var/log/apache2/error.log. Similarly, it maintains access logs for client interactions in the file /var/log/apache2/access.log.
So in case anything goes wrong, you should start your investigations by checking out these two files.
Apache, like many other Linux-based software, operates via configuration files. They are all placed in the directory /etc/apache2/.
Here is a list of important directories and files you should know:
- /etc/apache2/sites-enabled: This directory contains the sites ready to serve clients. To add sites to this location, run the a2ensite command on a virtual host file in the sites-available directory.
- /etc/apache2/sites-available: Apache virtual host files are stored here. A virtual host is a representation of one of the server’s websites.
- /etc/apache2/ports.conf: This is the configuration file for the Apache ports. By default, port 80 is set to accept HTTP traffic. If you wish to change this or add a new port, make appropriate changes to this file.
- /etc/apache2/apache2.conf: This is the primary Apache configuration file, which governs everything Apache performs on your server. Changes made here impact all of the websites hosted on the server.
The Apache Ubuntu manual describes several folders and configuration files.
Modules
If you want to use software modules (programs that extend or improve Apache’s core capabilities), you need to active your required module with the following command:
# a2enmod <name_of_module>
To disable the module, use the following command:
# a2dismod name_of_module
When working with Apache, you’ll frequently encounter the following terms:
- UFW – Uncomplicated Firewall. A simple firewall that filters network traffic (typically used for server security).
- SSH – Secure Shell, used for secure network logins.
- APT – Ubuntu’s default package manager used to install and update software packages.
- GUI – Graphical User Interface is a software’s “point and click” interface.
Conclusion
This guide demonstrated installing Apache on Ubuntu using a few basic commands. We also covered basic configuration commands to control your Apache server better.
At RedSwitches, we facilitate customers by providing fully customizable bare metal servers that they can use for installing Apache on Ubuntu 20. If you’re unsure of the server specifications for your latest projects, get in touch, and our expert support engineers will guide you throughout the process.
FAQs
Q. Which module can you use to install Apache on the Ubuntu OS?
Because Apache is included in the standard Ubuntu repositories, you can easily install it with the APT package management tool. The Apache package and service are known as apache2 on Ubuntu and Debian systems.
Q. Where is Apache installed on Ubuntu?
All virtual host configuration files in Apache on Ubuntu are saved in the /etc/apache2/sites-available directory. The new Apache installation includes a default virtual host file named 000-default.
Q. How to add an Apache user in Ubuntu?
Follow these steps to add an Apache user in Ubuntu 20
- Access the terminal.
- Login to the server using SSH.
- Run the useradd -g www-data redswitches command to add a new user called redswitches to the www-data group.
- On Ubuntu, use the usermod -a -G www-data bar command to add an existing user bar to Apache’s www-data group.
