
Securing your Linux server is of paramount importance to prevent cyberattacks and ensure data safety. While Linux offers robust security features, it’s essential to configure additional protections, considering the intensity of cyber security attacks today.
You can deploy Ubuntu’s native UFW (Uncomplicated Firewall) firewall as an additional security layer. Built on top of iptables, UFW provides an intuitive interface for firewall management, making it ideal for users new to network security.
This comprehensive tutorial will guide you through setting up and customizing UFW on your Ubuntu system. We will also show you how to set rules to control inbound and outgoing traffic to your machine.
Table Of Contents
- A Short Introduction to the UFW Firewall
- How to Set Up UFW
- Working with the UFW Rules
- Profiles For Applications
- Conclusion
- FAQs
A Short Introduction to the UFW Firewall
UFW is a Linux firewall configuration program that comes preinstalled with Ubuntu 18.04 LTS and Debian 10 or later but is disabled by default.
UFW plays a crucial role in the intrusion detection and prevention system by controlling inbound and outbound connections to your server. The firewall uses a predetermined set of rules to approve or reject these connections.
The UFW uses a command-line interface (CLI) and iptables, the built-in Linux kernel firewall tool, and a graphical user interface (GUFW) that users can install on their desktop environment. The UFW command line also manages the remote server, such as a VPS. This flexibility allows users to choose the method that best suits their needs.
Here’s is an overview of the benefits of having UFW firewall on your Ubuntu system:
- Cyber threat protection: UFW acts as a filter, preventing malicious connections that cybercriminals use to initiate hacks or insert malware.
- Traffic filtering: VPS users can create a custom rule that only allows particular connections to reach the server while effectively blocking others.
- Access control: A system administrator can set up custom UFW rules to block outgoing traffic, preventing users from visiting potentially harmful websites.
- Data collection: UFW can maintain detailed logs of all traffic events. You can use third-party tools to analyze logs to improve security policies.
How to Set Up UFW
UFW comes preinstalled on Ubuntu 20.04 and 22.04. However, if you are on an older version or need to reinstall it on your Ubuntu system, follow these instructions:
The Prerequisites
Before you set up the UFW firewall on Ubuntu 18.04, 20.04, or 22.04, ensure you have the following:
- A system running Ubuntu 18.04, 20.04, or 22.04.
- A user account with root or sudo permissions.
Install UFW on Ubuntu
Run this command to install UFW on your Ubuntu machine:
# sudo apt install ufw
Wait until the installation is finished.
Set up UFW to Support IPv6
If your network uses IPv4 and IPv6, you should modify the UFW configuration file to add support for these protocol versions. Here are the steps of this process:
- Open the UFW main settings file in your preferred text editor. We will use the following command to open it in Nano on our test system:
# sudo nano /etc/default/ufw

- To enable IPv6 use, modify the IPv6 value to Yes if it was set to No by default.
- Save the file and close the editor.
Restore the Default UFW Policy
The default configuration of the UFW permits all outgoing connections and blocks all incoming connections. These two limitations are typical for personal computers, which are not obligated to respond to incoming requests.
We recommend the following commands if you wish to restore these two default rules.
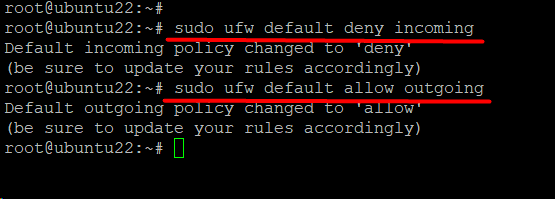
The following command will add the rule for denying all incoming requests:
# sudo ufw default deny incoming
Similarly, the following command allows all outgoing connections:
# sudo ufw default allow outgoing
Allow Incoming SSH Connections
Set UFW to accept incoming SSH connections if you wish to allow remote access to your server.
Run the following command to set UFW to accept SSH connections:
# sudo ufw allow ssh
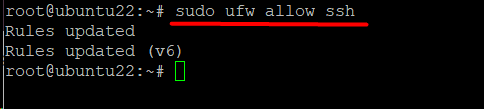
The command sets up a rule for IPv4 (and IPv6 if enabled) that allows incoming and outgoing traffic from SSH connections.
After changing the settings and rules, we recommend restarting the UFW firewall to ensure the changes take effect. This is a two step process where we will first disable the firewall and then bring it back online.
First, to disable UFW, enter:
# sudo ufw disable
Next, re-enable the firewall with the following command:
# sudo ufw enable
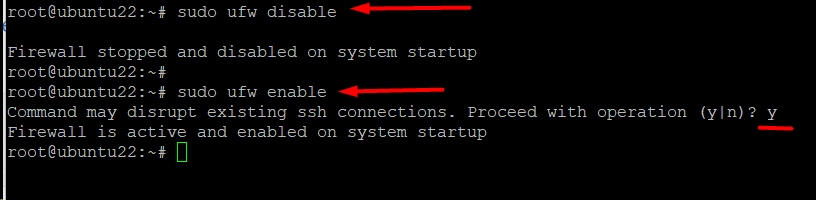
As you can see, the command shows the current status of the firewall. When the firewall restarts, the new rules are loaded and applied.
UFW Status Check
Use the following command to confirm the UFW status and get relevant information in the terminal:
# sudo ufw status verbose
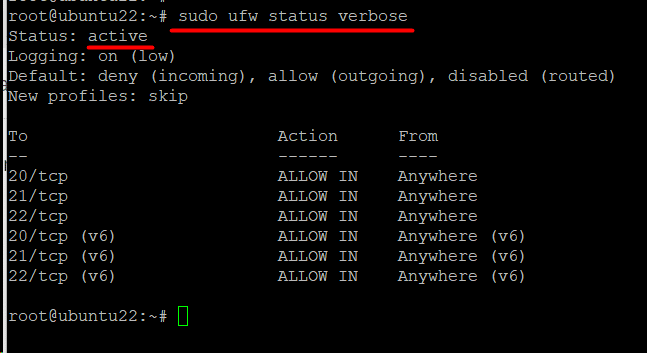
The output displays the UFW‘s current status, default settings, and open ports.
Working with the UFW Rules
UFW uses a set of rules that specify the level of communication the server has with other machines on the network. You can fine-tune these rules to have additional control over which connections are allowed and which are refused.
Allow Incoming Connections
You can allow particular inbound connections based on the server’s purpose. For this, consider the following scenarios:
Configure the Server to listen for HTTP Traffic
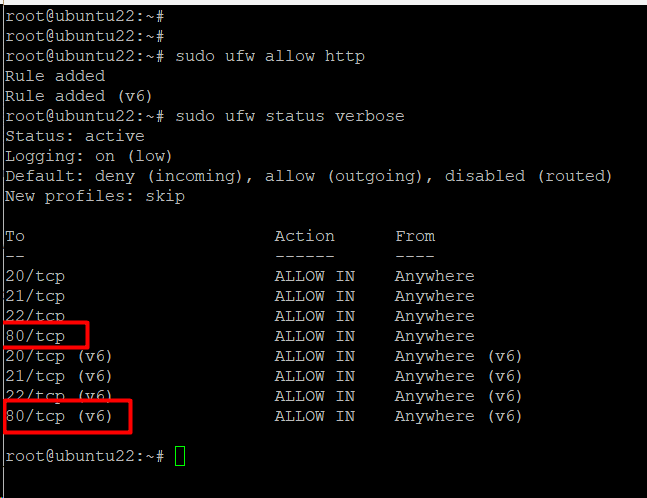
Run the following command to allow HTTP traffic:
# sudo ufw allow http
Alternatively, you can specify a port number in the command to allow traffic to the port. Consider the following command that allows traffic to port 80 (HTTP).
# sudo ufw allow 80
After setting a rule, we recommend checking the UFW status for rule visibility:
# sudo ufw status verbose
Configure the Server to Listen for HTTPS Connections
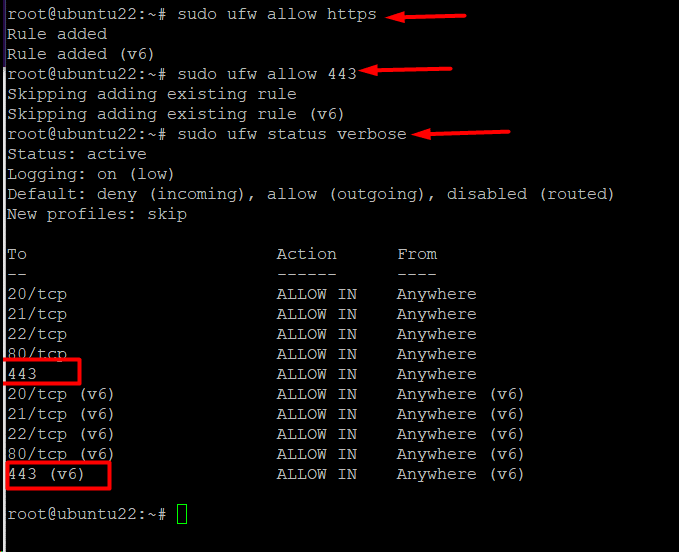
Run the following command to allow HTTPS traffic across the firewall:
# sudo ufw allow https
Alternatively, set a custom rule for allowing traffic to use port 443 for HTTPS connections:
# sudo ufw allow 443
After the changes, check the rules to ensure the new rule is visible.
# sudo ufw status verbose
Configure the Server to Accept All Connections From an IP Address
You can configure the server to accept all incoming requests from a particular IP address. In this case, the IP address can connect to any port on the server.
Run the following command to implement the idea:
# sudo ufw allow from <IP address>
Configure the Server to Accept Incoming Connections on a Specific Port
You can configure the server to accept incoming requests on a specific port. For this, run the following command:
# sudo ufw allow from <IP address> to any port <port number>
You can extend this idea to allow incoming requests for specific protocols with the following command:
# sudo ufw allow <start port>:<end port>/<protocol>
For instance, the following command permits TCP connections from ports 3000 to 3004:
# sudo ufw allow 3000:3004/tcp
You can modify the protocol using the following commands to permit connections for UDP from ports 3000 to 3004:
# sudo ufw allow 3000:3004/udp
Stop Incoming Connections on Server Ports
You can set up a deny rule that will block connections from the specified IP address with this command:
# sudo ufw deny from <IP address>
Additionally, you can add a port number to further fine-tune the deny rule:
# sudo ufw deny from <IP address> to any port <number>
Remove UFW Rules
UFW offers flexibility in managing firewall protection, including removing rules that are no longer needed or relevant.
As such, you can remove a rule in one of these two ways.
Remove Rules Using Rule Numbers
Each rule in the UFW has a number you can find by listing out all rules. For this, use the following command that prints rules with line numbers:
# sudo ufw status numbered

Next, use the following command to delete a rule by mentioning the rule number:
# sudo ufw delete <rule number>
Mention the Rule in the Command
You can mention the rule in the delete command. The syntax of this command will be as follows:
# sudo ufw delete <rule>
As an example, execute the following command to remove a rule that permits connections to port 3000:
# sudo ufw delete allow 3000
Profiles For Applications
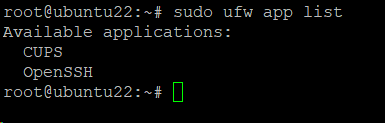
Any package installed with the apt command has an application profile, located in the /etc/ufw/applications.d directory. The profile contains information about the software and its UFW settings.
Use the following command to view a list of every application profile available on your system:
# sudo ufw app list
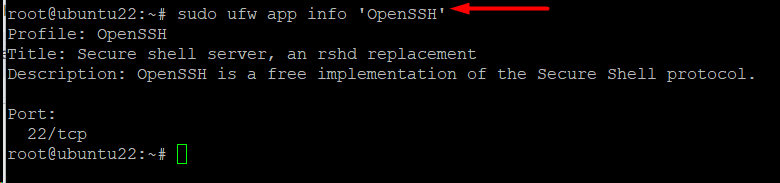
To see more information about a certain package (and open ports), run the following command:
# sudo ufw app info '<package name>'
As an example, run the following to display the OpenSSH application profile:
# sudo ufw app info 'OpenSSH’
Conclusion
Uncomplicated Firewall (UFW) is an essential component for enhancing system security. This firewall simplifies the system’s security, allowing users of all skill levels to configure firewalls effectively.
Users can establish robust security measures against unauthorized access to their Ubuntu system by enabling, disabling, and adjusting rules. Installing a firewall compatible with UFW offers a proactive and streamlined approach to safeguarding your desktop or server environment.
RedSwitches is your global dedicated hosting partner. We offer the best dedicated server pricing and deliver instant dedicated servers, usually on the same day the order gets approved. Whether you need a dedicated server, a traffic-friendly 10Gbps dedicated server, or a powerful bare metal server, we are your trusted hosting partner.
FAQs
Q. What is UFW, and why is it used to set up a Ubuntu firewall?
Ubuntu‘s Netfilter firewall rules can be easily managed with the user-friendly UFW, or Uncomplicated Firewall, interface. It makes setting up and maintaining a firewall easier.
Q. How can I check the status of the UFW firewall on my Ubuntu system?
To view the active rules and check the UFW firewall’s status, use # sudo ufw status.
Q. Can I use UFW to block or allow specific incoming and outgoing ports?
With commands like # sudo ufw allow or # sudo ufw deny, you can use UFW to block or allow certain ports.
Q. What is the default behavior of UFW when no rules are configured?
All outbound connections are allowed, and all inbound connections are denied by UFW by default.
Q. How do I enable UFW and set it to start on system boot?
Use the command # sudo ufw enable to enable UFW and # sudo systemctl enable ufw to set it to start on system boot.
Q. Can I configure UFW only to allow traffic from specific IP addresses?
To enable traffic from certain IP addresses, use instructions such as # sudo ufw allow from <IP address>.
Q. Is it possible to disable UFW temporarily without removing the rules?
Yes, you can disable UFW temporarily using the command # sudo ufw disable. This won’t remove the configured rules.
Q. How do I block or allow traffic for a specific application or service with UFW?
You can allow or deny traffic for a specific application or service using commands like # sudo ufw allow <app/service> or # sudo ufw deny <app/service>.
Q. Can UFW be configured to log firewall events?
You may use the command # sudo ufw logging on to enable UFW logging.
Q. What steps should I take if I accidentally block access to my server with UFW?
If you lock yourself out, consider accessing the server through a different method (console, physical access) and modifying UFW rules accordingly, or disable UFW temporarily to regain access.
