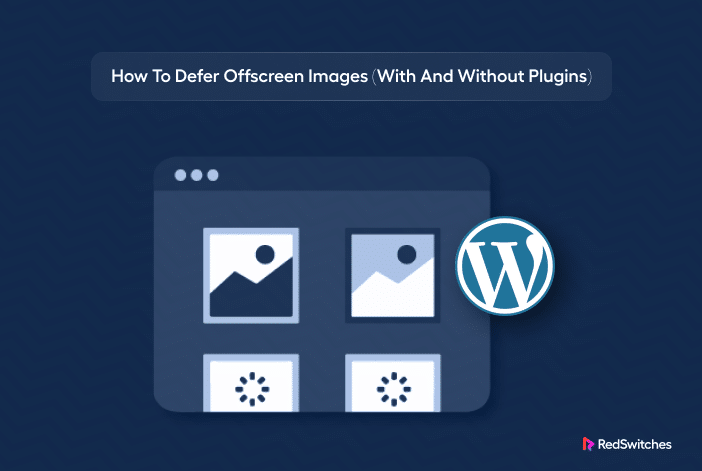
In the fast-paced world of web development, a website’s performance is not just a priority—it’s a necessity. One critical aspect of website optimization is efficiently handling images, specifically defer offscreen images. This technique has become a cornerstone in enhancing user experience and boosting website speed.
Images account for a significant portion of a website’s weight, often contributing to slow loading times. Implementing strategies to defer offscreen images can significantly reduce initial page load time, enhancing user experience and search engine rankings.
Developers and website owners can unlock a world of performance improvements by mastering how to defer offscreen images through plugins or manual methods. This guide delves into the hows and whys, providing practical insights for novice and experienced tech enthusiasts alike.
Table of Contents
- What Defer Offscreen Images Means?
- How to Find the Offscreen Images to Defer?
- How to Defer Offscreen Images Without Plugins?
- Using Plugins to Defer Offscreen Images
- Why Should You Defer Offscreen Images?
- Conclusion
- FAQs

Credits: Freepik
What Defer Offscreen Images Means?
Defer offscreen images, frequently used in web performance discussions, refer to delaying loading images on a webpage until needed- when they enter the user’s viewport. This technique is pivotal in optimizing loading times and enhancing overall website performance.
Also read Tips on How to Increase Your Server Speed & Performance
A Deep Dive into the Concept
At its core, deferring offscreen images is about intelligent resource management. When a webpage loads, it calls upon numerous resources, including images, scripts, and stylesheets. Traditionally, these resources load simultaneously, regardless of their immediate necessity. This approach often leads to unnecessary consumption of bandwidth and longer loading times, particularly detrimental for users with slower internet connections.
By implementing the deferral of offscreen images, websites can prioritize loading only the essential content that appears in the viewable area upon the initial load. Other images, particularly those below the fold (the portion of the webpage not visible without scrolling), are loaded dynamically as the user scrolls through the page.
The Technical Perspective
From a technical standpoint, this involves using JavaScript or specific attributes in HTML like loading=”lazy” which instructs the browser to hold off loading certain images until they’re about to enter the viewport. This lazy loading technique is crucial in modern web optimization, especially with the increasing focus on mobile user experience and the need for speedy, responsive sites.
Understanding the mechanics and importance of deferring offscreen images is a stepping stone to mastering website optimization. As we progress, we will explore the various methods and tools available for effectively implementing this technique.

Credits: Freepik
How to Find the Offscreen Images to Defer?
Identifying which images on your website are candidates for deferral is critical in optimizing your site’s performance. This process thoroughly analyzes how images are loaded and displayed on your pages.
Using Tools and Techniques for Identification
Several tools and techniques can assist in pinpointing offscreen images:
-
-
- Browser Developer Tools: Modern browsers like Chrome, Firefox, and Edge come equipped with developer tools that can help identify images that are not immediately visible. By inspecting the network activity and scrolling through your webpage, you can see which images are loaded and when.
- Performance Auditing Tools: Tools like Google’s Lighthouse, GTmetrix, or WebPageTest offer in-depth analysis of your website’s performance, including insights into image loading. These tools often flag images that could be deferred, clearly indicating where optimizations can be made.
- Manual Scrolling and Inspection: Simply scrolling through your website and noting which images appear below the fold can be an effective, albeit less technical, method of identifying offscreen images. This approach gives a real-world sense of what your users experience.
-
Analyzing the Impact
Once you have identified the offscreen images, it’s crucial to analyze their impact on your site’s loading time. Large, high-resolution images can significantly slow down your site, making them prime candidates for deferral. However, it’s crucial to balance optimization with the quality of the user experience. Ensuring images load swiftly and smoothly as users scroll through your site is just as crucial as deferring them.
Also, Read How to Check Your WordPress Latest Version

Credits: iStock
How to Defer Offscreen Images Without Plugins?
While plugins offer a convenient route to defer offscreen images, a world of optimization can be unlocked manually. This approach, tailored for those who prefer a more hands-on method or operate in environments where plugins might not be feasible, involves direct modifications to your website’s code. By delving into the intricacies of manual deferral, web developers and site owners can gain a deeper understanding and control over their site’s performance.
Introduction to Manual Image Deferral
Manual image deferral represents a fundamental skill in a web developer’s toolkit. It’s about taking the reins and directly influencing how images are handled and loaded on a website. This section serves as your primer into the world of manual image deferral, laying the groundwork for implementing this technique effectively.
Understanding the Basics
Before diving into the technical aspects, it’s crucial to understand what manual image deferral entails. It involves using HTML and JavaScript to control the loading behavior of images, specifically those that are offscreen. By manually coding this functionality, you bypass the need for plugins, giving you deeper customization and control.
The Significance of Going Manual
Why choose manual deferral over plugin-based solutions? The answer lies in precision and optimization. Manual methods allow for tailored solutions that align perfectly with your website’s specific needs and structure. This approach is particularly beneficial for sites with unique designs or those looking to minimize reliance on third-party plugins, which can sometimes bloat website code.
Understanding the Basics of Lazy Loading
Lazy loading is a key concept in manual image deferral, serving as the backbone of this optimization strategy. It’s a technique that delays the loading of non-critical resources at page load time, instead loading these resources as needed when they are about to enter the user’s viewport. This section aims to demystify lazy loading and lay out its foundational principles.
The Mechanism Behind Lazy Loading
At its core, lazy loading is a simple yet effective concept. When a user first loads a webpage, only the images visible in the immediate viewing area (above the fold) are loaded. As the user scrolls down, additional images load right before they come into view. This approach significantly reduces initial page load time, as fewer resources are requested and processed upon the initial visit.

Credits: Freepik
Implementing Lazy Loading Manually
After understanding the fundamentals of lazy loading, it’s time to roll up your sleeves and implement it manually. This section will guide you through the practical steps of applying lazy loading to your website images, enhancing your site’s performance without relying on external plugins.
Step-by-Step Guide to Manual Implementation
-
-
- Using the loading=”lazy” Attribute:
-
- The simplest way to implement lazy loading is by adding the loading=”lazy” attribute to your <img> tags.
- Most modern browsers support this method and require minimal coding.
- Example:
-
<img src=”example.jpg” alt=”Example Image” loading=”lazy”>
-
-
- JavaScript-Based Lazy Loading:
-
- For more control or to support older browsers, you can use JavaScript to handle the lazy loading manually.
- Start by marking your offscreen images with a specific class or attribute.
- Write a JavaScript function that checks if these images are in the viewport and loads them accordingly.
- You can use getBoundingClientRect() or the Intersection Observer API for detecting viewport entry.
- Example:
-
document.addEventListener("DOMContentLoaded", function() {
var lazyImages = [].slice.call(document.querySelectorAll("img.lazy"));
if ("IntersectionObserver" in window) {
let lazyImageObserver = new IntersectionObserver(function(entries, observer) {
entries.forEach(function(entry) {
if (entry.isIntersecting) {
let lazyImage = entry.target;
lazyImage.src = lazyImage.dataset.src;
lazyImage.classList.remove("lazy");
lazyImageObserver.unobserve(lazyImage);
}
});
});
lazyImages.forEach(function(lazyImage) {
lazyImageObserver.observe(lazyImage);
});
}
});
Also read Python vs JavaScript: 16 Differences Between The Popular Programming Language
Best Practices for Manual Lazy Loading
-
-
- Test Across Different Browsers and Devices: Ensure your implementation works smoothly across various browsers and devices, especially if you’re using JavaScript-based methods.
- Consider Placeholder Images: Use low-resolution placeholders or CSS effects to maintain layout integrity until the high-resolution image is loaded.
- Monitor Performance Impact: Regularly check your website’s performance using tools like Lighthouse to understand the impact of your lazy loading implementation.
- Accessibility Considerations: Ensure that your lazy loading implementation doesn’t hinder the accessibility of your site, especially for users relying on assistive technologies.
-
By following these steps and best practices, you can implement lazy loading manually, giving you greater control over your website’s performance and user experience.
Ensuring Compatibility and Responsiveness
Implementing lazy loading is just part of the equation. Ensuring this feature works harmoniously across various browsers and devices is crucial for a truly optimized website. This section focuses on the best practices to guarantee compatibility and responsiveness when defer offscreen images.
Cross-Browser Compatibility
-
-
- Fallback for Older Browsers: While modern browsers support native lazy loading, older ones do not. Ensure that your implementation includes a fallback mechanism. For JavaScript-based lazy loading, this usually means the images will load normally without lazy loading on unsupported browsers.
- Feature Detection: Implement feature detection to provide different loading behaviors based on browser capabilities. This can be done using JavaScript to check if the browser supports certain features, like the loading attribute or the Intersection Observer API.
- Regular Testing: Continuously test your website on different browsers, including older versions, to ensure your lazy loading implementation works as intended.
-
Ensuring Responsiveness
-
-
- Responsive Image Tags: Use the <picture> element and srcset attributes to load the correct image size for different screen resolutions and device sizes. This is crucial for maintaining a high-quality user experience on all devices.
- Adaptive Placeholder Images: If you use placeholder images, ensure they adapt to different screen sizes to maintain the layout’s integrity. CSS techniques can be employed to ensure placeholders scale correctly.
- Load Event Handling: In JavaScript-based lazy loading, handle the load event of images to perform actions like hiding placeholders or adjusting layout once the image is fully loaded.
-
Performance and User Experience
-
-
- Balancing Image Quality and Load Time: Optimize image sizes to balance quality and load time. This might involve creating multiple versions of the same image in different resolutions.
- Accessibility: Ensure that your lazy loading solution does not impede accessibility. All images should have appropriate alt attributes, and the site should remain navigable and understandable even if images haven’t loaded yet.
-
By prioritizing compatibility and responsiveness, your website can deliver a seamless and efficient experience to all users, regardless of their device or browser. This approach boosts performance and contributes to higher user satisfaction and engagement.
Also Read Best Free WordPress Blog Themes in 2024

Credits: Freepik
Best Practices and Common Pitfalls
Implementing lazy loading for offscreen images, while immensely beneficial, comes with its own set of best practices and potential pitfalls. This section aims to equip you with the knowledge to maximize the benefits of this technique while avoiding common mistakes.
Best Practices for Effective Lazy Loading
-
-
- Optimize Image Sizes: Before even considering lazy loading, ensure your images are optimized in size and format. Use compression tools and choose formats like WebP for better performance.
- Prioritize Above-the-Fold Content: Ensure the content above the fold is instantly loaded. Lazy loading should primarily be applied to images offscreen on the initial page load.
- Test Load Times Frequently: Regularly monitor your website’s load times using tools like Google Lighthouse. This helps you gauge the effectiveness of your lazy loading implementation.
- Use High-Quality Placeholders: If you use placeholders, ensure they are visually appealing and aligned with your website’s design. Blurred image previews or solid color backgrounds can maintain the layout without distracting the user.
- Consider SEO Implications: Ensure your lazy loading implementation doesn’t hide content from search engines. Use appropriate markup and follow SEO best practices for images.
-
Common Pitfalls to Avoid
-
-
- Overuse of JavaScript: Relying too heavily on JavaScript for lazy loading can negatively impact users with JavaScript disabled. Ensure there’s a graceful fallback.
- Ignoring Browser Compatibility: Failing to account for browser compatibility can lead to a poor user experience on unsupported browsers. Always include fallback mechanisms.
- Neglecting Accessibility: Lazy loading should not hinder the accessibility of your site. Ensure all images have proper alt attributes, and the content is accessible with JavaScript disabled.
- Forgetting Mobile Users: Mobile users often have different needs regarding image sizes and resolutions. Ensure your lazy loading is responsive and adaptive to mobile devices.
- Not Testing Enough: Not testing your implementation across various devices and network conditions can lead to unexpected behavior and performance issues.
-
By adhering to these best practices and steering clear of common pitfalls, you can ensure that your lazy loading implementation contributes positively to your site’s performance, user experience, and SEO ranking.
Credits: iStock
Using Plugins to Defer Offscreen Images
For many website owners and developers, especially those using content management systems (CMS) like WordPress, plugins offer a straightforward and efficient way to implement lazy loading for offscreen images. This section will explore the advantages of using plugins and highlight some popular options.
Introduction to Plugin-Based Image Deferral
In the realm of website optimization, plugin-based image deferral stands as a beacon of simplicity and efficiency. This approach, particularly favored by users of content management systems (CMS), offers a streamlined path to optimizing web performance through lazy loading. This section aims to provide an overview of what plugin-based image deferral entails and its significance in the broader context of web optimization.
Also Read Drupal vs WordPress: Content Management Systems To Pick in 2024
The Essence of Plugin-Based Deferral
Plugin-based image deferral is about leveraging the power of pre-built tools to automate the process of lazy loading images. These plugins are designed to seamlessly integrate with your website’s infrastructure, requiring minimal manual intervention.
Why Opt for Plugins?
Using plugins to defer offscreen images usually hinges on several key factors:
-
-
- Ease of Implementation: Plugins can be installed and activated with just a few clicks, making them accessible even to those with limited technical expertise.
- Customization and Flexibility: Many plugins offer customizable settings to fit the specific needs of your website, from controlling which images are lazy-loaded to adjusting how they load as users scroll.
- Regular Updates and Maintenance: Plugin developers continuously update their products to adapt to the latest web standards and technologies, offering peace of mind regarding compatibility and security.
-

Credits: Pexels
Selecting the Right Plugin for Your Website
Choosing the appropriate plugin for deferring offscreen images is a critical decision that can significantly impact your website’s performance and user experience. With many options available, it’s essential to know what factors to consider to ensure you select the plugin that best aligns with your website’s needs.
Key Considerations in Plugin Selection
-
-
- Compatibility: Ensure the plugin is compatible with your website’s platform, whether WordPress, Joomla, Drupal, or any other CMS. Also, consider its compatibility with other plugins or themes you are using.
- Feature Set: Different plugins offer different features. Some might focus solely on lazy loading, while others offer a suite of image optimization tools. Determine which features are most relevant to your needs.
- Performance: Evaluate the impact of the plugin on your website’s loading time. Look for lightweight plugins that don’t add unnecessary bulk to your site.
- Ease of Use: The user interface and configuration are essential, especially if you’re not very technical. A good plugin should be straightforward to set up and customize.
- Support and Documentation: Reliable customer support and comprehensive documentation can be invaluable, particularly if you encounter issues or have questions.
- Ratings and Reviews: Check user feedback and reviews to gauge the plugin’s effectiveness and reliability. Pay attention to recent reviews, as they are more likely to reflect the current state of the plugin.
- Update Frequency: A regularly updated plugin is more likely to keep up with web standards and security updates.
-
Testing and Evaluation
Once you’ve selected a plugin, test your website’s performance before and after implementation using tools like Google PageSpeed Insights or GTmetrix. This will help you evaluate the plugin’s impact and ensure it meets your expectations.
Selecting the right plugin can significantly enhance your website’s loading speed and user experience without delving into complex coding.
Step-by-Step Guide to Configuring Image Deferral Plugins
Once you’ve selected the right defer offscreen images wordpress plugin, the next crucial step is configuring it correctly to optimize your website’s performance. This section provides a step-by-step guide to help you navigate the setup process, ensuring your plugin is functional and fine-tuned to your site’s needs.
Getting Started with Plugin Configuration
-
-
- Installation and Activation:
-
-
-
- Navigate to your CMS’s plugin section (e.g., ‘Plugins’ on WordPress).
- Search for the chosen plugin, install it, and then activate it.
-
-
-
- Accessing Plugin Settings:
-
-
-
- After activation, locate the settings or configuration page for the plugin, usually accessible from the main dashboard or under a specific tab in your CMS.
-
-
-
- Enabling Lazy Loading:
-
-
- Most image deferral plugins have lazy loading disabled by default. You must enable it, often with a simple checkbox or toggle.
-
-
Customizing Your Plugin
-
-
- Selecting Images to Lazy Load:
-
-
-
- Decide which images to apply lazy loading to. Some plugins offer the option to include/exclude certain images, like featured images, thumbnails, or background images.
-
-
-
- Configuring Load Triggers:
-
-
-
- Adjust how and when images load as the user scrolls. Some plugins allow you to set the distance from the viewport at which images start loading.
-
-
-
- Placeholder Settings:
-
-
-
- If the plugin supports placeholders, configure them to match your site’s aesthetics. This could be a simple color, a low-resolution image, or custom graphic.
-
-
-
- Advanced Options:
-
-
- Explore advanced options, if available. These may include settings for image formats, responsiveness, and integration with other optimization features.
-
-
Testing and Monitoring
-
-
- Preview Changes: After configuring, preview your site to ensure that images are loading correctly and that there’s no negative impact on layout or functionality.
- Performance Testing: Use performance testing tools to measure the impact of the plugin. Compare the results with your site’s performance before plugin installation.
- User Feedback: Consider gathering feedback from actual users about their browsing experience, especially regarding load times and image visibility.
- Regular Updates and Maintenance: Keep the plugin updated to ensure continued compatibility and performance improvements. Regularly check for updates and apply them as needed.
-
Following these steps, you can effectively configure your image deferral plugin, balancing speed and user experience to achieve optimal website performance.
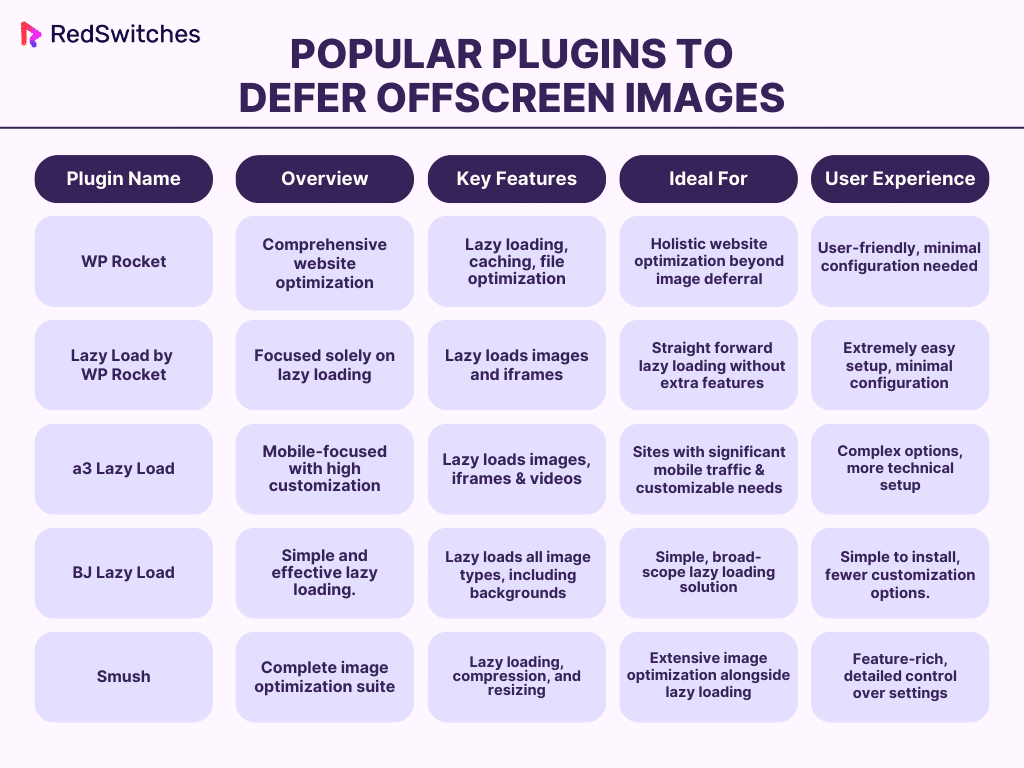
Comparing Popular Image Deferral Plugins
In the quest for the ideal plugin to defer offscreen images, it’s vital to understand each option’s nuances and unique features. This detailed comparison of some of the most popular plugins in the market will help you discern which is best suited for your specific needs.
WP Rocket
WP Rocket is more than just a lazy loading plugin; it’s a comprehensive solution for website optimization.
-
-
- Lazy Loading Feature: It offers advanced lazy loading capabilities as part of its broader performance optimization toolkit.
- Additional Features: Apart from lazy loading, WP Rocket excels in page caching, file optimization, database optimization, and more.
- Ideal For: WP Rocket is perfect for users seeking a holistic approach to website optimization beyond just image deferral.
- Ease of Use: It boasts a user-friendly interface, making it accessible even to those not deeply versed in technical aspects of website optimization.
-
Lazy Load by WP Rocket
This plugin is a focused extension by WP Rocket, dedicated exclusively to lazy loading images and iframes.
-
-
- Specifics of Lazy Loading: It uses JavaScript to lazy load images and iframes efficiently, ensuring minimal impact on site speed.
- Simplicity: The plugin is known for its simplicity and effectiveness without additional optimization features.
- Ideal For: Best suited for those who need a straightforward, dedicated lazy loading solution without the additional features of a complete optimization plugin.
- User Experience: Extremely easy to set up with minimal configuration, making it ideal for beginners.
-
a3 Lazy Load
A3 Lazy Load is specifically tailored for mobile users, offering a high degree of customization.
-
-
- Lazy Loading Efficiency: Highly efficient in lazy loading images, iframes, and videos, with a particular focus on mobile responsiveness.
- Customization Options: Offers a variety of settings to control how and when images are loaded, especially on mobile devices.
- Ideal For: Websites with significant mobile traffic looking for a plugin that can be finely tuned to different user experiences.
- User Interface: Offers more complex options, which might require more technical know-how to configure optimally.
-
BJ Lazy Load
BJ Lazy Load is designed to replace all your post images, thumbnails, and content iframes with placeholders.
-
-
- Lazy Loading Approach: It lazy loads all images, including background images, in posts and pages.
- Additional Capabilities: Besides lazy loading, it offers minimal additional features, focusing primarily on image deferral.
- Ideal For: Those who need a no-nonsense, effective lazy loading solution with a broad scope of application.
- Ease of Use: Simple to install and activate but offers fewer customization options than others.
-
Smush
Smush extends beyond lazy loading, offering a complete suite for image optimization.
-
-
- Lazy Loading and More: Incorporates features like image compression, automatic resizing, and bulk image optimization alongside lazy loading.
- Comprehensive Optimization: Provides detailed control over each aspect of image optimization, making it a robust choice for comprehensive site enhancement.
- Ideal For: Perfect for websites with many images requiring extensive optimization and lazy loading.
- User Experience: Offers a more complex, feature-rich interface, catering to users who want in-depth control over their image optimization settings.
-
Each of these plugins brings its unique strengths to the table. Your site’s specific requirements should influence your choice, whether you need a comprehensive solution like WP Rocket and Smush, a mobile-focused plugin like a3 Lazy Load, or a simple, straightforward tool like Lazy Load by WP Rocket or BJ Lazy Load.
Here’s a summarized comparison table of the popular plugins to Defer Offscreen Images:
Also Read How to List / Start / Stop Docker Containers
Why Should You Defer Offscreen Images?
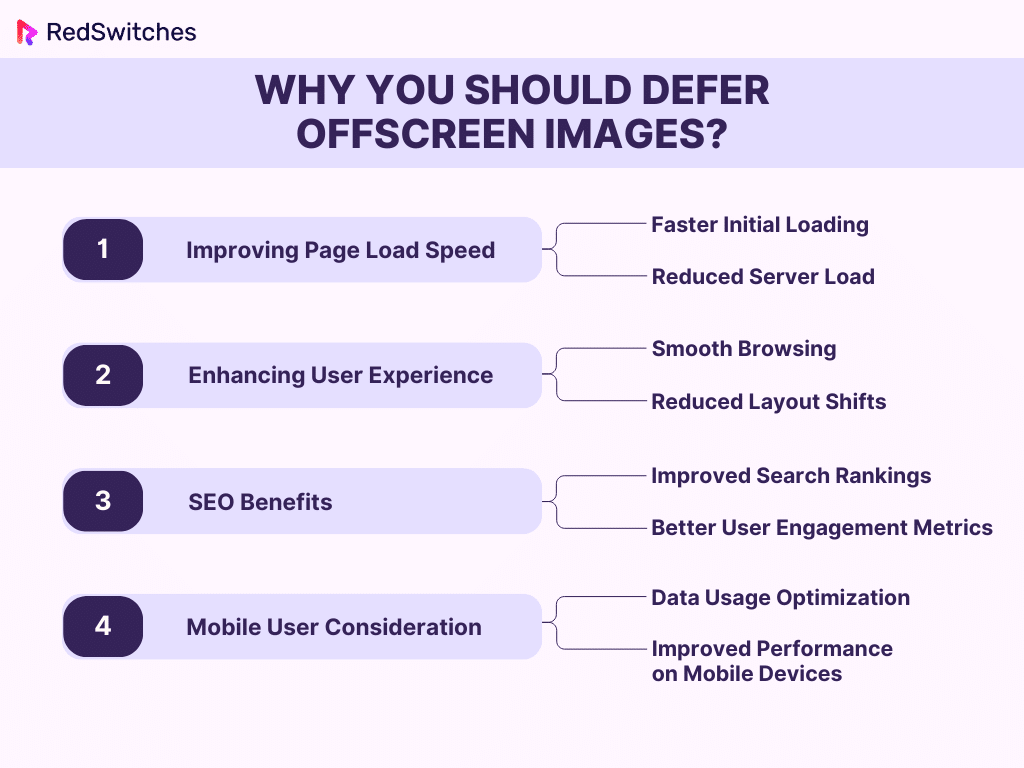
Deferring offscreen images is not just a technical tweak; it’s a strategic move that can significantly enhance your website’s performance and user experience. This section delves into why implementing this practice is crucial in today’s digital landscape.
Improving Page Load Speed
-
-
- Faster Initial Loading: By loading only the immediately visible images, your website’s initial load time can be dramatically reduced.
- Reduced Server Load: Deferring images decreases the number of simultaneous requests to your server, reducing the load and potentially lowering server costs.
-
Enhancing User Experience
-
-
- Smooth Browsing: Users enjoy a smoother browsing experience with faster loading pages, particularly noticeable on mobile devices with slower internet connections.
- Reduced Layout Shifts: With proper implementation, lazy loading can reduce unexpected layout shifts, making the browsing experience more pleasant.
-
SEO Benefits
-
-
- Improved Search Rankings: Page speed is a known ranking factor for search engines like Google. Faster sites tend to rank higher, leading to increased visibility.
- Better User Engagement Metrics: Faster sites reduce bounce rates and can improve other engagement metrics like time on page, positively influencing SEO.
-
Mobile User Consideration
-
-
- Data Usage Optimization: For mobile users with limited data plans, defer offscreen images means less data consumption, enhancing the mobile user experience.
- Improved Performance on Mobile Devices: Mobile devices generally have less processing power than desktops, so reducing the load can significantly improve performance.
-
The decision to defer offscreen images aligns with technical optimization, providing an optimal user experience, improving SEO, considering mobile users, and contributing to environmental sustainability. It’s a multifaceted strategy that touches every modern, successful website aspect.
Conclusion
As we’ve navigated through the defer offscreen image intricacies, it’s clear that this practice is a game-changer in web optimization. Whether you choose the defer offscreen images wordpress without plugin route or opt for a plugin, the impact on your website’s performance, user experience, and SEO is undeniable.
In today’s fast-paced digital world, staying ahead of the curve in website performance is not just an advantage; it’s a necessity. And this is where RedSwitches steps in. With cutting-edge hosting solutions and a relentless focus on speed and reliability, RedSwitches is the perfect partner to elevate your website’s performance with their Dedicated Server.
Join the ranks of successful websites that have turbocharged their performance with RedSwitches. Whether you’re looking to implement image deferral strategies, optimize your hosting environment, or seek comprehensive performance solutions, RedSwitches is your go-to partner.
FAQs
Q. What does defer offscreen images mean?
Deferring offscreen images means delaying loading images on a webpage until those images must be displayed on the user’s screen. This technique improves page loading times and overall website performance, reducing the amount of data that needs to be loaded initially.
Q. How do I fix defer offscreen images in HTML?
To defer offscreen images in HTML, use the loading=”lazy” attribute in your <img> tags. This instructs the browser to load the images only when they are about to enter the viewport. For older browsers that don’t support this attribute, you can use JavaScript or a library like Lozad.js to achieve a similar effect.
Q. How do I fix defer offscreen images in WordPress?
In WordPress, you can fix deferred offscreen images using plugins like WP Rocket, Smush, or a3 Lazy Load. These plugins provide easy-to-use settings to enable lazy loading, which defers the loading of images until they are in or near the viewport.
Q. How do I fix defer offscreen images in Shopify?
In Shopify, deferring offscreen images can be managed through theme modifications or apps. You can edit your theme’s Liquid code to include lazy loading scripts or use Shopify apps like Booster or Avada SEO Image Optimizer, which offer lazy loading functionalities and other optimization features.
Q. What is the importance of deferring offscreen images?
Deferring offscreen images can improve the loading speed and performance of a website, which is crucial for providing a better user experience and achieving higher search engine rankings.
Q. How can I defer offscreen images without using plugins on my WordPress site?
You can defer offscreen images on your WordPress site by utilizing native lazy load, WP Rocket, or implementing lazy loading through code to achieve the desired effect without relying on additional plugins.
Q. Are there any drawbacks to using plugins for lazy loading images on a WordPress site?
While plugins can simplify the process of lazy loading images, they may add unnecessary bulk to your website and could potentially impact its performance, especially if not optimized properly.
Q. What impact can offscreen images have on a website’s performance and Core Web Vitals?
Offscreen images can significantly affect a website’s performance, particularly with metrics such as Largest Contentful Paint (LCP) and Cumulative Layout Shift (CLS), which are essential components of Core Web Vitals assessment.
Q. How can I identify and address offscreen images that are impacting my site’s loading speed?
Conducting a thorough audit using tools such as Lighthouse can help identify offscreen images causing performance issues, allowing you to take appropriate measures to address them, such as lazy loading or deferring their loading.
Q. What are some common techniques for deferring offscreen images on a WordPress site?
Employing lazy loading for images, using CSS selectors to exclude certain images, and implementing JavaScript events to trigger the loading of offscreen images are effective techniques for deferring offscreen images on a WordPress site.
Q. Can deferring offscreen images have an impact on the time to interactive (TTI) of a webpage?
Yes, deferring offscreen images can contribute to improving the time to interactive (TTI) of a webpage by prioritizing the loading of essential content first, thus enhancing the overall user experience.
Q. What should I do if a large number of offscreen images are affecting my site’s performance?
If a significant number of offscreen images are impacting your site’s performance, consider incorporating lazy loading for both images and videos, as well as optimizing the loading of above-the-fold and below-the-fold images.
Q. How can I ensure that offscreen images are properly deferred on my WordPress site?
To ensure that images are appropriately deferred, utilize tools to measure the loading of offscreen images, adjust lazy load settings, and verify through testing that the desired images are deferred effectively.
Q. Are there cases where images are not deferred even when lazy loading is implemented on a WordPress site?
Yes, there may be instances where certain images aren’t deferred despite the implementation of lazy loading, requiring additional measures such as excluding specific images from lazy loading or refining the lazy load configuration.
