Key Takeaways
- Turning hardware, storage, or operating systems into virtual versions is known as Virtualization.
- Physical hardware resources are abstracted and presented as virtual resources for Virtualization to function.
- Several virtual machines can be operated on a single physical server thanks to Virtualization, which promotes effective resource usage.
- Virtualization reduces costs and maximizes resource use.
- Resource sharing results in a performance overhead.
- Hardware that supports Virtualization and is compatible (CPU with VT-x or AMD-V technology).
- Detailed instructions for configuring Virtualization.
Greetings from the entrance of the digital age! The significance of Virtualization is huge. This is in the fast-changing world of technology. Moving into Virtualization can lead to new efficiency, scalability, and resource use. This is true no matter your IT experience or curiosity.
In this article, we’ll clarify the Virtualization setup. We’ll do it in this step-by-step tutorial. It will let you entirely use virtual machines and containers. Get ready to find a new level of computer power. We will explore the complexities of making a smooth virtual world. Let’s get started and take your digital experience to new heights!
Table of Contents
- Key Takeaways
- What is Virtualization?
- How Does Virtualization Work?
- Installing a Hypervisor
- Building Containers or Virtual Machines (VMs)
- Allocating and Managing Resources
- Virtual Environment Isolation
- Operating Systems for Guests
- Interaction with the Hypervisor
- Migration and Snapshot
- The Foundation of Cloud Computing
- Why Do We Need Virtualization?
- Advantages & Disadvantages of Virtualization
- Types of Virtualization
- What Are The Requirements For Enabling Virtualization?
- Virtualization Setup
- Step 1: Defining Objectives and Requirements
- Step 2: Choosing a Hypervisor
- Step 3: Verifying Hardware Compatibilities
- Step 4: Installing Hypervisor
- Step 5: Configuring Hypervisor Settings
- Step 6: Creating Virtual Networks
- Step 7: Creating Storage Datastores
- Step 8: Installing Virtualization tools
- Step 9: Creating Virtual Machines
- Step 10: Configuring Virtual Machine Settings
- Step 11: Testing Virtual Machines
- Step 12: Implementing Backup and Monitoring
- Conclusion
- FAQs
What is Virtualization?

Credits: Freepik
Cloud computing is based on Virtualization. It makes actual computer hardware more compelling.
Software enables Virtualization and creates an abstraction layer over computer hardware. This layer lets a single computer’s hardware be divided. It includes processors, memory, storage, and other parts. They are divided into several virtual computers called virtual machines (VMs).
Even though each virtual machine (VM) uses only a tiny bit of real computer hardware, each has its own operating system (OS). It functions much like an independent computer.
As a result, Virtualization lets an organization get more from its hardware. It lets them use actual computer hardware better.
Virtualization is now a common approach in business IT architecture. Cloud computing economics are also driven by technology. Cloud customers can buy only the resources they need when needed. Cloud providers can serve users with their current computer hardware thanks to Virtualization.
Additionally, cloud users can scale those resources cost-effectively as their workloads increase.
Virtualization often means sharing hardware between multiple virtual machines. A dedicated server is a physical server assigned to just one person or group.
Users in a virtualized environment can choose a dedicated server for better performance and control. Or, they can use shared resources, which is common in Virtualization.
How Does Virtualization Work?

Credits: Freepik
After discussing the definition, we will understand the working procedure of Virtualization.
Installing a Hypervisor
The first step in the procedure is to install a hypervisor on the actual hardware. The hypervisor is a specialized software layer. It serves as a virtual machine monitor (VMM).
Hypervisors come in two types. Type 1 (bare-metal) operates directly on hardware. Type 2 (hosted) runs on top of an installed operating system.
Building Containers or Virtual Machines (VMs)
In complete Virtualization, the hypervisor creates virtual instances called Virtual Machines (VMs). In containerization, it creates virtual containers.
Virtual machines (VMs) behave similarly to real machines. They have virtualized hardware components like CPU, memory, storage, and network interfaces.
Allocating and Managing Resources
The CPU, memory, and disc space are distributed evenly. The virtual machines share them via the hypervisor.
As part of resource management, allocations change. They change in response to each virtual machine’s workload.
Virtual Environment Isolation
They operate independently. Each virtual machine (VM) creates a safe environment. Because of this isolation, one VM’s functioning cannot impact another.
Containers are separated at the user space level. But they share the same operating system kernel. This provides a compromise between efficiency and isolation.
Operating Systems for Guests
A guest operating system is deployed in each virtual machine. The guest OS instances don’t know about the underlying Virtualization. They operate as if on dedicated hardware.
Interaction with the Hypervisor
Virtual machines (VMs) interact with the hypervisor to request and manage resources. The hypervisor responds to these queries and ensures every virtual machine runs well.
Migration and Snapshot
Virtualization enables Snapshots. They show a virtual machine’s state at one moment. This is a very useful feature for testing, recovery, and backup.
Live migration features help with load balancing and resource optimization. They allow virtual machines (VMs) to be moved across hosts without interfering with services.
The Foundation of Cloud Computing
A key component of cloud computing technology is Virtualization. Cloud service providers use Virtualization. It gives end users infrastructure services that scale and adapt. They get things like Virtual Machines (VMs) or Containers.
Why Do We Need Virtualization?
In this section, we will understand the reasons behind Virtualization.
Optimization of Resources
Virtual instances can share a server. This is thanks to Virtualization, which maximizes hardware. Merging reduces wasted space and also cuts the need for new hardware. Plus, it improves resource use in the end.
Consolidation of servers
Consolidating servers requires using Virtualization. It moves many separate servers onto one more powerful server. Using fewer servers cuts costs for data center space. It also reduces hardware purchases and maintenance.
Also read Different Types of Servers: Understanding Server Types for Enhanced Functionality
Security and Isolation
Virtualization adds a layer of abstraction between virtual machines. It makes sure that actions on one VM don’t affect those on others. By limiting malware and system malfunctions to specific virtual environments, isolation improves security.
Adaptability and Expandability
Virtualization allows resources to be allocated dynamically. Businesses can then grow their infrastructure as demand shifts. The ease of modifying resources ensures they can handle more work. This keeps them efficient and high-performing.
Simplified Recovery and Backup
Thanks to snapshot technology, Virtualization makes backup procedures simpler. These snapshots enable fast backups. They do this by capturing the virtual machine’s current state. Virtual machines can be restored to a previous snapshot in case of a failure or data loss, reducing downtime.
Effective Development and Testing
Virtualization offers a flexible and affordable environment for testing and development. By creating virtual instances with many configurations, developers may speed up development. They can ensure that their apps work in many scenarios.
Hardware Autonomy
Virtualization abstracts the hardware layer. So, virtual machines can run smoothly on many servers. This hardware independence makes balancing workloads, maintenance, and upgrades easier. It does not interfere with services.
Superior Availability and Resistance to Errors
High availability makes it possible to move virtual machines between servers without downtime. This is called live migration. In a hardware breakdown, fault tolerance systems move instantly to a backup virtual computer. This move ensures ongoing operation.
Advantages & Disadvantages of Virtualization
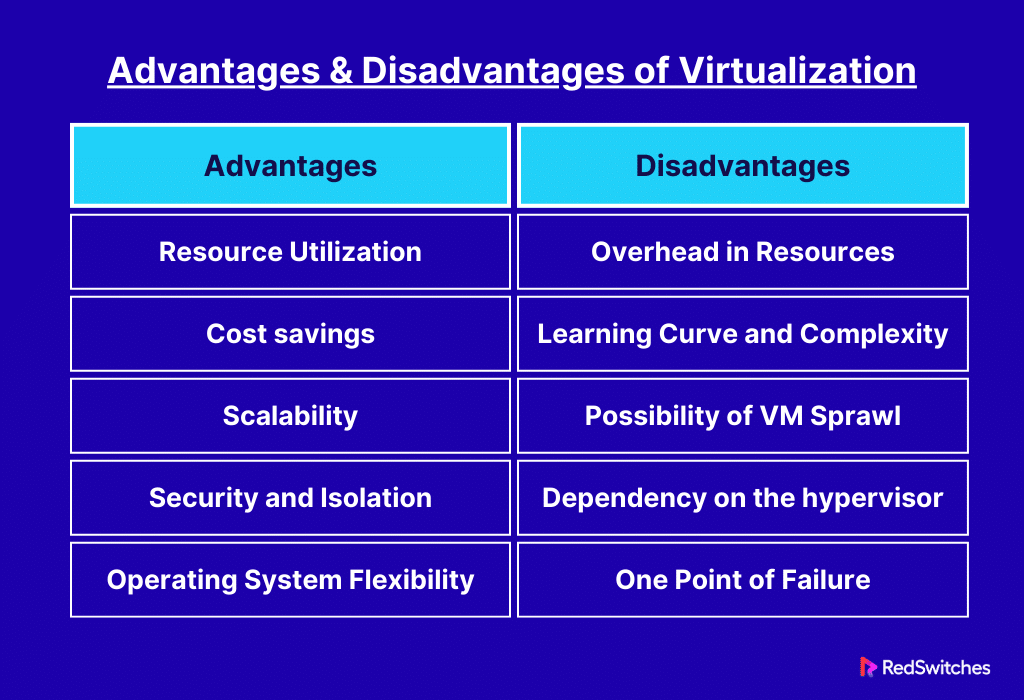
Advantages of Virtualization
In this section, we will learn about the advantages of Virtualization.
Resource Utilization
Virtualization enables multiple virtual machines (VMs) to share one physical server. It maximizes resource use. The server’s resources, such as CPU, memory, and storage, are well distributed among VMs. Thanks to hypervisor technology, it increases overall use and decreases the need for unused, idle hardware.
Cost Savings
Virtualization’s ability to consolidate servers results in a substantial reduction in costs. Having fewer physical servers cuts initial hardware costs. It also lowers recurring maintenance and energy use. Another factor in lowering operating costs is the decreased requirement for physical space in data centers.
Scalability
Virtualization provides scalability. It allows businesses to adjust their IT in response to demand. We can quickly add or remove virtual computers as the workload changes. This lets us match resources to business needs without buying or removing hardware.
Security and Isolation
Virtualization offers robust virtual machine isolation. Every virtual machine (VM) runs independently to improve security and has its own file systems and resources. This isolation helps make IT more reliable and secure. It prevents interruptions or security breaches in one virtual machine (VM) from affecting others.
Operating System Flexibility
Virtualization enables multiple operating systems to run concurrently on the same physical hardware. This flexibility allows for smooth cohabitation in a virtualized infrastructure. It is helpful for enterprises running many apps that need different OS settings.
By using Virtualization, organizations can boost productivity, cut costs, and scale. It also improves security and the flexibility of operating systems. Dedicated servers provide extra choices for users with particular control and performance needs.
Also Check out our Powerful Bare Metal Server Hosting Solutions
Disadvantages of Virtualization

Credits: Freepik
After discussing the advantages, let’s take a look at the disadvantages of Virtualization in detail.
Overhead in Resources
The hypervisor is a new layer that Virtualization adds between the actual hardware and the virtual computers. This layer may have a little overhead that affects virtualized environments’ overall performance. However, hardware and hypervisor advances have reduced this issue. But it should still be considered. This is especially true for applications needing many resources.
Learning Curve and Complexity
It takes expertise to set up Virtualization. And keeping virtualized systems can be harder than keeping old-fashioned ones. Organizations moving to Virtualization may face a learning curve. It’s due to the need for extra training for IT professionals. They need to deploy, manage, and troubleshoot virtualized systems.
Possibility of VM Sprawl
The simplicity of creating virtual machines can result in VM sprawl or the unchecked growth of virtual instances. Poor management of this can lead to more resource use. It also causes worse performance. It also brings challenges in monitoring and safeguarding each virtual machine.
Dependency on the Hypervisor
Virtualized environments rely on the software known as hypervisor. Any problems or vulnerabilities with the hypervisor could affect the virtualized infrastructure. Organizations must prioritize hypervisor security. They must keep up with patches and updates. This will reduce such threats.
One Point of Failure
Virtualization increases system stability. But, it creates a single point of failure in the hypervisor. All virtual machines executing on that host are impacted if the hypervisor malfunctions. Although it increases complexity and expense, clustering and redundancy can reduce this risk.
Types of Virtualization
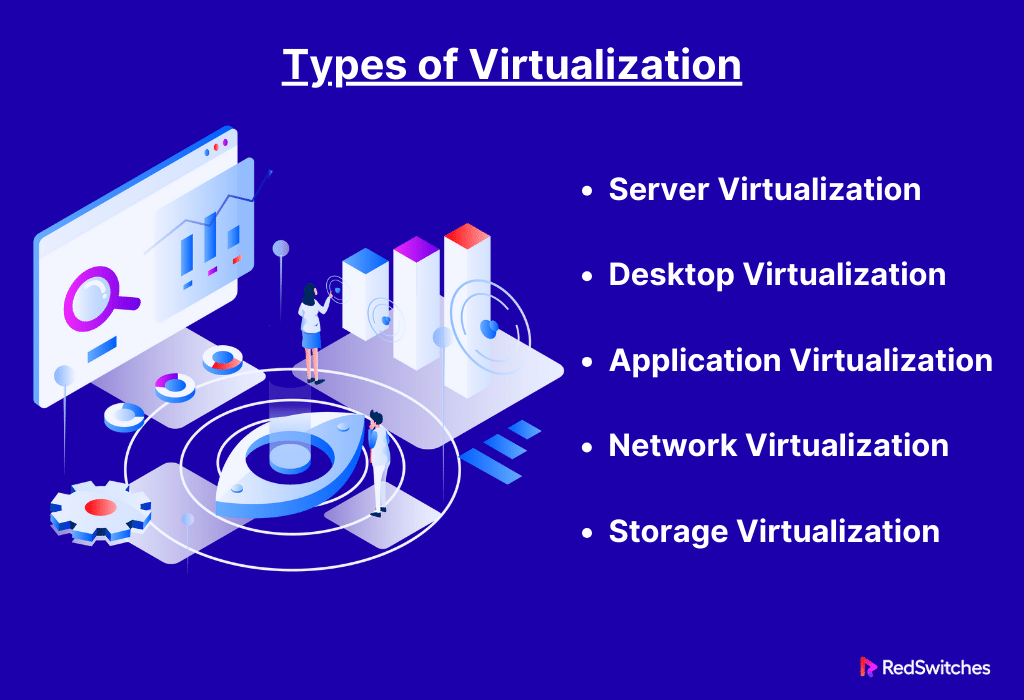
After discussing the Pros and Cons, we will now learn the types of Virtualization in detail.
Server Virtualization
Making many virtual servers on one physical server is server Virtualization. A hypervisor is a software layer. It separates a real server into separate virtual environments. This is used to do it. Every virtual server runs independently with its operating system and set of apps.
The hypervisor controls resource distribution. It allocates CPU, memory, and storage to the virtual servers. This technology optimizes one physical server. It improves resource use and allows server consolidation. This cuts costs and boosts scalability.
Desktop Virtualization (VDI – Virtual Desktop Infrastructure)
Desktop Virtualization is often known as Virtual Desktop Infrastructure (VDI). It is a server-based method for centralizing desktop environments. Users access specific desktop instances hosted by virtual machines from a distance. This method offers a reliable and secure computing experience on various gadgets.
Organizations may improve security by centralizing control. They can also do so by simplifying software updates and maintenance. And by speeding up desktop management with VDI. It also helps remote access. This lets users work more efficiently from different places.
Also Read: VDI vs VM: Understand The Differences
Application Virtualization
Application Virtualization frees programs from the underlying operating system to function independently. To do this, the app and its dependencies are in a virtual environment.
No apps conflict between different operating systems. This isolation improves compatibility. Application Virtualization reduces app conflicts. It also streamlines deployment by removing the need for standard installations.
Also, it makes updating software easier. It increases the IT environment’s adaptability.
Also read Network Load Balancers: Optimizing Server Performance in 2024
Network Virtualization
Network Virtualization is the abstraction of network resources. It creates virtual networks that work apart from the actual infrastructure. Usually, software-defined networking (SDN) technologies are used to do this.
Network Virtualization offers flexibility. It helps in setting up and maintaining network resources. It enables effective traffic isolation, network segmentation, and bandwidth allocation.
It additionally improves the network’s scalability and agility. Plus, streamlines network management.
Storage Virtualization
Abstract and present storage resources as a single pool. Storage Virtualization unifies them. This technology streamlines storage management. It does this by providing a central and abstract view of storage.
It improves flexibility by allowing dynamic allocation and reallocation of storage. The allocation meets the needs of the applications or virtual machines. It removes the need for specific storage devices. This boosts data access and eases storage management and scaling.
What Are The Requirements For Enabling Virtualization?

Credits: Freepik
After discussing the requirements for Virtualization, we will now focus on enabling it.
Hardware Requirements
Central Processing Unit (CPU)
The CPU needs to be able to use Virtualization. This functionality is present in most contemporary AMD (AMD-V) and Intel (VT-x) CPUs. Ensure that the system’s BIOS or UEFI has Virtualization functionality enabled.
RAM, or memory
To run numerous virtual computers at once, you must have enough RAM. The quantity and resource requirements of the virtual machines determine the precise specifications.
Storage
You’ll need enough storage space to install the hypervisor and create virtual machine images. SSDs (solid-state drives) are suggested for improved performance.
Motherboard
The motherboard should have settings in the BIOS or UEFI. It should support Virtualization technology.
Support for I/O Virtualization
I/O Virtualization optimizes data flow between virtual machines and devices. It increases the efficiency of Virtualization by using hardware characteristics.
Software Requirements

Credits: Freepik
Software for Hypervisors
Select a hypervisor based on your requirements. Popular options include VMware, Microsoft Hyper-V, KVM (Kernel-based Virtual Machine), and Xen. Install the hypervisor on the host machine after downloading it.
System of Operation
The hypervisor of choice should work with the host operating system. Certain hypervisors, such as VMware ESXi, operate straight on bare metal without a host operating system.
Extensions for Virtualization
Verify that the host operating system’s Virtualization extensions are enabled. This could entail turning on Hyper-V in the “Turn Windows features on or off” settings for Windows.
Drivers for devices
Install the right drivers for the hardware. They ensure good performance and compatibility with the hypervisor.
Setting Up a Network
Set up networking settings so virtual machines and the host system can communicate. This covers establishing network devices, assigning IP addresses, and setting up virtual switches.
By using Virtualization, organizations can optimize resource use. They can also provide flexibility in workload management. They do this by meeting specific hardware and software requirements.
Some users have specific performance and control needs. Dedicated server options give them more choices.
Users who need control and performance can select dedicated server hosting. They need it in the context of dedicated servers. This option improves performance and control by granting exclusive access to physical hardware.
Users looking for more control and resource exclusivity have more options. They can get them with dedicated server solutions.
Also read A Comprehensive Guide to IP Addressing, Subnets, and Subnet Masks
Virtualization Setup
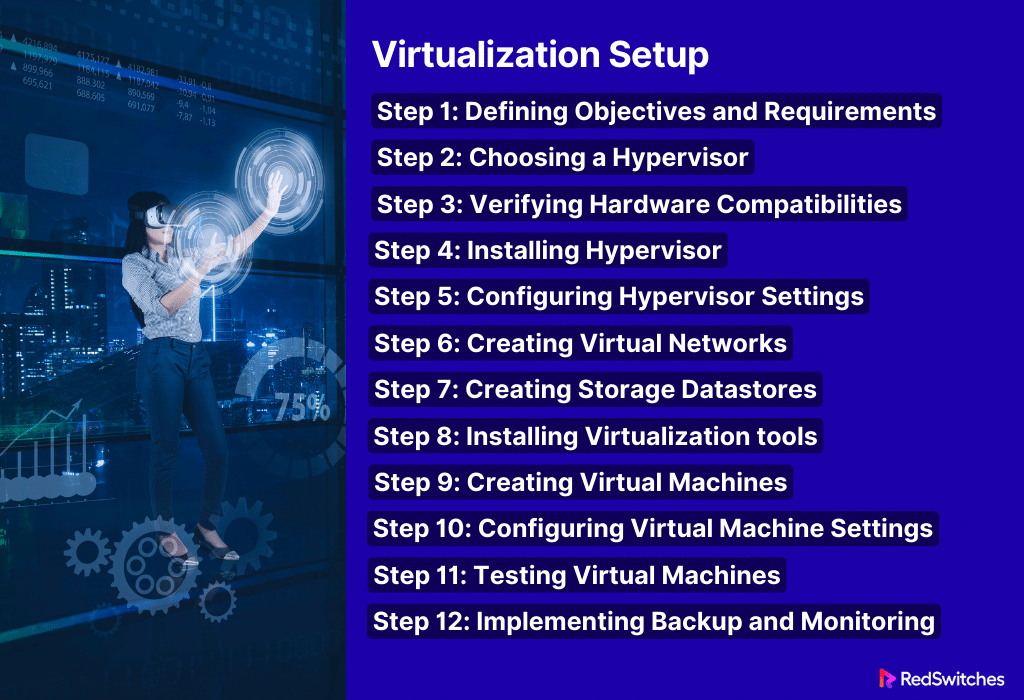
We will now discuss the core part of our blog, where we will discuss Virtualization setup in detail in a step-by-step manner.
Step 1: Defining Objectives and Requirements
- Clearly state the objectives of Virtualization, including resource optimization, testing, and server consolidation. Recognize the particular technical or business issues that Virtualization seeks to resolve.
- Determine the hardware needed per the goals. Consider CPU specs. Search for Virtualization support like AMD-V or Intel VT-x. Also, consider memory needs for virtual machines, storage requirements, and network capabilities.
- Examine the compatibility of Virtualization with the infrastructure’s intended purpose. Determine how many servers need to be combined, for instance, if server consolidation is the aim. Recognise the kinds of scenarios or apps that will be assessed if it is for testing.
Step 2: Choosing a Hypervisor
- Examine all of the various hypervisors in detail. Examine their functionality, performance, scalability, and suitability for current hardware and software. Consider elements like vendor support, community contributions, and licensing models.
- Make sure the hypervisor meets your unique Virtualization goals. Also, check that it works with the listed hardware. Verify that the selected hypervisor supports the OS systems you intend to use for virtual machines.
- Consider popular hypervisors. For example, Microsoft Hyper-V is for Windows. KVM is for Linux. Xen is for open-source systems. VMware vSphere/ESXi is for enterprises.
Step 3: Verifying Hardware Compatibilities
- Check if the CPU supports Virtualization extensions by gaining access to the BIOS/UEFI settings of the machine. This is commonly referred to as AMD-V or Intel VT-x. If required, enable these functionalities.
- Ensure the system has enough RAM (random access memory) to support virtual machines and the host operating system. Determine the amount of memory that will be allotted to every virtual machine.
- Examine the system’s storage capacity. Make sure it can handle the needs of the virtualized environment. Think about the storage type (SSD or HDD) and speed. In particular, if high-performance workloads are anticipated, assess the I/O capabilities.
Step 4: Installing Hypervisor
- Using the hypervisor image, make a bootable USB or DVD. One way to install VMware ESXi is by using a bootable USB drive with the ESXi installer.
- Using the installed media that has been prepared, boot the host computer. Observe the guidelines displayed on the screen by the installation of the hypervisor. Certain hypervisors, like VMware ESXi, install straight into the hardware. They do not need an operating system to be the host.
- During the installation, supply the required data, such as network setups and basic settings. Set up the necessary parameters and administrator credentials.
Step 5: Configuring Hypervisor Settings
- Navigate to the hypervisor’s management interface after installation. This may be a command-line interface, a specialized management console, or an online interface.
- Set up network parameters such as gateway settings, subnet masks, and IP addresses. Ascertain the host computer’s and virtual machines’ network connectivity. Define networking policies and configure virtual switches.
- Verify that the BIOS or UEFI settings have Virtualization enabled. This step is essential. It lets the hypervisor use the CPU’s hardware-level Virtualization.
- Adapt security configurations to industry best practices. Establish rules for controlling user access, virtual machines, and other security-related setups.
Step 6: Creating Virtual Networks
- To enable communication between virtual machines and the host, create virtual networks.
- Go to the networking area of the hypervisors’ management interface.
- To link virtual computers to external networks and to each other, create virtual switches.
- Assign virtual machines IP addresses, ensuring the gateway and subnetting are configured correctly.
- Implement network regulations like VLANs and Quality of Service (QoS) to maximize network traffic.
Step 7: Creating Storage Datastores
- Create datastores for storage to hold virtual machine files.
- Link to storage devices, including network attached storage (NAS) or storage area networks (SANs).
- Create data stores on the attached storage devices. They are logical containers that hold virtual machine files.
- Establish storage rules with thin provisioning, performance optimization, and data redundancy in mind.
- Ensure the selected storage solution satisfies the hypervisors’ performance and capacity requirements.
- Plan for scalability by taking expansion and future storage requirements into account.
Step 8: Installing Virtualization tools
- Adding extra drivers or tools from the hypervisor can boost virtual machine performance.
- Navigate to the console or management interface of the hypervisor.
- Install guest add-ons. These tools are for guest integration. They enhance the connection between the host and guest operating systems.
- These tools may include drivers for better graphics, mice, and performance.
- For the best virtual machine performance, install Virtualization tools. They are advised, even though they are optional.
- Keep these tools updated. This way, you can use the newest enhancements and patches.
Step 9: Creating Virtual Machines
- Use the hypervisor’s administration interface to construct virtual machines that meet certain needs.
- Open the hypervisor’s interface or virtual machine creation wizard.
- Indicate the RAM capacity. Also, indicate the disc space, CPU allocation, and network setups, among other factors.
- To install, choose the guest operating system.
- Configure virtual machines to best suit their intended purpose and resource needs.
- Verify that the guest operating system and the selected hypervisor are compatible.
Step 10: Configuring Virtual Machine Settings
- Adjust virtual machine settings to maximize resource usage and performance.
- Via the management interface of the hypervisor, access the virtual machine settings.
- Adapt resource allocations, including CPU and memory, to the demands of the workload.
- Change the number of virtual processors, network adapters, and storage devices. Also, adjust other virtual hardware settings.
- As workload requirements change, assess and tweak virtual machine parameters regularly.
- Allocating resources in a balanced way will avoid overcommitting and guarantee efficient operation.
Step 11: Testing Virtual Machines
- Test them well before putting virtual machines into a production environment. Check to ensure they perform as planned.
- Turn on virtual machines and make sure the guest OSs are installed properly.
- Run programs within the virtual computers to make sure everything works properly.
- Make sure that networking setups are correct and test network connectivity.
- Recognize and resolve any problems that surface while testing.
- To assess performance in various settings, create test scenarios representative of real-world use.
Step 12: Implementing Backup and Monitoring
- Provide monitoring systems and backup plans to protect virtualized resources.
- Set up regular backups of your virtual machine’s contents to guarantee data security.
- Use tools to watch for the use of resources. They track performance and the state of virtual resources.
- Set up notifications for possible problems so you can deal with them before they arise.
- Test backup and restore processes frequently to make sure they can recover data.
- Modify the monitoring criteria based on the specific needs. Also, consider the expected performance of the virtualized environment.
Dedicated hosting users can add monitoring and backups to their servers. This guarantees effective protection and monitoring. It covers the server’s private physical resources, too.
Conclusion
Finally, Virtualization opens up business opportunities. It lets them optimize resource use, save money, and strengthen their IT. We have examined a comprehensive guide. It lays out the essential factors. These factors range from hardware needs to program choices. They help create a smooth Virtualization setup. Virtualization is vital for modern IT and has many benefits. These include improved scalability and strong security.
The idea behind dedicated servers fits well with businesses‘ desire for control and performance. They want these things when looking for customized hosting. Our dedicated server hosting space, guides individuals apprehensive about the complex Virtualization world. A key partner, such as RedSwitches, is vital. They make a robust and effective virtualized infrastructure possible. Our dedication to providing innovative solutions is what highlights businesses’ importance and enables organizations to use Virtualization fully.
FAQs
Q. Is enabling Virtualization good?
Yes, enabling Virtualization enhances resource use. It improves efficiency and allows for flexible IT management. This makes it a beneficial practice for optimizing hardware.
Q. How do I set up virtualization on my computer?
Install the hypervisor on the host computer. Then, choose an operating system. Next, configure virtual machines with the needed resources, settings, and operating systems.
Q. Virtualization Setup: Is Virtualization safe for PCs?
Virtualization is safe for PCs in general. Hypervisors create strong separation between virtual machines. This reduces security lapses and guarantees the host system’s security.
Q. What is Virtualization, and why is it important in Windows 10?
Virtualization in Windows 10 means creating a virtual (not actual) version of something. This includes an operating system, a server, a storage device, or network resources. It’s important in Windows 10 and allows users to run many operating systems on one machine. This use of hardware increases efficiency and cuts costs.
Q. Virtualization Setup: How can I enable Virtualization in Windows 10?
To enable Virtualization in Windows 10, you need to access your PC’s BIOS/UEFI settings. This involves restarting your computer. You then enter the BIOS/UEFI setup utility by pressing a specific key. For example, F2, ESC, F10, or DEL. Do this during the boot-up process. You then navigate to the Virtualization settings in your BIOS and turn on the feature if it’s off. Refer to your computer’s user manual for the exact steps. The process may vary by PC maker and model.
Q. Virtualization Setup: What if I cannot find the Virtualization settings in my BIOS?
You may not be able to find the Virtualization settings in your BIOS. This may mean your computer’s BIOS does not support Virtualization. Or, it has the feature off. In these cases, you can ask your computer maker for help. Or, check if a BIOS update enables Virtualization.
Q. Virtualization Setup: Can I enable Virtualization using the Task Manager in Windows 10?
No, you cannot enable Virtualization using the Task Manager in Windows 10. Virtualization is a hardware feature. It needs to be enabled at the BIOS/UEFI level. It cannot be turned on or set up through the operating system or its utilities like Task Manager.
Q. What are the common hotkeys to enter the BIOS/UEFI setup utility?
Standard hotkeys to enter the BIOS/UEFI setup utility include F2, ESC, F10, DEL, or F1. The specific key may vary depending on your computer model and manufacturer. Typically, the hotkey is displayed on the screen during the initial startup process.
Q. Virtualization Setup: What is the significance of hardware Virtualization in recent PCs?
Recent PCs support hardware Virtualization. It improves performance and efficiency. This is true when running virtual machines or using Virtualization. It makes the system better at Virtualization. Examples are Intel VT-x or AMD-V (also called AMD-v or AMD SVM). Enabling hardware Virtualization is crucial. It is key for running Virtualization software well. This software includes hypervisors and emulators.
Q. Why is it important to enable Virtualization as shipped from the factory?
Turning on Virtualization as shipped from the factory ensures the feature is ready. No extra setup is needed. It gives flexibility to users who need Virtualization. It lets them use the feature without delays or complications.
Q. What is the process to enable Virtualization in the BIOS/UEFI settings?
You need to restart your computer to enable Virtualization in the BIOS/UEFI settings. Then, enter the BIOS/UEFI setup by pressing the designated hotkey. Once inside the BIOS/UEFI settings, go to the Virtualization settings. They may have different names. For example, “Intel VT-x”, “AMD-V”, “Virtualization Technology”, or “SVM Mode”. Turn on the feature if it’s off. Save the settings and exit the BIOS/UEFI setup utility to implement the changes.
Q. Is Virtualization only applicable to 64-bit operating systems?
No, Virtualization is not only applicable to 64-bit operating systems. It works on both 32-bit and 64-bit operating systems. However, the support for Virtualization features may vary. It depends on the system architecture, processor capabilities, and BIOS/UEFI support.
Q. Are there specific requirements for Virtualization? Like chipset or processor compatibility?
Yes, to enable Virtualization, certain requirements need to be met. The processor must support hardware Virtualization technology, like Intel VT-x or AMD-V.
