Virtualization is a technology that creates multiple virtual instances of an operating system, application, or hardware on a single physical host. It enables you to run multiple operating systems, applications, or services in isolation from each other as if they were running on separate physical machines.
Table Of Content
- What is Proxmox?
- Alternatives to Proxmox
- Prerequisites For Proxmox Installation
- Install Proxmox VE
- Conclusion
- FAQs
Virtualization can be implemented at different levels, including hardware, operating system, and application level. At the hardware level, Virtual machines (VMs) can operate their operating systems and applications, sharing the physical resources of the host machine, such as CPU, memory, and storage. At the operating system level, virtualization involves creating containers or zones that share the host operating system kernel and resources, providing a lightweight virtualization solution with less overhead.
Virtualization provides several benefits, including increased hardware utilization, greater flexibility and scalability, easier management, better resource allocation and isolation, and improved disaster recovery and business continuity. It is widely used in data centers, cloud computing, and software development and testing.
What is Proxmox?
Proxmox is a free and open-source server virtualization management solution that allows you to run multiple virtual machines (VMs) and containers on a single physical host. It provides a web-based graphical user interface (GUI) that allows you to manage the entire virtualization infrastructure, including VM creation, management, migration, backups, and monitoring.
Proxmox supports various virtualization technologies, including KVM, LXC, and OpenVZ, and it also includes features such as live migration, high availability, clustering, and network virtualization. Proxmox can be used to build a private cloud or as a virtualization platform for hosting providers. Proxmox is based on Debian GNU/Linux and is licensed under the GNU Affero General Public License (AGPL) v3.
Alternatives to Proxmox
There are several alternatives to Proxmox for server virtualization and management, including:
VMware vSphere – a proprietary virtualization platform that offers enterprise-grade features such as high availability, live migration, and distributed resource scheduling.
Microsoft Hyper-V – a virtualization platform built into the Windows Server operating system that offers features such as live migration, high availability, and virtual networking.
Citrix XenServer is an open-source virtualization platform offering enterprise features such as live migration, high availability, and storage management.
Oracle VirtualBox – a free and open-source desktop virtualization software that allows you to run multiple operating systems on a single host.
OpenStack – an open-source cloud computing platform that offers virtualization, storage, and networking services.
Red Hat Virtualization – a virtualization platform that combines the open-source KVM hypervisor with enterprise features such as high availability, live migration, and storage management.
oVirt – an open-source virtualization platform based on KVM that offers features such as live migration, high availability, and storage management.
Each of these alternatives has its strengths and weaknesses, and the choice of which one to use depends on your specific needs and requirements.
Prerequisites For Proxmox Installation
- A physical or dedicated server.
- 64-bit CPU.
- A minimum of 4GB RAM, but at least 8GB is recommended for better performance.
- Basic command-line skills and familiarity with Linux administration, networking concepts, and virtualization technology.
Install Proxmox VE
Follow the below steps to install Proxmox VE on a physical or dedicated server.
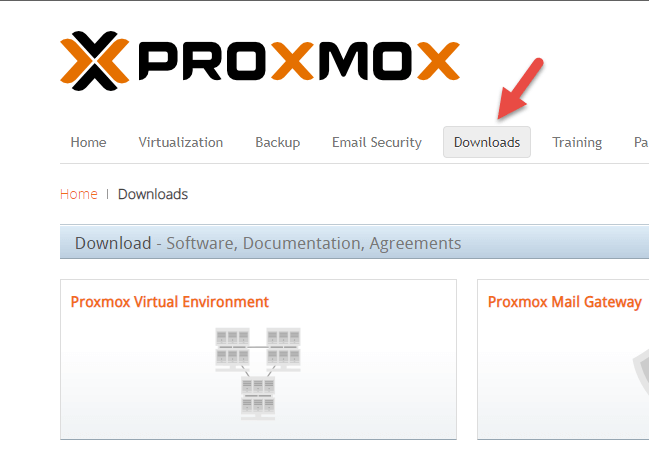
1. The first step is to download the Proxmox VE ISO image.
Go to the Proxmox Downloads webpage and choose Proxmox Virtual Environment from the available options.
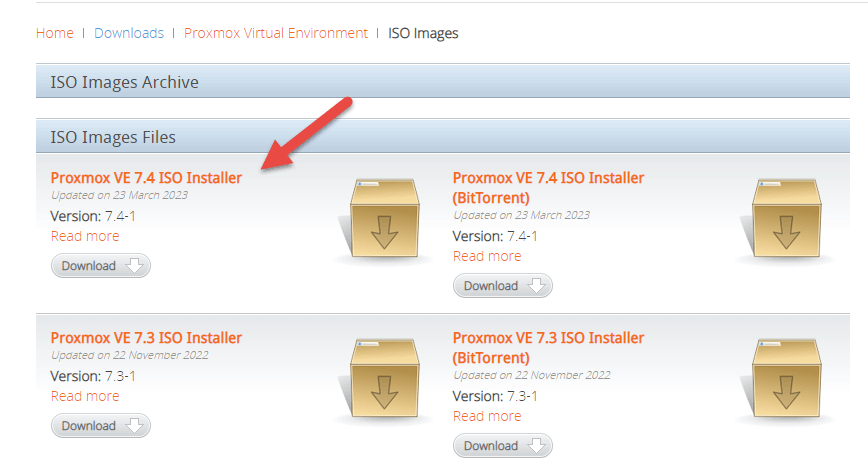
2. Upon clicking, you’ll be directed to the Proxmox Virtual Environment Archive, where you can find ISO images and official documentation. Proceed by selecting the ISO Images option.

As of now, the most recent release of the Proxmox VE ISO Installer is version 7.4. If a more recent version is accessible, it will be displayed at the beginning of the list. To obtain the installer, click the Download button and save the file.
3. Follow the following steps to mount a Proxmox ISO image to a physical server’s virtual console
To mount a Proxmox ISO image to a physical server’s virtual console, you can use a remote console application like IPMI or iLO. Here are the general steps you can follow:
- Log in to the remote console application for the physical server.
- Locate the virtual media option in the console interface.
- Choose the option to mount a virtual CD/DVD.
- Select the Proxmox ISO image from your local machine or network location, and upload it to the remote console.
- Save the settings, and start the virtual console.
- Access the virtual console, and the Proxmox ISO image should be available as a bootable option.
Please note that the specific steps may vary depending on the remote console application and your physical server hardware.
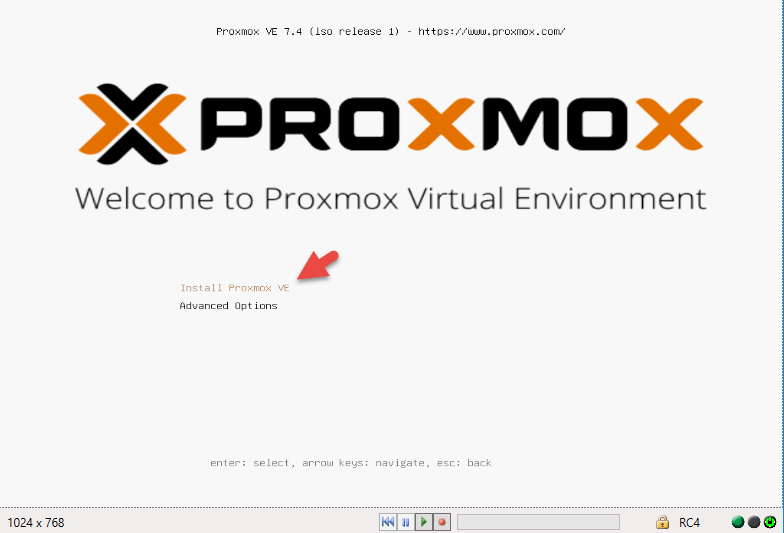
4. Select the installation medium with the Proxmox ISO image and boot from it. Next, the Proxmox VE menu appears. Select Install Proxmox VE to start the standard installation.
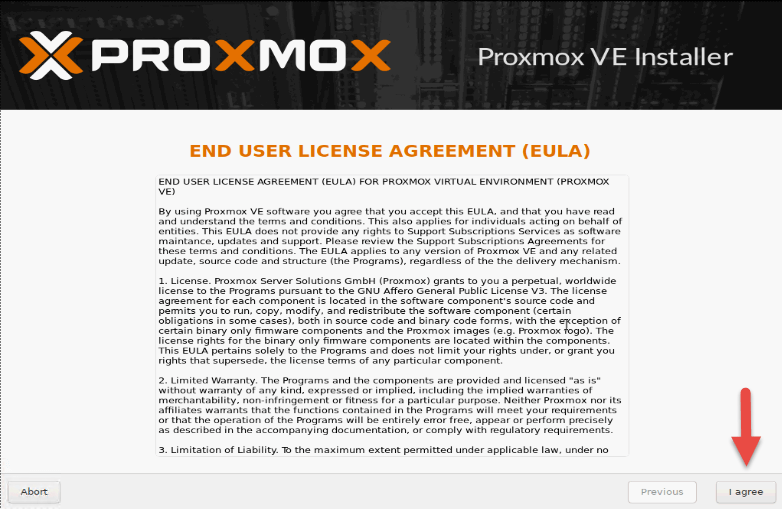
5. To proceed, review and agree to the End User License Agreement (EULA).
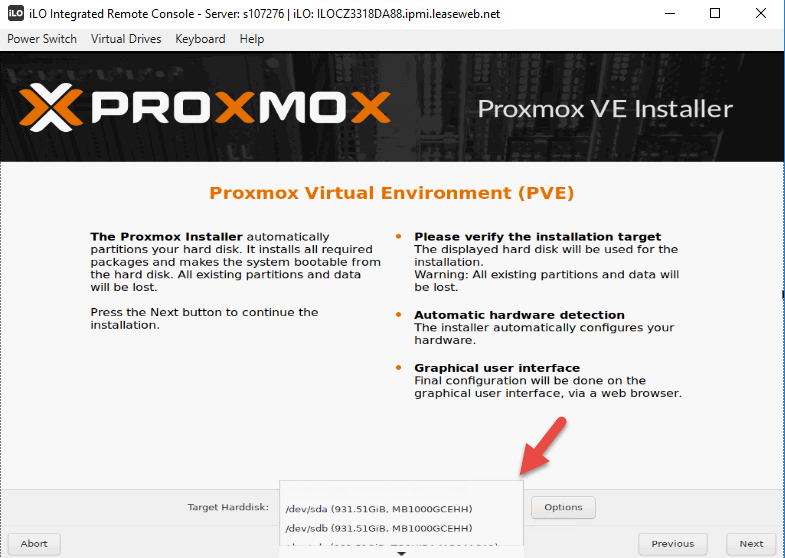
6. Select the desired destination hard disk for Proxmox installation. To configure additional parameters like the filesystem, click on the Options button. By default, the filesystem is set to ext4.
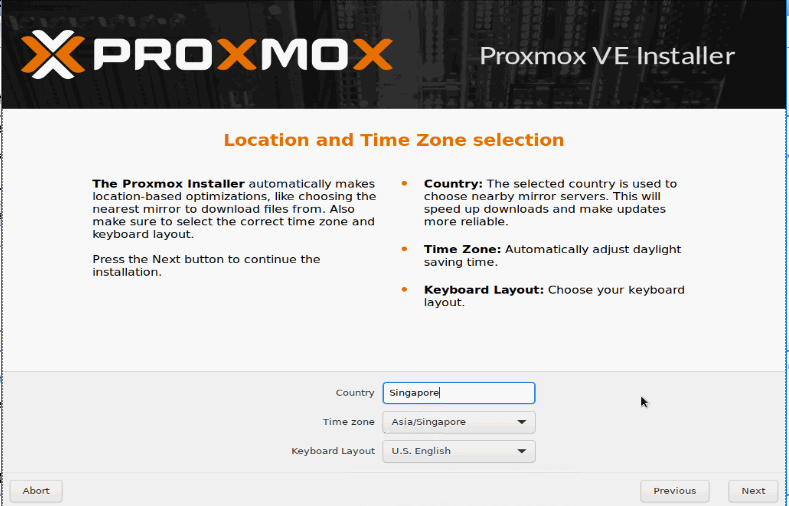
7. Afterwards, configure the location, time zone, and keyboard layout, as the installer will automatically detect most of these settings.
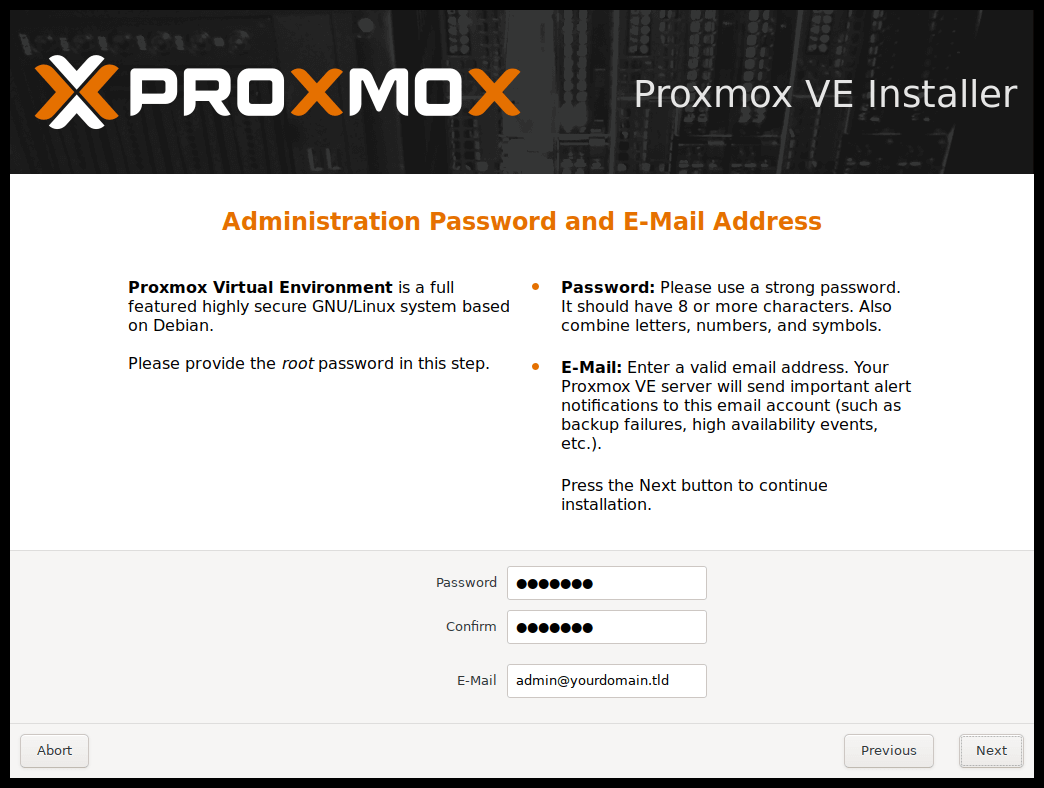
8. Generate a robust password for your administrative credentials, confirm it by retyping, and provide an email address to receive system administrator notifications.
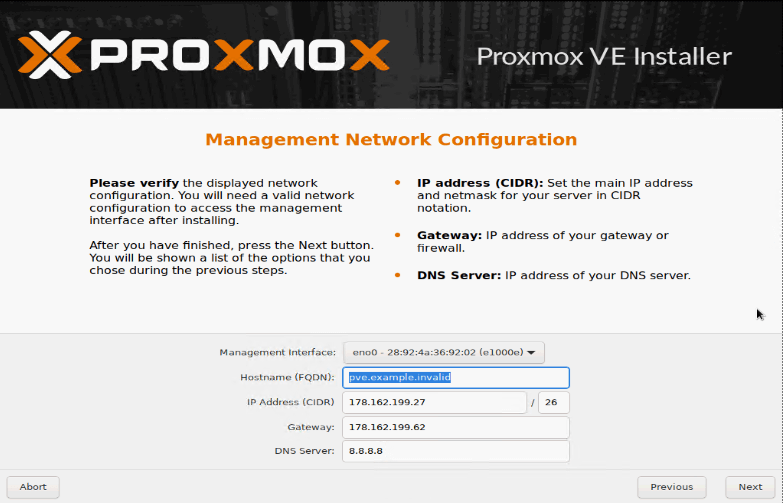
9. To complete the installation of Proxmox, you must configure the network settings, which involve selecting the management interface, assigning a hostname to the server, specifying an available IP address, setting the default gateway, and configuring a DNS server.
It is important to note that you can only use an IPv4 or IPv6 address during the installation process. If you want to use both, you can modify the configuration after the installation is complete.
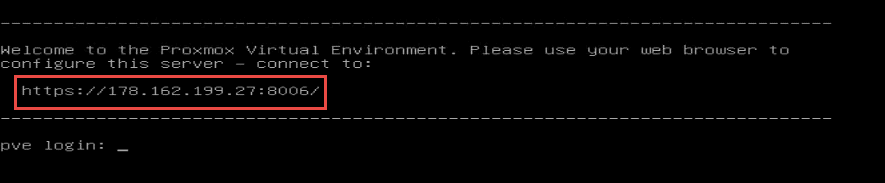
10. After completing the installation and allowing the system to reboot, the Proxmox GRUB menu will appear. From there, select “Proxmox Virtual Environment GNU/Linux” and press the Enter key.
Then, a welcome message from Proxmox VE will appear, which includes an IP address to access Proxmox. To access Proxmox, open a web browser of your choice and navigate to the provided IP address
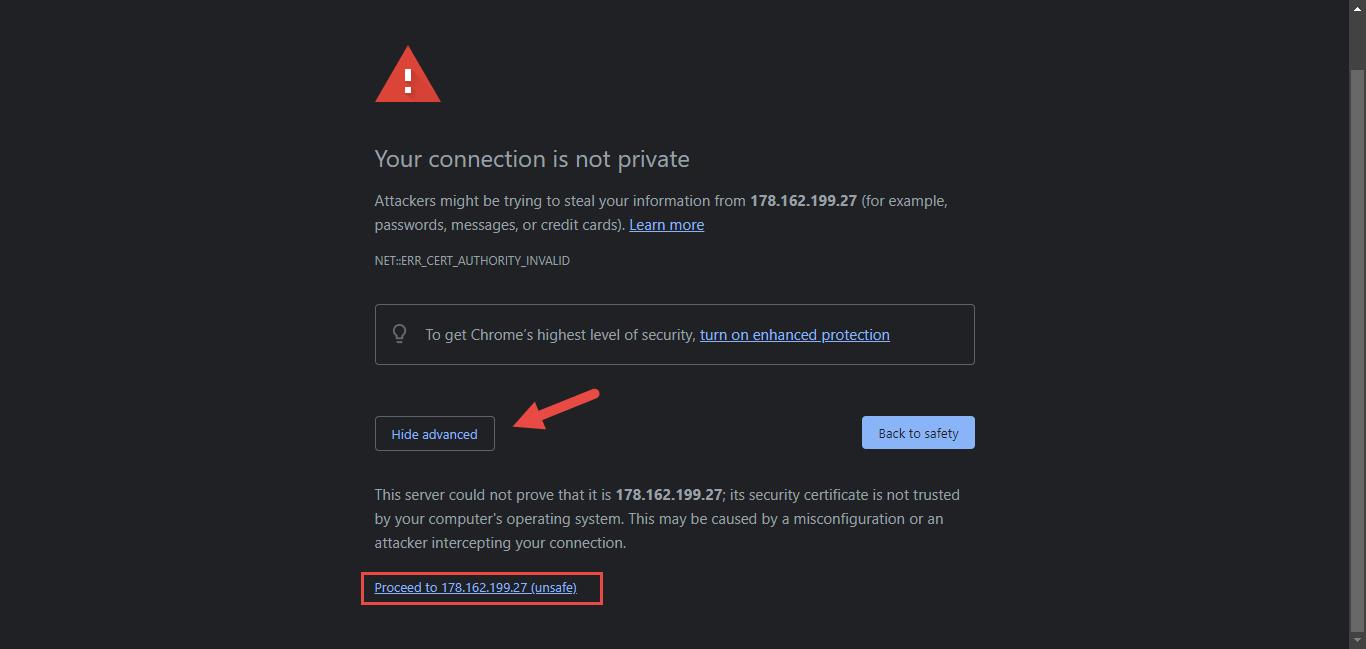
11. Once you have navigated to the necessary IP address, it is likely that you will encounter a warning message stating that the page is insecure due to the usage of self-signed SSL certificates by Proxmox VE. To proceed to the Proxmox web management interface, you must select the option to proceed past this warning message.
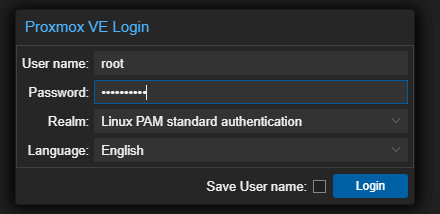
12. To gain access to the Proxmox interface, you must log in as root and enter the password set during installation.
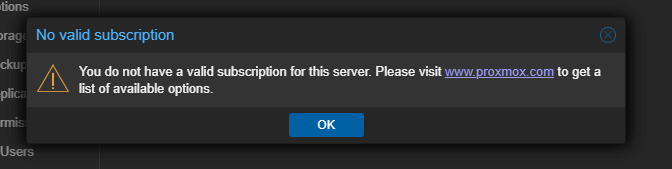
13. Upon accessing the interface, a dialogue box may appear indicating no valid subscription for the server. It is important to note that this add-on service offered by Proxmox is optional. If you wish to ignore this message, simply click the OK button.
Proxmox Management Interface
The Proxmox Management Interface is a web-based GUI that manages virtual machines, containers, storage, networks, and clusters in the Proxmox VE virtualization platform. It provides features such as virtual machine and container management, storage management, network management, and high availability.
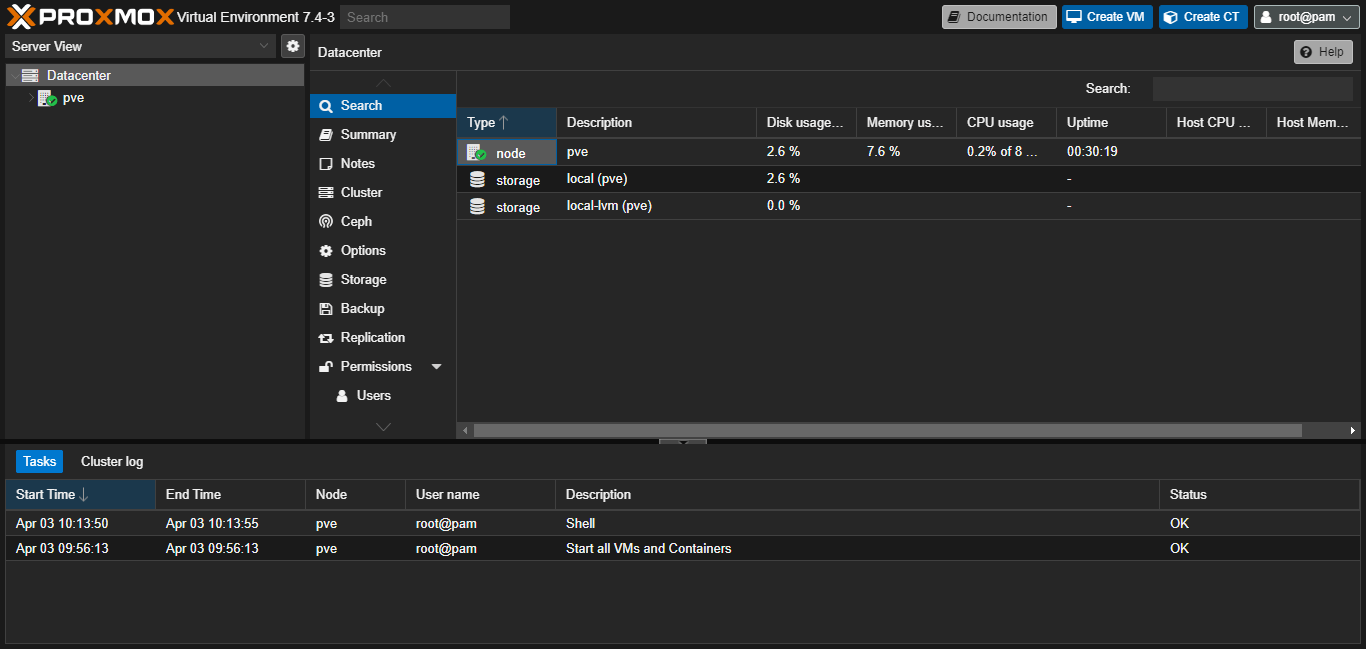
To configure and create VMs, refer to the Proxmox VE Documentation Index.
Conclusion
In conclusion, installing Proxmox VE is a straightforward process that involves downloading the ISO image, creating a bootable USB or CD, and then booting the system from the media to start the installation process. Once installed, Proxmox VE provides a powerful virtualization platform with many features, including container and VM management, storage management, network management, and high availability. By following the installation guide and configuring the necessary settings, users can easily set up a Proxmox VE environment to meet their virtualization needs.
FAQs
Q: What is Proxmox VE?
A: Proxmox VE is an open-source virtualization management platform that allows you to manage virtual machines, containers, and high-availability clusters.
Q: What are the system requirements for Proxmox VE?
A: The system requirements for Proxmox VE vary depending on the number of virtual machines and containers you plan to run. You can find the minimum requirements on the Proxmox VE website.
Q: How do I install Proxmox VE?
A: To install Proxmox VE, you need to download the ISO image from the Proxmox VE website and create a bootable USB drive or DVD. You can boot your system from the USB drive or DVD and follow the installation wizard.
Q: Can I install Proxmox VE on a physical machine, or do I need a virtual machine?
A: Proxmox VE can be installed on a physical or virtual machine.
Q: Can I use Proxmox VE for production environments?
A: Yes, Proxmox VE is suitable for production environments.
Q: Does Proxmox VE support backups?
A: Proxmox VE includes backup functionality for virtual machines and containers.
Q: Can I use Proxmox VE with other virtualization platforms?
A: Proxmox VE uses its virtualization technology based on Linux containers and KVM, which is incompatible with other virtualization platforms.
Q: Is Proxmox VE free?
A: Proxmox VE is open-source software and is available for free. However, support subscriptions and add-ons are available for purchase.
Q: How do I update Proxmox VE?
A: Proxmox VE can be updated through the web interface or the command line interface using the “apt-get” command.
Q: Where can I find documentation and support for Proxmox VE?
A: The Proxmox VE website provides documentation and a community forum for support. Support subscriptions are also available for purchase.
