CentOS 7 network configuration is critical to keeping the systems running smoothly. That’s why editing the config files that control the network configuration of a CentOS 7 server is an essential step when you’re setting up a new server or maintaining an existing server.
You can edit these configuration options via the terminal’s GUI or config files. Whichever method you opt for, the objective is to streamline the performance of your network connectivity so that the applications deployed on the CentOS 7 server don’t face any outages.
This tutorial will show how you can easily customize network interface configuration. First, we’ll show you how to use a network manager to set up a static IPv4 address on your dedicated server. Then, we’ll show you how to easily change these settings using the command line and GUI utility.
Let’s start with a short overview of network interface naming.
Table Of Content
- How Network Interface Naming Works in Linux
- Process Prerequisites
- Configure Network Settings on CentOS 7 Using the Terminal
- CentOS 7 Network Config Through the GUI
- Set the System Hostname
- Validate Network Settings in CentOS 7
- Conclusion
- FAQS
How Network Interface Naming Works in Linux?
Naming network interfaces is essential for better interface management. Choosing the naming convention becomes very important in a multi-interface or virtualized setup with several network interfaces.
Network interface naming conventions assign names based on attributes like location and type. These predictable network Interface names provide consistent labels for easier identification.
CentOS 7 uses “biosdevname” or “systemd” schemes. Some examples of these conventions are “eno1” (Ethernet Onboard 1), “ens2” (Ethernet Server 2), “enp0sX” (Ethernet PCI slot 0, interface X), and “enx<MAC>” (Ethernet with MAC).
Important Changes in Centos 7 network config GUI Files
If you’re coming from CentOS 6, you should know that the network interface naming convention has changed in CentOS 7.
In CentOS 6, the network interfaces were numbered, starting from 0. So, for instance, the first interface would be eth0. In CentOS 7, the naming convention has changed because of the changes by the RHEL 6. Now, the first network interface is enp3s0.
Process Prerequisites
To change CentOS 7 network config files, you need a bare metal, cloud VPS, or dedicated server running CentOS 7.
Configure Network Settings on CentOS 7 Using the Terminal
Since many sysadmins prefer the terminal, we’ll start by discussing how you can edit Centos 7 network config files.
Configure a Static IP Address
You can easily set up a static IP address by changing the network script the network interface uses. This involves the following steps.
Step # 1:Find the Right Network Interface
Before changing anything, you need to find the correct network interface. This is important because a bare metal server can connect multiple network interfaces to internal or external connections. That’s why you must find the network interface name you wish to modify before proceeding.
We’ll use the following command to list all network devices.
# nmmcli d

step # 2: Access Network Configuration
Now that you have the network interface name use the following command to access the network configuration for the network interface.
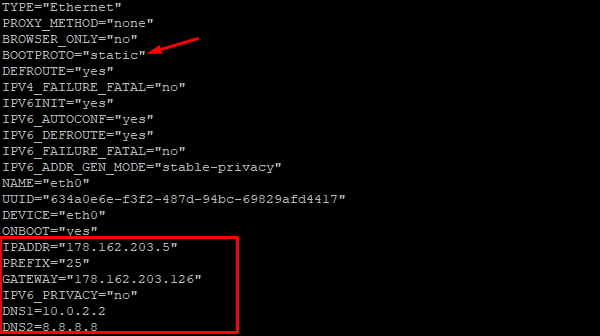
# vi /etc/sysconfig/network-scripts/ifcfg-[network_device_name]

step # 3: Make the Changes in the CentOS 7 Network Interface Configuration Details
Now, to set the static IP for the CentOS 7 network interface configuration, change the following values:
BOOTPROTO to “static” to change the boot protocol to a static IP address
ONBOOT to “yes” to enable the network interface at the system startup.
Next, you need to add the following information about the IP address and the DNS server IP address:
- IPADRR (The static IP address assigned to the network interface)
- NETMASK (The network mask)
- GATEWAY (The gateway information)
- DNS1 (The primary DNS server IP address)
- DNS2 (The secondary DNS server IP address)
Important: You can get information about the gateway and DNS by using the command.
# nmcli dev show [network_device_name]
Save the file and exit the text editor.
step # 4: Restart the Network Interface
At this point, the information you added in the previous step is saved to the network configuration file. However, the changes are ineffective because the network interface is still on the old settings.
Therefore, you need to restart the network for the new settings to take effect. For this, use the following command in the terminal:
# systemctl restart network
Configuring Network Interface for DHCP
To configure a network interface for DHCP (Dynamic Host Configuration Protocol) in CentOS 7, follow these steps:
step # 1: Find the Network Interface Name
Identify the device name with the command #nmcli d, and follow the steps outlined in the static IP configuration section.
step # 2: Edit the Network Configuration File
Navigate to the network configuration directory, often found at /etc/sysconfig/network-scripts/.
Locate the configuration file corresponding to the target network interface, e.g., /etc/sysconfig/network-scripts/ifcfg-ens33.
In our case, the network interface is eth0.
step # 3: Edit the Configuration File
Use a text editor like vi or Nano to modify the file to include the following settings.
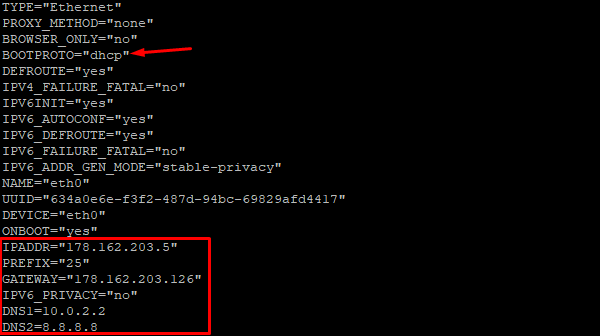
Save the changes and close the text editor.
step # 4: Restart the Network Service
You need to restart the network interface to ensure your changes take effect. For this, use the following command:
# systemctl restart network
step # 5: Verify the Changes
To confirm the changes, use the ip addr, ifconfig, or nmcli d command. You should observe that the network interface now has an IP address acquired through DHCP.
We hope you can now adjust the interface name and file paths to enable DHCP for a network interface in CentOS 7.
CentOS 7 Network Config Through the GUI
You can use the GUI to change the config network CentOS 7 files if you want to use the Network Manager utility. The significant details of the process are similar to what we mentioned earlier in the terminal section.
Configure a Static IP Address
You must carry out the following steps to configure a static IP address via the GUI.
step # 1: Open the Network Manager
In the terminal, type the nmtui command to launch the Network Manager. Next, in the NetworkManager TUI screen, select Edit a Connection.
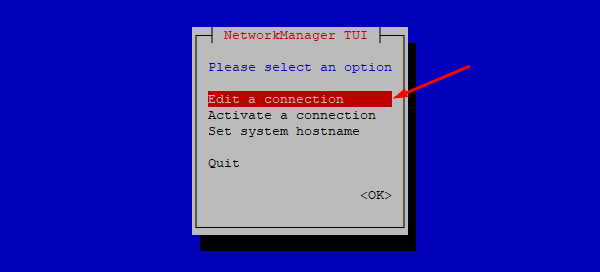
This will open the list of all available network interfaces. Select the network interface you wish to modify.
step # 2: Navigate to Edit a Network Connection Screen
Use the arrow keys to navigate to the “Edit a connection” and press Enter.
step # 3: Choose the network interface
Choose the network interface you want to configure (e.g., eth0 or ens33) from the list, and press Enter.
step # 4: Edit Network Connection Settings
On the “Edit Connection” screen, navigate through the options using arrow keys and set the following:
- Select “Automatically connect” to ensure the interface connects during boot.
- Under “IPv4 CONFIGURATION,” select “Manual.”
- Enter the desired IP address, subnet mask, gateway, and DNS servers.
- Optionally, set DNS search domains.
- Press Tab to select “OK” and press Enter.
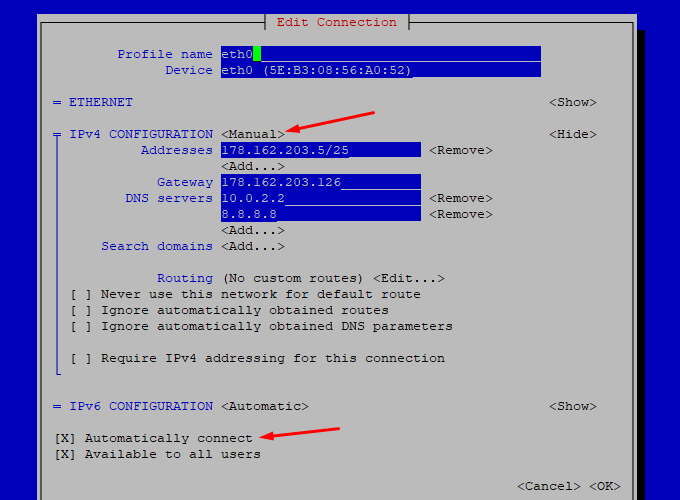
Review the changes, navigate to OK with the TAB key, and press Enter to confirm the changes.
step # 5: Restart the Network Interface
After making the changes, return to the terminal and use the following command to restart the network service:
# systemctl restart network
After making the changes and restarting the network service, it is essential to check if the new settings are in force. For this, you should display the current information by entering the following command in the terminal:
# ip a show [network_device_name]
Configuring Network for DHCP
To configure a network interface for DHCP in CentOS 7. We suggest using the nmtui (NetworkManager Text User Interface) command.
The process has the following steps.
step # 1: Launch the nmtui Utility
Open a terminal and enter nmtui to launch the NetworkManager Text User Interface.
step # 2: Navigate to “Edit a Network Connection”
Use the arrow keys to navigate the menu and select “Edit a connection” by pressing the Enter key.
step # 3: Choose the network interface
Select the appropriate network interface you want to configure (e.g., eth0 or ens33) from the list and press Enter.
step # 4: Edit Connection Settings
On the screen, make the following changes:
- Toggle “Automatically connect” to ensure automatic connection during boot.
- Under “IPv4 CONFIGURATION,” choose “Automatic” for DHCP configuration.
- Configure DNS servers and search domains if necessary.
When done, press Tab to select “OK” and press Enter.
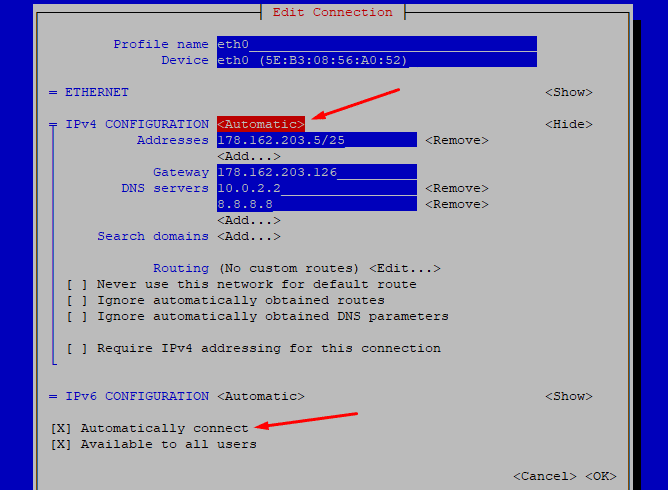
Review the changes, navigate to OK by pressing the TAB key, and press Enter to confirm the changes.
step # 5: Restart the Network Interface
You need to restart the network service to ensure your changes take effect. Enter the following command in the terminal:
# systemctl restart Network
Set the System Hostname
You should assign a hostname to your system if you haven’t done it already. These names are visible to the entire network, making it easy for all users to identify your CentOS 7 server.
Setting up the hostname using the nmtui utility in CentOS 7 involves the following steps.
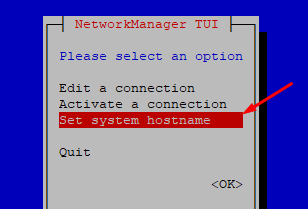
step # 1: Launch the nmtui Utility
Open a terminal and enter nmtui to launch the NetworkManager Text User Interface.
step # 2: Navigate to “Set System Hostname”
Use the arrow keys on the main screen to select “Set system hostname” from the menu, and then press Enter.
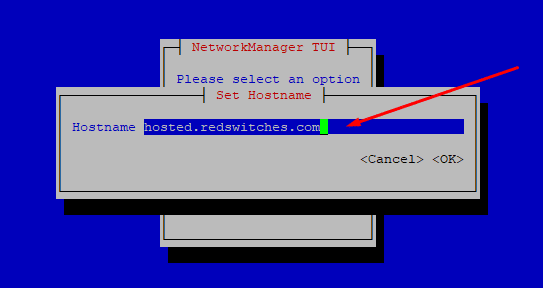
step # 3: Enter the Hostname
On the hostname configuration screen:
- Enter the desired hostname into the provided field.
- Navigate to the “OK” button using the Tab key, and press Enter.
step # 4: Restart the Network
You need to restart the network service to ensure the new hostname is applied and visible to all users. Enter the following command in the terminal:
# systemctl restart Network
step # 5: Verify the New Hostname
Verify the hostname change by executing the hostname command in the terminal.
![]()
Validate Network Settings in CentOS 7
As a server admin, you should keep a close watch on the network settings of your CentOS 7 server because, during typical usage, network settings might change as admins add new services and rename or modify existing services.
To validate your network settings in CentOS 7, follow these steps:
step # 1: Check Network Interfaces
Use the ip addr or ifconfig command to display the configured network interfaces and their associated IP addresses, subnet masks, and status.
# ip addr

or

#ifconfig
step # 2: Verify Default Gateway
The ip route command displays the routing table and confirms the default gateway settings.
#ip route
step # 3: Test Network Connectivity
The ping command tests connectivity to external data sources (servers and websites). This test confirms that your network is functional. We’ll ping Google, but you can use any website or server for this test.
# ping google.com
step # 4: Check DNS Resolution
Next, test DNS resolution by using the nslookup or dig command to query DNS servers for the IP address of a domain.
#nslookup google.com

or

#dig google.com
step # 5: Inspect Network Configuration Files
Review the configuration files in the /etc/sysconfig/network-scripts/ directory, such as ifcfg-<interface-name>, to ensure they reflect the most optimal settings.
#cat /etc/sysconfig/network-scripts/ifcfg-<interface-name>
step # 6: Check DNS Servers
Verify that your DNS servers are correctly configured. For this, check the /etc/resolv.conf file to see the DNS server IP addresses.
#cat /etc/resolv.conf
Following these steps, you can comprehensively validate your network settings in CentOS 7. This ensures your network connections, IP settings, hostname resolution, and DNS configuration are all in order.
Conclusion
This short tutorial demonstrated how to change the CentOS 7 network config files easily. While we showed how to set a static IP address for a network interface, you can use the process to set other options, such as a DHCP configuration or setting the system’s hostname. In addition to this blog, you can also read about CentOS vs Ubuntu, CentOS vs Debian, HAProxy for CentOS 7 servers, and how to install MySQL on CentOS 7.
Ready to configure your CentOS 7 server’s network for optimal performance and security? Trust Redswitches, your reliable partner in server management and networking solutions. Our expert team can guide you through every step of the process, ensuring your network is robust and efficient. Contact us today to get started.
FAQs
Q. Where is the network config file in CentOS 7?
In CentOS 7, the network configuration files are typically in the /etc/sysconfig/network-scripts/ directory. These files, such as ifcfg-<interface-name>, contain network settings like IP addresses and DNS servers.
Q. Where is the network interface file in CentOS?
In CentOS 7, network interface configuration files are found in the /etc/sysconfig/network-scripts/ directory. These files store settings like IP addresses and gateway information for specific network interfaces.
Q. How to check Network status by using the systemctl command in CentOS 7?
To check the network status using the systemctl command in CentOS 7, you can use the following command:
#systemctl status network.
This command provides you with information about the status of the network service, including whether it’s active, inactive, or failed. It also displays recent log entries related to the network service.
Q. Where is the hosts file in CentOS 7?
In CentOS 7, the hosts file is located at /etc/hosts. This file maps IP addresses to hostnames, crucial for local DNS resolution. You can edit this file to add custom hostname mappings or modify existing ones.
Q. What’s the use of the nmcli dev command in CentOS 7?
In CentOS 7, the nmcli dev command manages network devices. It facilitates tasks such as viewing device details, enabling/disabling devices, modifying settings, connecting/disconnecting, monitoring statuses, and aiding network configuration and management via the command line.
