For decades, passwords used to be the traditional user authentication method.
However, the advancements in password-cracking techniques and the ease of initiating brute-force attacks have reduced the utility of passwords for server security and user identification.
SSH authorized keys offer a better password alternative and have mostly replaced other authentication methods, especially when connecting and working with remote servers.
In this article, we’ll discuss how SSH authorized keys work and how you can generate and use SSH keys for better protection.
Let’s start with an introduction to SSH keys.
Table of content
What Are SSH Authorized Keys?
SSH keys are a simple lock-and-key mechanism to authenticate remote users and systems without passwords. They provide a more secure alternative to traditional password-based authentication by bringing the complexity of paired cryptographic keys.
This system implements a one-on-one relationship between a public and a private key and enables secure and seamless access to remote systems. Overall, using SSH keys harden server security and simplifies the authentication process for administrators and users.
We highly recommend using SSH authorized keys to log into your own and remote servers. This should be the primary user and asset authentication mode on the entire network infrastructure.
Why Have SSH Keys Replaced Passwords?
User credentials in the form of usernames and passwords were the most popular form of user authentication on remote servers.
However, as time passed, problems with password security emerged, and server admins started to consider it an insecure authentication method.
In addition, while passwords can be transmitted securely to the server, the lack of complexity and user negligence (people don’t always adhere to the organizational policies about password security and length) removed all benefits of using passwords for authentication.
Password-protected accounts can be compromised through brute-force attempts that have become effective because of the availability of cheap processing capacity and automated attack tools. Although specific techniques (such as rate limiting) and tools (like fail2ban) can improve password security, SSH keys present a better, more reliable, and secure alternative.
How Do SSH Keys Work?
SSH keys consist of cryptographic keys that allow clients to connect to an SSH server and prove their identity. This key pair consists of a private key and a corresponding public key.
Private Keys
A private SSH key is a 256-character long (it could be longer depending upon specific user requirements) randomly generated string used to authenticate a user’s identity to a remote server. The user (also known as the client) owns the private key, which must be kept strictly confidential. The public key is the counterpart to the private key.
If an attacker gains access to the private key, they can log into servers with the matching public key without further authentication. You can minimize the probability of this security lapse by adding a passphrase to encrypt the key further when stored.
Public Keys
Similar to a private key, a public SSH key is a long, random string used to verify a user’s identity on a remote server. It is usually stored on the server and made available to anyone who wants to connect to a remote server.
The remote server uses the public key to encrypt data sent to the client. When the client receives the encrypted data, it uses its private key to decrypt it.
This process ensures that only the private key user can access the data that the server encrypts with the public key.
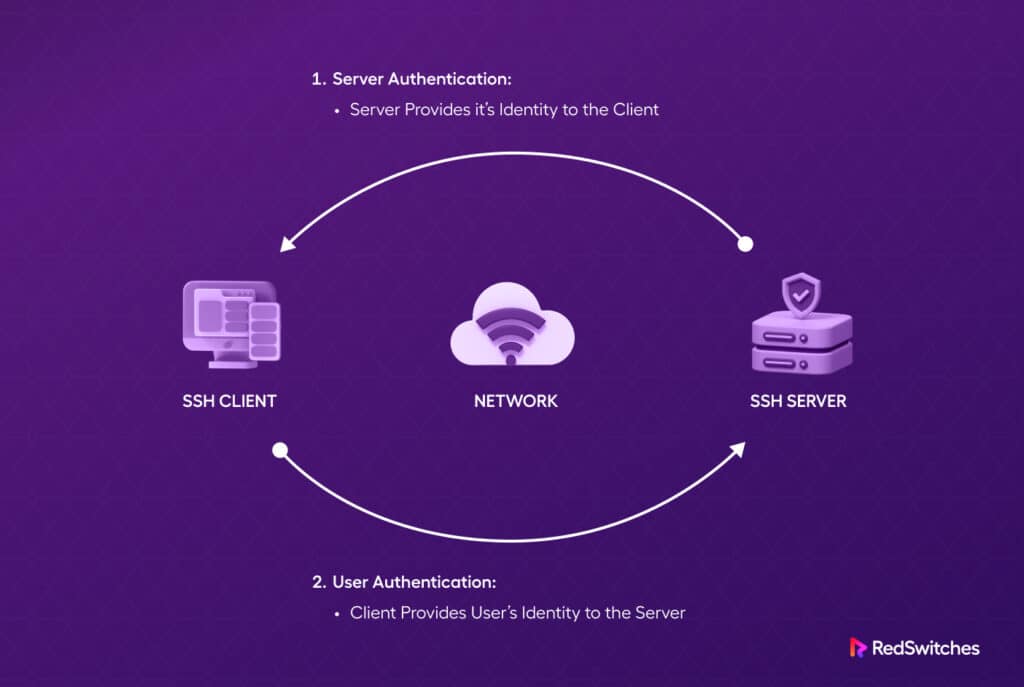
How SSH Authorized Keys Work Together?
To connect to an SSH server on a remote system, the client needs to upload their public key to that server. The key is typically stored in a designated file called ~/.ssh/authorized_keys within the user’s login directory.
When a client seeks to authenticate with an SSH server using secure shell keys, the server verifies the client’s possession of the private key. If the client successfully demonstrates ownership of the private key, the server initiates a shell session or executes the specified commands.
How to Use SSH Keys for Server Authentication
Now that you know about the two types of SSH keys and how these keys are used in the authentication process, let’s discuss how you can generate and set up SSH key-based authentication on your server.
Step # 1: Generate the Secure Shell (SSH) Key Pair
Before configuring SSH key authentication for a server, you must generate an SSH key pair on your source machine.
Since SSH keys are a prevalent authentication mode, you can use the ssh-keygen tool, which is included in the standard OpenSSH tool package available for Linux, Windows, and macOS.
By default, this utility generates an RSA key pair with a 3072-bit key size, which is adequate for most uses. If you wish, you can go as high as 4069 bits. However, we recommend sticking to the default bit length to avoid performance or compatibility issues.
To create an SSH key pair on your local source server, follow these steps:
Start the Process
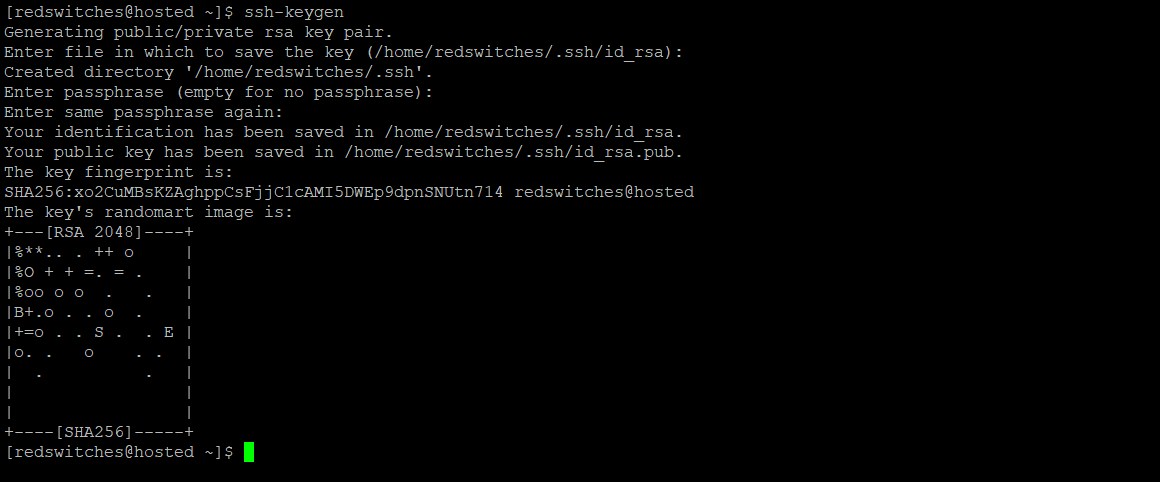
Launch the terminal and use the following command to initiate the critical generation process using the ssh-keygen utility.
$ ssh-keygen
The output of the command should be as per below image:

You can use the default location (usually ~/.ssh/id_rsa) or provide a custom path.
Add Passphrase
Next, you must enter a passphrase to protect your private key. This is an extra layer of security, and you’ll be required to enter it every time you use the key. However, if you do not wish to set a passphrase, press the ENTER button to bypass the prompt.
Once you provide the passphrase, the ssh-keygen tool will generate the SSH key pair. The process may take a few moments.
After the key generation is complete, you will see a summary that includes the location of the public and private keys.
The public key has a .pub extension and is used for authentication, while the private key should never be shared and always be kept safe. This guarantees that only you and the root user can access the private key file. In the event of compromised system security, the passphrase provides an additional layer of protection.
Here’s how the screen would look like at this point:
Step # 2: Transfer the SSH Public Key to Your Server
Now that you have the two keys, the next step is to copy the public key to the remote server.
You can use several methods for this. We recommend using the method that best fits your requirements.
IMPORTANT: We assume you have already generated the SSH key pair and have the public key file ready for transfer.
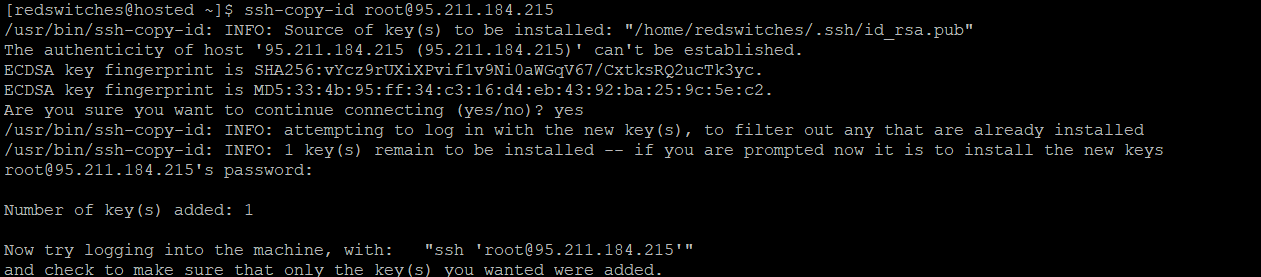
Method # 1: Copy the Public Key Using the ssh-copy-id (Recommended)
One of the most straightforward ways to copy your public key to an existing server is through the ssh-copy-id utility. This method is simple and highly recommended.
The ssh-copy-id tool is typically included in the OpenSSH packages. Note that you need password-based SSH access to your server to use this utility.
When using the utility, specify the remote host you wish to connect to and the user account associated with password-based SSH access. The public SSH key will be copied to the directory associated with the user account.
Here is the syntax for using the utility:
$ ssh-copy-id username@remote_host
Remember to replace username@remote_host with the server’s remote user account and hostname or IP address.
When connecting to a new host from your local computer, it is normal for your computer not to recognize the remote host. This is common during the initial connection to a new host.
To proceed, type “yes” and press ENTER to continue.
After confirming the host, the ssh-copy-id utility will search your local account for the previously generated id_rsa.pub key. Once it locates the key, it will prompt you to enter the remote user’s account password. This step ensures your public key’s authentication and secure transfer to the remote server.
Please enter your password (your input will be hidden for security purposes) and press ENTER.
The utility will then connect to the remote host’s account and copy the contents of the local ~/.ssh/id_rsa.pub key into the authorized_keys file. This file is located in the remote account’s home ~/.ssh directory, ensuring your public key is correctly positioned for SSH key authentication on the remote server.
At this point, here’s how your screen should look like:
You are now ready to proceed to the next step, where you can further configure and utilize SSH key authentication for secure and convenient access to the remote server.
Method # 2: Use SSH to Copy the Public Key
You can still upload your keys using the standard SSH procedure if you don’t have the ssh-copy-id utility on your machine but have password-based SSH access to a server account.
We will utilize an SSH connection to stream the content of the local public SSH key to the remote server. Alternatively, we can cross-check the existence of the ~/.ssh directory under the account we are using and then append the piped content to a file named authorized_keys within this directory.
To prevent overwriting existing content and instead append the new key, we will use the >> redirect symbol.
Here is the complete command:
$ cat ~/.ssh/id_rsa.pub | ssh username@remote_host "mkdir -p ~/.ssh && cat >> ~/.ssh/authorized_keys"
You’ll be asked to enter the account’s password. Once authenticated, the content of the id_rsa.pub key will be appended to the end of the authorized_keys file in the remote user’s directory.
Method #3: Manually Copy the Public Key
IMPORTANT: You should consider this process if you can’t use the above two methods.
In this method, the contents of your local id_rsa.pub file are added to a file located at ~/.ssh/authorized_keys on the remote system.
We recommend checking the contents of the id_rsa.pub key before proceeding further. For this, use the following command in the local terminal:
$ cat ~/.ssh/id_rsa.pub
You’ll see the key’s content, which might look like this:

To start the process, access the remote server through the offered method (usually a web-based console provided by the infrastructure provider).
After the successful login, it is crucial to verify the existence of the ~/.ssh directory. If the directory is not already present, you can create it using the following command:
$ mkdir -p ~/.ssh
Within this directory, you can now alter or create the authorized_keys file. You can add the contents of the local id_rsa.pub file to the end of the authorized_keys file, which you can create if necessary, using the below command:
$ echo public_key_string >> ~/.ssh/authorized_keys
Substitute the cat ~/.ssh/id_rsa.pub command output on your local system for the public_key_string in the command. It should begin with ssh-rsa AAAA… or something like that.
Once the process finishes, you can test the SSH key-based authentication.
Step # 3: Authenticate On the Server Using SSH Keys
At this point, you should be able to log into the remote host without requiring the remote account’s password.
The procedure is usually similar to the SSH access to the server:
Start the SSH session with the following command:
$ ssh username@remote-host
If you are connecting to this host for the first time, you may see something like this:

This indicates that your local machine is unaware of the remote host. Type yes to proceed and then hit the ENTER button.
You will be logged in directly if you have not used a passphrase-based private key. If you have a passphrase for the private key, you’ll be asked to enter it.
Once you’re authenticated via the SSH authorized keys, a new shell session will be created on the remote server

Step # 4: Disable Password Authentication On the Remote Server (Optional)
If you have successfully logged in to your account using SSH without a password, it means you have successfully configured SSH key-based authentication.
However, it’s important to note that your server may still be vulnerable to brute-force attacks if password-based authentication is still active.
While not strictly necessary, you can disable password-based authentication to secure server access.
IMPORTANT: Before proceeding with the steps in this section, ensure that either SSH key-based authentication is configured for the root account on the remote server or, preferably, for an account on the server with sudo access. This is crucial as the following steps will turn off password-based logins, and you could lose administrative access.
Once you have acted upon the above caution, use the SSH keys to log into the remote server as root or a user with sudo capabilities.
Edit the SSH config file for the SSH daemon with the following command:
$ sudo nano /etc/ssh/sshd_config
Within the file, look for a directive called PasswordAuthentication. Usually, it is commented out with a #.
You should remove the # to enable the directive and set the value to no. This will prohibit all users from logging in with the account’s password over SSH:
PasswordAuthentication no
When finished, close and save the file. Next, restart the service to apply the changes. On most of the Linux distro servers, use the following command to restart the ssh service:
$ sudo systemctl restart ssh
After completing this step, you’ve switched your SSH daemon to only react to secure shell keys.
Conclusion
SSH authorized keys offer a reliable and secure alternative to password-based authentication for establishing secure connections between clients and servers. This method ensures an end-to-end secure communication channel that contributes toward improving remote access security.
Consider RedSwitches For Improved Server Security
Improving server security is critical for protecting sensitive data, preventing unauthorized access, and ensuring the system’s integrity. RedSwitches provides ideal solutions for such business requirements and helps you harden the security of your valuable servers. Our security experts regularly assist our users in building and maintaining the best server security processes to safeguard critical business operations.
FAQs
Q. What exactly are SSH authorized keys?
SSH-authorized keys authenticate remote users in Secure Shell (SSH). They enable users to connect to a remote server without typing a password, making remote access convenient and safe.
Q. Can a single user have several SSH authorized keys?
Yes, a user can have numerous authorized keys. Each key should be listed on its line in the authorized_keys file.
Q. What if I delete an SSH-authorized key from the authorized_keys file?
When an authorized key is removed from the authorized_keys file, the matching private key can no longer authenticate the user on the server. The user must use another key or a login password to connect to the server.
Q. Where are SSH-authorized keys stored on the server?
Authorized keys for SSH are usually saved in the authorized_keys file in the user’s.ssh directory. Typically, the complete path is ~/.ssh/authorized_keys.
