Git is a powerful version control system that developers use to track changes in their codebase. Commits in Git repositories are like checkpoints in your project’s history. However, sometimes, these commits can become messy and cluttered, making it difficult to understand your project’s progression and the codebase’s evolution.
Learning how to squash commits in Git is essential for streamlining your commit history. Squashing commits is a powerful feature that allows you to combine multiple commits into one, eliminating unnecessary clutter and making your project history more concise and readable.
In this article, we will discuss how to squash commits in Git so you can effectively manage your codebase and avoid any future headaches.
Let’s start with a look at Git Squash and why you need this capability.
Table Of Contents
- What Is Git Squash?
- Why Do You Need Git Squash?
- When to Squash Commits?
- How to Squash Commits in Git
- Method 1: Use an Interactive Git Rebase
- Method 2: Use Git Merge
- Method 3: Use the Pull Request
- Method 4: Use the Git Reset Functionality
- Conclusion
- FAQs
What Is Git Squash?
In Git, squashing refers to merging several commits into a single entry. You can perform this action at any moment using Git’s Interactive Rebase feature. However, many developers and project managers prefer to squash commits when merging branches.
Note that Git Squash is not a native functionality or command. You squash commits when you merge branches or rebase your repository.
Why Do You Need Git Squash?
Squashing commits in Git is important for a few reasons.
For starters, squashing keeps the commit history clean and organized. The process merges multiple small commits into a single entry. As a result, the long list of commits is reduced, and you can better navigate the commit history. This practice can be particularly useful when multiple developers collaborate on a project or during codebase reviews.
Squashing commits can also help improve the readability and clarity of the commit messages. Instead of having a long list of individual commits with vague or repetitive messages, squashing allows for more concise and informative commit messages. Anyone viewing the commit history after a squashing round can easily understand the changes made in each commit.
Lastly, squashing commits also helps maintain a more logical and cohesive development history. Combining related commits into a single commit creates a more cohesive narrative of the development process and makes it easier to track the evolution of the codebase over time.
Squashing commits in Git results in a more organized, readable, and cohesive commit history. At the same time, it has the effect of rewriting Git history, so we usually don’t advise squashing commits on branches shared with outside developers as it can potentially introduce confusion into the collaborative development process.
When to Squash Commits?
Knowing when to squash commits is critical expertise because not every situation or codebase can benefit from the idea.
Let’s discuss two situations where knowing how to squash commits in Git is very productive.
Post Feature Delivery
While developing a feature, the dev team makes multiple commits as they code functionalities and fix bugs.
Once the feature is complete and delivered, the “in-between” commits become unnecessary and clutter up the commit history. Squashing these intermittent commits into a single, more meaningful commit cleans up the history and makes it more readable.
Merging Branches
Typically, when you start working on a new feature, you create a separate branch for it. Let’s say you’ve made 20 commits in this feature branch. When it’s time to merge this branch into the main or master branch, the 20 commits will add a lot of clutter to the main branch. The recommended practice is to squash those 20 commits into one. This helps maintain a clean and readable main branch.
How to Squash Commits in Git
Squashing commits is such an important activity that Git offers several ways of accomplishing the task. We’ll now discuss the prerequisites for the process and then go into the details of the four methods.
Prerequisites
The prerequisites for squashing commits in Git include the following:
- You have Git installed on your system.
- You have a Git repository to experiment with
Method #1: Use an Interactive Git Rebase
You can manually combine your previous commits using Git’s Interactive Rebase feature. We’ll not go into the details of the feature because it’s beyond the scope of this article. Instead, we’ll discuss a typical example.
Imagine you’ve finished your tasks for a new feature branch and plan to merge it back into the main branch. You can follow these steps to squash commits using the interactive rebase command.
Step #1: Switch to the branch that contains the commits you want to squash
You can use the git checkout or git switch command to switch to the branch.
$ git switch <branch_name>

Step #2: Check the git log for the commit history
Check the commit history with the following command:
$ git log --graph --oneline --all
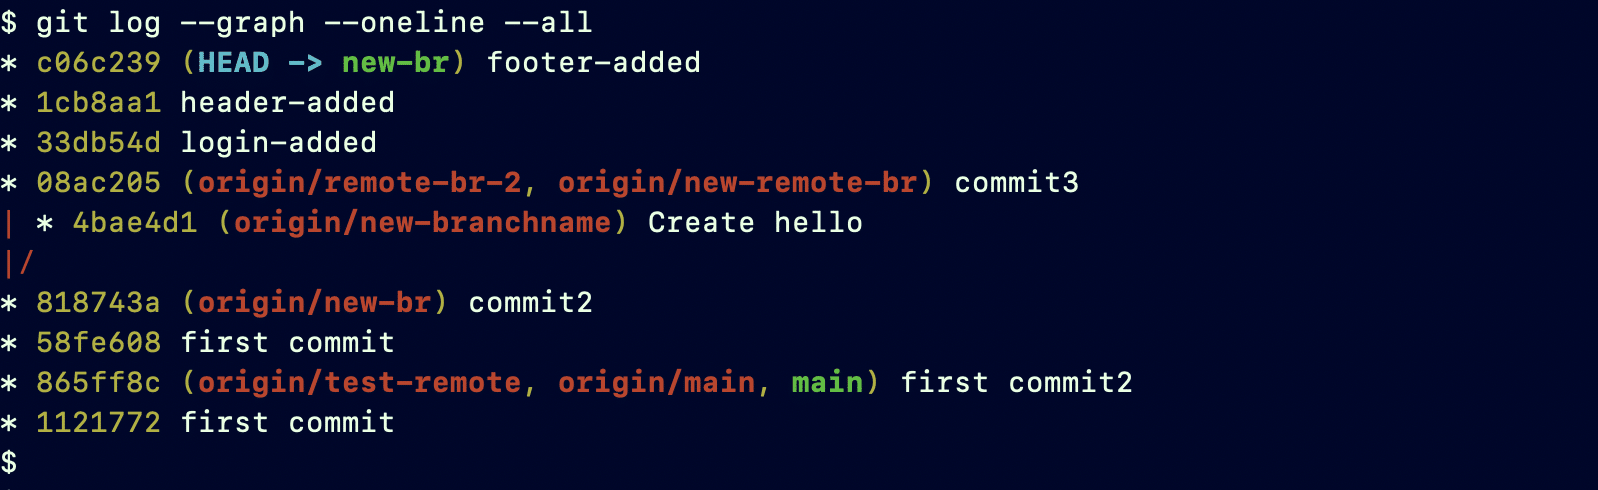
Each entry on the list represents a commit made during the project execution. Note down the commits on the feature branch you want to squash.
In the screenshot, we can see two branches, main and new-br. The new-br branch has seven commits. We’ll now squash these commits into a single commit.
Step #3: Start the interactive rebase process
The syntax of the command is
$ git rebase -i HEAD~<number_of_commits>
In our case, the command will be:
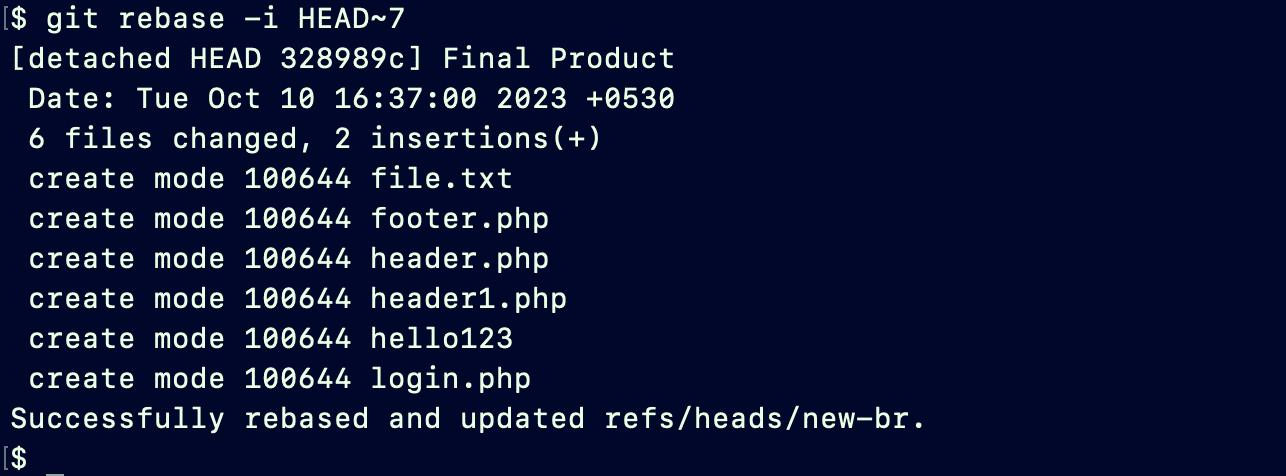
$ git rebase -i HEAD~7
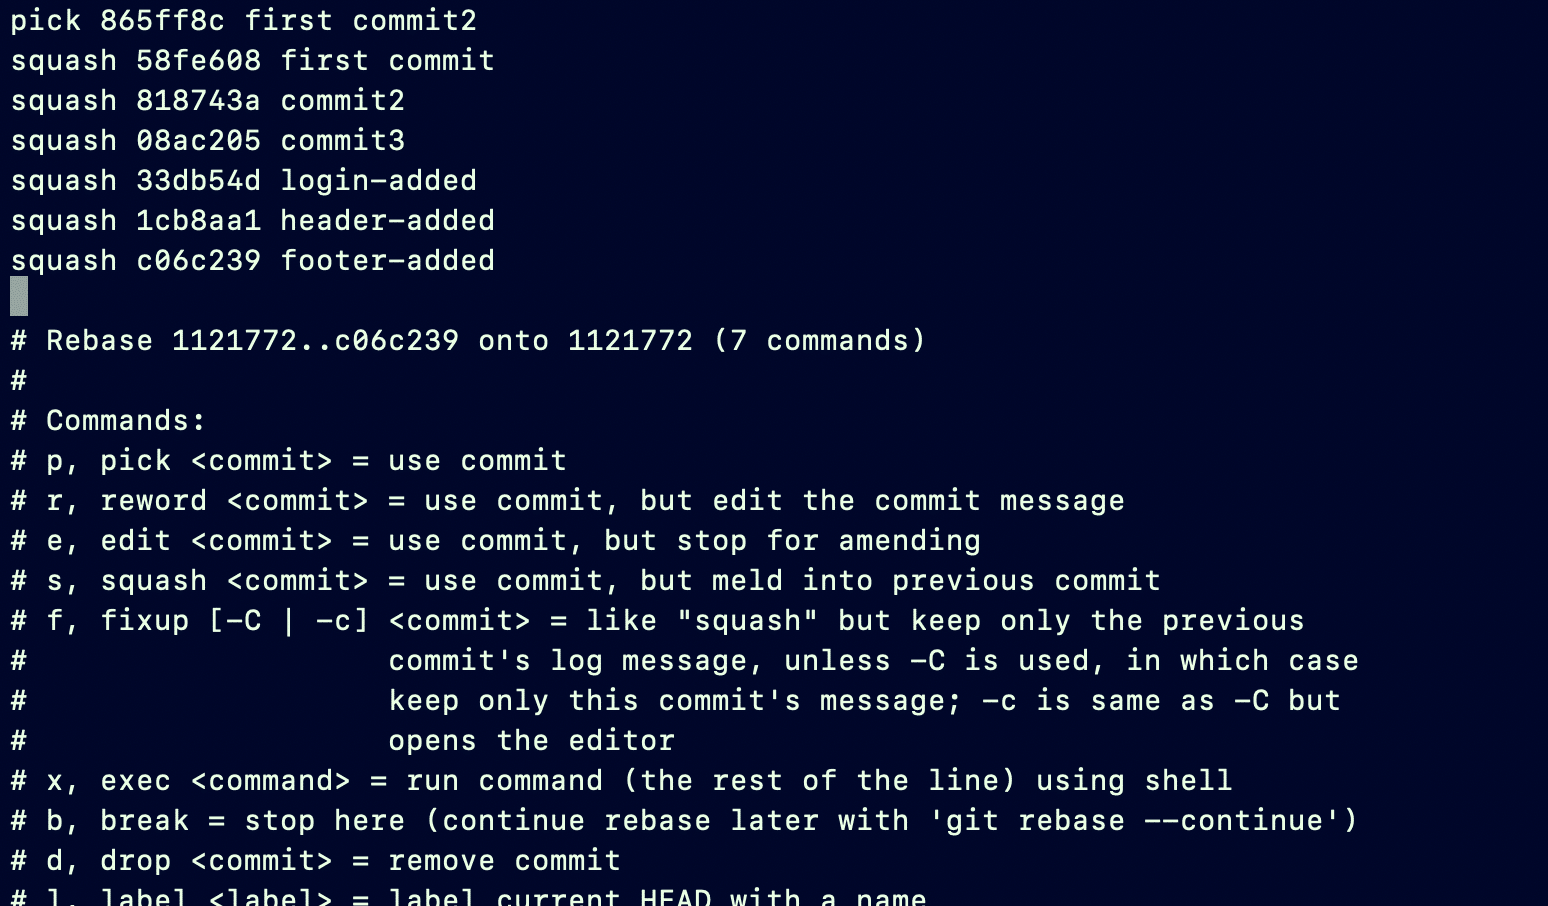
When executed, you will see the default editor window where you can define the changes you wish to make to the chosen segment of the commit history. The Interactive Rebase provides several actions you can apply to the commit history, including squash, edit, and drop.
In our specific scenario, we will focus on the squash action. When we designate a line as squash, it will be merged with the line immediately above. Make sure at least one commit is with the pick command so that the commits below can be merged into it.
Change to insert mode of the default editor. Here, we have chosen the first commit for the pick command.
Save the file and quit the text editor.
Step #4: Enter a new commit message
Git will now initiate another text editor, displaying the commit message.
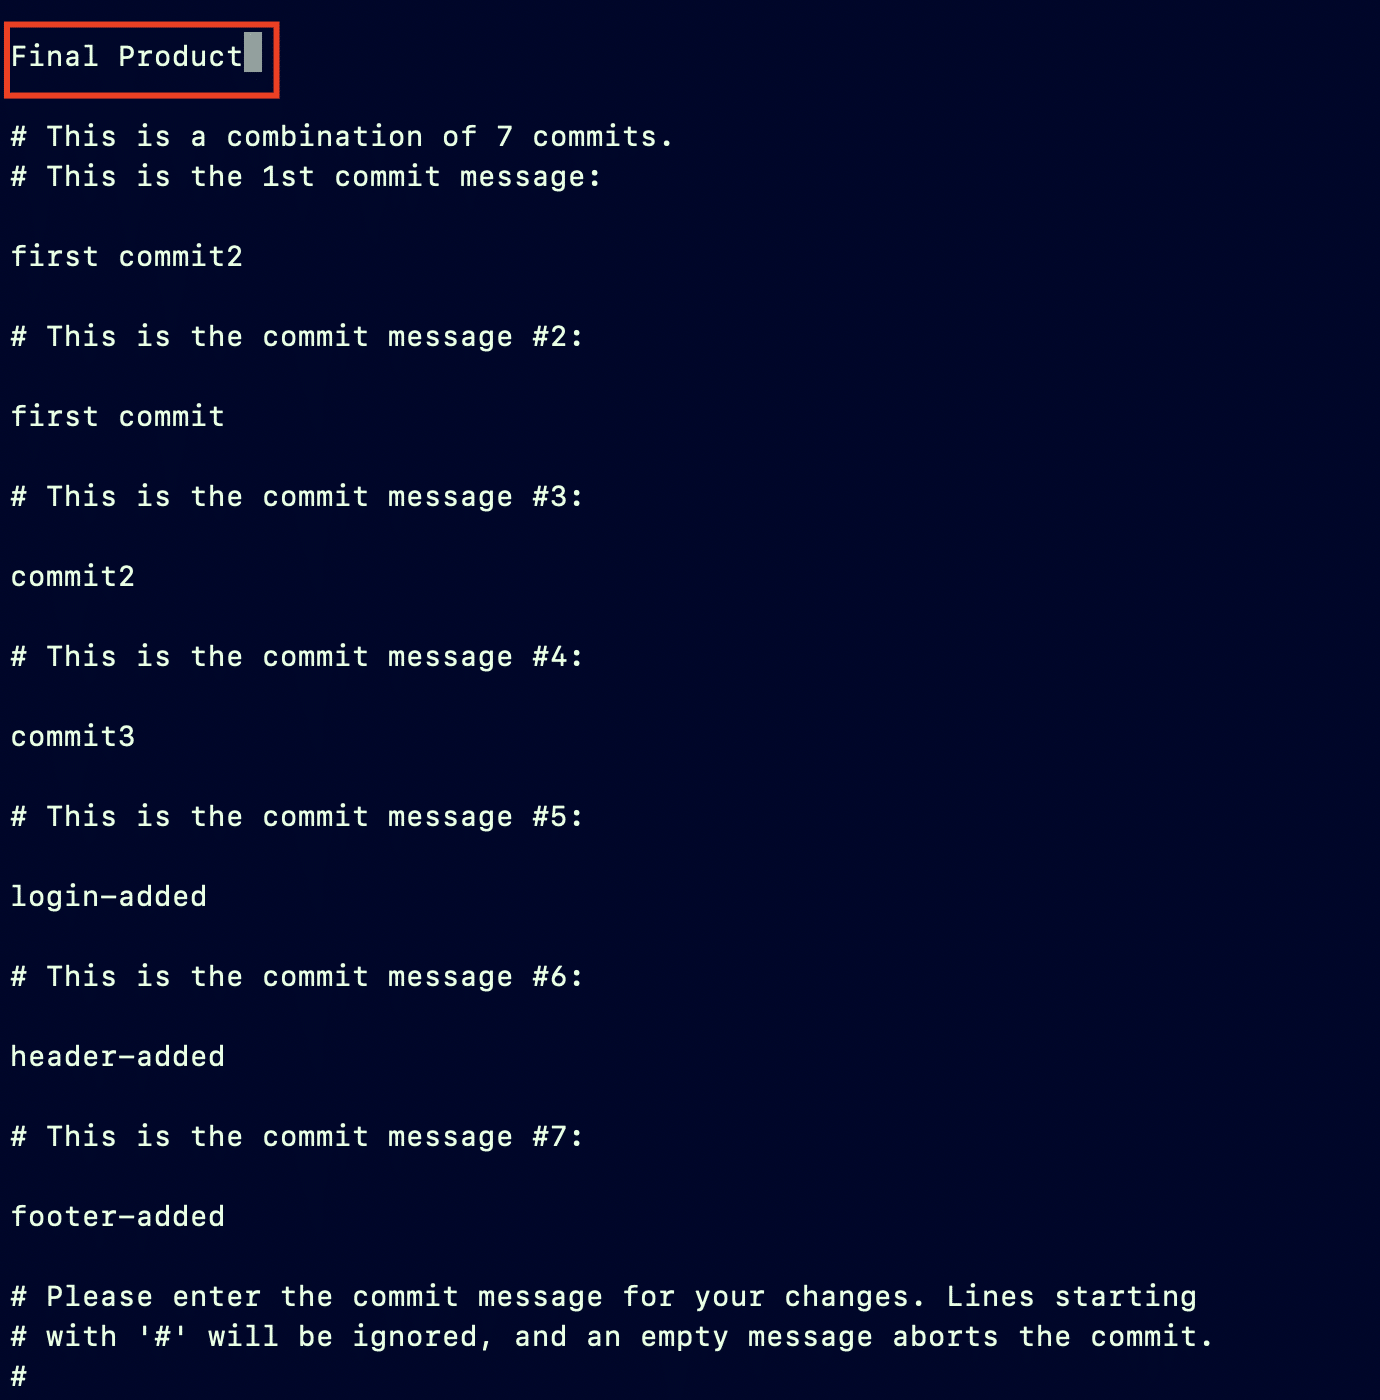
You can remove all existing messages and replace them with a custom message. Alternatively, you can keep the existing messages and append a new commit message. Once you’ve made your choice, save the file and close it.
After completing these steps, you should receive a success message in the terminal.
Step #5: Push the changes
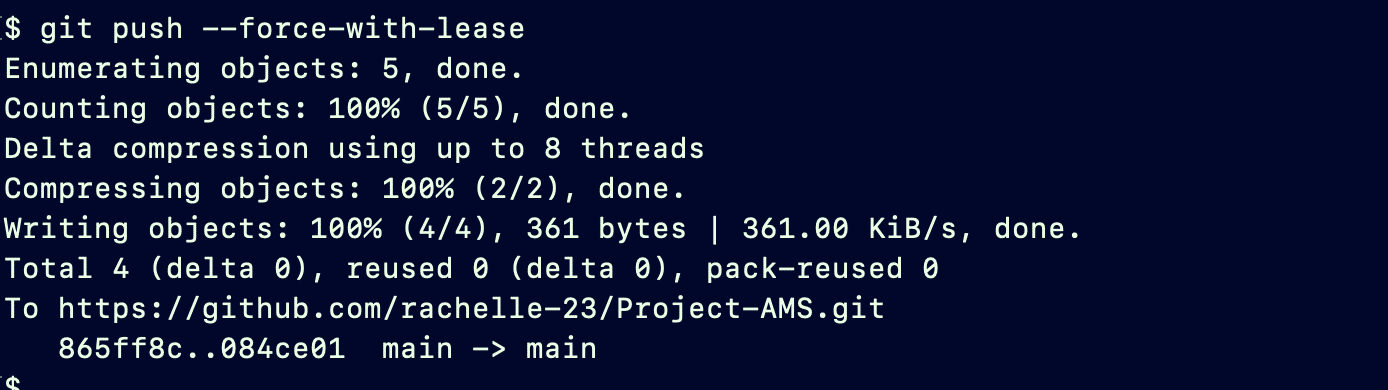
After the rebase operation finishes, you can update the remote repository by executing a force push. It’s essential to be aware that this action may overwrite commits made by other project collaborators, so exercise extreme caution when using this option.
Use the following command to apply and share the changes:
$ git push --force-with-lease

Pushing changes to the Git branches is a serious decision. We recommend our detailed guide on git push to a remote branch to help you understand how it works.
Method #2: Use Git Merge
When you’re preparing branches for the merge process, you can consolidate multiple commits into a single commit. This practice streamlines the incoming branch by eliminating redundant commits.
However, it’s important to note that this approach provides less flexibility compared to the control offered by the rebase method.
Run through the following steps to merge and squash commits using Git.
Step #1: Select the branch
Navigate to the branch you intend to merge with the git switch or git checkout command:

Step #2:Initiate git merge
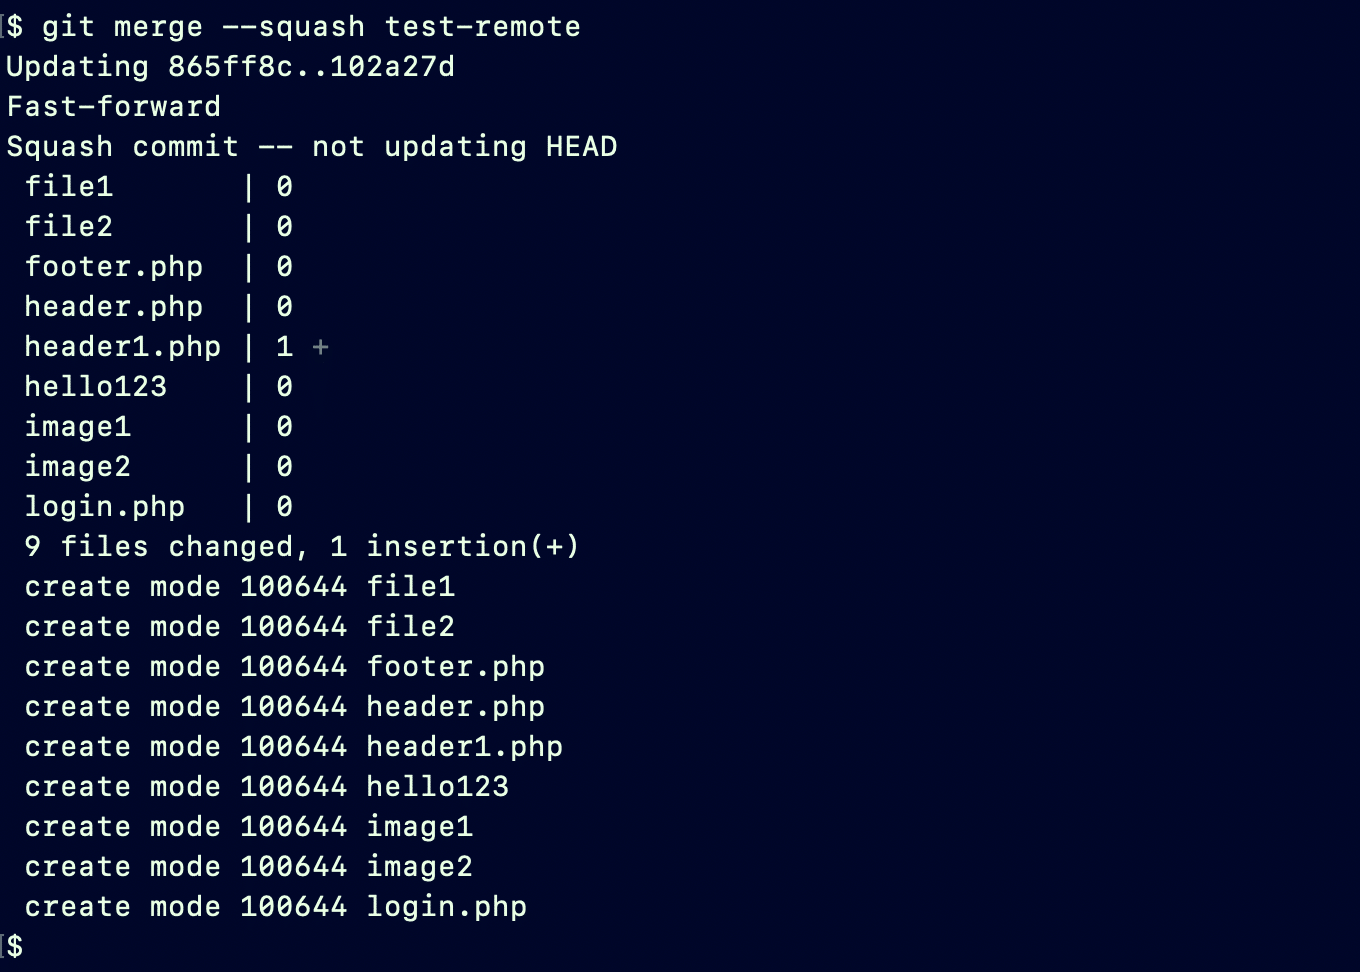
Execute git merge with the ‘–squash flag, and indicate the branch that contains the commits you wish to combine:
$ git merge --squash <branch_name>
Step #3: Finalize with git commit
Finalize the process by committing with a custom message. The syntax of the command is:
$ git commit -m "<your_commit_message>"

Step #4: Push the changes
Finally, force push the changes to the remote repository with the git push command:
The –force-with-lease flag confirms whether the remote branch matches the version of the one you are merging. It ensures that any new commits pushed in the interim are acknowledged and rejects the push if the remote branch has been modified in between.
When working with a remote repository, many users start with listing all the branches to see how the repo is laid out and what branches they need to work on. We have created a short tutorial on how you can list remote branches in a Git repo.
Method #3: Use the Pull Request
Git repository hosting platforms, like GitHub and GitLab, offer built-in features for squashing commits when creating a pull request.
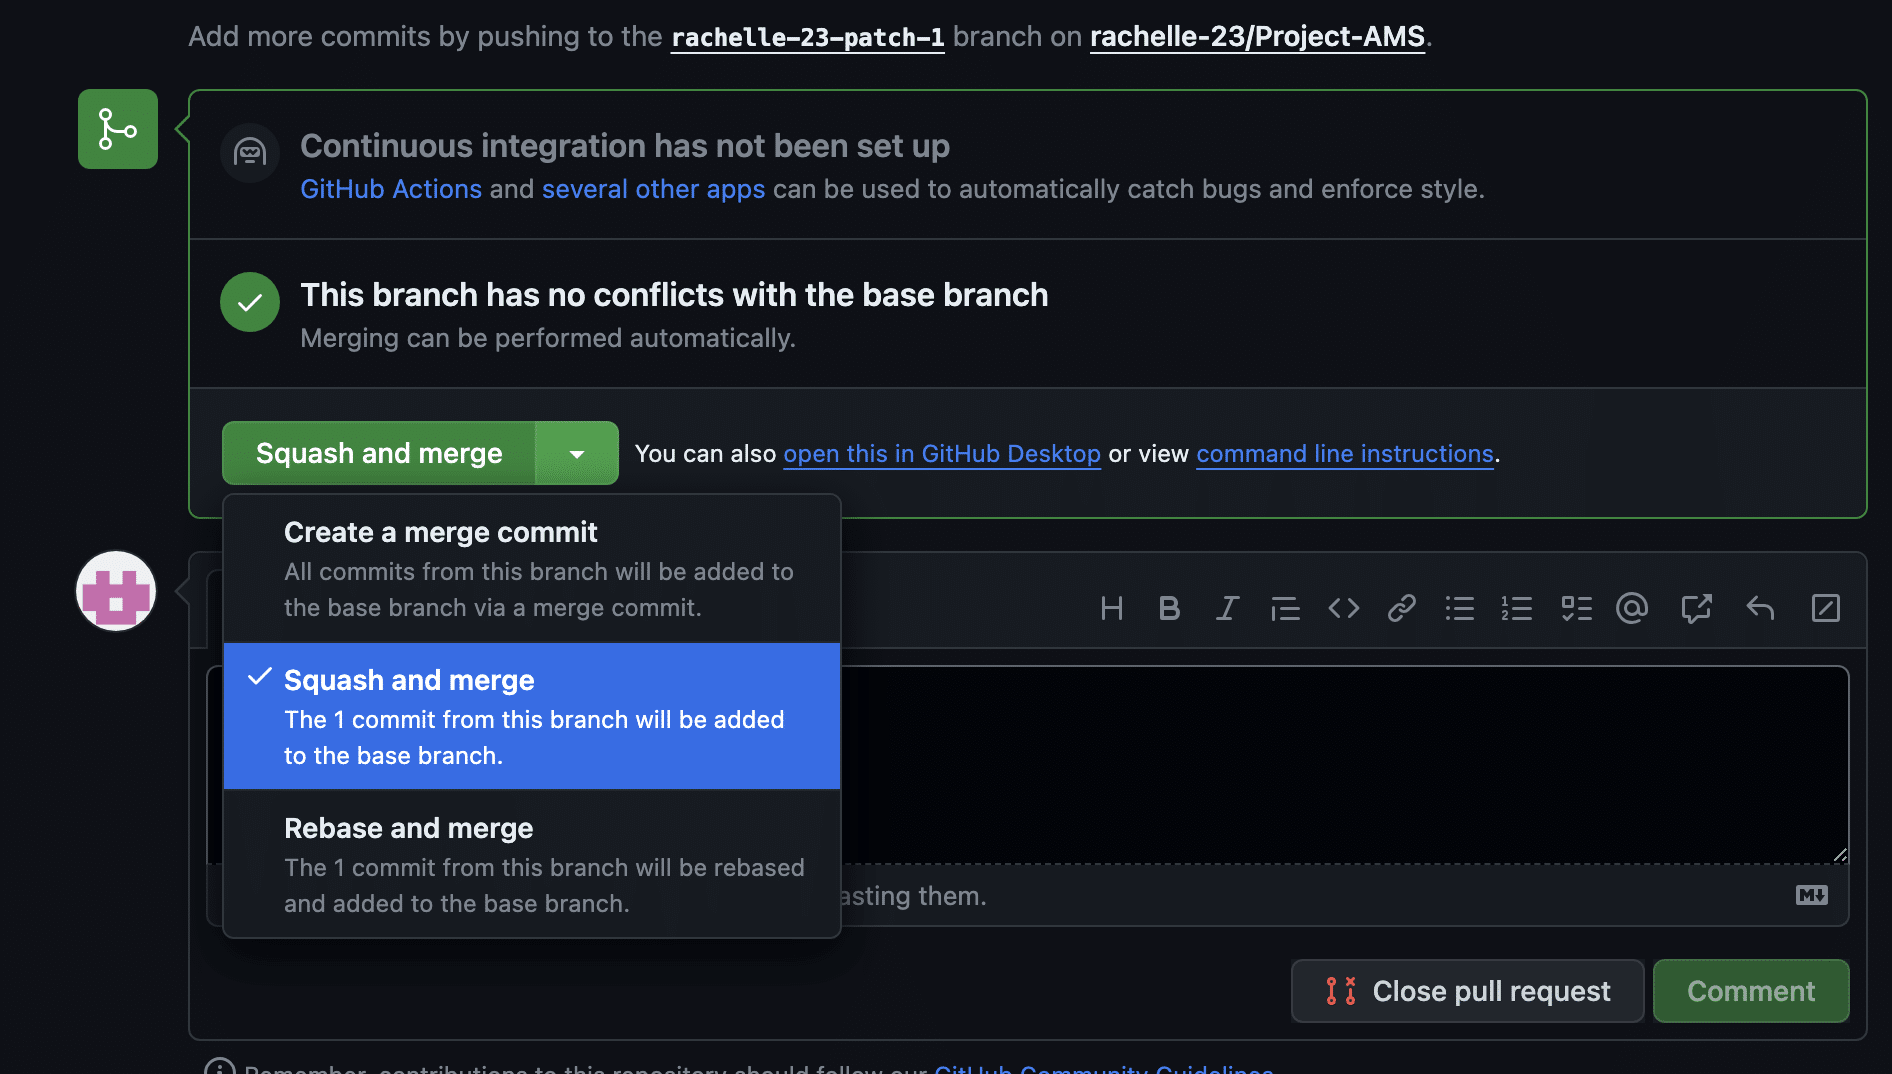
For instance, GitHub lets you choose the “squash and merge” option during the pull request creation process. Here’s how you can use this feature:
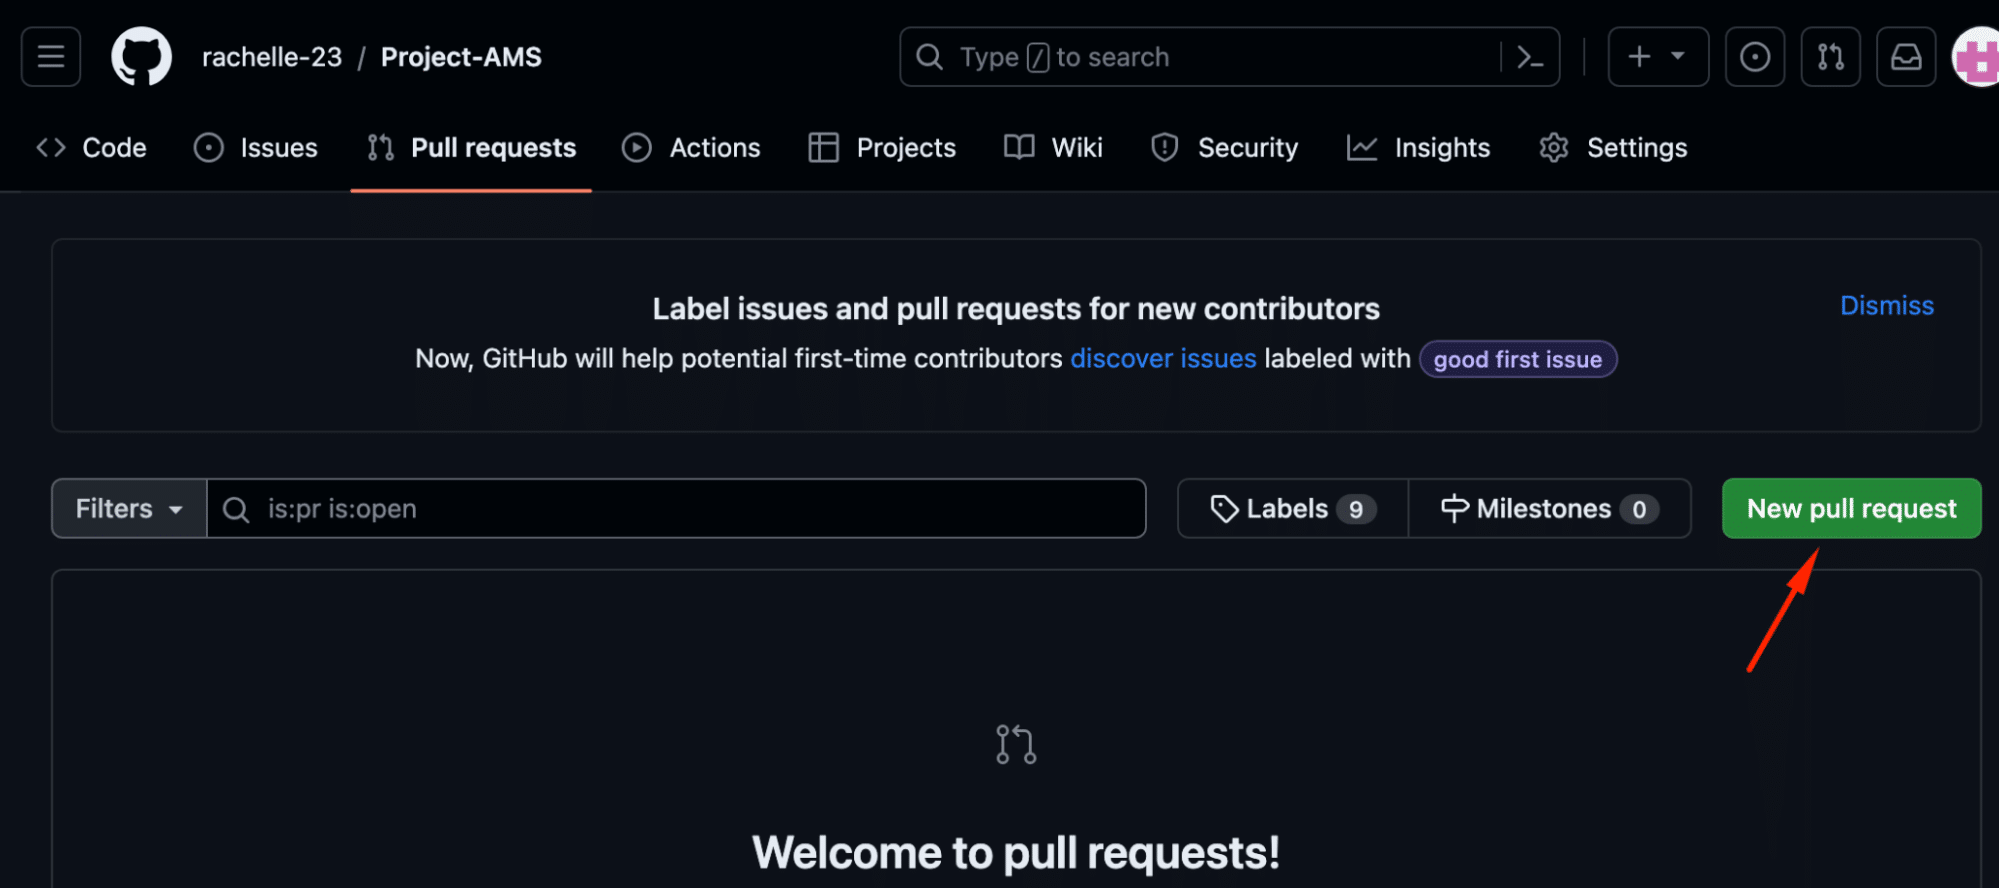
- Log into your Git public repository.
- Navigate to the Pull requests section and tap the New pull request button.

- Once the commits are done, click Create a merge commit and select the Squash and merge option.

- Confirm the action and merge.
Method #4: Use the Git Reset Functionality
Git Reset offers an alternative method to squash commits without relying on rebase or merge options. This robust option is used to change the current HEAD to a designated state or to reverse local changes within a Git repository.
The soft reset operates by repositioning the HEAD to the most recent commit you intend to keep. The process does not affect the index and working tree. Consequently, the index retains all changes from the commits slated for consolidation.
Follow these steps to apply the soft reset for squashing commits:
- Execute the git reset command in the terminal. The syntax is as follows
$ git reset --soft HEAD~<number_of_commits> && git commit - This command opens a file in the editor, and you just have to enter the commit message at the top.
- Save and exit the file.

In this example, the command will squash the last two commits into one.
Conclusion
In this tutorial, we’ve explored four approaches to squashing commits in Git. Depending on your preferences, you can opt for commit squashing through git merge, git rebase, git reset, or by initiating a pull request on select repository hosting platforms.
Ready to take your Git workflow to the next level? Try RedSwitches Hosting solutions and experience the difference of customizable bare metal servers.
We offer the best-dedicated server pricing and deliver instant dedicated servers, usually on the same day the order gets approved. Whether you need a dedicated server, a traffic-friendly 10Gbps dedicated server, or a powerful bare metal server, we are your trusted hosting partner.
FAQs
Q. What is the purpose of squashing commits in Git?
The purpose of squashing commits in Git is to combine multiple commits into a single commit, making the commit history cleaner and easier to understand. It helps simplify the Git tree and remove unnecessary commit noise.
Q. How can I squash multiple commits into a single new commit?
To squash multiple commits into a single new commit, you can use the interactive rebase feature in Git. This allows you to select the commits you want to squash and combine them into one.
Q. How do I choose a base commit when squashing commits?
When squashing commits, you can choose a base commit to squash onto. During the interactive rebase process, you can reorder the commits to select the desired base commit. The commits will be squashed to this base commit.
Q. Can I squash commits in a branch other than my current branch?
Yes, you can squash commits in a branch other than your current branch. You can use the “git rebase” command followed by the name of the branch you want to squash commits in. This will perform the squashing operation on the specified branch.
Q. What is the “target branch” in Git?
The “target branch” in Git is the branch you want to integrate your changes into, typically through methods like merging or rebasing. It’s where your commits will be applied.
Q. What is the “interactive rebase tool” in Git?
The “interactive rebase tool” in Git allows you to review, modify, or reorder commits during the rebase process. It provides an interactive interface for managing your commit history.
Q. What is the purpose of “git rebase –continue”?
“git rebase –continue” is used to resume the rebase process after resolving conflicts. It lets you proceed with applying the remaining commits once conflicts have been resolved.
Q. How is the “git rebase command” used in Git?
The “git rebase” command is used to reapply a sequence of commits from one branch to another. It’s commonly used to merge changes from one branch into another while maintaining a cleaner commit history.
Q. How can the “squash command” be utilized during a Git rebase?
To squash commits during a Git rebase, you can use the “squash” command in the interactive rebase tool. When you mark a commit with “squash,” it combines that commit with the previous one, helping to consolidate your commit history.
