Over the last few years, MongoDB has become a popular choice as a DBMS component in web apps. It is an open-source document-oriented NoSQL database that is written in C++.
Thanks to its schema-less system, adding (and removing) fields is very easy. Similarly, in the event of a disaster, recovery is fast and generally painless.
In this article, we’ll cover the process of installing MongoDB on Ubuntu 20.04 OS. But first, let’s find out a bit about MongoDB to understand the reasons behind its popularity.
Table Of Content
- What are the Popular Applications of MongoDB?
- What is the Difference Between MongoDB Community & Enterprise Editions?
- Install MongoDB v6.0 on Ubuntu 20.04
- How to Secure a MongoDB Installation?
- How to Configure MongoDB for Remote Access?
- How To Remotely Access a MongoDB Database?
- Conclusion
- FAQs
At the time of writing this blog, MongoDB’s most recent release is v6.0. It was released on July 2022 and shipped with new features and enhancements, including:
- Optimizations for time series collections
- Improved support for event-driven architectures
- Support for sharded joins and graph traversal
- Improvements to operational resilience and sharding.
- The ability to run expressive queries on fully randomized encrypted data
- Additional data security and operational efficiency
What are the Popular Applications of MongoDB?
MongoDB is widely used in web and mobile application development, data warehousing and big data analytics, Content management and delivery, e-commerce, real-time data processing, cloud applications, etc.
Here’s why:
- MongoDB has a highly scalable architecture that developers prefer for building scalable systems with multiple data formats. MongoDB’s document database architecture makes storing both structured and unstructured data a piece of cake. For instance, It stores documents in a format equivalent to JSON.
- MongoDB makes data access straightforward because it hardly needs joins or transactions.
- The MongoDB dev team decided to represent and store data in a document format, so you can access it from any language using data structures unique to that language, such as dictionaries in Python, objects in JavaScript, maps in Java, etc.
- MongoDB’s document model allows for incorporating information without requiring expensive join operations used by traditional relational databases.
What is the Difference Between MongoDB Community & Enterprise Editions?
MongoDB Community Edition and MongoDB Enterprise Edition are two different editions of the MongoDB database management system, each with its own features and capabilities.
- MongoDB community editions are open source, and it has a limitation on support for In-Memory Storage Engine, Auditing, Kerberos Authentication, LDAP Proxy Authentication, and Encryption at Rest.
- Although MongoDB Enterprise subscriptions come with extra operational and administration tools, a business license (warranty & indemnity, which is an additional cost every year), access to proactive support, and on-demand training, the core server functions for developers remain largely the same.
- Both editions provide basic features like database Engine tools, server, replication & sharding.
This guide will focus on installing the MongoDB Community Edition 6.0 version on Ubuntu.
Install MongoDB v6.0 on Ubuntu 20.04
The process of installing MongoDB on Ubuntu has several steps that check for dependencies and then go into the specifics of the installation.
Let’s start.
Step 1: Install the MongoDB Dependencies
Start by updating the package index:
#apt-get update
#echo "deb http://security.ubuntu.com/ubuntu impish-security main" | sudo tee /etc/apt/sources.list.d/impish-security.list
# apt update
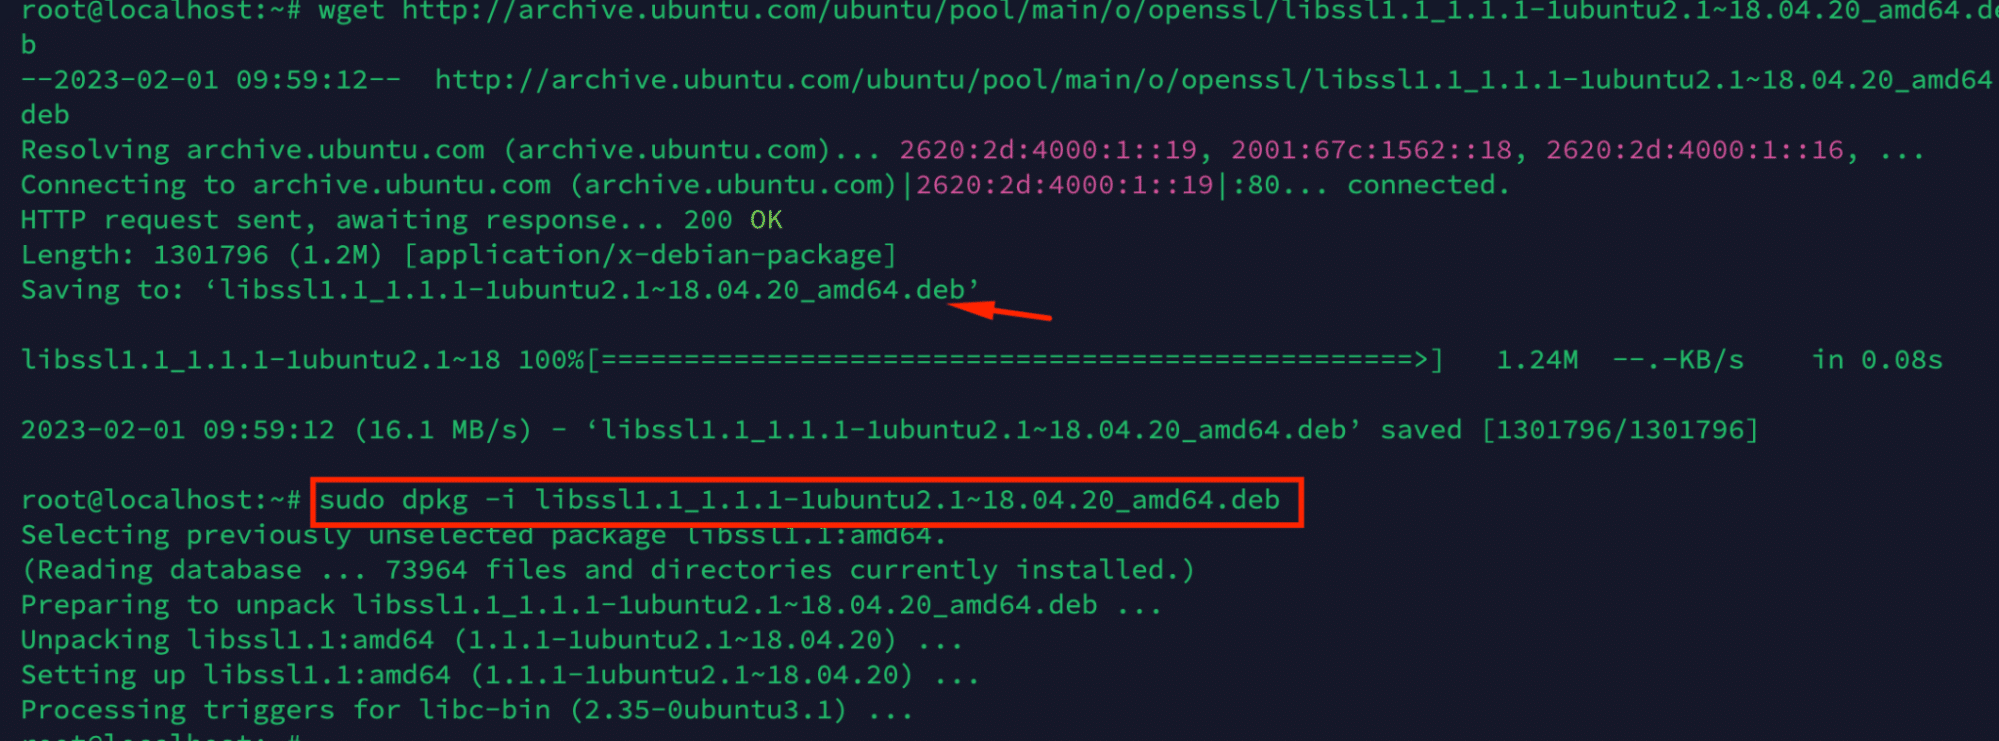
Before proceeding to the next step, you may get an error message regarding the libssl1.1 package(Depends: libssl1.1 (>= 1.1.1), but it is not installable). To resolve this issue, you need to follow the additional steps mentioned below :
# wget http://archive.ubuntu.com/ubuntu/pool/main/o/openssl/libssl1.1_1.1.1-1ubuntu2.1~18.04.20_amd64.deb
# dpkg -i libssl1.1_1.1.1-1ubuntu2.1~18.04.20_amd64.deb
Ubuntu 18/20 distributions require installing these packages before proceeding to install MongoDB. So before installing MongoDB from the repositories, we will add the dependency packages to the server.
#apt update
#apt install wget curl gnupg2 software-properties-common apt-transport-https ca-certificates lsb-release
Step 2: Import the public key
Now that the dependencies are out of the way, the next step is to import the public key. For this, you can refer to the steps to obtain a GPG key on Ubuntu 22.
Start with the following command:
# wget -qO - https://www.mongodb.org/static/pgp/server-6.0.asc | sudo apt-key add -

You may ignore the warning you are facing while obtaining the key.
You must add the official package repository for MongoDB to your APT sources to get the most recent version. You may install mongodb-org, a meta-package constantly pointing to the most recent MongoDB version. If you’ve upgraded from Ubuntu 18.x, use the following command to get the GPG key:
#curl -fsSL https://www.mongodb.org/static/pgp/server-6.0.asc|sudo gpg --dearmor -o /etc/apt/trusted.gpg.d/mongodb-6.gpg

Step 3: Configure MongoDB Repo
In this step, we’ll configure the MongoDB repo.
Run the following command, which is common for the ubuntu distro 18/20/22, which creates a file in the sources.list.d directory named mongodb-org-4.4.list.
#echo "deb [ arch=amd64,arm64 ] https://repo.mongodb.org/apt/ubuntu
focal/mongodb-org/6.0 multiverse" | sudo tee /etc/apt/sources.list.d/mongodb-org-6.0.list

Now that you’ve made your list file, you can set up the Local Package repository in the next step.
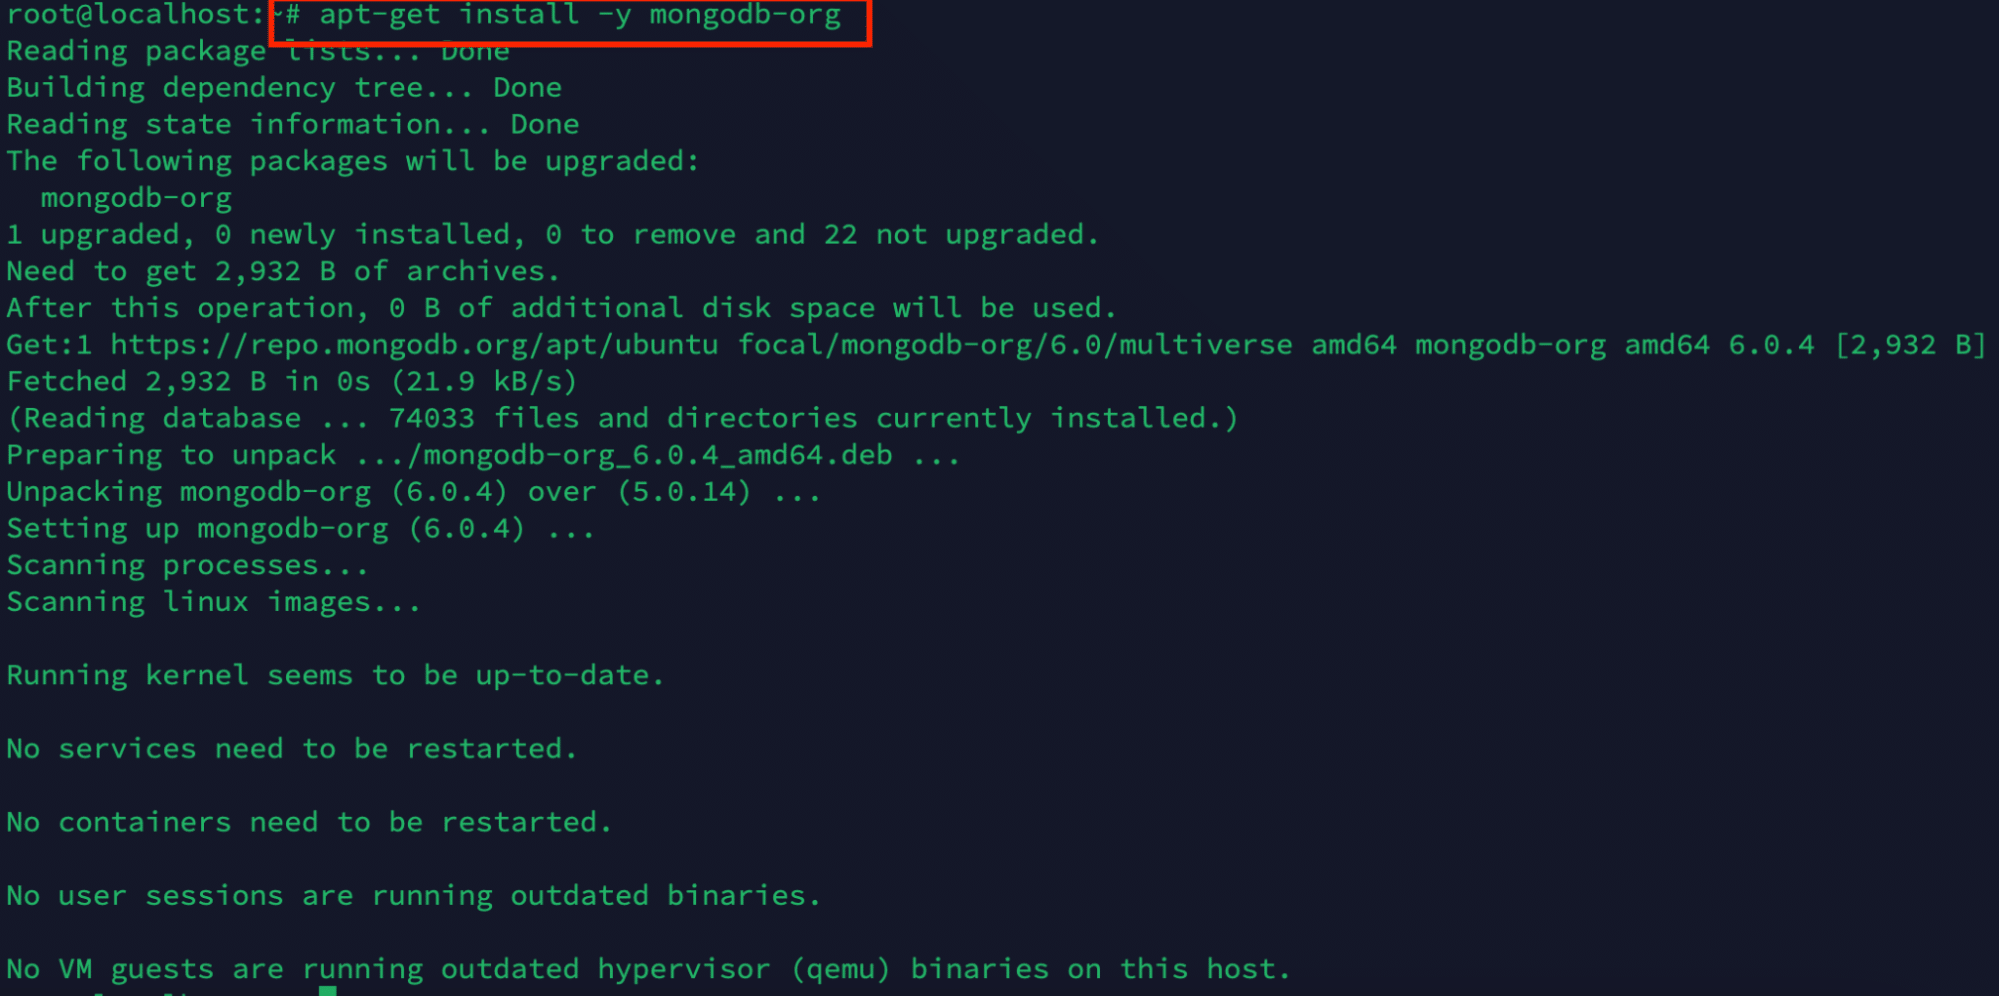
Step 4: Install MongoDB 6.0 on Ubuntu 20.04
On Ubuntu 20.04 version, you can use the following commands:
# apt update
# apt install mongodb-org
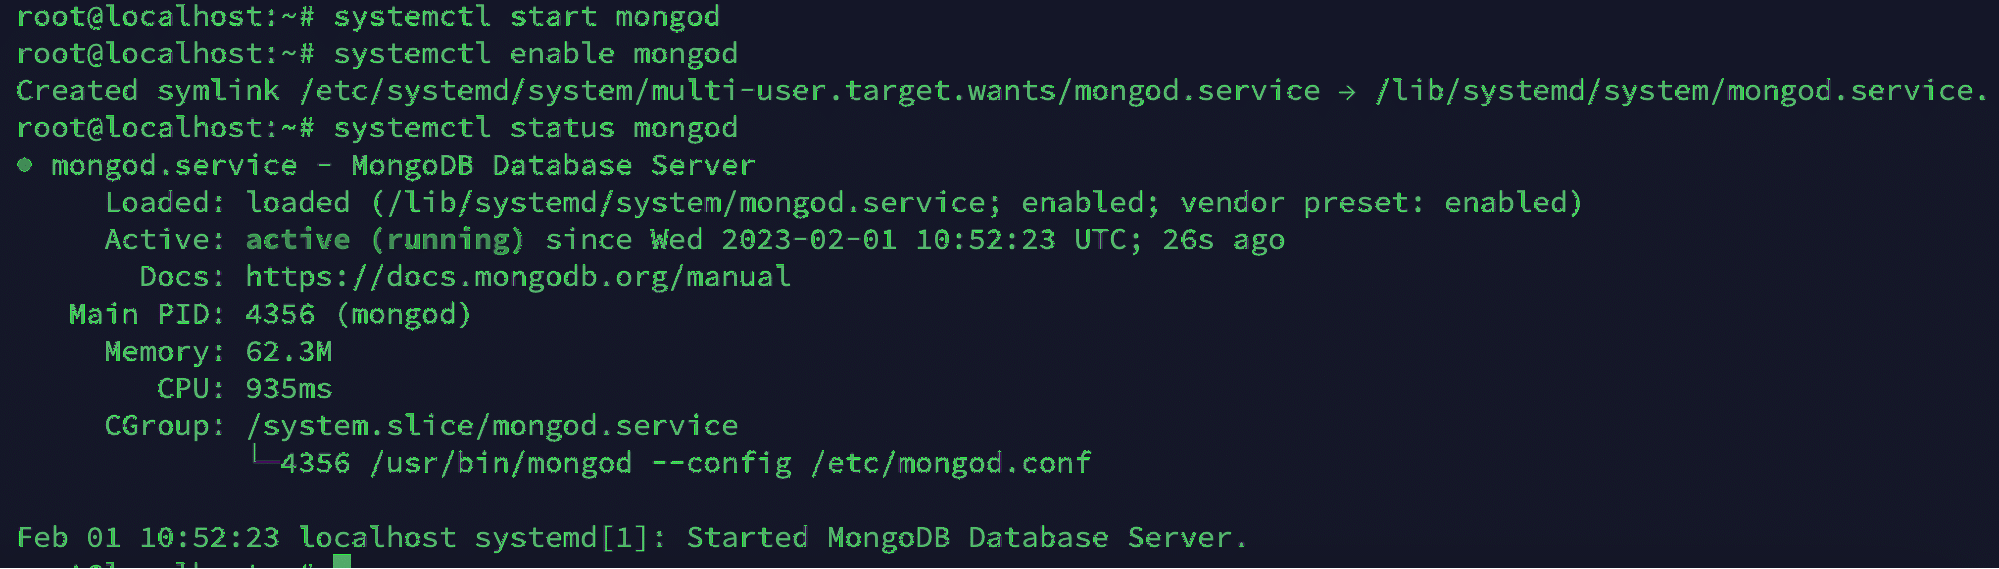
Step 5: Start and enable the MongoDB service
Once the installation is successfully completed, start & enable the MongoDB service by entering the following commands;
# systemctl start mongod.service
# systemctl enable mongod
Next, run the following command:
# mongod –version
This command prints the current version and related information. This shows that the MongoDB service is up and running.
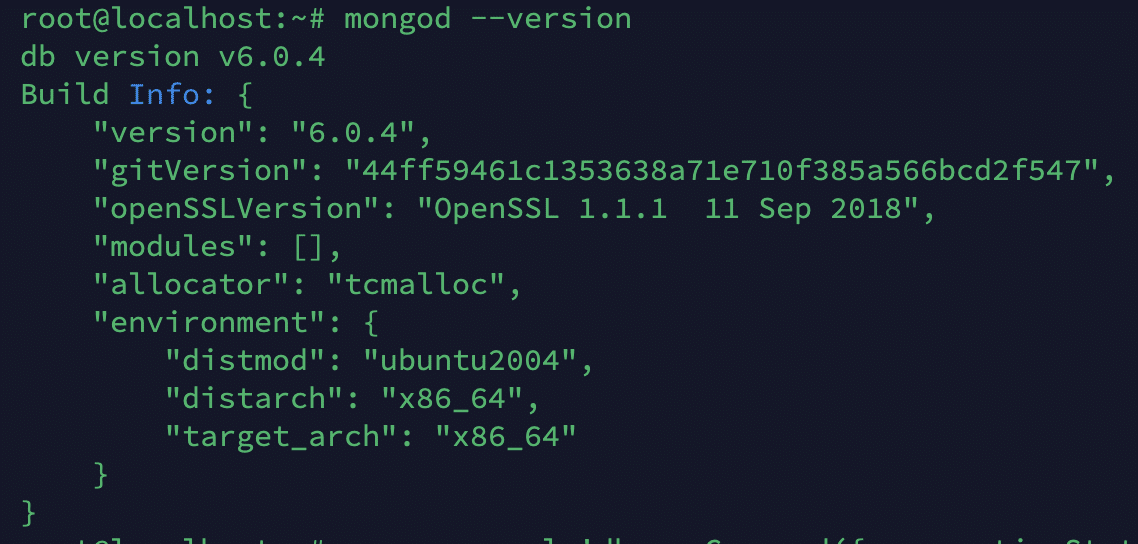
Note- If you are still getting any order versions listed in the output of the above command, you can try to run ‘apt upgrade’ to resolve the same and restart mongod service.
MongoDB directly listens at port 27017. You can connect to the MongoDB shell via the following command:
# mongo --host 127.0.0.1:27017
How to Secure a MongoDB Installation?
Once the MongoDB has been installed and properly set up, the next order of business should be securing the MongoDB database server. Note that the specific security measures for MongoDB will depend on specific use cases and the data being stored. It’s important to conduct a thorough security assessment and seek advice from security experts to determine the best practices for securing a MongoDB installation.
The first step is to create an administrative user.
For this, access the MongoDB shell with the following command:
#mongosh
Next, add an admin user with the USE command:
> USE admin
You are now logged in as an admin user on the MongoDB server. Create a new admin user with the following command:
>db.createUser({USER:"admin", pwd:"new_password_here", roles:[{ROLE:"root", db:"admin"}]})
Important: Remember to create a strong password and replace “new_password_here” with it. Also, note that the ROLE grants root privileges to the user “admin”.
Now that you have an admin user in place, the next step is to enable authentication. To do this, open the mongod.conf file.
#vi /etc/mongod.conf
Scroll down and locate the security section. Uncomment it and add the authorization directive and set it to enabled.
#security:
authorization: enabled
Exit the configuration file after saving the modifications. Restart the MongoDB service with the following command so that the changes can take effect.
#systemctl restart mongod
First, log out of the Mongo Shell by using the exit command. Then, log in using credentials for the user admin. For this, use the following command:
# "mongosh "mongodb:/adminuser@mongo-ip-address:27017"
How to Configure MongoDB for Remote Access?
To configure the MongoDB installation for remote access, open the mongod.conf file in your preferred text editor.
#vi /etc/mongod.conf
Take note of the value of bindIp under the network interfaces section.
#network interfaces
net:
port: 27017
bindIp: 127.0.0.1
Add a comma before the IP address of the Mongo server to enable remote access. For instance:
bindIp: 127.0.0.1, <mongo-server-ip>
Save the modifications and close the configuration file. Restart the MongoDB service with the systemctl restart command to make the modifications take effect.
How To Remotely Access a MongoDB Database?
The default port that MongoDB listens to is 27017. Therefore, use the netcat tool to open a TCP connection to this port.
If you haven’t already, you can install it using the following command to access MongoDB remotely.
#apt install netcat
Now to access the MongoDB server, enter the following command in the terminal:
#nc-zv mongodb_server_ip 27017
Alternatively, you can use the MongoDB Shell to access the server:
>mongosh"mongodb://username@mongo_server_ip:27017"
Common MongoDB Operations
Now that you have installed and set up MongoDB on an Ubuntu machine, you can try out the common database operations such as adding, removing, and editing records. Let’s go into the details of these basic Mongo shell operations.
Insert Data in MongoDB
You can use the insertOne() function to add a single document to a collection. The technique supports all popular data types, such as strings, numbers, boolean values, and arrays.
Here’s how you can use the command
>db.store.insertOne({ Stock: “Apples”, Weight: 25, location: "London” })
Get Data in MongoDB
You can use the find() method to get the required document from a collection. Note that the find() function comes with several options to filter the results.
Here’s the basic format of the command:
>db.store.find()
Update Data in MongoDB
Use the update() method to update the records in a database. You can also use this command to change the values in the database.
Here’s how you can use the update() method to change the values in a record.
db.collection.updateOne()db.collection.updateMany()db.collection.replaceOne()
Delete Data in MongoDB
You can easily remove or delete records from a database. In fact, MongoDB offers two methods for deleting records from the database.
If you wish to remove a single document from the database, use the following method:
>deleteOne()
Similarly, if you need to delete multiple documents, use the following method:
>deleteMany()
Conclusion
You can easily install MongoDB on Ubuntu by following the steps outlined above. Additionally, we covered post-installation security steps you need to secure the MongoDB installation. To round off, we provided MongoDB shell commands for the four most common database operations.
Let us know if you have any questions about the installation process.
FAQs
- What is MongoDB Database?
MongoDB is a NoSQL DBMS that offers a document-oriented database. MongoDB uses collections (tables) with many documents (records) in each one and enables non-relational data storage.
- What are the advantages of MongoDB?
MongoDB offers two significant advantages:
- A MongoDB powered database can be hosted in a distributed environment for optimal performance with minimum downtime.
- With MongoDB, schema updates may be made without the server going offline. As a result, users can update the MongoDB Database without interfering with other processes.
