
Over these decades, Java-based software can be found in all industries, especially in the corporate sector, where Java powers several popular operational components.
One of the factors behind the continued popularity of Java programs is Apache Tomcat, the well-known open-source web server for Java. This server provides a feature-rich web application environment for Java programs.
Installing Apache Tomcat on Windows is a simple two-step process you can complete in 15 minutes. Let’s run through the process and see how you can kickstart working with Java web projects on your Windows machine.
Table Of Contents
Install Apache Tomcat on Windows
You can opt for one of the following methods for installing Apache Tomcat on Windows:
- Use a service installer for Windows.
- Utilize a zip archive.
The Prerequisites
Before proceeding, confirm that the following software and version requirements are satisfied.
- You have Java JRE installed and properly configured on the Windows machine
- You have an administrator-level user account
Step #1: Get the Windows Version of Apache Tomcat
Start by getting a copy of the Tomcat installation file:
- Go to the Apache Tomcat official website. Find the Download section and select the most recent Tomcat version.
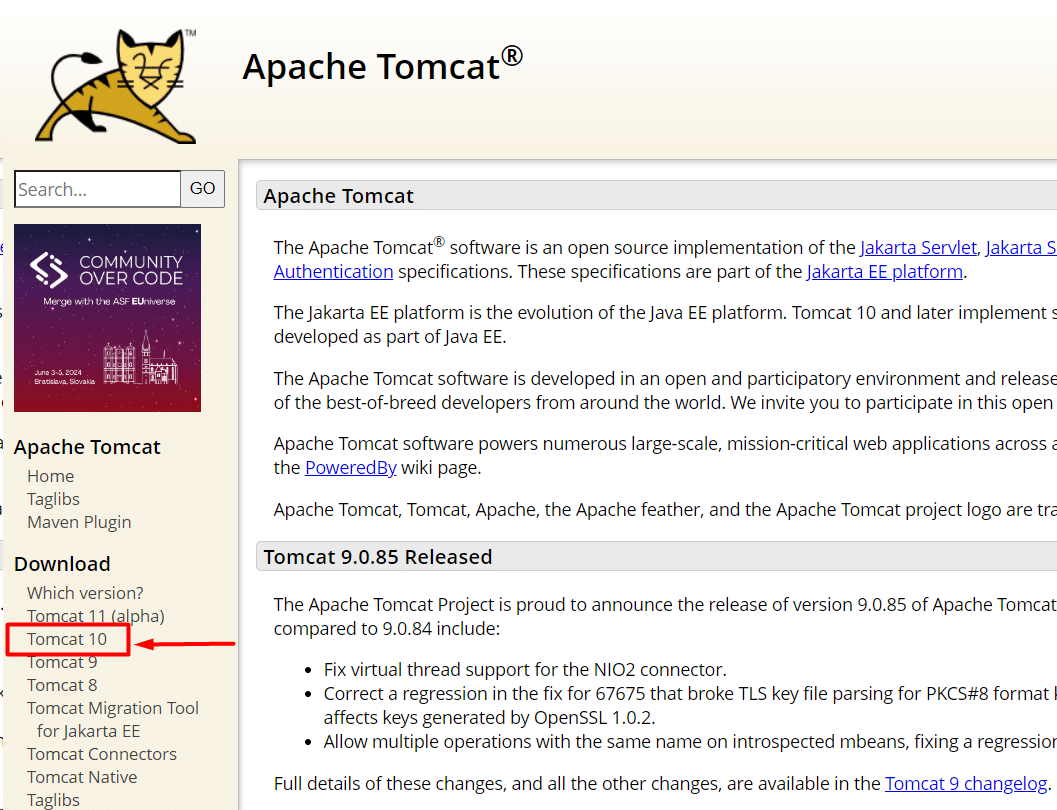
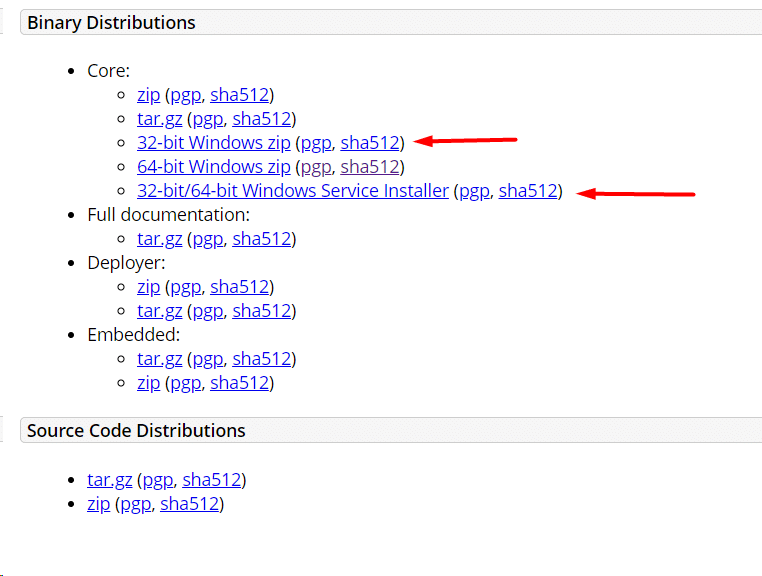
- Scroll down to the Binary Distributions section of the Download page.
Click the download link for the 32- or 64-bit Windows zip file or the Windows Service Installer in the Core list.
Step #2: Set up the Apache Tomcat Server on Your Windows Machine
Depending upon the installation method you chose in the previous step, you can now go ahead and install Tomcat using the Windows Service Installer for an automated, wizard-guided installation procedure or the zip archive for a more hands-on installation.
During the installation, you can set the Tomcat service to start up automatically when the machine boots up.
The zip archive is preferable when you are looking for a portable experience. In cases when Tomcat is no longer required, you can easily uninstall it by deleting the Tomcat directory and moving it to another location.
Method #1: Set up Tomcat Using the Installer for Windows Services
Follow the steps below to install Tomcat using the Windows Service Installer.
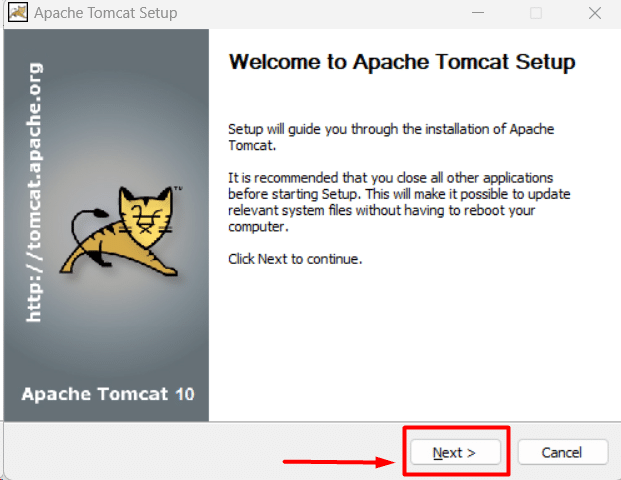
- Launch the Windows Service Installer executable file you downloaded to begin the installation.
- To continue, click Next on the Tomcat Setup welcome screen.
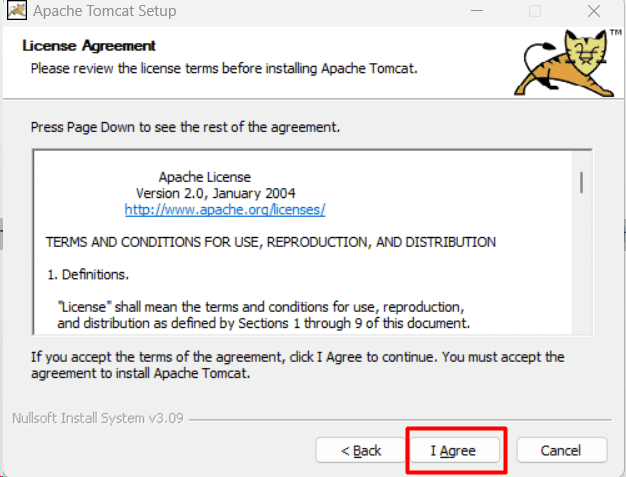
- Read the License Agreement and select I Agree to accept the terms and proceed to the next step.
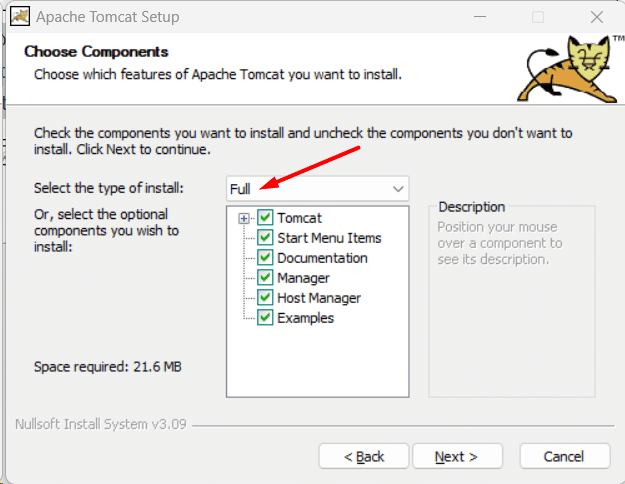
- We recommend selecting the Full option from the Tomcat component selection screen option list to make sure that the wizard installs the Tomcat Host Manager, Servlet, JSP example web apps, and other required components. Alternatively, you can select Normal to select the default selection of components.
Finally, click Next to move to the next step.
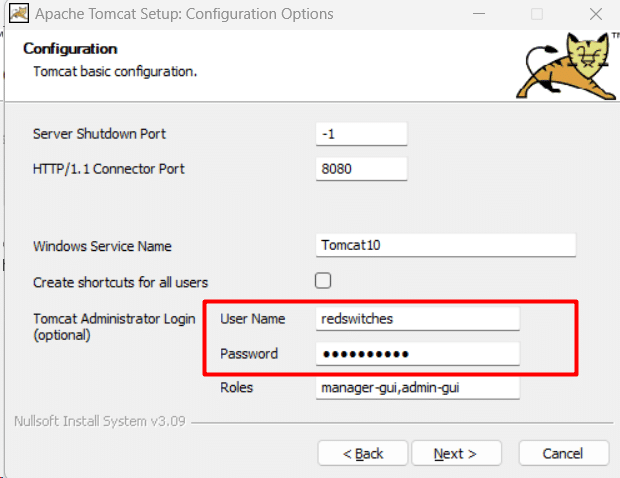
- Configure basic settings such as ports and Windows server identifier. On this screen, you can also configure an administrator login for the Tomcat server. This is an optional step, and you can skip it at this point and configure it later on.
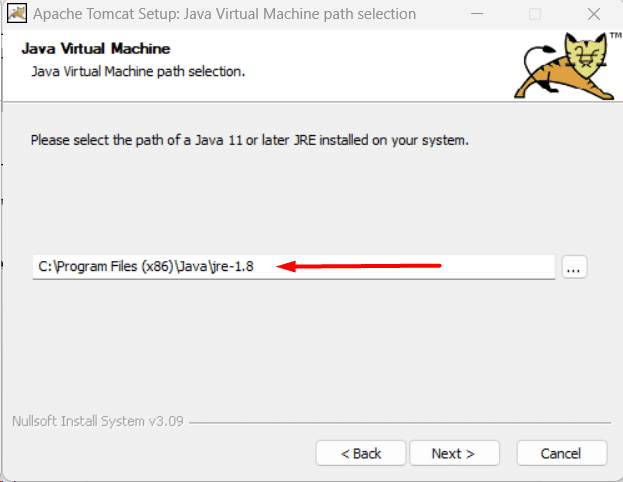
- On the next screen, enter the full path to the JRE directory on your machine. If you have configured the Java environment variables, the wizard will fetch the path and finish this step automatically. Click Next to go to the following stage.
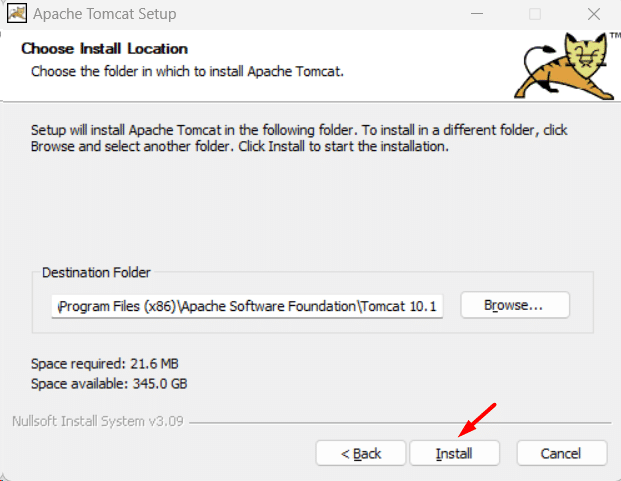
- On the next screen, you can select the Tomcat server install location or leave the default suggestion in place. Click Install to start the installation process.
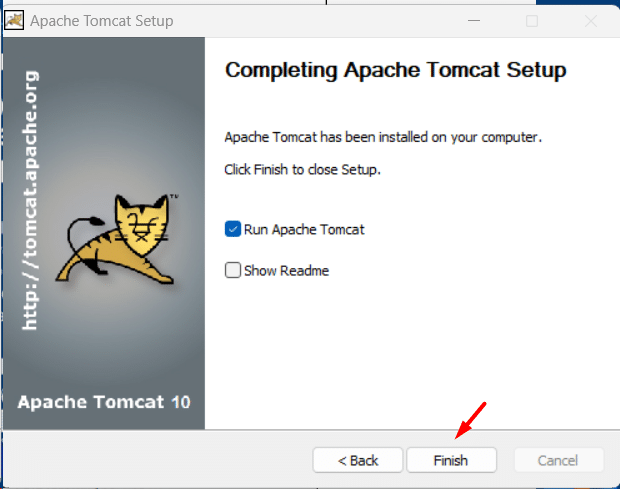
- Once the process finishes, you can optionally check the box for Run Apache Tomcat to launch the service immediately after the wizard exists. We recommend checking the box for Show Readme to read the changelog. Click Finish to end the installation and exit the wizard.
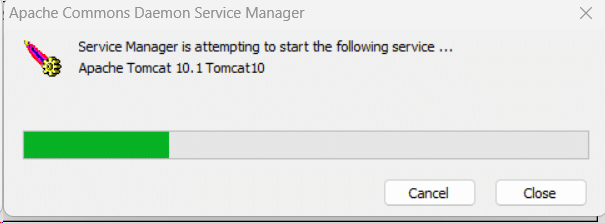
- If you selected the Run Apache Tomcat option in the last step, you will see a popup window that indicates that the Tomcat service is starting up. Upon finishing the process, the window automatically shuts.
You have now installed the Apache Tomcat web server successfully.
Also Read: How to Restart Windows Server 2016 – 4 Reboot Command Scenarios
Method #2: Use the Zip Archive to Install Apache Tomcat
Before following these steps, download the appropriate zip archive from the Tomcat Download section.
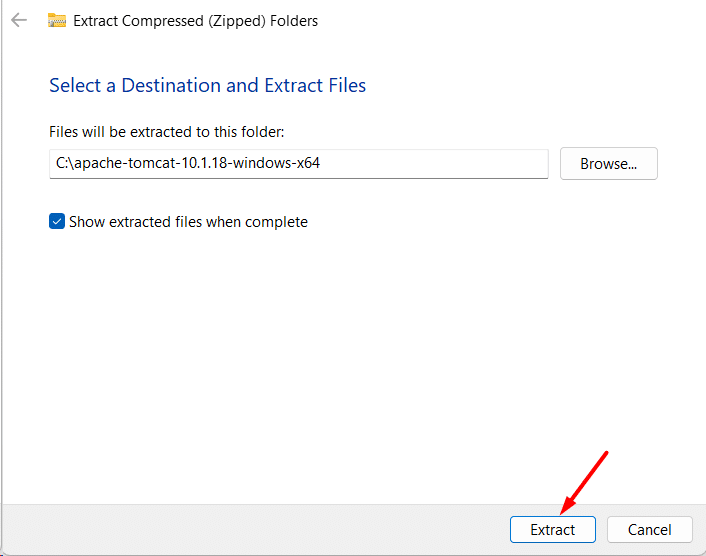
- Depending on your Windows version, unzip the 32- or 64-bit zip file after downloading it. For this, we recommend bringing up the context menu and choosing the Extract All option.
- Choose where to extract the contents of the archive. For a simpler approach, we suggest extracting it to the root directory. Later on, when server configuration becomes more manageable, you can rename the installation’s current directory.
- Locate the server.xml file by navigating to the conf sub-directory in the extracted installation directory.
Important: Create a backup of the.xml configuration files before making any changes.
- Open the file in a text editor like Notepad++. Find the following lines in the server.xml file to modify the entry for the port (the default connecting port is 8080).
<Connector port="8080" protocol="HTTP/1.1"
connectionTimeout="20000"
redirectPort="8443" />
Save and exit the editor.
- Next, edit the web.xml file located in the conf directory to enable directory browsing. In addition to being useful for system testing, directory browsing can sometimes help fix a 403 Forbidden error.
Change the listing value from false to true by finding and editing the following lines:
<servlet>
<servlet-name>default</servlet-name>
<servlet-class>org.apache.catalina.servlets.DefaultServlet</servlet-class>
<init-param>
<param-name>debug</param-name>
<param-value>0</param-value>
</init-param>
<init-param>
<param-name>listings</param-name>
<param-value>false</param-value>
</init-param>
<load-on-startup>1</load-on-startup>
</servlet>
- Edit the context.xml file to add an auto-reload capability. This option comes in handy when working with the Tomcat server because the developers don’t have to restart the server whenever they make a manual change.
Open the file and locate the following line. Change the value from false to true in each example:
<Context reloadable="false" crossContext="false" parallelAnnotationScanning="false">
......
......
</Context>
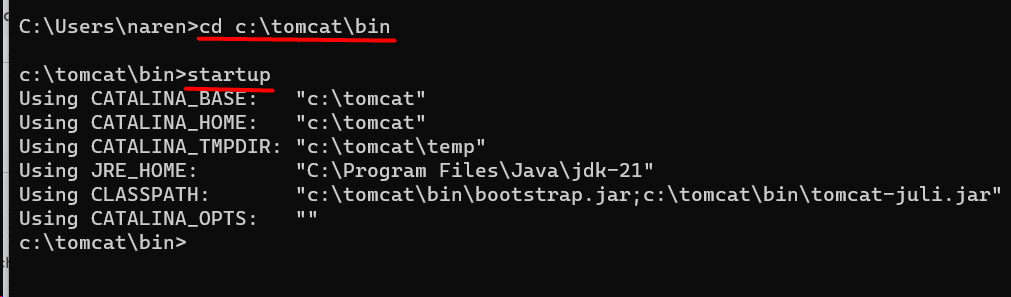
- Once the changes are complete, start the server. For this, launch the Command Prompt by pressing Win+R.
- Locate the bin directory of the Tomcat server installation on your Windows machine. Next, run the following command to start the server:
> startup
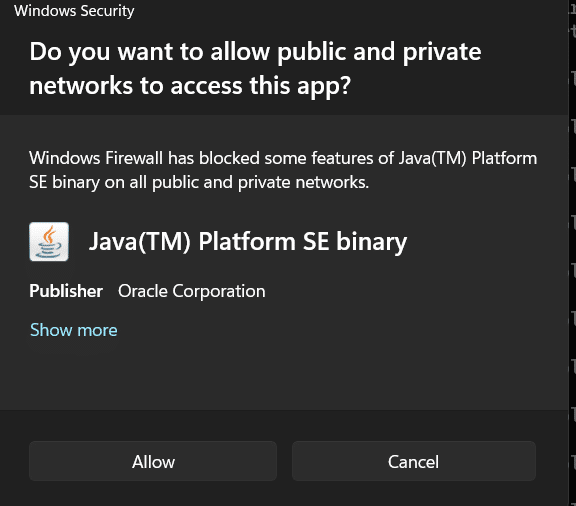
- The Windows Defender firewall may raise a security alert at this point. We recommend setting up a firewall exception for Tomcat by selecting Allow in the alert window:
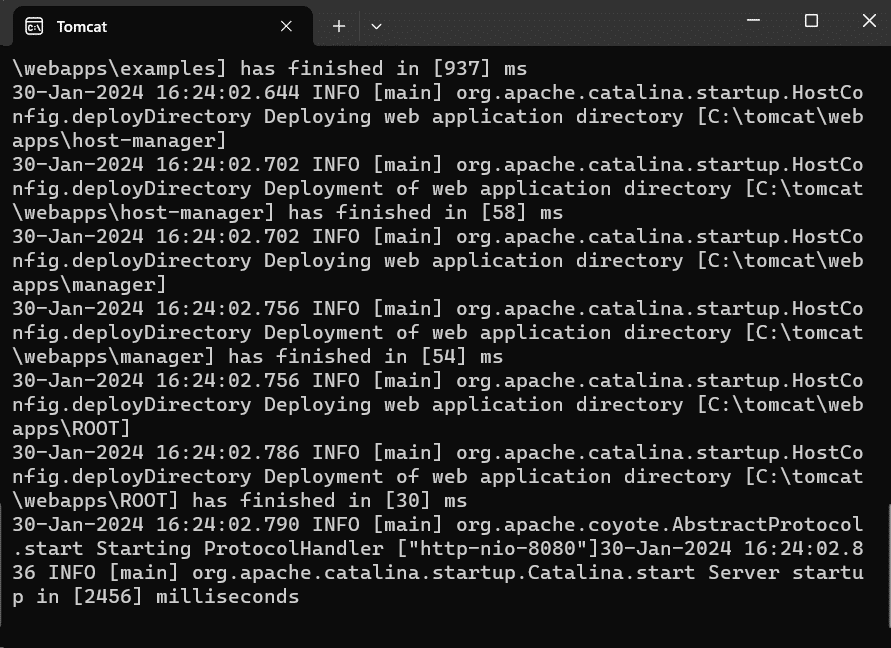
- You will now see a new window for the Tomcat console. This is an important component of working with the Tomcat server, as the Java servlets send errors and system.out.println() messages to this location.
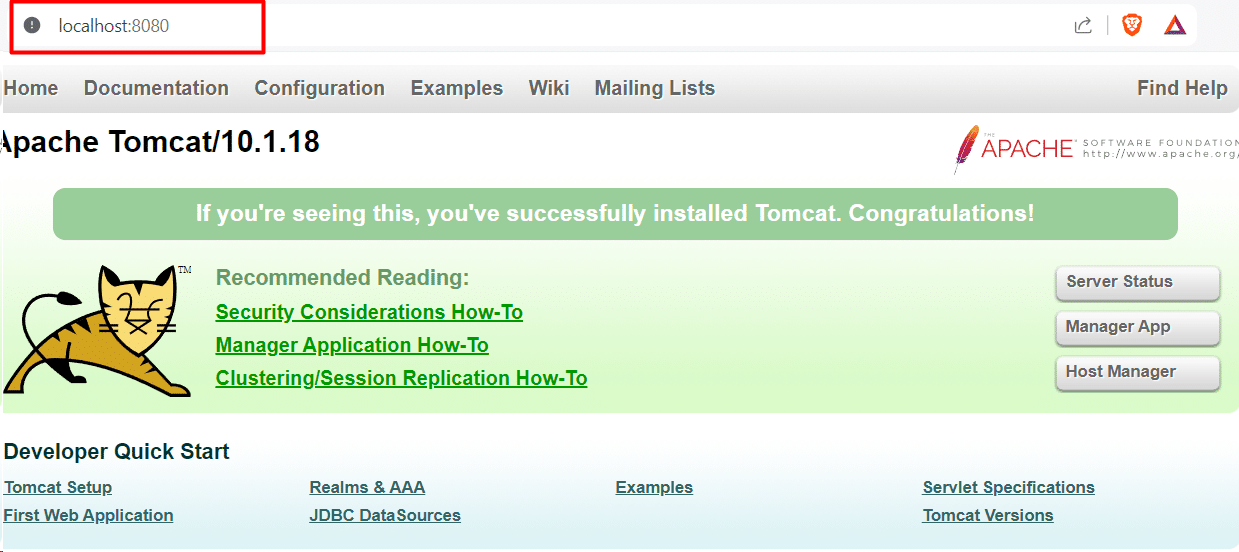
- Launch your system browser to create an HTTP client connection with the server. Navigate to http://localhost:8080 to view the Tomcat welcome page. This indicates that the Apache Tomcat is working properly on your machine.
You can click the Developer Quick Start links to start using and configuring the server and learn more about using the server.
- You can now exit the Tomcat server using the keyboard shortcut Ctrl+C in the Tomcat console.
Also Read: A Guide to Apache Log Files: What You Need to Know.
Step #3: Check the Status of the Apache Tomcat Service
When you install Apache Tomcat via the Windows Service Installer, it is installed as a Windows service that launches automatically upon system boot. To ensure that Tomcat is launched as a Windows service, follow these steps.
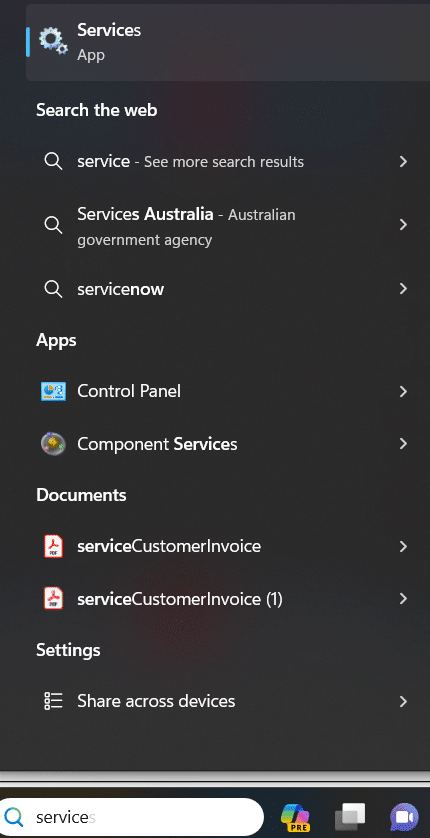
- Check the Start menu for Services and launch the app.
- The Apache Tomcat service is usually located in the Services pane. The service’s current state is displayed in the Status column. Here, you can start or stop the service using the toolbar buttons or by selecting Stop or Restart on the left side of the service list.
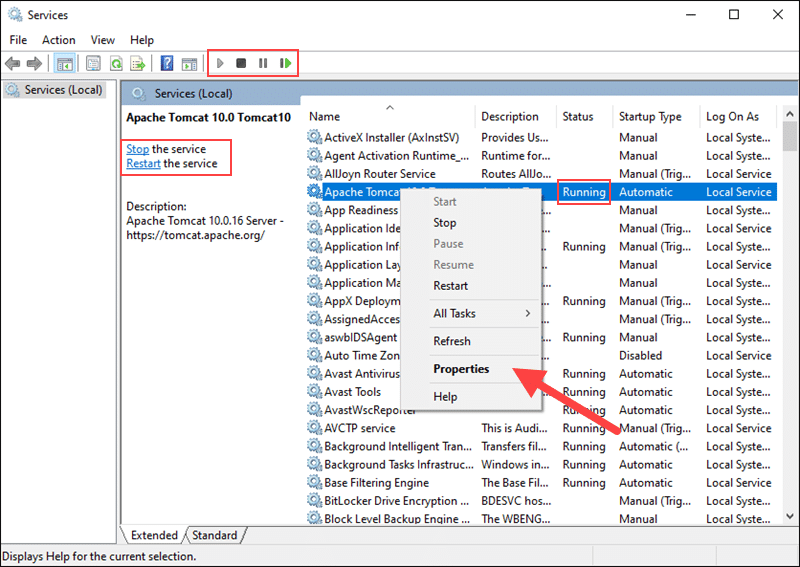
- You can customize the service startup by right-clicking on the Tomcat service and choosing Properties.
- From the Properties window’s Startup type dropdown menu, select one of the following options to change the current startup behavior of the Tomcat service.
- Automatic (Delayed Start): The service is launched shortly after boot. Delaying the start of a server boosts its startup performance and offers security advantages.
- Automatic: The service is launched automatically upon the system boot.
- Manual: The service only launches upon manual invocation or when required by Windows or another service.
- Disabled: The Tomcat service launch is disabled for users and services.
Press OK to confirm the changes made.
Also Read: How to Install Apache Tomcat 9 on Ubuntu 22.04
Conclusion
Setting up Apache Tomcat on Windows is an easy task.
The process involves setting the JAVA_HOME variable, downloading and extracting the Tomcat configuration files, installing the Java Development Kit (JDK), and configuring users in tomcat-users.xml. Next, use startup.bat to launch the server, navigate to the Tomcat Manager in a web browser, and move applications to the webapps directory.
In case you get stuck anywhere, check the Apache Tomcat documentation frequently for updates.
Setting up Apache Tomcat on your Windows system makes it ready to host and manage Java-based web applications, giving you a flexible and effective platform for development and deployment.
With RedSwitches, find the power of hosting dedicated servers globally. RedSwitches provides dependable solutions for flawless operation, whether you’re configuring Apache Tomcat on Windows for Java applications or other server requirements. Boost your hosting experience and help your projects reach their full potential.
Go to RedSwitches right now to find robust and adaptable dedicated server choices that fit your needs. Take advantage of outstanding support and a worldwide network that strengthens your internet presence.
We offer the best dedicated server pricing and deliver instant dedicated servers, usually on the same day the order gets approved. Whether you need a dedicated server, a traffic-friendly 10Gbps dedicated server, or a powerful bare metal server, we are your trusted hosting partner.
FAQs
Q. What is Apache Tomcat, and why is it necessary for Windows installation?
The Apache Software Foundation is the developer of the open-source Apache Tomcat Java Servlet container. Java-based web applications are deployed and managed with its help. Java applications can be hosted and run on a dependable platform by installing Tomcat on Windows.
Q. Is installing the Java Development Kit (JDK) necessary before setting up Apache Tomcat?
A Java Development Kit (JDK) or Java Runtime Environment (JRE) is needed to run Apache Tomcat. Make sure your system has the JDK installed and that the JAVA_HOME environment variable is set up properly.
Q. How do I configure users and roles in Apache Tomcat on Windows?
Edit the tomcat-users.xml file in the conf directory of Tomcat. Define users and their associated roles to control access to the Tomcat Manager and other administrative features.
Q. Is it possible for me to use a Windows web browser to access the Tomcat Manager?
Yes, after starting the Tomcat server, open a web browser and navigate to http://localhost:8080 (default port) to access the Tomcat Manager and verify the installation.
Q. What steps should I follow to deploy a web application on Apache Tomcat?
Transfer the files for your web application to the webapps directory in the Tomcat installation. The configured port will be used to access and automatically deploy the application.
Q. How can I gracefully shut down the Apache Tomcat server on Windows?
Use the shutdown.bat script in the bin directory of Tomcat to gracefully shut down the server.
Q. Where can I find additional configuration files and updates for Apache Tomcat on Windows?
Regularly refer to the official Apache Tomcat documentation (https://tomcat.apache.org/) for the latest updates, additional configurations, and best practices for managing Tomcat on Windows.
