How to Install Apache Tomcat 9 on Ubuntu 22.04
Learn how to easily configure and install Apache Tomcat 9 on Ubuntu with this step-by-step tutorial. Start deploying Java applications today!

Apache Tomcat is an open-source, lightweight application server designed for hosting Java web applications. It supports Java Servlet, JavaServer Pages (JSP), Java Expression Language (EL), and Java WebSocket technologies, making it a popular choice for developing and deploying Java applications.
In this guide, you’ll learn how to install Tomcat on Ubuntu 22.04 and configure it for application deployment.
Let’s start with a look at the prerequisites for the installation.
Install and Configure Tomcat 9 on Ubuntu 22.04
Before going into the steps of installing Tomcat 9 on Ubuntu, it is important that you have the following in place:
The Prerequisites
- A system running a stable Ubuntu version. Our test system has Ubuntu 22.04
- A user account with root or sudo privileges
Step #1: Verify Java Availability
Before installing Tomcat, you need to make sure you have Java on your Ubuntu system. To verify this, open the terminal using Ctrl+Alt+T and check the Java version with the following:
# java -version

If Java is installed and available, you will see the version information in the terminal. We recommend Java version 11 or later for installing Tomcat 9 on Ubuntu.
Step #2: Install Java (Optional)
If Java is not installed or you have an older version on the system, you need to install the latest OpenJDK version using the following command:
# sudo apt install default-jdk

Step #3: Set Up the Tomcat User
We strongly recommend avoiding using the root user to run Tomcat. This is a critical security flaw that can expose your system to incoming attacks.
Instead, create a dedicated user and group for Tomcat:
# sudo groupadd tomcat
sudo useradd -s /bin/false -g tomcat -d /opt/tomcat tomcat
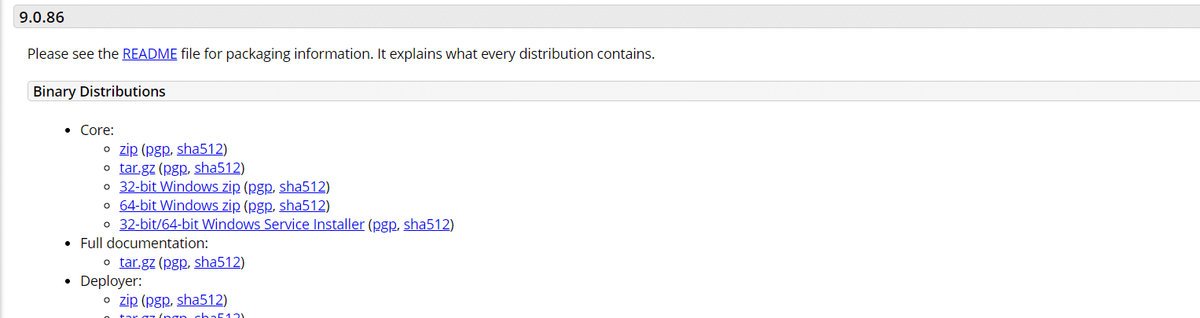
Step #4: Download and Install Tomcat 9<
Go to the Apache Tomcat Download page and locate the tar.gz file under Binary Distributions > Core. Copy the link for the tar.gz file.
Next, in the terminal, switch to the /tmp directory with the cd command:
# cd /tmp
Next, download the Tomcat tar.gz file using the following cURLcommand:
# curl -O [paste-the-tar.gz-link-here]

Step #5: Extract the Tomcat Archive
Create a directory named /opt/tomcatwith the mkdir command:
# sudo mkdir /opt/tomcat
Switch to this directory in the terminal and then extract the Tomcat archive into this directory with the following command:
# sudo tar xzvf apache-tomcat-9*tar.gz -C /opt/tomcat --strip-components=1
Step #6: Update the Tomcat User Permissions
Assign the tomcat directory ownership to the Tomcat user and group, and ensure the scripts in the bin directory are executable by changing file and directory permissions. Run the following commands for these tasks:
# sudo chown -RH tomcat: /opt/tomcat
# sudo chmod +x /opt/tomcat/bin/*.sh
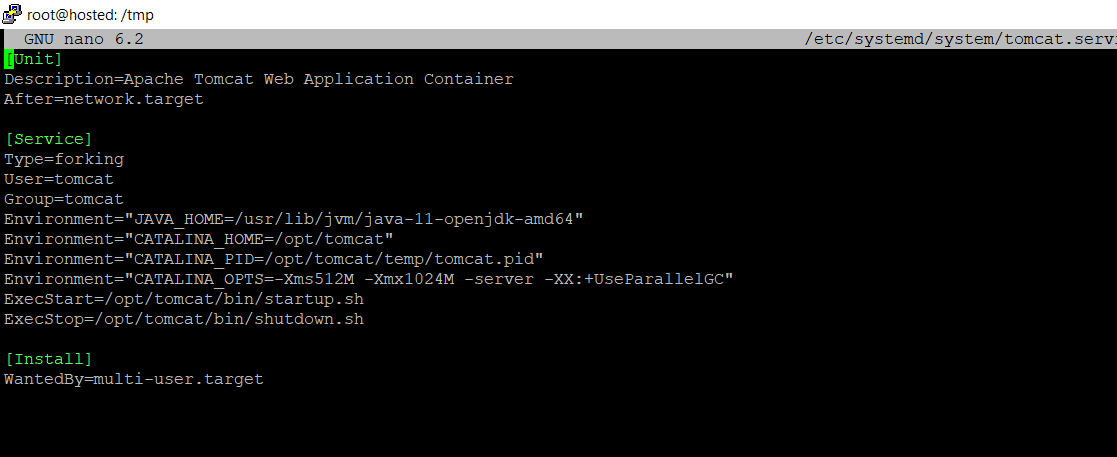
Step #7: Create the Tomcat Service File
Determine the Java installation path using the following command:
# sudo update-java-alternatives -l

Next, create a new systemd service file for Tomcat with the following command:
# sudo nano /etc/systemd/system/tomcat.service
The system will open the tomcat.service file in the Nano editor. Add the following configuration lines to the file. Remember to adjust theJAVA_HOME variable to your system’s path:
[Unit]
Description=Apache Tomcat Web Application Container
After=network.target
[Service]
Type=forking
User=tomcat
Group=tomcat
Environment="JAVA_HOME=/usr/lib/jvm/java-11-openjdk-amd64"
Environment="CATALINA_HOME=/opt/tomcat"
Environment="CATALINA_PID=/opt/tomcat/temp/tomcat.pid"
Environment="CATALINA_OPTS=-Xms512M -Xmx1024M -server -XX:+UseParallelGC"
ExecStart=/opt/tomcat/bin/startup.sh
ExecStop=/opt/tomcat/bin/shutdown.sh
[Install]
WantedBy=multi-user.target
Save the file and reload the daemon:
# sudo systemctl daemon-reload
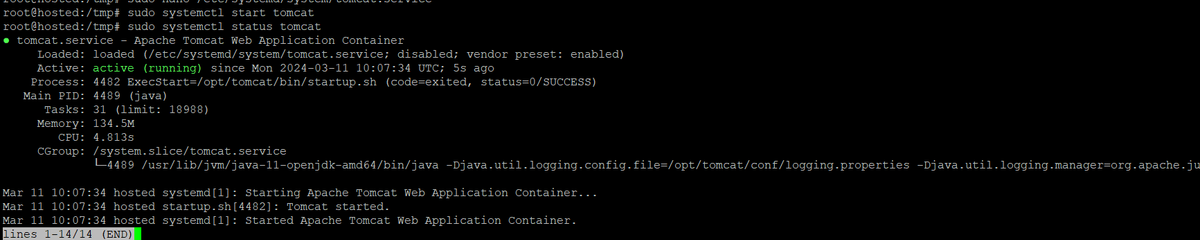
Now, start the Tomcat service and check its status with the following systemctl commands:
# sudo systemctl start tomcat
# sudo systemctl status tomcat
Step #8: Configure the Firewall
Now that the Tomcat service is running, you should configure the firewall to allow traffic on port 8080, commonly used by web servers on Ubuntu systems:
# sudo ufw allow 8080/tcp
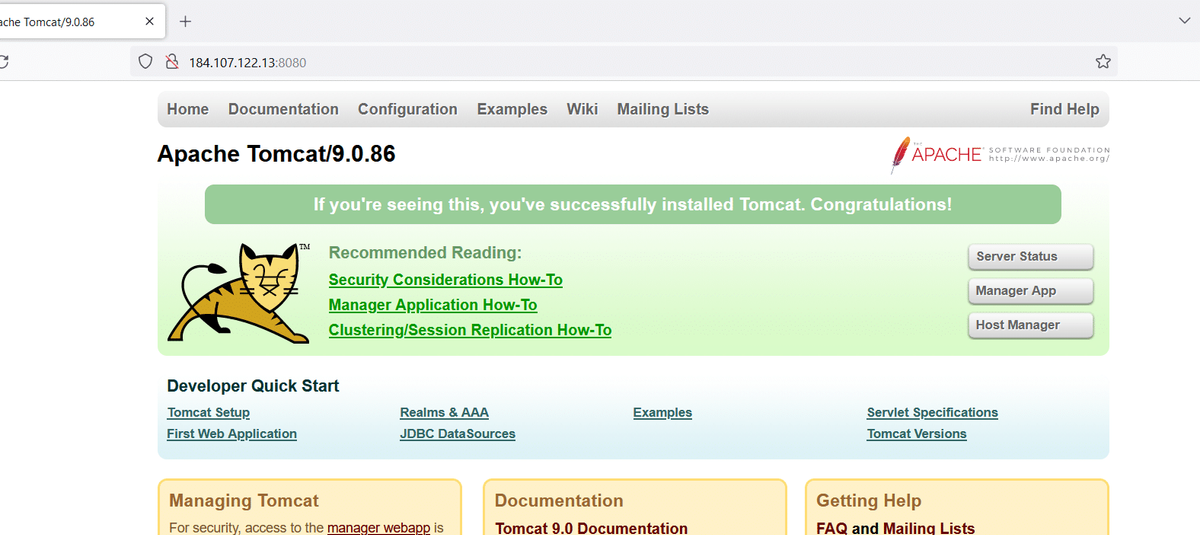
Next, open the following URL in your browser to test access to the Tomcat server:
http://localhost:8080 or http://server_ip:8080
If you see the following Tomcat welcome page, the server has been properly configured and is available for deploying and serving Java applications.
Step #9: Set Up Web Management Interface
Open the tomcat-users.xml in Nano by running the following command in the terminal:
# sudo nano /opt/tomcat/conf/tomcat-users.xml
Next, add the following line to the file to set up the user and role configurations:
<tomcat-users>
<role rolename="manager-gui"/>
<role rolename="manager-script"/>
<user username="admin" password="Your_Password" roles="manager-gui,manager-script"/>
</tomcat-users>
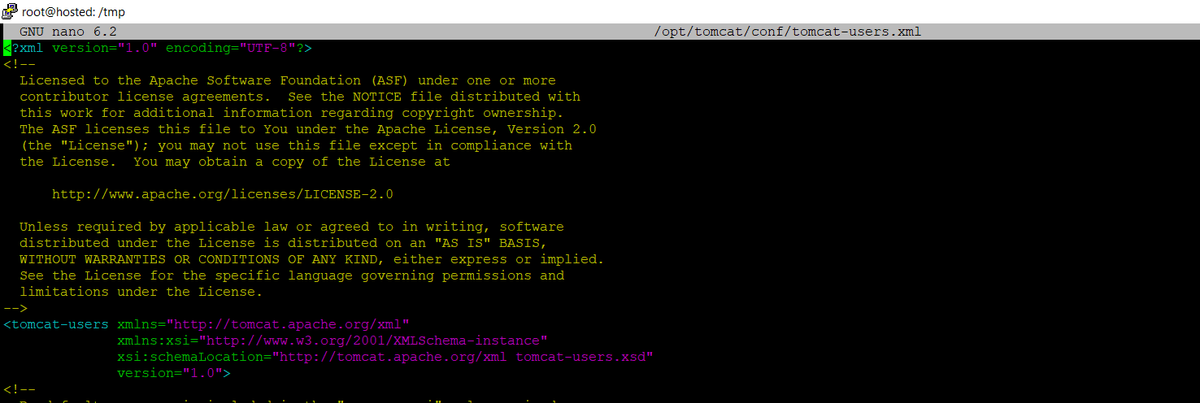
Remember to replace Your_Password with a secure password.
Step #10: Configure Remote Access
Finally, you need to configure remote access by modifying the context.xml file, found within the manager and host-manager directories.
Start by editing the context.xml file in the Nano editor:
# sudo nano /opt/tomcat/webapps/manager/META-INF/context.xml
Comment out or adjust the RemoteAddrValve to control access. For unrestricted access, it would look like:
<Context antiResourceLocking="false" privileged="true">
<!-- Valve configurations here -->
</Context>
Repeat for the host-manager context.xmlif needed.
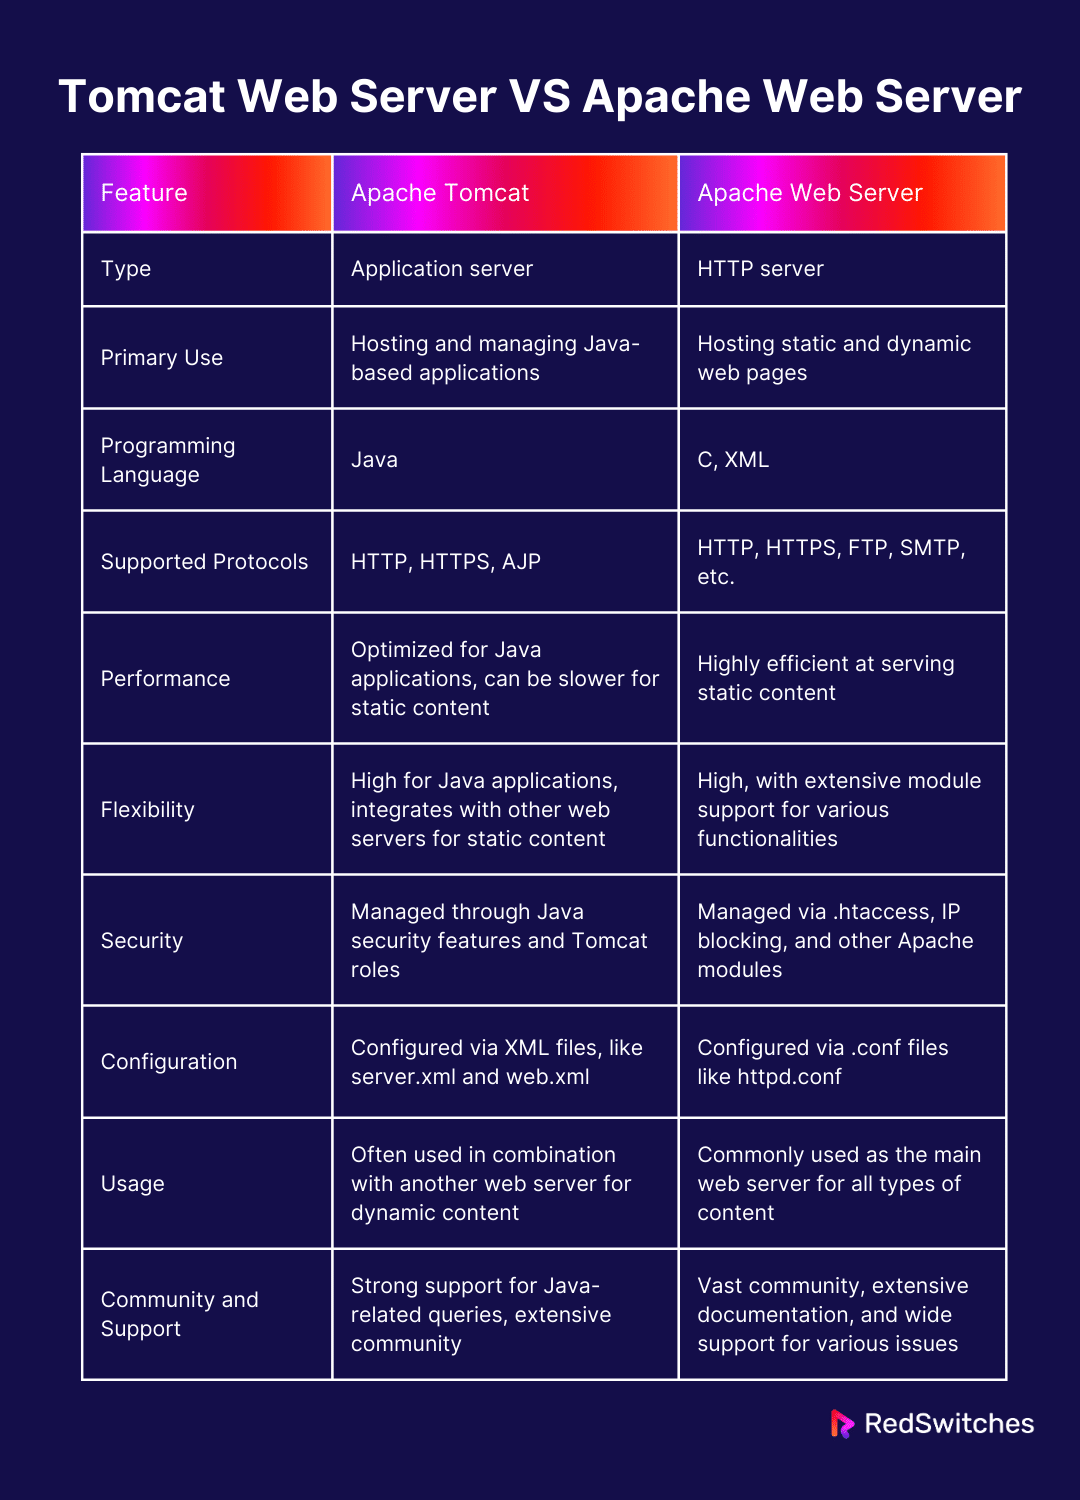
Tomcat Web Server VS Apache Web Server
Here are the key differences between the Tomcat web server and the Apache web server:
Also Read: A Guide to Apache Log Files: What You Need to Know.
Conclusion
This guide helps you successfully install Apache Tomcat on Ubuntu 22.04. Your server is now capable of handling Java web applications, allowing you to deploy and manage them efficiently.
For those seeking optimal performance and control over their hosting environment, exploring the best Singapore dedicated servers can enhance the capabilities of their web applications.
If you’re looking for top-tier hosting solutions to complement your Tomcat installation, consider exploring the RedSwitches offers. With their robust infrastructure and dedicated support, we provide the high-performance and reliable hosting services you need to ensure your web applications run smoothly.
If you’re looking for a robust server for your Linux projects, we offer the best dedicated server pricing and deliver instant dedicated servers, usually on the same day the order gets approved. Whether you need a dedicated server, a traffic-friendly 10Gbps dedicated server, or a powerful bare metal server, we are your trusted hosting partner.
Visit RedSwitches to learn more about their dedicated server offerings and how they can benefit your business.
FAQs
Q. What is the purpose of the tomcat-users.xml file in Apache Tomcat?
The tomcat-users.xml file is crucial for defining user credentials and roles in Tomcat. It specifies which users can access the Tomcat web management interface and their permissions.
Q. How does Apache Tomcat function as an open-source web server?
Apache Tomcat serves as an open-source web server and servlet container that executes Java servlets and renders web pages that include Java Server Page coding. It’s a flexible and widely-used platform for hosting Java applications.
Q. Why is it important for the installer to be a user with sudo privileges?
A user with sudo privileges can execute commands with administrative rights, which are essential for installing software, changing system configurations, and managing service permissions, ensuring Tomcat’s secure and successful installation.
Q. What is the significance of the default Tomcat installation directory?
The default Tomcat installation directory, typically /opt/tomcat, is where the Tomcat files and scripts reside. This directory structure is crucial for organizing Tomcat’s components and ensuring the web server operates correctly.
Q. How are virtual hosts configured in Tomcat?
Virtual hosts in Tomcat are configured in the server.xml file located in the conf directory. They allow Tomcat to serve different web applications under separate hostnames or IP addresses from a single server.
Q. What are the risks of running Tomcat as a non-root user, and why is it recommended?
Running Tomcat as a non-root user reduces security risks, as it limits the potential impact of a security breach. A non-root user has restricted access to system files and processes, thereby safeguarding the system.
Q. How does the curl command facilitate Tomcat installation?
The curl command is used to download the Tomcat binary files from the internet. It is a reliable and efficient way to fetch the necessary files directly into the installation directory.
Q. Why is the tar command used during the Tomcat installation process?
The tar command is used to extract the compressed Tomcat files (in tar.gz format) into the installation directory. This step is essential for unpacking all the necessary components of Tomcat.
Q. What is the admin package in Tomcat, and how is it accessed?
The admin package in Tomcat, which contains tools for managing and configuring the Tomcat server, is accessed through the web management interface. You need proper user configuration in the tomcat-users.xml file to ensure secure access.
Q. Why is the OpenJDK package required to install Tomcat?
The OpenJDK package provides the Java environment Tomcat needs to run. Since Tomcat is a Java-based application, having a stable version of the OpenJDK package is essential for its operation.
Q. How do user credentials in the tomcat-users.xml file affect security?
User credentials set in the tomcat-users.xml file are essential for authentication and authorization, determining who can access the Tomcat server and what actions they can perform, thus securing the server against unauthorized access.
Q. What steps should be taken if the Tomcat server doesn’t start after following the previous steps?
If Tomcat doesn’t start, review the previous steps to ensure all actions were executed correctly, check the Tomcat logs for errors, verify the Java and Tomcat configurations, and ensure the service files are properly set up in the system.
Q. How can the IP address be configured to secure Tomcat access?
To secure Tomcat, configure the RemoteAddrValve in the context.xml file within the webapps directory, specifying which IP addresses are allowed to access the server, thereby limiting potential unauthorized access.
Prakash Avhale
System Administrator
Prakash Avhale is a Linux System Administrator at RedSwitches with more than ten years of hands-on experience keeping web hosting infrastructure running. His work spans the full stack of server operations, from diagnosing kernel-level issues and configuring hardware RAID to managing cPanel, WHM, and Plesk and virtualization with Proxmox and VMware ESXi.
Ubuntu vs Linux: Key Differences Explained
Linux is the kernel, while Ubuntu is a complete operating system built on it. This guide breaks down their key differences, use cases, and when to choose each.
Reduce Docker Image Size: Best Practices to Slim Your Images
Docker image size can become a serious issue as you add more code to the image. Learn how to reduce Docker image size and optimize Dockerfiles for production to speed up CI/CD pipelines and improve container efficiency.
Best Linux Distros 2026, Full Guide for Beginners, Developers, Gamers & Servers
Match your hardware, workflow, and skill to the right Linux distro in 2026. Compare 23 top picks, Mint, Ubuntu, Fedora, Arch, Bazzite, covering beginners, developers, gamers, and servers.
Power Your Next Project With Bare Metal
10 min delivery, zero setup fees, and 24/7/365 human engineers across 20+ global locations.