MySQL is a popular database management system used for web and dedicated server applications. It uses a relational database and SQL (Structured Query Language) to manage its data.
With the release of CentOS 7, MySQL was dropped from the standard repositories in favor of MariaDB. CentOS 7 prefers MariaDB, a fork of MySQL managed by the original MySQL developers and designed as a replacement for MySQL. If you run yum install mysql on CentOS 7, it is MariaDB that is installed rather than MySQL.
MariaDB is fully compatible with MySQL and can be substituted almost seamlessly.
This guide will walk you through how to install MySQL version 8 on CentOS 7 server.
Step 1: Installing MySQL
As mentioned in the introduction, the Yum command to install MySQL in fact installs MariaDB. To install MySQL, we’ll need to visit the MySQL community Yum Repository which provides packages for MySQL.
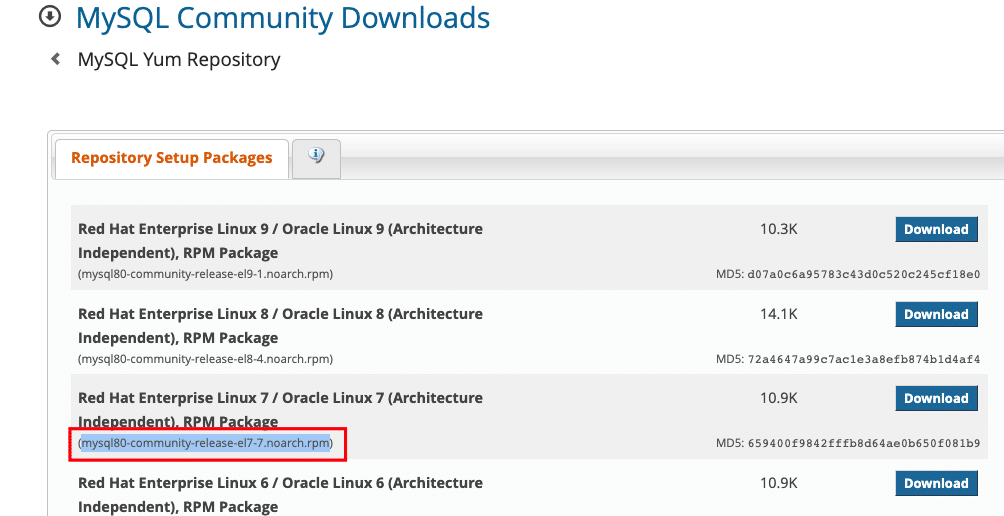
Locate the desired version that you want to download. You can click the Download button, which takes you to a registration page. You can sign up if you’d like or select the No thanks, just start my download link.
OR
Alternatively, you can open a terminal and use the wget command to save the file.
On the web page that lists release versions, you’ll see a gray subtext that shows something like “(mysql80-community-release-el7-1.noarch.rpm)”. That’s the setup package of a specific package.
Copy the name of the desired setup package, then open a terminal window and enter the following command:
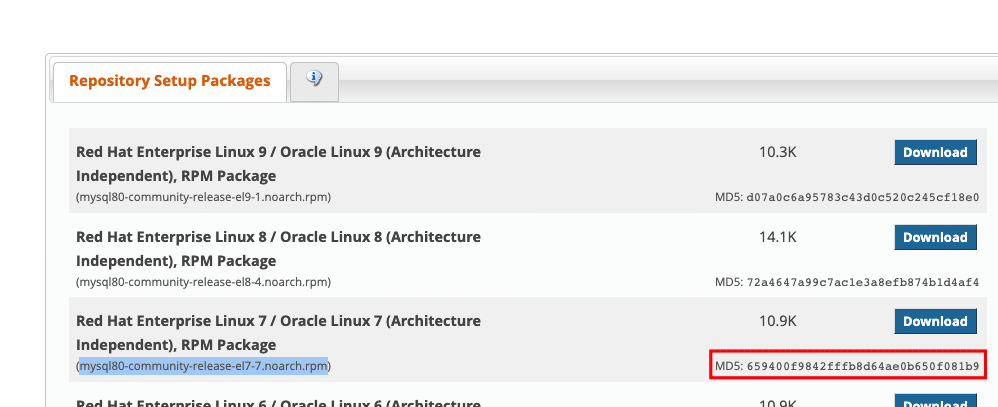
# sudo wget https://dev.mysql.com/get/mysql80-community-release-el7-7.noarch.rpmThe files we just downloaded provide access to the MySQL software repositories. Before adding them, use the md5sum command to authenticate the software:
# md5sum mysql80-community-release-el7-7.noarch.rpmCompare this output with the appropriate MD5 value on the site:
NOTE: If they don’t match, it’s possible that your download was corrupted in transit. Or, it’s possible that the download has been compromised. Repeat Steps 1 and 2 and overwrite the downloaded file. If the MD5 values still don’t match, stop the procedure.
Now that we’ve verified that the file wasn’t corrupted or changed, we’ll install the package:
# sudo rpm -ivh mysql80-community-release-el9-1.noarch.rpmThis adds two new MySQL yum repositories, and we can now use them to install MySQL server:
# sudo yum install mysql-serverPress y to confirm that you want to proceed. Since we’ve just added the package, we’ll also be prompted to accept its GPG key. Press y to download it and complete the install.
Step 2: Starting MySQL
You’ll need to start the MySQL service by entering:
# sudo systemctl start mysqldTo check the status of MySQL use the command:
# sudo systemctl status mysqld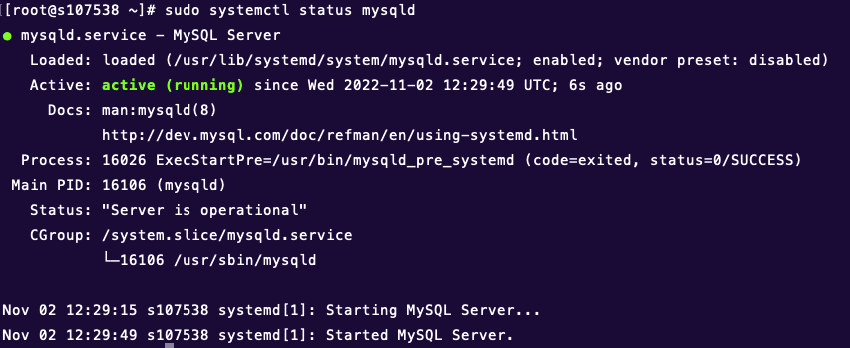
NOTE: MySQL is automatically enabled to start at boot when it is installed. You can change that default behavior with sudo systemctl disable mysqld
Step 3: Configuring MySQL
The MySQL installation routine sets up a default temporary password.
Use the grep command to find the password:
# sudo grep 'temporary password' /var/log/mysqld.log
2022-11-02T12:29:28.637498Z 6 [Note] [MY-010454] [Server] A temporary password is generated for root@localhost: >WW<pbMCa6Tu
Make a note of the password.
Your new MySQL installation comes with a security script to make securing configurations easier.
Launch the script with the following terminal command:
# sudo mysql_secure_installationThe system will prompt you to enter the default root password. Enter the password you recovered earlier.
Next, the system will tell you that the password has expired, and prompt you to enter a new one. Enter a new password, make a note of it, then press Enter.
The system will rate your password strength, and ask if you want to enter a new, stronger password. If you’re satisfied with your password strength, hit the spacebar. To revise your password, press Y.
The Secure Installation script will continue, and you can safely reply Y to the rest of the prompts, which include:
- Remove anonymous users
- Disallow remote root login
- Remove test database
- Reload privilege tables
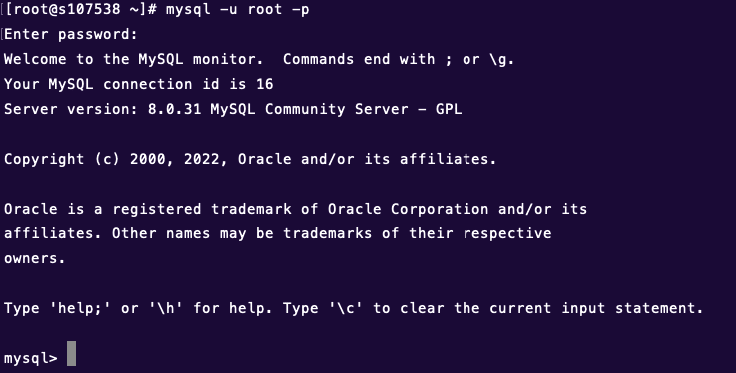
Once you’ve MySQL installed on CentOS 7, you can test if everything was set up correctly by checking its version. Type in the following command:
# mysql -u root -pEnter the root password that you’ve created, and the response will be as below:
Creating a New MySQL User, Database
As the root user in MySQL, you have full access to all of the databases.
However, if you work with a team, there are cases where you might need to apply some restrictions. You’d either have to build a new database or create users with custom permissions.
Here’s how to quickly solve this issue:
- Use the following command to create a new database:
mysql> CREATE DATABASE newdbChange newdb with the name of the database.
- Create a new user by typing the following line:
mysql> CREATE USER 'username'@'localhost' IDENTIFIED BY 'password'Change the variables for both username and password to create your new user.
- If you want to delete a certain user instead, use the command:
mysql> DROP USER 'username'@'localhost'Conclusion
You have learned how to install MySQL on a CentOS 7 server. By installing MySQL, you are able to store your databases and manage them efficiently on your server.
