The idea of branches is central to how Git keeps track of multiple contributors’ work.
This core functionality allows multiple developers to work on a larger software product without conflicts affecting the main codebase. In a typical Git implementation, a main branch contains the main production-ready codebase of the project. In addition, there are multiple feature branches where contributors can work on features and fixes (these branches are known as Bug Fixes branches).
If you’re part of a larger team, you can create your branch and merge it into the main branch when you’re done.
As you can guess, how to create a new branch in Git is crucial for working with Git repositories.
In this tutorial, we’ll go into the details of creating a new branch in Git. We’ll discuss six scenarios where you can tap into the power of this command and take your Git experience to the next level.
Table Of Contents
- How To Create a New Branch in Git
- Prerequisites
- Scenario #1: Create a New Git Branch
- Scenario #2: Create a New Git Branch From the Current Branch
- Scenario #3: Create a New Git Branch From an Existing Branch
- Scenario #4: Create a New Branch With commit
- Scenario #5: Create a New Branch From a Tag
- Scenario #6: Create a New Branch Using the Detached HEAD State
- How to Delete a Git Branch
- Conclusion
- FAQs
How To Create a New Branch in Git
There are several methods of creating a new Git branch. Typically, it comes down to whether you are adding a branch to the main branch, a new commit, or a new tag.
Let’s start with the prerequisites of the process.
Prerequisites
Before creating a new branch in Git, make sure you have:
- Git installed on a CentOS or Ubuntu system.
- Access to a command line or terminal window.
- A working local or remote Git repository.
Scenario #1: Create a New Git Branch
The most typical scenario is when you need to create a new branch with the git branch command. The syntax of the command is:
$ git branch <new_branch_name>
Note that after Git creates the branch, you will still remain on your current branch. You can switch over to the new branch with one of the following commands:
$ git checkout <new_branch_name>
Or
$ git switch <new_branch_name>
![]()
Scenario #2: Create a New Git Branch From the Current Branch
Creating a new branch from the current branch you’re on is a more common scenario. The simplest and most frequently used command is the git checkout command with the -b flag. The syntax of the command is:
$ git checkout -b <new_branch_name>
![]()
This command creates a new branch and switches to it, so you don’t have to use additional commands to switch branches.
Scenario #3: Create a New Git Branch From an Existing Branch
There are cases where you need to create a new branch based on an existing one. For this, use the git checkout command with the following syntax:
$ git checkout -b <new_branch_name> <existing_branch>
Note that after the command creates the new branch, it switches over to it.

This command creates a new branch and switches to it so that you don’t have to use additional commands to switch branches.
Scenario #4: Create a New Branch With commit
The commit command is often used to store changes to a branch. During the course of a project, developers make multiple commits to the repository.
You can use the information in a commit to create a new branch. Developers use this approach when they need to repair a branch without losing any current functionality and need to revert to an earlier version.
When using this technique, start with the git log command to get the commit’s hash key:
$ git log
The hash key is included in the commit’s log entry.

Now, you can create a branch from this existing commit by entering just a few first letters of the hash key:
$ git branch <new_branch_name> 70b2b6

Next, use the git log command to see the new branch.
At this point, you will still be on the original branch. So, use the git checkout command to switch over to the new branch.
Scenario #5: Create a New Branch From a Tag
A tag represents a commit’s final, unmodifiable version. In most cases, you can edit a commit, but the tags that point to specific commits are not editable.
You can use the git branch command to generate a branch from a tag:
$ git branch <new_branch_name> <tag_name>
After the branch has been created, you need to use the git checkout command to switch to the new branch:
$ git checkout <new_branch_tag>

As you can see, the branch has a v1.2 tag, indicating that the command used this tag for creating the new redswitches5 branch.
Scenario #6: Create a New Branch Using the Detached HEAD State
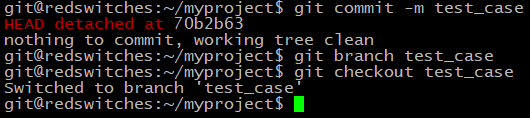
A detached HEAD state happens when you check out a commit that isn’t strictly a part of a branch.
Start with the git log command to get the commit’s hash key. Next, switch to the branch with the first few letters of the hash key:
$ git checkout

You will see a warning about the branch’s state where you can modify the code depending on the commit. Note that if changes are not saved, they will be lost.
Stage it and enter the following commands to save any changes:
$ git commit -m test_case

$ git branch test_case

$ git checkout test_case
Next, use the following commands to merge the changes into the master branch:
$ git checkout master

$ git merge test_case

git push is another common activity of maintaining branches in a Git repository. We have created a detailed tutorial on how to push branches using git push.
How to Delete a Git Branch
Now that you know how to create a branch in Git, you should also know how to delete a Git branch.
It’s important that before you delete a branch, you should list the branches with the git branch command:
$ git branch --list

Now that you have identified the branch you wish to delete, run the following commands to delete the branch, where the -d flag in the second command deletes the branch:
$ git checkout master

$ git branch -d <branch_name>

Conclusion
Using Git to create a new branch is an effective approach to control the progress of your project. You can easily improve existing branches without impacting the primary code.
And if you’re looking for top-notch hosting services, consider RedSwitches as your dedicated hosting provider.
We offer the best dedicated server pricing and deliver instant dedicated servers, usually on the same day the order gets approved. Whether you need a dedicated server, a traffic-friendly 10Gbps dedicated server, or a powerful bare metal server, we are your trusted hosting partner.
FAQs
Q. What is Git?
Git is a distributed version control system that allows developers to track changes in their code and collaborate with others. It provides a way to manage source code efficiently and track different project versions.
Q. What is a branch in Git?
In Git, a branch is a lightweight, movable pointer that points to a commit. It is used to create separate lines of development and allows multiple developers to work on a project simultaneously without interfering with each other.
Q. How do I create a new branch in Git using the git branch command?
Use the following command syntax to create a new branch in Git using the git branch command: git branch
How do I create a new branch in Git using the git checkout command?
To create and switch to a new branch in Git using the git checkout command, you can use the following syntax: git checkout -b
Q. What is the benefit of creating a new branch in Git?
Creating a new branch in Git allows you to work on different features or bug fixes without affecting the main codebase. It provides isolation and flexibility in development, enabling developers to experiment and make changes without fear of breaking the existing code.
Q. How do I switch between branches in Git?
To switch between branches in Git, you can use the git checkout command followed by the branch name.
Q. How do I merge changes from one branch to another in Git?
To merge changes from one branch to another in Git, you can use the git merge command followed by the branch name.
Q. How do I delete a branch in Git?
To delete a branch in Git, you can use the git branch command with the -d flag followed by the branch name.
Q. How do I create a new branch in Git and push it to a remote repository?
To create a new branch in Git and push it to a remote repository, you can use the following commands: 1. git branch 2. git push -u origin
Q. What is the difference between a remote and a local branch in Git?
A remote branch in Git is a branch that exists on a remote repository hosting platform, such as GitHub or Bitbucket. It allows multiple developers to collaborate on a project by pushing and pulling changes to and from the remote repository. On the other hand, a local branch is a branch that exists on your local machine and might not be synced with a remote repository.
