
Whether you are a novice or a seasoned user, finding files and folders on a Linux system is one of the most frequent tasks.
You can use several native commands and utilities to search files and directories. Out of these, the locate command is perhaps the most common and simplest to use for all users. Even experienced users prefer it because of its performance and speed of searching for files and directories by name.
In this tutorial, we will take a deep look at the locate command and discuss more than ten use cases where you can use the command to extract relevant information from your system.
Table of Contents
- What is the locate Command?
- How to Use Linux’s Locate Command: Examples
- The Prerequisites
- Use Case #1: File Search
- Use Case #2: Format the Output
- Use Case #3: Show the Current Files
- Use Case #4: Count The Existing Files
- Use Case #5: Turn Off Errors in the Output
- Use Case #6: Limit the Number of Search Results
- Use Case #7: Ignore Case of the Search Pattern
- Use Case # 8: Search for a File by Specific Name
- Use Case #9: Separate Entries Using the ASCII NUL Character
- Use Case #10: View Database Statistics
- Use Case #11: Manually Update the locate Database
- Use Case #12: Choose an Alternative mlocate Database
- Conclusion
- FAQs
What is the locate Command?
In Linux, the locate command uses the file name to locate files. As mentioned earlier, the command is well known for its fast results.
This speed is the result of how the command uses a database with fragments of files and related system paths. This database is also the weak point of the command because it does not search for files outside of the database. As a result, the results of the locate command do not include the files produced and updated after the latest database update.
The locate command has the following standard syntax:
# locate [options] [pattern]
The locate Command Options
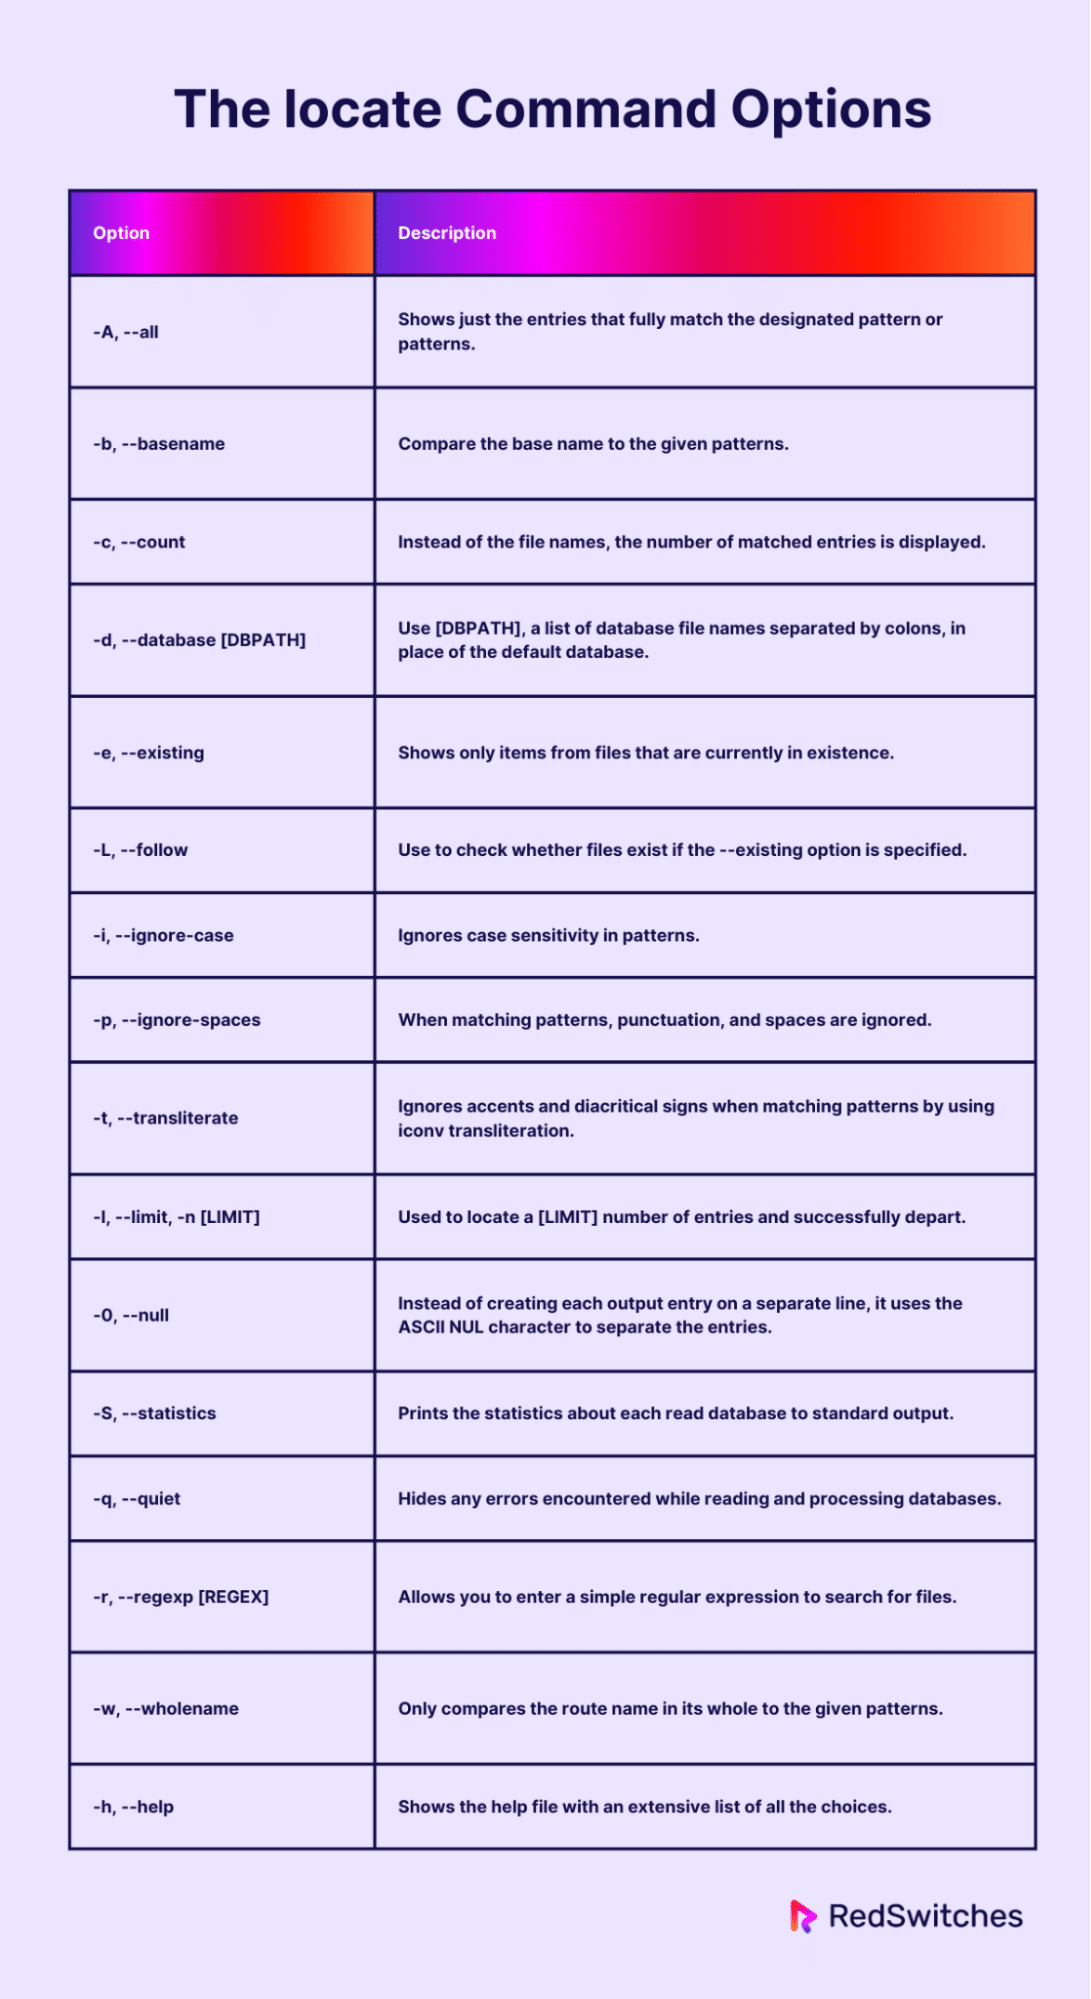
The locate command is very versatile, and you can fine-tune the output by adding options to the standard command syntax. We recommend the following command options for the locate command:
| Option | Description |
| -A, –all | Shows just the entries that fully match the designated pattern or patterns. |
| -b, –basename | Compare the base name to the given patterns. |
| -c, –count | Instead of the file names, the number of matched entries is displayed. |
| -d, –database [DBPATH] | Use [DBPATH], a list of database file names separated by colons, in place of the default database. |
| -e, –existing | Shows only items from files that are currently in existence. |
| -L, –follow | Use to check whether files exist if the –existing option is specified. |
| -i, –ignore-case | Ignores case sensitivity in patterns. |
| -p, –ignore-spaces | When matching patterns, punctuation, and spaces are ignored. |
| -t, –transliterate | Ignores accents and diacritical signs when matching patterns by using iconv transliteration. |
| -l, –limit, -n [LIMIT] | Used to locate a [LIMIT] number of entries and successfully depart. |
| -0, –null | Instead of creating each output entry on a separate line, it uses the ASCII NUL character to separate the entries. |
| -S, –statistics | Prints the statistics about each read database to standard output. |
| -q, –quiet | Hides any errors encountered while reading and processing databases. |
| -r, –regexp [REGEX] | Allows you to enter a simple regular expression to search for files. |
| -w, –wholename | Only compares the route name in its whole to the given patterns. |
| -h, –help | Shows the help file with an extensive list of all the choices. |
Verify That You Have The locate Command on Your System
Before using the locate command, you should confirm it’s available on your system. Many mainstream Linux distributions include it by default. However, you should always check the availability before you try out the examples we will mention later on in this tutorial.
Open the terminal, enter locate, and hit Enter to see if locate is available on your system.
If you see the standard locate error message, locate: no pattern to look for given, the package is installed. Alternatively, if the utility is not installed, you will see the standard error message, locate command not found.

How to Set Up the locate Command in Linux
Depending upon your distribution, the steps to install the locate command differ slightly.
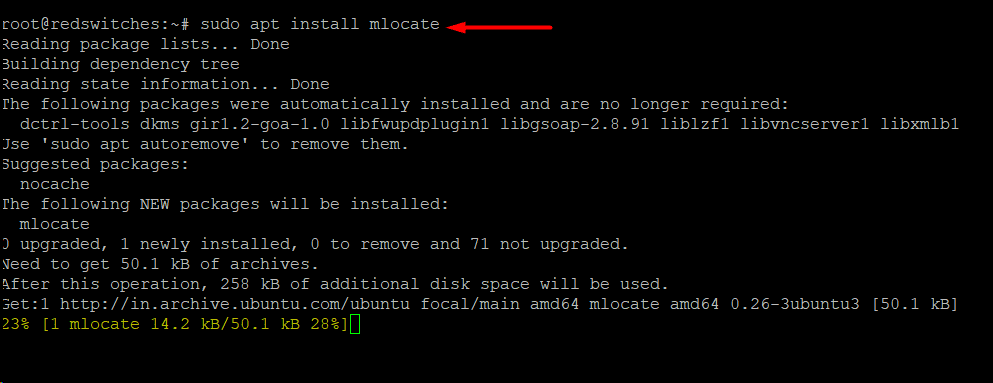
Install locate on Ubuntu
Follow these steps to install Locate on Ubuntu:
1. Update the current package index with the following command:
# sudo apt update
2. Install the locate utility by running this command:
# sudo apt install mlocate
Set up locate on Fedora and CentOS
To install locate on Fedora or CentOS, follow these steps:
1. Update the YUM package repository:
# sudo yum -y update
2. To install Locate, use the following command:
# sudo yum install mlocate
Important: When the locate package is installed, a cron job updates the database every 24 hours by running the update command. Alternatively, you can use sudo updatedb to update the database manually.
How to Use Linux’s Locate Command: Examples
Now that you have a clear idea of how the locate command works, let’s look at several use cases where you can use the locate command to find files on the system.
Let’s start with the prerequisites.
The Prerequisites
Before trying out the following applications of the locate command, make sure you have the following:
A system running a mainstream Linux distribution
A user account with root or sudo privileges.
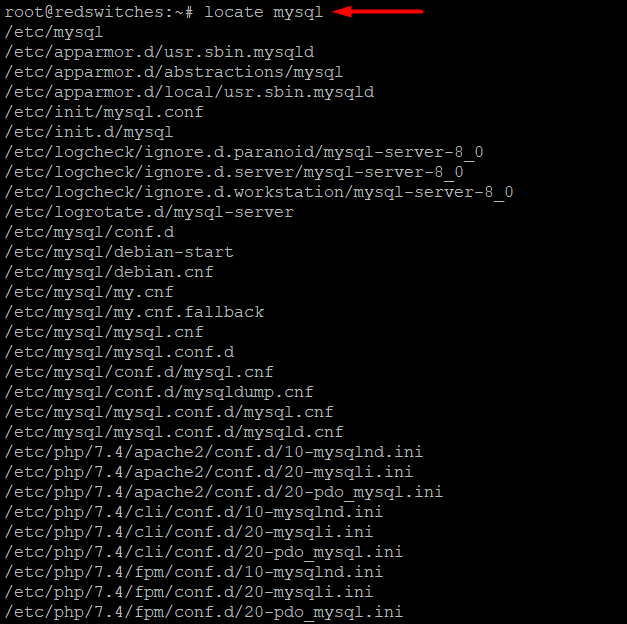
Use Case #1: File Search
The following command searched for all files with mysql in the file name. The output will list file names and the full absolute paths.
# locate mysql
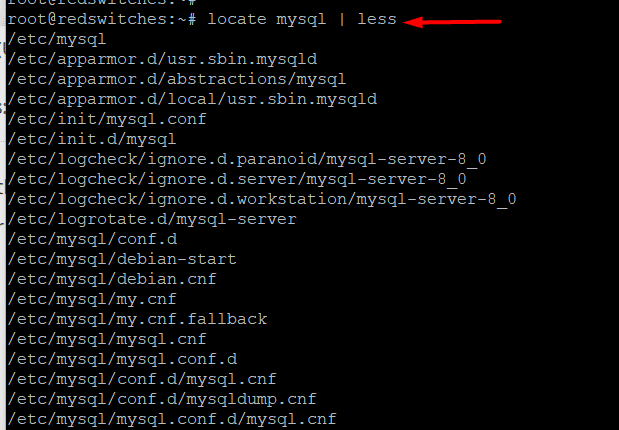
Use Case #2: Format the Output
For faster reading and scrolling through long output, we recommend piping the locate command into less.
For instance, consider the following command that pipes the output of the locate command into less for better control over how the output is displayed in the terminal:
# locate mysql | less
Use Case #3: Show the Current Files
While the locate command returns results relatively instantly, its speed has a price. Deleted or otherwise unavailable files can show up in the results because the database may contain outdated information. Similarly, the results do not include files produced after the previous database update.
You can use the -e option with the locate command to remove these drawbacks. This command searches the filesystem and limits the results to only the files that are present in the file and directory tree.
# locate -e redswitches.txt
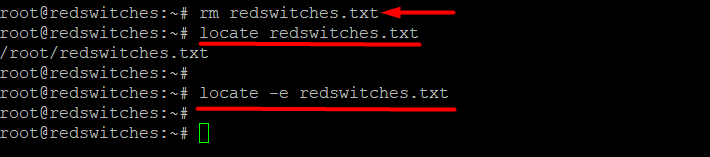
As you can see, we used rm to delete a file. However, since the database was not updated, the locate command without the -e option shows the file’s location. The location of the deleted file can be found by using locate to search for it. When we ran the command again with the -e option, it returned nothing because the file is no longer on the filesystem.
Use Case #4: Count The Existing Files
Use the -c option with the command to print the number of matching files rather than the file names and absolute locations.
For instance, run the following command to count the number of files containing mysql in the file name:
# locate -c mysql

Use Case #5: Turn Off Errors in the Output
The locate command generally prints errors in the terminal. However, you can suppress any errors that may occur when accessing a database by using the -q option.
In the example that follows, locate searches a different database. The database is first reported as nonexistent by the command. We used the -q option to suppress this error.
Use Case #6: Limit the Number of Search Results
By default, the locate command outputs all the results. However, in some cases, the list can be very long. You can use the -n option to control the number of search results. For instance, input the following to restrict the search output to only five results:
# locate *.txt -n 5

Use Case #7: Ignore Case of the Search Pattern
The default behavior of the locate command is to match the case of the search pattern. This means you have to enter the right case (upper or lower) to find the desired files.
However, you can use the -i option to instruct locate to disregard case sensitivity.
In this example, locate doesn’t produce any output because the search pattern was in lowercase.

However, when we included the -i option, locate produced the location of the file, regardless of the fact that the search pattern and the file name are different in terms of case.

Use Case # 8: Search for a File by Specific Name
The locate command lists all files that contain the search pattern included in the file name. This means the command uses the pattern as a string and thus presents all database entries that contain the string.
However, there are times when you want only the files that contain an exact match for the search pattern. For example, instead of all files containing mysql in their names, you may want the files that contain only mysql and nothing else in the filename.
For this, use the -r option with the command:
# locate -r /mysqld$

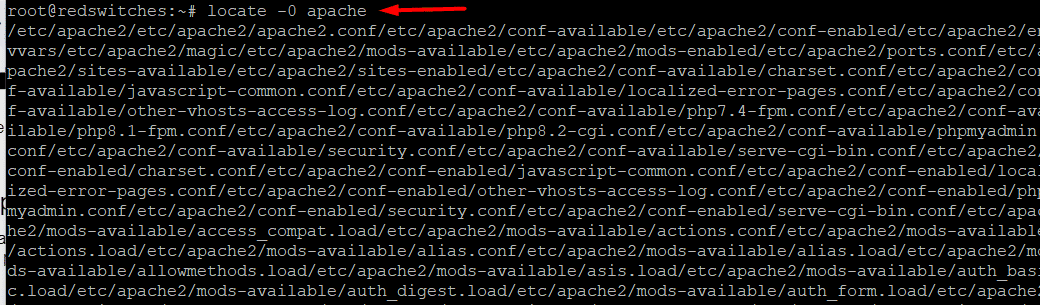
Use Case #9: Separate Entries Using the ASCII NUL Character
Usually, the output of the locate command is separated by the newline (\n) character. This is an important reason behind the long output lists.
You can change the default separator with the -0 option that uses the ASCII NUL rather than a newline character.
# locate -0 apache
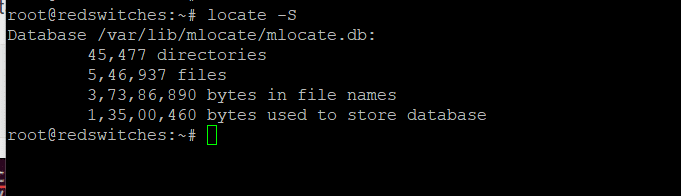
Use Case #10: View Database Statistics
If you want to see the database statistics, such as the number of indexed files and directories, use the -S option with the command:
# locate -S
Use Case #11: Manually Update the locate Database
Every day at the same time, the locate database is automatically updated as the associated cron job is executed. However, if you have made extensive modification to the files , we recommend manually updating the database so that you can use the command without worrying about deleted files corrupting the output.
Use the following command to manually update the database and verify that the file index is correct and up-to-date:
# sudo updatedb
Depending on how many files are on the system, the updating process might take a few seconds.
Use Case #12: Choose an Alternative mlocate Database
You can use the -d option to tell the locate command to use a different database. This is very useful when the utility can’t find the results in the default database.
Use this syntax to specify a different database:
# locate -d [new database path] [pattern]
Also Read: A Guide on How to Install and Use Linux Screen Command in 2024
Conclusion
Becoming skilled with the Linux locate command allows quick and effective file searches. This tutorial has clarified the basics, syntax, and presents several use cases for the optimal usage of the command. This program allows users to browse the file system quickly and accurately because of its pre-built index. locate is an invaluable utility for everyone using Linux, regardless of experience level; it makes finding files much easier.
Enjoy a perfect hosting experience with RedSwitches, the world’s leading dedicated hosting company.
We offer the best dedicated server pricing and deliver instant dedicated servers, usually on the same day the order gets approved. Whether you need a dedicated server, a traffic-friendly 10Gbps dedicated server, or a powerful bare metal server, we are your trusted hosting partner.
FAQs
Q. What is Linux’s ‘locate’ command, and how does it differ from other file search methods?
The ‘locate’ command is a Linux utility that enables quick file searches using a pre-built index. Unlike traditional methods such as ‘find,’ ‘locate’ offers faster results by accessing this index.
Q. How do I install the ‘locate’ command on my Linux system?
In most Linux distributions, ‘locate’ is included by default. However, you can typically install it using the package manager specific to your distribution. For example, on Ubuntu, you can use sudo apt-get install mlocate.
Q. Can ‘locate’ search for files with specific extensions or patterns?
Absolutely! You can use patterns and wildcards with the ‘locate’ command to search for files with specific extensions or naming conventions. For instance, locate *.txt will find all text files.
Q. How frequently is the ‘locate’ database updated, and can I manually update it?
The ‘locate’ database is typically updated daily through a cron job. You can manually update it by running the command sudo updatedb.
Q. Can ‘locate’ search for files in specific directories or limit the search to certain paths?
You can specify paths with the ‘locate’ command to narrow your search to specific directories. For example, locate -r ‘/home/user/*.pdf’ searches for PDF files only in the user’s home directory.
Q. Are there security considerations when using the ‘locate’ command?
While ‘locate’ itself is generally safe, remember that the indexed data may reveal file locations. Exercise caution when using ‘locate’ on sensitive systems, and know who can access the ‘locate’ command.
Q. Can ‘locate’ be used to find recently modified files or directories?
Yes, the ‘locate’ command can be combined with other tools like ‘find’ to search for files based on modification time. For example, find /path -mtime -1 searches for files modified within the last day.
Q. Are there alternatives to ‘locate’ for file searching in Linux?
Yes, alternatives include the ‘find’ command and desktop search tools like ‘grep’ and ‘ag’ (The Silver Searcher). Each has its strengths, and the choice depends on specific use cases and preferences.
Q. How can I use ‘locate’ effectively in scripts or automated tasks?
To use ‘locate’ in scripts, ensure the ‘updatedb’ command runs regularly, and consider error handling if files or paths change unexpectedly. Test your scripts thoroughly before deploying them.
Q. Can ‘locate’ be integrated into GUI file managers in Linux?
Many Linux file managers integrate with ‘locate’ or use similar indexing mechanisms to provide quick and efficient file search capabilities within their graphical interfaces. Check the settings or preferences of your file manager for such options.
