
Sharing files among the various systems on a network is an everyday activity. In fact, this is so common that not many people use the traditional cp (copy command without a second thought.
However, this simple action can open up a security loophole because the cp utility is not secure by default. As such, an attacker can easily exploit this transfer and can potentially access sensitive information.
Because of these security concerns, experts recommend using the Secure Copy Protocol (SCP) to securely transfer files between servers and directories on server systems across a network.
This comprehensive guide will introduce you to SCP and give you a head start at using the protocol within your operations. We’ll discuss the basic syntax and then discuss 13 use cases where you can use SCP to optimize and secure your file and directory transfer.
But first, let’s get a detailed introduction to Secure Copy Protocol (SCP).
Table of Contents
- What is Secure Copy Protocol (SCP)?
- When Should You Use SCP?
- The SCP Command Structure
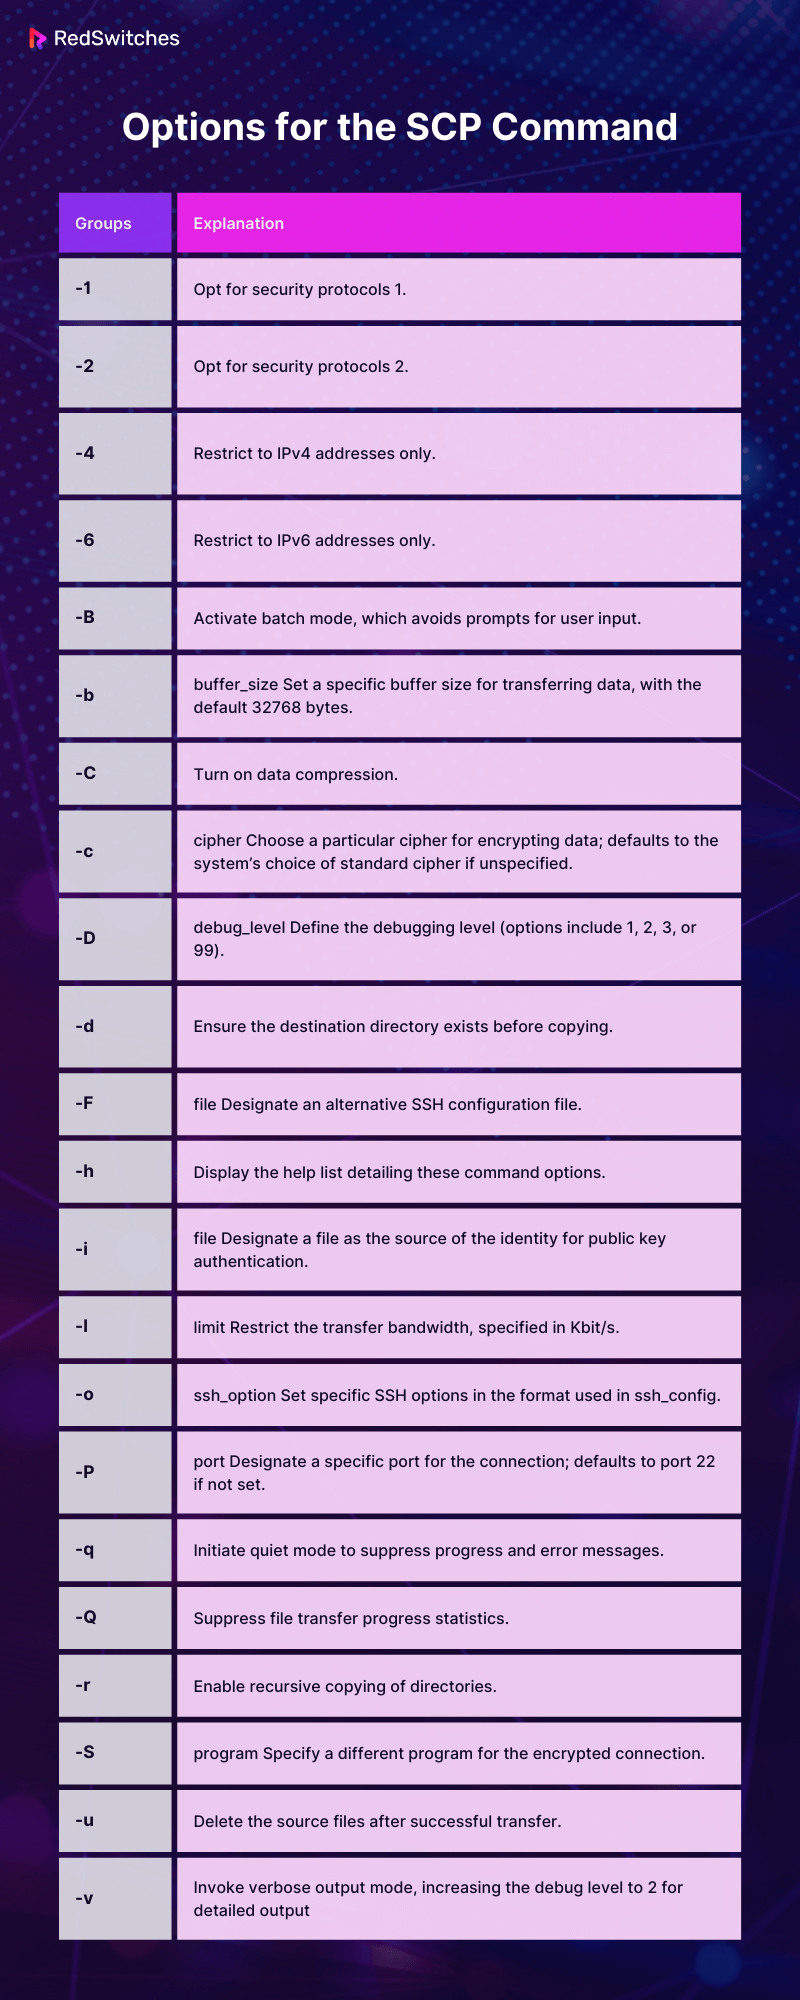
- Options for the SCP Command
- How to Transfer Files and Directories with SCP
- SCP Command Use Cases
- Use Case #1: Transferring/Copying a File from a Local Computer to a Remote Host
- Use Case #2: Downloading/Copying a File from a Remote Server to Your Local Computer
- Use Case #3: Transfer/Copying a File Between Two Remote Servers
- Use Case #4: Transferring/Copying Multiple Files
- Use Case #5: Transfer a Directory to a Remote Server Recursively
- Use Case #6: Use a Specific SSH Port When Copying a File
- Use Case #7: Run SCP in Quiet Mode
- Use Case #8: Transfer a File with Detailed Output in Verbose Mode
- Use Case #9: Limit SCP Transfer Bandwidth Usage
- Use Case #10: Use Compression to Enhance SCP File Transfer Speed
- Use Case #11: Select a Specific Cipher Method for SCP File Encryption
- Use Case #12: Enforce SCP to Use IPv4 or IPv6
- Use Case #13: Transfer a File with SCP While Maintaining Original File Attributes
- Conclusion
- FAQs
What is Secure Copy Protocol (SCP)?
SCP uses SSH (Secure Shell) to set up a more secure alternative to the cp command.
This protocol ensures data confidentiality during transit by encrypting both the files and related information. Consequently, the information remains secure even when an attacker is able to intercept network traffic.
When Should You Use SCP?
We recommend using Secure Copy Protocol (SCP) in all scenarios where you need to transfer files between servers on a network. More specifically, you should consider SCP in the following cases:
- When you are transferring files between systems from your local computer to a remote server.
- When you’re downloading files from a remote server to your local computer.
- When you are moving files between two remote servers.
The SCP Command Structure
The typical SCP command has the following syntax:
# scp [option] [user_name@source_host:path/to/source/file] [user_name@target_host:target/path]
Remember to provide the username and host information when working with files on a remote server when using this command.
Similarly, you need to make sure that the user account on the source system has, at the minimum, read permissions for the files you intend to transfer. Likewise, on the target system, the user account has both read and write privileges for the directory where the files will be copied.
Options for the SCP Command
The SCP command syntax looks pretty straightforward. However, the real power of the command comes from the options you can combine to optimize the command and use it to accomplish a wide range of tasks.
Here’s a short list of popular options you can use with the SCP command:
How to Transfer Files and Directories with SCP
Now that you know all about the theoretical aspects of Secure Copy Protocol (SCP), let’s see the command in action. We’ll first cover the prerequisites and then describe several use cases where you can use the command to take care of specific operational tasks.
Prerequisites
Before you begin, ensure you have:
- A secure shell (SSH) login credentials for the target server
- (Optional) Root access on both the client and server for operations that require them and with Linux Terminal
SCP Command Use Cases
The following use cases demonstrate the various scenarios of copying files with SCP.
Use Case #1: Transferring/Copying a File from a Local Computer to a Remote Host
Use the following command syntax to transmit a file from your local machine to a remote server:
# scp Desktop/demo_file.txt [email protected]:/tmp/shared_dir
![]()
In this command:
- Desktop/demo_file.txt – indicates the file to be transferred, including its current directory.
- [email protected] – represents the login credentials (in this case, ‘root’) and the IP address of the destination server.
- /tmp/shared_dir –specifies the destination folder on the remote server where the file will be stored.
Use Case #2: Downloading/Copying a File from a Remote Server to Your Local Computer
Use the following command to download a file from a remote host machine to your local device.
# scp [email protected]:/tmp/shared_dir demo_file1.txt Desktop
![]()
In this command:
- [email protected] – specifies the remote server’s login credentials (here, ‘root’) and IP address.
- /tmp/shared_dir demo_file1.txt– indicates the remote file’s name and directory path.
- Desktop –refers to the local machine’s directory where the file will be saved.
Use Case #3: Transfer Copying a File Between Two Remote Servers
To move a file from one remote host to another, use the scp command as shown below:
# scp root@184.107.122.15:/tmp/shared_dir demo_file2.txt [email protected]:/home/Desktop
In this command:
- root@184.107.122.15– denotes the user and IP address of the remote server where the file currently resides.
- /tmp/shared_dir demo_file2.txt – the file name and path you intend to copy.
- root@184.107.122.15– the user and IP address of the destination remote server to which the file will be transferred.
- /home/Desktop– the target directory on the destination server where the file will be placed.
Use Case #4: Transferring/Copying Multiple Files
SCP can handle the simultaneous copying of several files.
The following command sends two files from the local system to a remote host:
# scp Desktop/demo_file3.txt Desktop/demo_file4.txt [email protected]:/tmp/shared_dir

In this command:
- Desktop/demo_file3.txt – specifies the first file and its directory path for the transfer.
- Desktop/demo_file4.txt – specifies the second file and its directory path for the transfer.
- root@184.107.122.15 – indicates the remote server’s credentials and IP address where the files will be sent.
- /tmp/shared_dir – denotes the directory on the remote server designated to receive the files.
Use Case #5: Transfer a Directory to a Remote Server Recursively
SCP isn’t limited to just transferring files — it can also transfer entire directories to or from a remote host. The command below illustrates how to copy a local directory to a remote server recursively:
# scp -r Desktop [email protected]:/tmp/shared_dir

In this command:
- -r – activates the recursive option to copy entire directories.
- Desktop – is the directory name you’re transferring from the local machine.
- [email protected] – specifies the login credentials and IP address of the remote server.
- /tmp/shared_dir – defines where on the remote server the directory will be copied to.
Use Case #6: Use a Specific SSH Port When Copying a File
SCP defaults to port 22, but if the target server listens on a different port for SSH connections, you can use the -P flag to set a specific port.
Consider this example, where a file is transferred from a local to a remote host on port 2222.
# scp -P 2222 Desktop/demo_file5.txt [email protected]:/tmp/shared_dir
![]()
In this command:
- -P 2222 – signifies using port 2222 for this SCP transfer.
- Desktop/demo_file5.txt – is the file and its path that you’re copying.
- root@184.107.122.15 – the user and IP for the destination server.
- /tmp/shared_dir – where the file will be placed on the remote server.
Use Case #7: Run SCP in Quiet Mode
If you prefer to execute scp without the progress bar and messages (other than errors), include the -q option for the quiet mode for file transfer.
# scp -q Desktop/demo_file6.txt [email protected]:/tmp/shared_dir
![]()
The -q option ensures a cleaner terminal window and displays only error messages.
Use Case #8: Transfer a File with Detailed Output in Verbose Mode
The -v option activates the verbose mode for the scp command and provides detailed output. You can use the verbose mode for debugging and see critical diagnostics details.
The following command demonstrates the verbose mode:
# scp -v Desktop/demo_file7.txt [email protected]:/tmp/shared_dir
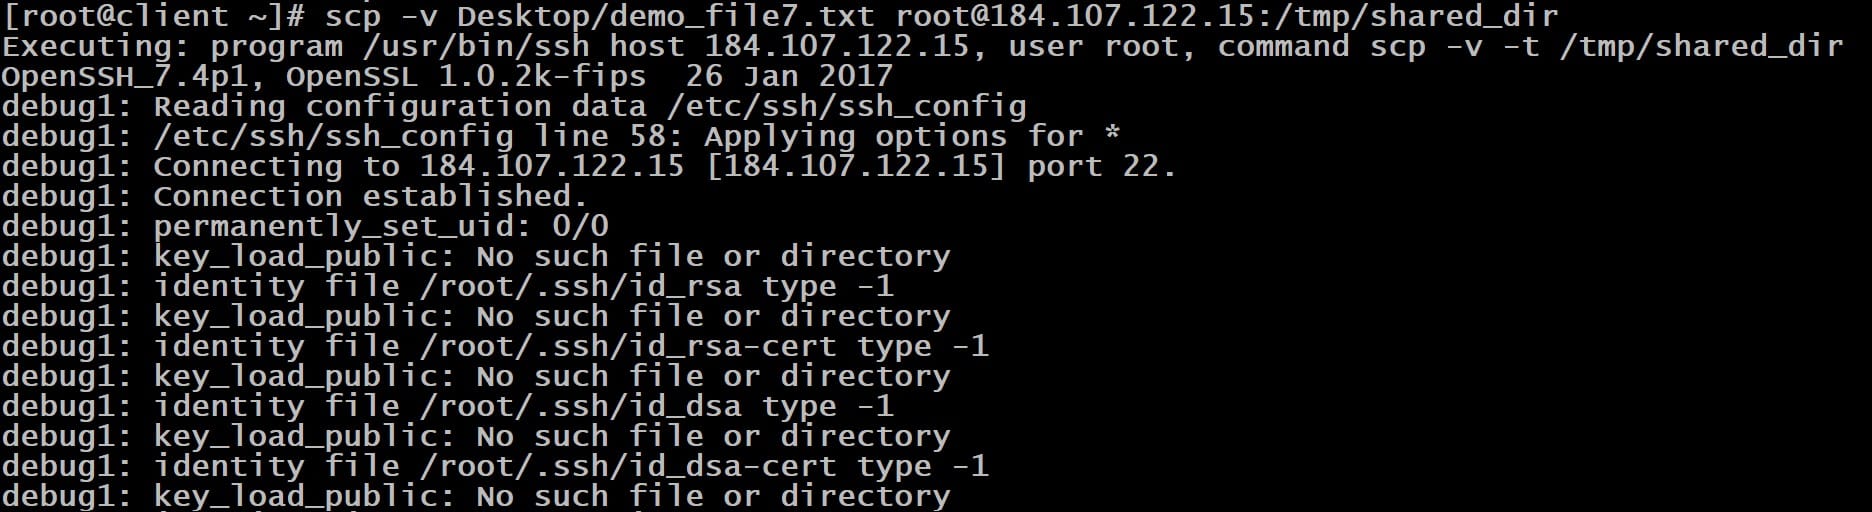
In this command:
- -v – enables verbose mode, producing a detailed log of the operation, which is particularly useful for debugging.
- Desktop/demo_file7.txt – specifies the file and its location on the local machine you’re copying.
- [email protected] – the username and IP address of the remote server where the file will be transferred.
- /tmp/shared_dir – the directory on the remote server where the file will be placed.
Use Case #9: Limit SCP Transfer Bandwidth Usage
You can use the -l option to cap the bandwidth consumed during an SCP transfer. This option is particularly useful for large file transfers where you need to prevent the consumption of the available network bandwidth
The -l option requires a value in kilobits per second (Kbps). Remember, 1 Kilobyte per second (KB/s) equals 8 kilobits per second (Kbps). For instance, the following command limits SCP bandwidth to 100 KB/s (with the -l value set to 800 Kbps):
# scp -l 800 Desktop/demo_file8.txt [email protected]:/tmp/shared_dir
Use Case #10: Use Compression to Enhance SCP File Transfer Speed
The -C flag enables compression during the transfer, accelerating the transfer of large files. The file(s) is compressed on the fly and decompressed after reaching the destination.
# scp -C Desktop/demo_file9.txt [email protected]:/tmp/shared_dir
Use Case #11: Select a Specific Cipher Method for SCP File Encryption
While SCP defaults to AES-128 encryption, the -c option allows you to select a different cipher algorithm. This option is great if your network policies require a different encryption algorithm.
For instance, the following command uses the Triple DES encryption algorithm instead of the default option:
# scp -c 3des Desktop/demo_file11.txt [email protected]:/home/remote_dir
Use Case # 12: Enforce SCP to Use IPv4 or IPv6
Using the -4 or -6 flag, you can dictate whether SCP should only use IPv4 or IPv6 for the transfer.
For instance, use the following command to enforce the IPv6 address scheme:
# scp -6 Desktop/demo_file12.txt [email protected]:/home/remote_dir
Use Case #13: Transfer a File with SCP While Maintaining Original File Attributes
The -p flag allows the utility to retain the original file attributes on the destination server. This is a critical requirement if you wish to keep the source file attributes like modification dates, access times, and permissions. Here’s the command:
# scp -p Desktop/demo_file13.txt [email protected]:/tmp/shared_dir
Here, the -p option ensures the file’s metadata is preserved during the transfer, providing a mirror copy at the destination.
Conclusion
The scp command is a powerful tool that offers a secure method for copying files and directories across Linux systems. We presented 13 examples to demonstrate how you can use SCP to securely transfer files and directories.
As you saw, SCP integrates seamlessly with SSH to ensure encrypted transfers. Whether you’re transferring files to a remote server, between servers, or managing bandwidth and encryption, SCP’s versatility is evident.
RedSwitches helps customers by offering customizable bare metal servers. So, if you’re looking for a robust server infrastructure for your projects, we offer the best dedicated server pricing and deliver instant dedicated servers, usually on the same day the order gets approved. Whether you need a dedicated server, a traffic-friendly 10Gbps dedicated server, or a powerful bare metal server, we are your trusted hosting partner.
FAQs
Q Can you explain the SCP command in Linux?
The SCP command in Linux, short for Secure Copy, is a command-line tool used to securely transfer files and directories between local or remote systems.
Q Could you provide the structure for using the SCP command?
Indeed, the structure of the SCP command is as follows:
# scp [options] [source] [destination]
In this command, [options] may include various flags to alter the behavior of the command, [source] denotes the file or directory you wish to copy, and [destination] indicates the path where the file or directory will be placed.
Q What steps should be followed to copy files with the SCP command?
To copy files using the SCP command, you can use the following syntax:
# scp [options] [source] [user@]host[: path]
For example, to copy a file named “file.txt” to a remote server located at “remote_host” in the directory “/path/to/destination”, you can use the command:
# scp file.txt user@remote_host:/path/to/destination
Q How do I copy directories using the SCP command?
To copy directories using the SCP command, you need to add the “-r” option, which stands for “recursive”. This option enables the SCP command to recursively copy a directory along with all its contents.
For example, to copy a directory named “directory” to a remote server located at “remote_host” in the directory “/path/to/destination”, you can use the command:
# scp -r directory/ user@remote_host:/path/to/destination
Q Can I copy multiple files and directories using the SCP command?
Yes, you can copy multiple files and directories using the SCP command. Simply list the files and directories separated by a space in the [source] parameter.
For example, to copy two files named “file1.txt” and “file2.txt” as well as a directory named “directory” to a remote server, you can use the command:
# scp file1.txt file2.txt directory/ user@remote_host:/path/to/destination
Q How do I specify a different port for the SCP command?
The SCP command, by default, transfers files securely using port 22. If there’s a requirement to utilize an alternative port, the “-P” option can be employed, followed by the desired port number. For instance, if you wish to copy a file called “file.txt” to a remote server on port 2222, the command would be formatted as follows:
# scp -P 2222 file.txt user@remote_host:/path/to/destination
Q How can I preserve the access time when copying files with the SCP command?
To preserve the access time of a file when copying it with the SCP command, you can use the “-p” option, which stands for “preserve”. This option ensures that the access time of the file is maintained on the destination system.
For example, to copy a file named “file.txt” to a remote server while preserving its access time, you can use the command:
# scp -p file.txt user@remote_host:/path/to/destination
Q How can I display the progress when copying files with the SCP command?
The “-v” option for verbose output can be included to monitor the file transfer progress while utilizing the SCP command. This provides comprehensive details of the transfer proceedings. For instance, if you want to copy “file.txt” to a remote server and observe the transfer progress, your command would look like this.
# scp -v file.txt user@remote_host:/path/to/destination
Q Can I compress the data when copying files with the SCP command?
Yes, you can compress the data using the SCP command to reduce the size of the transferred files. To enable compression, you can use the “-C” option.
For example, to copy a file named “file.txt” to a remote server while compressing the data, you can use the command:
# scp -C file.txt user@remote_host:/path/to/destination
