Many sysadmins and developers spend a lot of their time in the Linux shell. Whether installing a new application or changing the configuration of a device, the fastest way is to run a couple of commands in the terminal.
The shell on your Linux machine is not just an empty screen. In fact, your Linux experience depends in large part on the shell you use for daily tasks. Many users don’t try anything other than the traditional Bash shell with the Ubuntu and other Debian-based distros.
However, Z Shell is fast emerging as a favorite replacement for the Bash shell.
Zsh, or Z Shell, is a powerful and feature-rich shell that can enhance your command-line experience on Ubuntu. Compared to the default Bash shell, it has more advanced features, better autocomplete for commands, and improved customization options.
So, if you’re interested in exploring the Z Shell, this tutorial is for you. We’ll show you how to configure and install Zsh Ubuntu.
But before that, let’s quickly go through some pointers that distinguish Z Shell from the Bash shell.
Table Of Contents
- Distinguishing Z Shell From Bash
- How to Install Z Shell on Ubuntu
- Configure Zsh on Ubuntu
- Uninstall Z Shell
- Conclusion
- FAQs
Distinguishing Z Shell From Bash
Z Shell and Bash are both widely used command-line interpreters. However, Zsh offers several advantages, while using a syntax that’s familiar to Bash users.
- Installation: Installing Zsh is easy. You can use your preferred package manager, like APT in Ubuntu, to install the required packages.
- Package Manager Compatibility: Zsh integrates seamlessly with all popular package managers, such as APT and YUM.
- Interactive Setup: Unlike Bash, which requires manual customization, Zsh provides more interactive customization options that ease the Zsh installation process.
- Customizable Terminal Prompt: Zsh lets you customize the terminal prompt for a more visually appealing and personalized experience.
- Interactive Customization: Zsh offers extensive customization options in the form of themes and a range of plugins that enhance productivity and user experience.
Switching to Zsh may seem like a small change, but these enhancements significantly improve your command-line experience.
Let’s now go into the details of setting up and customizing Z Shell on Ubuntu.
How to Install Z Shell on Ubuntu
Installing Z Shell on Ubuntu is a simple process that involves three easy steps.
Prerequisites
Here are the prerequisites to install Zsh Ubuntu:
- A system running the latest stable Ubuntu version
- A user account with administrative privileges
- Access to terminal
Ubuntu uses Bash as the default shell. You can easily follow these steps to switch to Z Shell on your Ubuntu machine:
Step #1: Update Package Repository
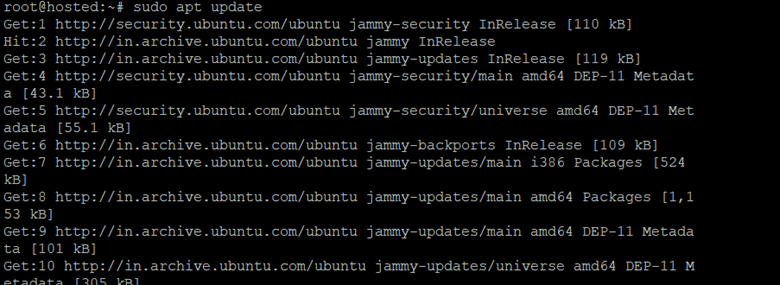
Updating Ubuntu’s package index is an essential step that ensures that you are working with the latest stable versions. For this, launch the terminal and run the following command:
# sudo apt update
Step #2: Install Zsh Ubuntu
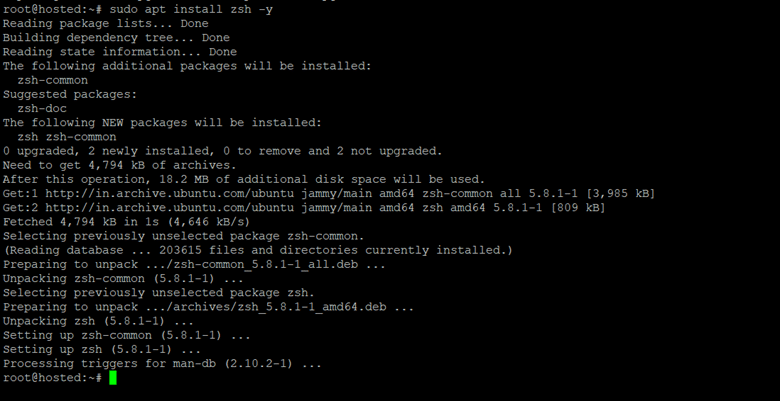
Now that the package repository is updated, you can install Zsh using the following command:
# sudo apt install zsh
Press Y to confirm the installation process.
Step #3: Verify the Installation
Once Zsh is installed, you can print the version information to verify that the Z Shell is available. For this, run the following command:
# zsh --version
Configure Zsh on Ubuntu
Once you have installed the Z Shell, the next step is the shell customization.
Z Shell is very flexible, and you can tailor the shell environment to your liking. This enhances your productivity and lets you tap into the powerful Zsh scripting features. You can follow these steps to configure the Z Shell on your Ubuntu machine.
Step #1: Start with the Initial Configuration
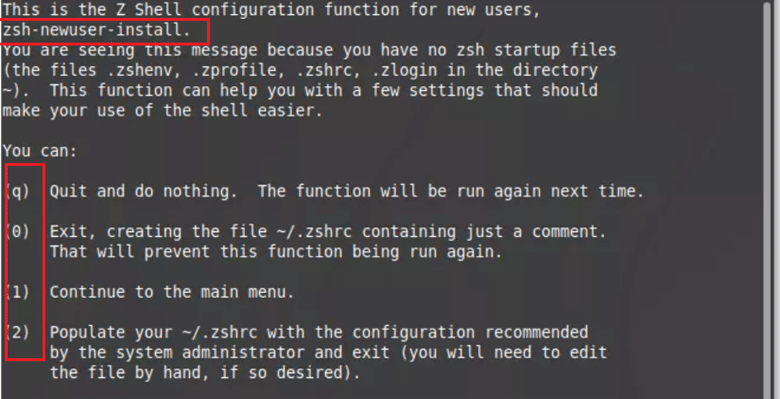
Unlike Bash (and some other shells), Zsh requires a bit of setup before the first time you use it. For this, launch the Z Shell with the following command in the terminal:
# zsh
Choose any of the options defined below:
- Press “1” for detailed setup.
- Press “2” for default settings in .zshrc.
- Press “0” for a blank .zshrc file.
- Press “q” to exit.
Your choices are remembered, and the Zsh will finalize the config files. If you need to redo this step, simply run the zsh-newuser-install command to see this menu.
Step #2: Set Zsh as the Default Shell
After initial configuration, the next step is to set Z Shell as your default shell.
For this, start by printing out the value of the $SHELL environment variable with the echo command:
# echo $SHELL
Next, set the Z Shell as the default shell with the chsh (change shell) command. Note that the syntax of the command is:
# chsh -s [path] [user]
Where [path] is the path to the shell you need and [user] is the user you’re changing the shell for (omit it for the current user).
If you’re unsure about the Zsh path, use:
# chsh -s $(which zsh)
Enter the root password when prompted. Log out and back in for the changes to take effect.
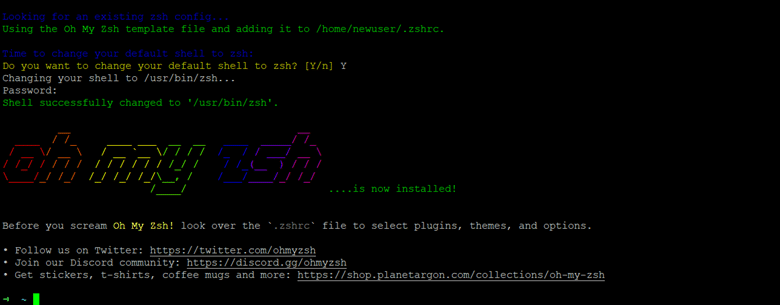
Step #3: Install Oh My Zsh
Oh My Zsh is a fantastic open-source framework that supercharges the Z Shell, making your command-line experience more enjoyable and productive. It introduces themes, plugins, and scripts you can easily install and manage.
Start with the following command to get and install Oh My Zsh:
#sh -c "$(wget https://raw.github.com/ohmyzsh/ohmyzsh/master/tools/install.sh -O -)"
Choose Y to set Z Shell as the default shell.
Step #4: Add a Custom Theme
After successfully installing Oh My Zsh, you can customize your command prompt to suit your preferences.
You can choose from 150+ themes for your terminal. You can preview and explore these themes on the Oh My Zsh GitHub theme page. Follow these steps to apply your preferred theme:
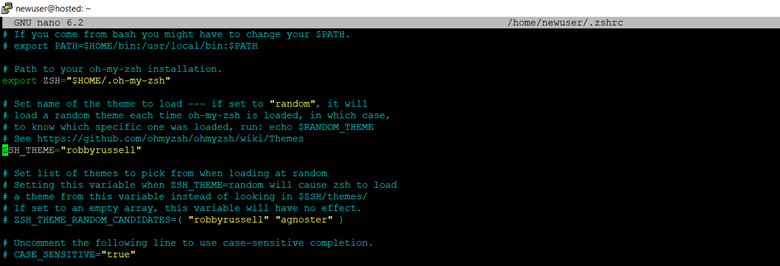
Open and edit the .zshrc configuration file using a text editor of your choice. We’ll use nano for the demonstration:
# nano ~/.zshrc
Locate the ZSH_THEME variable in the file. In most cases, the default value is:
ZSH_THEME="robbyrussell"
Replace the value of this variable with the name of your preferred theme. For instance, to apply the theme named jonathan, change the value to:
ZSH_THEME="jonathan"
Save the file and restart the terminal to apply the selected theme.
Step #5: Enable Auto-Suggestions
Auto-suggestions save you a lot of time by completing the commands and providing suggestions based on your Zsh command history. This feature is convenient for rapidly using commands you use regularly.
Here’s how to enable auto-suggestions in Z Shell:
Begin by adding the auto-suggestion plugin repository. For this, run this command to clone the repository to your system:
# git clone https://github.com/zsh-users/zsh-autosuggestions ${ZSH_CUSTOM:-~/.oh-my-zsh/custom}/plugins/zsh-autosuggestions
Next, open the .zshrc configuration file. We’ll use nano for this step:
# nano ~/.zshrc
Add the entry for the auto-suggestions plugin in ~/.zshrc:
plugins=(git zsh-autosuggestions)
Save the changes and exit the text editor. Restart the terminal and use the Z Shell Plugin Manager to enable the auto-suggestions plugin.
Once it’s up and running, the suggestions will appear as you begin typing a command. You can accept a suggestion by pressing the Right Arrow key, which will automatically complete the command.
Step #6: Enable Syntax Highlighting
Syntax highlighting has many benefits, like making code easier to read, spotting errors, boosting productivity, and improving aesthetics. Follow these steps to add this feature to your Z Shell:
Start by cloning the Syntax Highlighting plugin repository:
# git clone https://github.com/zsh-users/zsh-syntax-highlighting.git ${ZSH_CUSTOM:-~/.oh-my-zsh/custom}/plugins/zsh-syntax-highlighting
Next, open the .zshrc configuration file in a text editor:
# nano ~/.zshrc
Navigate to the plugins section in the file and add zsh-syntax-highlighting in the list of plugins:
Save your changes and exit the file. Restart your terminal and launch Zsh to enable syntax highlighting. Now, when you type a command with a typo, it will be highlighted in red, while a correct command will be highlighted in green:
Uninstall Z Shell
If you want to remove Zsh from your system and return to your previous shell (Bash in Ubuntu), follow these steps:
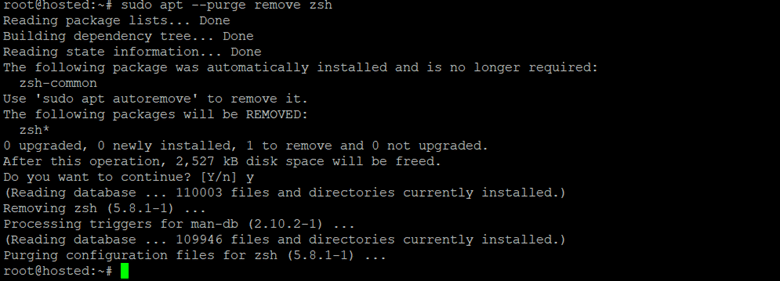
Start by purging the Zsh package from your system:
# sudo apt --purge remove zsh
Confirm with Y and press Enter. Purging the package removes the core Zsh files and deletes pre-installed configuration files and dependencies.
Next, change the default shell back to Bash (or any other shell you prefer) with the following command:
# chsh -s $(which bash)
Close the terminal and open a new session for the changes to take effect.
Conclusion
Customizing your terminal with Zsh on Ubuntu can make your command line more powerful and easier to use. With the installation and configuration steps outlined above, you can harness the power of Zsh and tailor it to your requirements.
RedSwitches offers the best dedicated server pricing and delivers instant dedicated servers, usually on the same day the order gets approved. Whether you need a dedicated server, a traffic-friendly 10Gbps dedicated server, or a powerful bare metal server, we are your trusted hosting partner.
FAQs
Q. What is Zsh?
Zsh, or Z Shell, is an interactive shell for Linux that incorporates many enhancements from other shells, making it a powerful command line tool.
Q. Why should I switch to Zsh?
Zsh has many features that improve the user experience over the default Bash shell, such as theme and plugin support, better auto-completion, and command correction.
Q. Can I use Bash scripts in Zsh?
Yes, Zsh is compatible mainly with Bash scripts.
Q. Is Oh My Zsh necessary for using Zsh?
While not necessary, Oh My Zsh is a popular framework that makes configuring Zsh easier and provides many additional features.
Q.How do I revert to Bash from Zsh?
You can change your default shell back to Bash by running chsh -s $(which bash), then log out, and you’ll return to Bash.
Q. What is Zsh and Oh My Zsh?
Zsh is an open-source command interpreter for UNIX systems that is highly customizable. Oh My Zsh is a community-driven framework for managing Zsh configuration and comes with a variety of themes and plugins.
Q. How do I install Zsh Ubuntu 20.04?
You can install Zsh Ubuntu 20.04 by running the command “sudo apt install zsh” in your terminal.
Q. Can I set up Zsh as the default shell on Ubuntu?
You can change the default shell to Zsh on Ubuntu by running the command “chsh -s $(which zsh)” and entering your password when prompted.
Q. What are the steps to install Oh My Zsh on Ubuntu?
First, to install Oh My Zsh on Ubuntu, ensure that Zsh is installed. Then, run the command “sh -c "$(curl -fsSL https://raw.github.com/robbyrussell/oh-my-zsh/master/tools/install.sh)“ in your terminal.
Q. How do I add plugins to Oh My Zsh?
You can add plugins to Oh My Zsh by editing the ~/.zshrc file and adding the plugin’s name to the list of plugins. Then, save the file and run the command “source ~/.zshrc” to apply the changes.
Q. Can I install Zsh Ubuntu 22.04?
Yes, you can install Zsh Ubuntu 22.04 using the same installation command, “sudo apt install zsh” in the terminal.
Q. How can I customize Zsh with different themes?
You can customize Zsh by selecting different themes. Edit the ~/.zshrc file and change the value of the ZSH_THEME variable to the name of the desired theme. Save the file and apply the changes by running the command “source ~/.zshrc“.
Q. What is the Zsh plugin architecture?
Zsh has a robust plugin architecture that allows users to extend its functionality. You can install plugins by adding them to the list in the ~/.zshrc file and then sourcing the file to activate the plugins.
Q. What is the apt install command for Zsh on Ubuntu?
The apt install command for Zsh on Ubuntu is “sudo apt install zsh. This command lets you download and install the Zsh shell on your Ubuntu system easily.
Q. How can I uninstall Zsh from my Ubuntu system?
To uninstall Zsh from your Ubuntu system, run the command “sudo apt remove zsh” in the terminal. Additionally, you can remove the configuration files by running “sudo apt purge zsh“.
