Software applications depend upon multiple libraries (called dependencies) that contribute various functionalities. Sometimes, the installation process might miss a required library, and the application fails to start or doesn’t function as the user expects.
Package managers are robust tools that automate installing, configuring, and removing software packages. They ensure that the software you install is compatible with your system and that dependencies are managed efficiently.
Homebrew is a package manager for macOS and Linux. It simplifies installing, updating, and managing software packages on your macOS system.
In this article, we’ll walk you through installing Homebrew on macOS. We’ll also show you how to use it for efficient software management. Let’s start with a short introduction to Homebrew and then move on to the installation process.
Table of Contents
- Introducing Homebrew
- How to Install Homebrew on macOS
- Disable Homebrew Analytics
- Install, Update, and Remove Packages Using Homebrew
- How to Install Desktop Applications Using Homebrew
- How to Uninstall Homebrew
- Conclusion
- FAQs
Introducing Homebrew
Homebrew is a package manager designed for macOS, and it’s perfect for newcomers. This tool simplifies installing, updating, and managing software packages on your Mac.
Before you can use Homebrew, you must install it on your system. Fortunately, you can install Homebrew on macOS by running a command in the macOS terminal. For Linux, the installation process may vary depending on the distribution. You can find installation instructions on the Homebrew website.
When you install a package using Homebrew, it automatically handles dependencies. During the installation process, it’ll also install those dependencies if the software relies on other libraries or tools.
The Idea of Formulae
Packages are called formulae in Homebrew terminology. A formula is a script that describes how to install and configure software. Homebrew maintains a repository of formulae, and users can contribute by adding or updating existing formulae.
Homebrew can also install graphical and desktop applications (and other software) through Cask, which extends Homebrew to manage binary applications, fonts, and other non-source packages.
The package manager simplifies software package management, making it easier to keep the system up-to-date. Developers and system administrators widely use it on macOS and Linux systems because of its excellent dependency management.
Homebrew Commands
Homebrew provides a list of Terminal commands to interact with the package manager. Here are some basic commands:
- brew install <package>: Installs a package.
- brew upgrade <package>: Upgrades a package to the latest version.
- brew uninstall <package>: Uninstalls a package.
- brew list: Lists installed packages.
- brew search <keyword>: Searches for packages containing the specified keyword.
- brew update: Updates Homebrew to the latest version.
How to Install Homebrew on macOS
Let’s go into the process of installing Homebrew on macOS.
Prerequisites
Before you begin, check that your macOS matches the following requirements:
- Apple Silicon or a 64-bit CPU
- macOS 10.14 or later
- Bourne-compatible shell (bash or zsh)
- Xcode command line tools
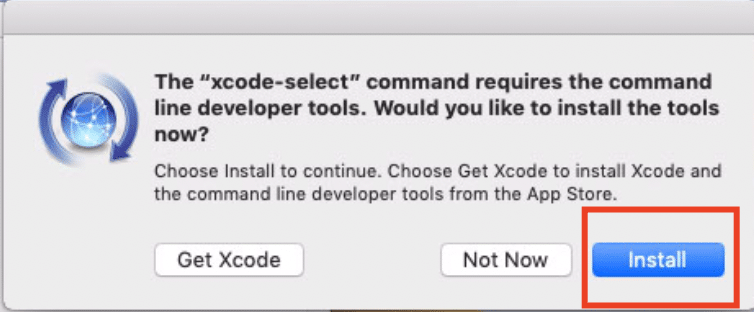
Step 1: Install Command-line Tools for Xcode
Xcode is Apple’s native IDE with all the tools for development in a macOS environment. If your system doesn’t already have it, you must first install Xcode’s command line tools to install some Homebrew package components.
For this, type Terminal into the search box on the Launchpad icon on the Dock. Next, click Terminal.
Alternatively, open the /Applications/Utilities folder in the Finder and double-click Terminal.
Once the Terminal is available, enter the following command:
# xcode-select --install.

Click Install to continue.
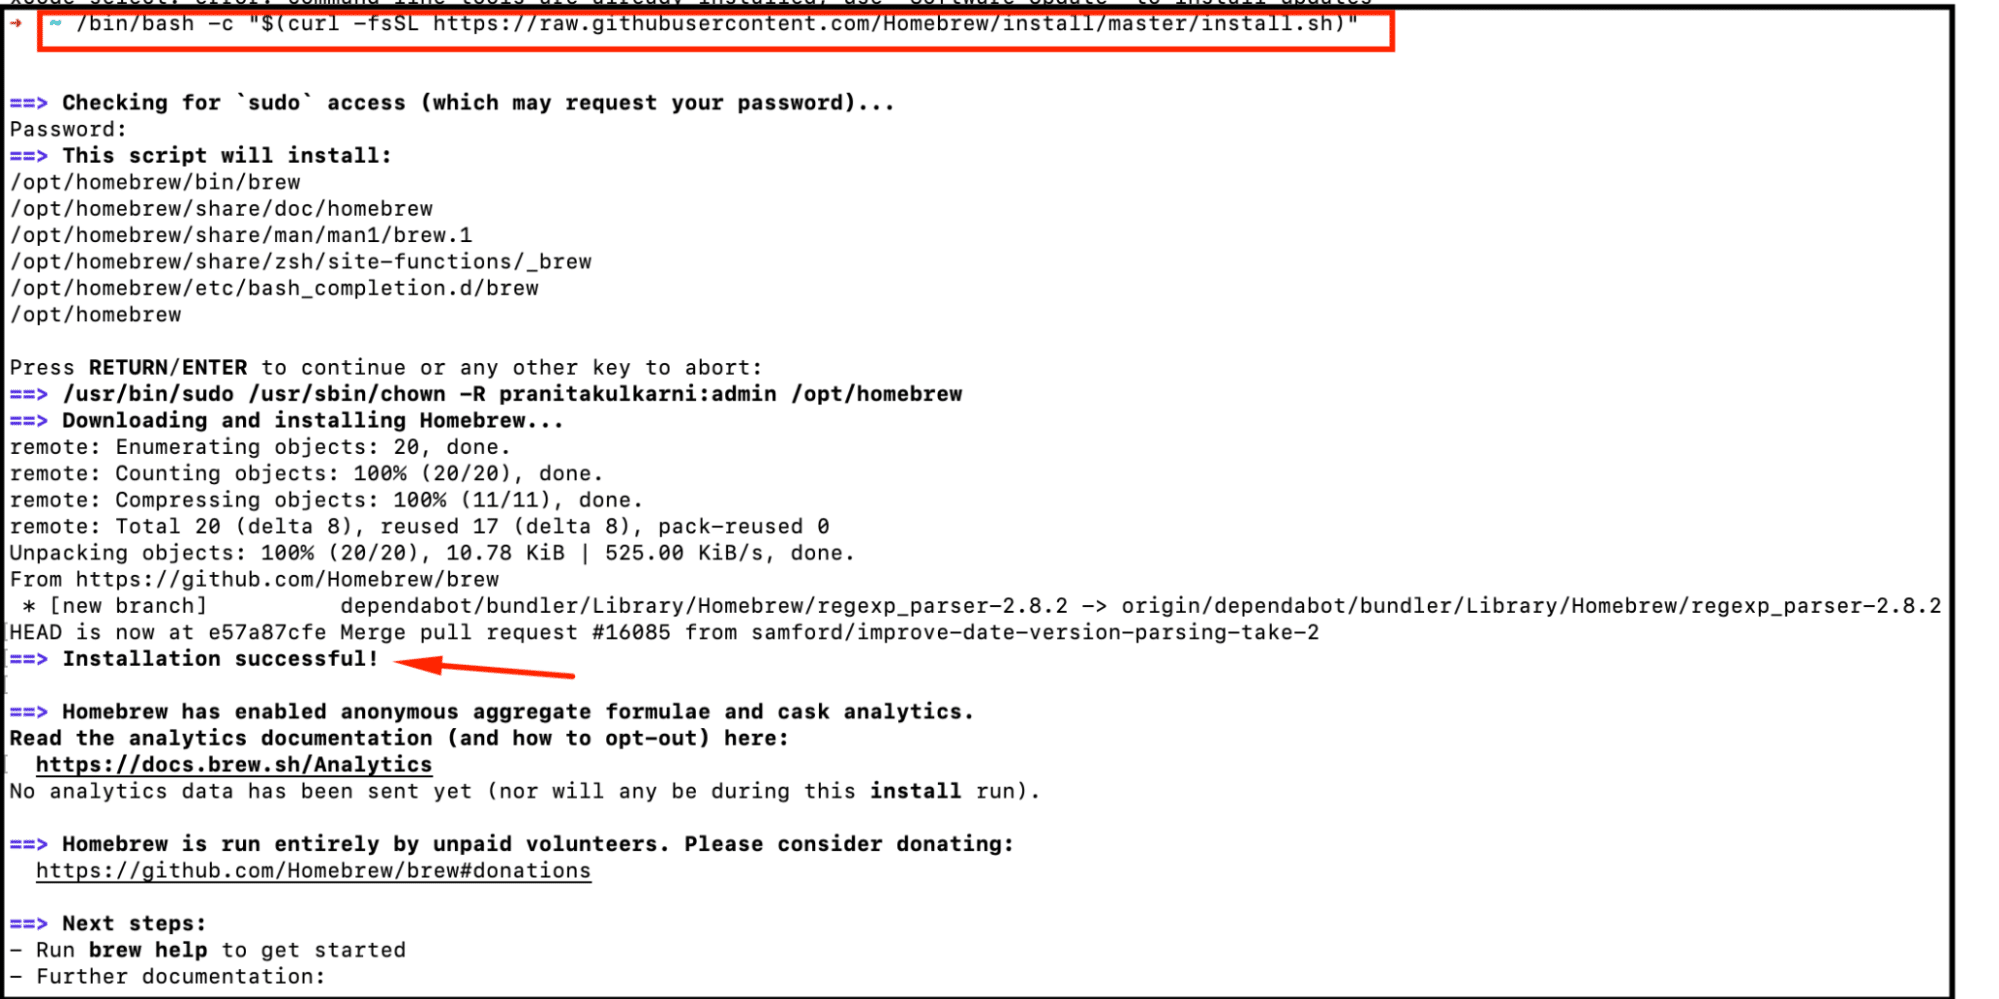
Step 2: Use the Installation Script to Download and Install Homebrew
We recommend following the installation script to download and install Homebrew on your macOS machine.
Run one of the following commands in the terminal:
# /bin/bash -c "$(curl -fsSL https://raw.githubusercontent.com/Homebrew/install/master/install.sh)"
OR
# /bin/bash -c "$(curl -fsSL https://raw.githubusercontent.com/Homebrew/install/HEAD/install.sh)"
When prompted, enter your administrator password and press Return to proceed. Wait for the download to finish.
Next, press Return to install Homebrew. The process will take some time, and you’ll see a success message at the end.
Step 3: Set the Homebrew Path Environment Variable
After installation, you should move the directory where Homebrew keeps its executables to the front of the PATH environment variable. This ensures that Homebrew installations will be used instead of the built-in macOS tools.
At this point, you should know what shell you’re in. If you’re on a macOS version after Mojave, you’re probably running the zsh shell. However, it is always best to find the shell you’re on by running the following command:
# echo $0
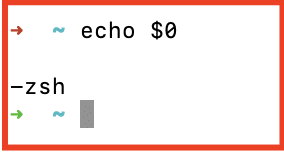
You’ll see either bash or zsh in the output.
If you’re using zsh, open the /.zshrc file in your preferred editor. We’ll open the file in VIM:
# vi ~/.zshrc
If you’re using the classic bash shell, use the following command to open the /.bash_profile file in VIM:
# vi ~/.bash_profile
Add the following lines at the end of the file:
~/.zshrc
# the executable directory for Homebrew should be added before the PATH
export PATH=/usr/local/bin:$PATH
When prompted, press the RETURN key while holding down the CTRL and O keys to save your changes. Next, close the editor by holding down the CTRL key while pressing X. You will return to the Terminal.
Apply the Changes
Close the Terminal app and reopen it to apply these changes. As an alternative, load the updated file using the source command.
If you’re on the zsh (and have made changes to the .zshrc file, use the following command:
# source ~/.zshrc
Alternatively, If you have made changes to the .bash_profile file, run the following command:
# source ~/.bash_profile
The modifications to the PATH environment variable will take effect once you relaunch the Terminal or use the source command.
Step 4: Verify Homebrew Installation
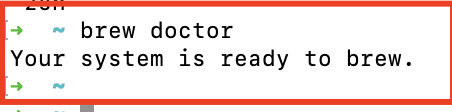
Finally, check to see if Homebrew is configured properly now. Run the following command:
# brew doctor
If the Homebrew is up to date, you will see this in your Terminal:
Disable Homebrew Analytics
Homebrew automatically gathers system data by default and transmits it to the program’s developers. At the minimum, the program collects the following basic information:
- The user agent for Homebrew.
- A version of Google Analytics.
- Both the user ID and tracking ID for Homebrew analytics.
- Events, such as the category for Homebrew install events.
If privacy is your primary concern and you don’t want to share anything with the developers, run the following command to disable the collection of analytical data:
# Brew analytics off
You can check the status of the analytic data collection after disabling analytics by running the following command:
# brew analytics
Install, Update, and Remove Packages Using Homebrew
Now that you have Homebrew on your macOS system, let’s see how you can use it to install, update, and remove packages.
Install Packages With Homebrew
Before you install a package, it is a good idea to see the installed package list with the following command:
# brew list

Next, you can install a package using Homebrew with the install command:
# brew install [package name]
For instance, here’s the command to install the MTR package:
# brew install mtr

Similarly, here’s the command to install the tree package, which shows a graphical directory tree:
# brew install tree
Update Packages with Homebrew
You should always strive to have the latest stable versions of the packages to get the newest features and bug fixes. We recommend checking the installed packages to verify that you have the latest versions.
First, you need to see a list of outdated packages you need to update. For this, run the following command:
#brew outdated
Next, run the upgrade command to upgrade the packages. The syntax of this command is usually:
# brew upgrade [package name]
For instance, we can use the following command to update the MTR package we installed earlier:
# brew update MTR

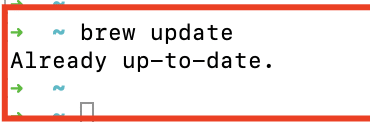
You should also check if you’re running the most recent Homebrew version:
# brew update
Remove Packages with Homebrew
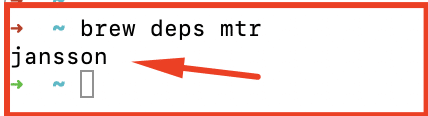
You will realize the benefits of using Homebrew when you need to uninstall a package. Homebrew can show you the dependencies of a package with the following command:
# brew deps ‘package_name’
For instance, use the following command to see the dependencies of the MTR package:
# brew deps mtr
Now that you know the dependencies, you can uninstall a package with the uninstall command. The syntax of the command is:
# brew uninstall ‘package_name’
For instance, you can uninstall the MTR package with the following command:
# brew uninstall mtr

If you wish, you can uninstall a package while ignoring the dependencies by adding the –ignore-dependencies flag:
# brew uninstall --ignore-dependencies ‘package name’
How to Install Desktop Applications Using Homebrew
Homebrew isn’t restricted to command-line tools. You can install desktop applications with Homebrew Cask. This component is already installed with the Homebrew, so you don’t need to install anything extra.
We’ll demonstrate how to use Homebrew Cask by installing the Visual Studio Code with Homebrew.
Start your Terminal and type the following command:
# brew install visual-studio-code


Once the process finishes, Visual Studio Code will be in your Applications folder.
The process of removing this package is the same as any other package:
# brew uninstall visual-studio-code

How to Uninstall Homebrew
If you wish to uninstall Homebrew, follow these steps:
Step #1: Run the Uninstall Script
Run the following command to remove or uninstall Homebrew from your macOS system:
# /bin/bash -c “$(curl -fsSL https://raw.githubusercontent.com/Homebrew/install/HEAD/uninstall.sh)”
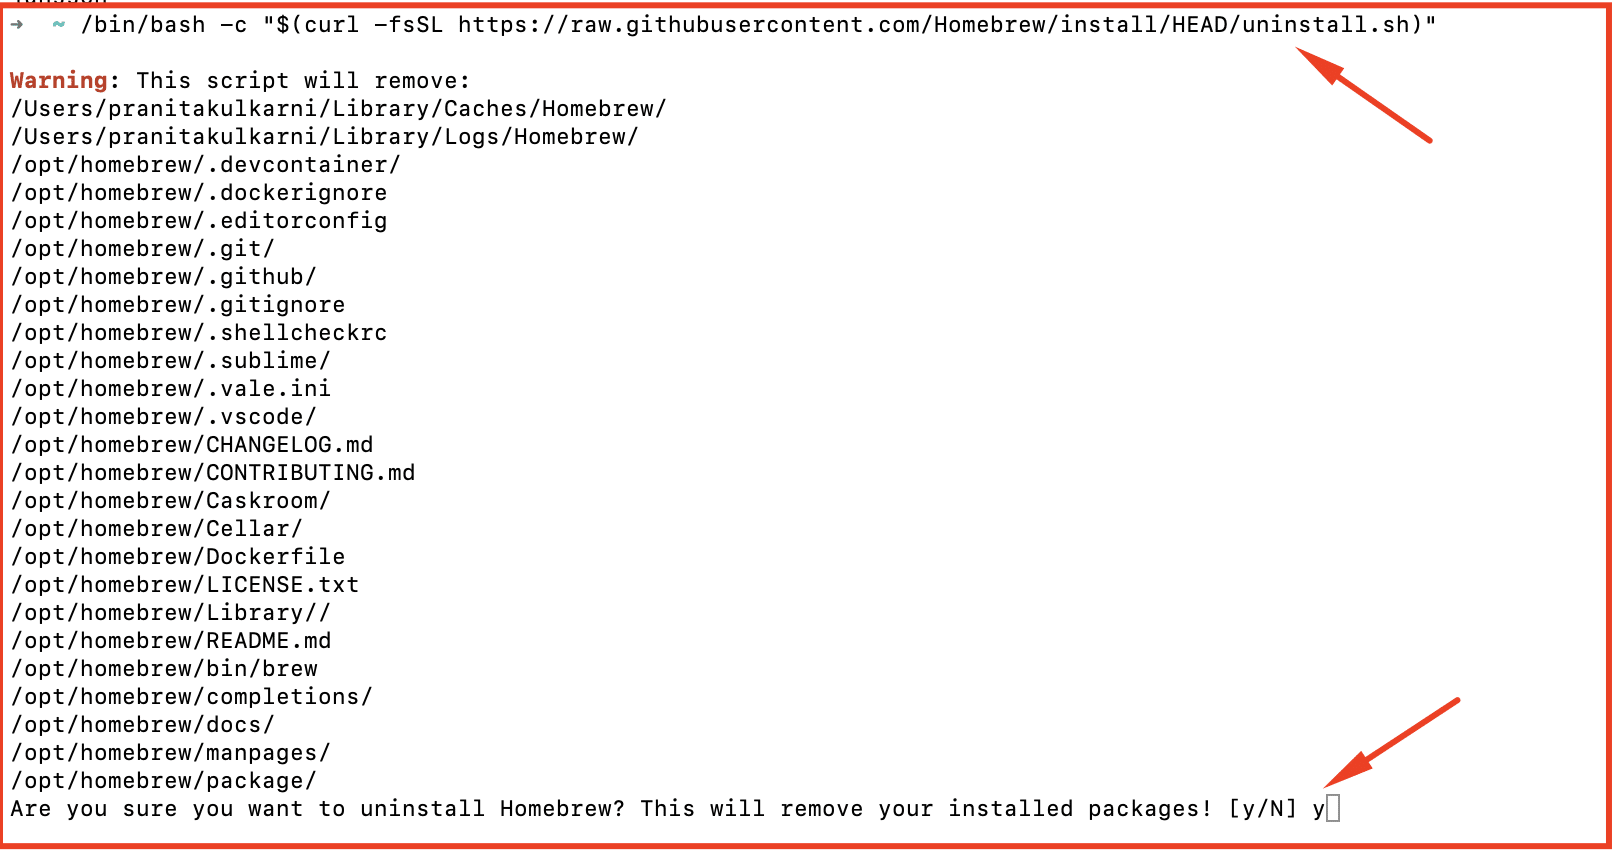
Step #2: Confirm Uninstallation
You will see a list of Homebrew files that will be erased and asked to confirm the uninstallation command. Press Return after typing y to remove Homebrew from your system.
Conclusion
This tutorial describes how you can install Homebrew on macOS. We also covered the Homebrew commands for package management.
Homebrew is a powerful tool that manages package dependencies, especially when you are uninstalling packages.
We also covered how you can use Homebrew Cask to install desktop applications.
If you’re looking for a robust server for your projects, RedSwitches offers the best dedicated server pricing and delivers instant dedicated servers, usually on the same day the order gets approved. Whether you need a dedicated server, a traffic-friendly 10Gbps dedicated server, or a powerful bare metal server, we are your trusted hosting partner.
FAQs
Q1: How do I clean up outdated brew packages?
You can use the brew cleanup command to clean up outdated brew packages. This command will remove any outdated or unnecessary packages from your system.
Q2: What is the difference between ‘brew cleanup’ and ‘brew cask cleanup’?
The brew cleanup command is used to clean up outdated brew packages, while the brew cask cleanup command is used to clean up outdated Cask packages.
Q3: How can I obtain information about the ‘bash’ package?
You can use the brew info bash command to get detailed information about the ‘bash’ package. This will provide you with information such as the package’s version, dependencies, and installation path.
Q4: How do I install a package with the ‘–cask’ flag?
To install a package with the ‘–cask’ flag, you can use the brew install –cask command followed by the package name. This flag is used specifically for cask packages, which are macOS applications.
Q5: How do I update the list of available packages?
You can use the brew update command to update the list of available packages. This will fetch the latest package information from the Homebrew repository.
Q6: Is Homebrew a package manager for macOS?
Yes, Homebrew is a package manager for macOS. It allows you to easily install, update, and manage a variety of software packages on your Mac.
Q8: Can you provide an overview of Homebrew?
Homebrew is a free and open-source package manager for macOS. It allows you to install and manage a wide range of software packages, libraries, and utilities from the command line.
