Formatting disks is an essential aspect of managing Linux servers. Formatting and partitioning disks prepare the storage media and set up the required file system for the rest of the software.
For existing disks, formatting disks is often the last-resort solution for fixing file system issues and space management.
That’s why understanding the specifics of disk formatting, whether configuring a new drive, reusing old storage, or troubleshooting disk usage issues, is crucial for system admins.
In this actionable guide, we’ll show you how to format disk partitions in Linux and discuss what to do after you have formatted the disk.
Table of Contents
- Popular Linux File System
- Format Disk Partitions in Linux
- Prerequisites
- Check Partition(s) Information
- Format Disk Partition with ext4 File System
- Format Disk Partition with FAT32 File System
- Format Disk Partition with NTFS File System
- Mount A Disk Partition in Linux
- Automatically Mount Disk At System Boot
- Conclusion
- FAQs
Let’s start with a brief overview of the popular file systems.
Popular Linux File System
Ideally, you should know about the current file system on a disk before you format or partition it. If you’re working with a fresh server, select the file system that the operating system and the installed software can use without issues.
We’ll now briefly discuss the popular file systems you can encounter in Linux environments.
Extended File System 4 (ext4)
Ext is the default file system for major Linux distributions. Introduced in the 1990s, it has gone through several versions, and the current ext4 is the standard file system on most recent Linux distros.
ext4 is backward-compatible; you can use it alongside previous versions without significant issues.
The file system is designed to handle large files (up to 16 TB) and can handle huge storage device volumes of 1 EB. These generous limits make ext4 an excellent fit for enterprise-level storage requirements. The file system is highly reliable and delivers exceptional performance as the number of devices and data volume approaches its limits.
Security is built into the core of the file system, and it offers several security-specific features such as journaling, filesystem checks, support for standard Linux file and directory permission models, and encryption (ext4 works well with external disk encryption utilities like LUKS).
File Allocation Table 32 (FAT32)
FAT32 is a versatile filesystem that works well with Windows, macOS, and most Linux distributions. The core of the filesystem is a 32-bit file allocation table that can be used to allocate space on diverse media, including USB and external storage devices.
You should note that FAT32 has a maximum supported file size of 4 GB and a maximum supported volume size of 2 TB. Despite these limitations, FAT32 remains prevalent for its broad compatibility and simplicity. You will likely encounter FAT32 when working with older drives and legacy systems.
New Technology File System (NTFS)
NTFS, developed as a replacement for the FAT32 file system, is now the default file system of Windows environments.
You’ll need to set up additional software or drivers if you plan to use it with Linux distributions. This could happen if you have a dual-boot system (Linux and Windows).
NTFS is known for supporting large file sizes (up to 16 EB) and large storage volumes (up to 256 terabytes). In addition, it provides multiple security features such as file and folder permissions, optional encryption, and Access Control Lists (ACLs) for securing sensitive data.
Here’s a summary of these file systems’ main characteristics and variations.
| FAT32 | NTFS | eXT4 | |
| Maximum file size | 4 GB | 16 TB | 16 TB |
| Maximum partition size | 2 TB | 16 TB | 16 TB |
| File permissions | No | Yes | Yes |
| Journaling | No | Yes | Yes |
| Encryption | No | Yes | Yes |
| Compatible operating systems | Windows, Mac, Linux | Windows, Mac, Linux | Linux |
| Suitable for | USB drives, SD cards, external hard drives | Internal hard drives, external hard drives, SSDs | Internal hard drives, external hard drives, SSDs |
Format Disk Partitions in Linux
Now that you understand the specifics of popular file systems let’s go into the details of formatting disk partitions in Linux.
Prerequisites
Before we start, make sure you have the following:
- A system running any popular Linux distribution
- A user account with root or sudo privileges
- Basic understanding of Linux CLI commands
Important: We strongly suggest you back up any data on the target drive because formatting destroys/deletes existing data.
Check Partition(s) Information
Getting information about the current setup is always a good idea before you format or execute any activity that can alter the contents or structure of a disk or partition. This is crucial for identifying the disk or partition you wish to format or modify.
Launch the terminal and run the lsblk command to list the block devices. These block devices technically represent storage hardware (CD/ROM drives, USB drives, RAM disks, and hard drives) as files.
# lsblk
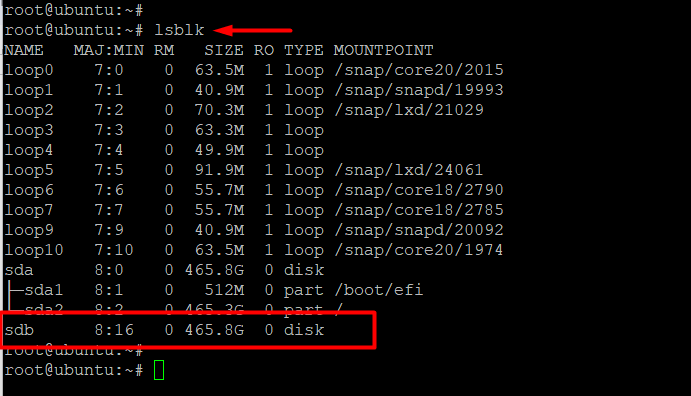
As you can see, the command prints details of each block device connected to the system. Here’s a brief description of the details:
- NAME: The name of the device
- MAJ:MIN: The significant number identifies the device driver, while the minor number identifies the specific device among all those using the same device driver
- RM: Whether the object may be removed or detached from the system (1 if yes, 0 if not)
- SIZE: The device’s size
- RO: Whether the device is read-only (1 if read-only, 0 if writable)
- TYPE: The type of the device
- MOUNTPOINT: The specific mount point for the device
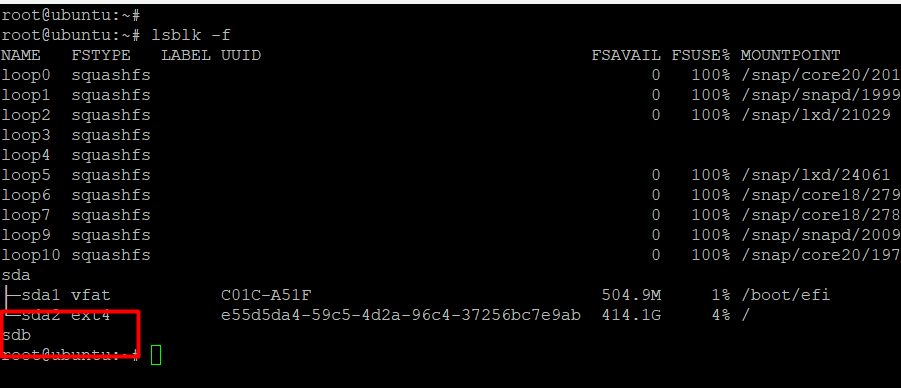
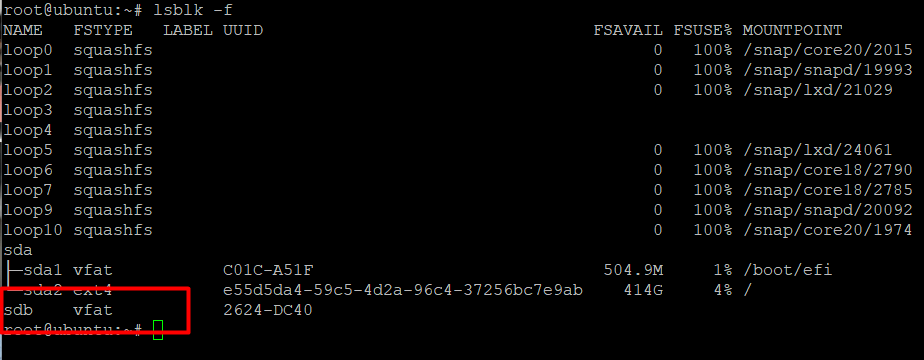
You can add the -f flag to display file system information:
# lsblk -f
The command prints a list of all block devices and the file system information. Non-formatted partitions lack information about the active file system (for instance, the partition labeled sdb has no file system information).
Now that we have complete information about the storage devices and partitions, we can use the mkfs command to format disk partitions. The great thing about the command is that it can set up any of the three file systems (ext4, NTFS, and FAT32) we discussed in the previous section.
In general, the mkfs command has the following syntax:
mkfs [options] [-t type fs-options] device [size]
Format Disk Partition with ext4 File System
Follow these instructions to format the partition with the Ext4 file system.
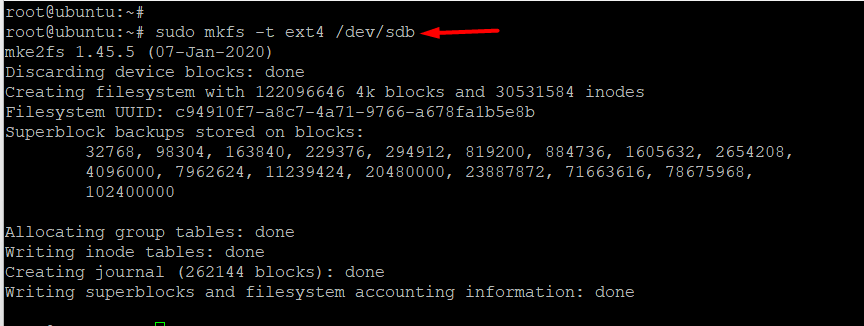
Step #1: Format the Partition
Use the following command to format the target disk partition (/dev/sdb) with the ext4 file system:
# sudo mkfs -t ext4 /dev/sdb
Step #2: Confirm Partition Changes
Next, use the following command to confirm the file system change:
# lsblk -f

Format Disk Partition with FAT32 File System
Follow these steps to format the partition with the FAT32 file system.
Step #1: Format the Partition
Use the following command to format the target partition (/dev/sdb) with the FAT32 file system:
# sudo mkfs -t vfat /dev/sdb
Step #2: Confirm Partition Changes
Use the lsblk command to confirm the file system change and find your new partition in the list.
# lsblk -f
Format Disk Partition with NTFS File System
Follow these steps to format the target partition (/dev/sdb1) with the NTFS file system.
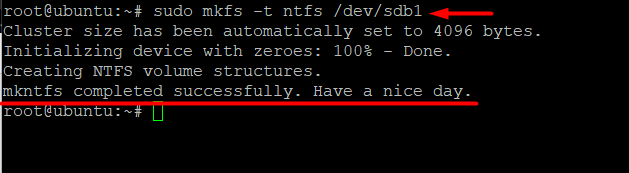
Step #1: Format the Partition
Use the mkfs command to format the partition with the NTFS file system:
# sudo mkfs -t ntfs /dev/sdb1
Step #2: Confirm Partition Changes
Confirm file system changes with the following command:
# lsblk -f

Mount A Disk Partition in Linux
You need to create a mount point for the storage devices before accessing data on a disk. A mount point helps a device “merge” into the current file system so that the operating system and the users can detect and access the contents. Mount points are treated as directories.
Let’s run through creating a mount point for a disk.
Step #1: Create the Mount Point
Use the following command to create a mount point for a primary partition before using the disk.
# sudo mkdir -p [mountpoint]
For this demonstration, the command will be:
# sudo mkdir -p /mt/sd1
Step #2: Mount the Partition
Next, mount the partition by running the following command:
# sudo mount -t [mountpoint]
For this demonstration, the command will be:
# sudo mount -t auto /dev/sdb1
If the process is successful, you won’t see any success message.

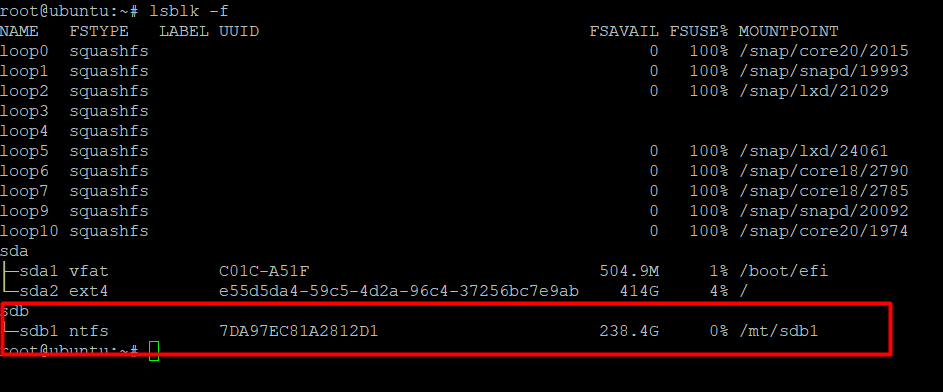
Step #3: Confirm That The Partition is Properly Mounted
Use the following command to check whether the partition is mounted:
# lsblk -f
Automatically Mount Disk At System Boot
Note that you need to add the disk to /etc/fstab so the system automatically mounts at the system boot. The process is really simple and has the following steps.
Step #1: Edit the /etc/fstab File
The first step is to edit the /etc/fstab file. For this, use the following command to open the file in the Nano editor:
# sudo nano /etc/fstab
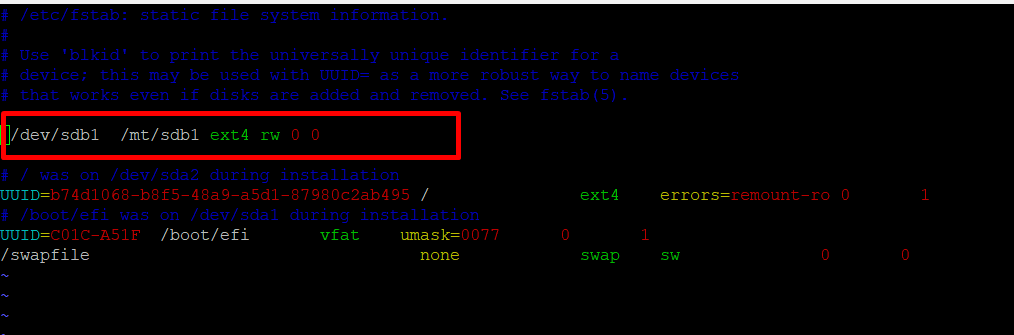
Step #2: Add Disk/Partition Information
Add a line for the filesystem you want to automatically mount in the “/etc/fstab” file. The line usually has the following format:
</path/to/disk/partition> </path/for/your/mount/point> <filesystem_type> <options_from_mount> <dump> <pass_number>
Where:
- </path/to/disk/partition> is the disk name
- </path/for/your/mount/point> is the directory where you want to mount the filesystem.
- <filesystem_type> is the type of filesystem (ext4 or NTFS).
- <options_from_mount> are mount options (default, rw).
- The last two fields are used for filesystem checks.
So, in our case, the entry will be:
/dev/sdb1 /mt/sdb1 ext4 rw 0 0
Step #3: Save and Exit
Exit the text editor after saving the changes to the file.
The changes will go into effect at the next system boot, and the disks will be automatically mounted and available for use.
Conclusion
System administrators and Linux power users often need to partition and format disks before they can use them. Formatting partitions is essential for data organization, system efficiency, and secure data access.
Now that you know how to format partitions properly, it’s time to go to the next level.
RedSwitches offers the best-dedicated server pricing and delivers instant dedicated servers, usually on the same day the order is approved. Whether you need a dedicated server, a traffic-friendly 10Gbps dedicated server, or a powerful bare metal server, we are your trusted hosting partner.
FAQs
Q: What is disk partitioning in Linux?
A: Disk partitioning divides a storage device into logical sections to effectively organize data and system files.
Q: Why is the file system important when formatting a partition?
A: The file system determines how data is saved and retrieved. Choosing the right file system ensures compatibility, performance, and data integrity.
Q: What are the common Linux partitioning tools, and how do they differ?
A: Common Linux partitioning tools include fdisk, parted, and GParted. Each utility has specific use cases and capabilities.
Q: How do I format a partition in Linux?
A: Use the mkfs command, followed by the chosen file system type, such as mkfs.ext4, to format a partition. This command initializes the file system on the partition.
Q: What is the role of the /etc/fstab file in Linux partitioning?
A: The /etc/fstab file lists the partitions to be mounted during system boot, automating the mounting process and ensuring accessibility to data.
Q: What precautions should I take to avoid data loss during partitioning storage devices?
A: First, back up critical data. Next, double-check partitioning commands to ensure they’re applied to the correct device to prevent accidental data loss.
Q: Are there Linux-specific best practices for managing storage devices efficiently?
A: We recommend practices such as labeling partitions descriptively, monitoring disk format space with tools like df, and performing regular maintenance.
Q: What tools can I use to monitor the health and performance of storage devices in Linux?
A: Use tools like smartctl, df, and du for monitoring disk health, available space, and data usage.
Q: Can I resize partitions after they have been created and formatted?
A: You can resize partitions using tools like GParted or command-line utilities to accommodate changing storage needs.
Q: What Linux distributions offer graphical partitioning tools for beginners?
A: Linux distributions like Ubuntu and Linux Mint come with user-friendly graphical partitioning tools, making it easier for beginners to manage storage.
