
WordPress is still the easiest and perhaps the fastest option if you wish to build and deploy websites and blogs quickly. This flexible platform is a popular choice for making everything from corporate portals, blogs, portfolio and resume websites, and eCommerce stores.
Table Of Content
- What is Docker and Docker Compose?
- Prerequisites
- Step # 1: Install the Docker Engine
- Step # 2: Install the Docker Compose
- Step # 3: Set Up the .yml File
- Step # 4: Building WordPress Container
- Step # 5: Access & Configure the WordPress Website
- Update WordPress Container
- Conclusion
- FAQs
So, if you’re in a VPS or dedicated server environment and wish to leverage WordPress for your projects, you’re in luck because
you can use Docker Compose to install WordPress on your system quickly.
Blending these two technologies combines both advantages to streamline WordPress installations through Docker Compose.
This article will discuss the detailed process of deploying WordPress through Docker Compose. We’ll discuss the prerequisites and the critical steps of the process.
But first, let’s get a comprehensive overview of Docker and Composer so that you can clearly understand the core platform used in the WordPress deployment process.
What is Docker and Docker Compose?
Docker is a widely used open-source platform that facilitates containerized applications’ creation, deployment, and administration.
The core unit of Docker operations is self-contained and lightweight containers that bundle all necessary dependencies and components to run an application effectively. This includes the application’s code, runtime, libraries, and system tools.
Docker empowers developers to build, distribute, and run applications uniformly across various environments. This simple idea eliminates the challenges of developing, deploying, and scaling software on multiple platforms.
One of the essential tools that Docker offers is Docker Compose. This tool simplifies the management of applications composed of multiple containers. Using a YAML file, Docker Compose enables the definition and coordination of the configuration and dependencies for various Docker containers.
Developers can initiate and manage the entire application stack effortlessly with just a single command through Docker Compose. This ensures proper connectivity and configuration between containers.
Additionally, Docker Compose handles network and volume configuration, provides dependency management, and supports the scaling and managing services associated with the application stack.
Overall, Docker and Docker Compose provide a standardized and efficient solution for developing, deploying, and managing containerized applications. This powerful combination streamlines the workflow, enhances portability, and contributes to the seamless operation of applications in diverse computing environments.
The Prerequisites of the Process
Before you install WordPress through Docker Compose, you need the following two prerequisites.
A server running Ubuntu (or any compatible Linux distro)
A non-root user with sudo privileges
This process assumes you don’t have Docker and Docker Compose installed on the system. So, that is the starting point of this process.
Step # 1: Install the Docker Engine
You can start by using the following command to install the required dependencies.
#apt-get install apt-transport-https curl ca-certificates curl software-properties-common -y
Next, run the following command to add Docker’s GPG key:
#curl -fsSL https://download.docker.com/linux/ubuntu/gpg | apt-key add -
After adding the key, include the Docker repository in the APT source file with the following command:
#add-apt-repository "deb [arch=amd64] https://download.docker.com/linux/ubuntu focal stable"
Finally, execute the following command to install the most recent Docker version.
#apt-get install docker-ce -y
Verify Docker Installation
Once Docker is installed, you can verify the installation by checking the version information. For this, execute the following command:
#docker --version

You can see the version information in the terminal. This indicates that Docker is properly installed and available for action.
Step # 2: Install the Docker Compose
The next step is to install Docker Compose on your system.
There’s a chance that the official Ubuntu repository might not contain the latest Docker Compose version. If so, you need to download it from the GitHub download page.
We recommend starting with the following command to download the most recent stable release of Docker Compose and install it:
#curl -L https://github.com/docker/compose/releases/download/1.29.2/docker-compose-Linux-x86_64 -o /usr/local/bin/docker-compose

You can see the outcome of the process:
By default, you might not have the correct permissions for using Docker Compose. So before going further, we’ll need to grant executable permissions to the Docker Compose binary file:
#chmod +x /usr/local/bin/docker-compose
Finally, you can print version information to verify the installation and access:
#docker-compose --version

The version information indicates that the file is available for use.
Step # 3: Set Up the .yml File
Now that the installation is over, let’s start the WordPress setup process.
For this, start by creating the docker-compose.yml file that defines the WordPress container, Database container, Volume, and Environment. This file instructs Docker on configuring and starting the WordPress and Database containers.
The first step in this process is creating a directory named “WordPress” to store the docker-compose.yml file:
# mkdir wordpress
Next, switch to the new directory and create a docker-compose.yml file. We are using the VI editor for creating this file. You can use your preferred editor for the task:
#vi wordpress/docker-compose.yml
Add the following code to define the Docker Compose version, WordPress and Database services, volumes, and environment in the docker-compose.yml file:
version: "3"
services:
database:
image: mysql
restart: always
environment:
MYSQL_ROOT_PASSWORD: wppassword
MYSQL_DATABASE: wpdb
MYSQL_USER: wpuser
MYSQL_PASSWORD: wppassword
volumes:
- mysql:/var/lib/mysql
wordpress:
depends_on:
- database
image: wordpress:latest
restart: always
ports:
- "80:80"
environment:
WORDPRESS_DB_HOST: database:3306
WORDPRESS_DB_USER: wpuser
WORDPRESS_DB_PASSWORD: wppassword
WORDPRESS_DB_NAME: wpdb
volumes:
["./:/var/www/html"]
volumes:
mysql: {}
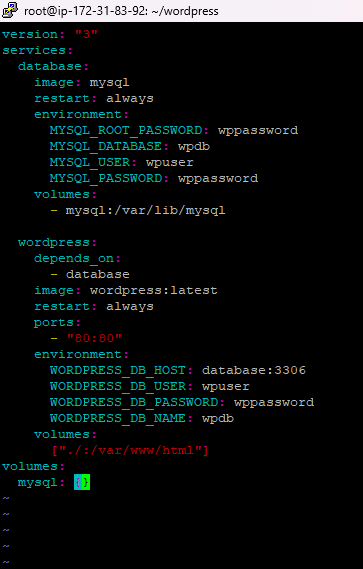
At this point, the file should look something like this:
Save and close the file when you are finished.
The above code represents a Docker Compose configuration file written in YAML format. It defines two services, “database” and “wordpress,” and provides their respective configurations.
This configuration data is critical to the process because Docker will use it as the “template” for creating the appropriate containers. Let’s break it down to understand it works:
version: “3”: Specifies the version of Docker Compose.
Service: “database”
MySQL: Specifies the Docker image to be used for the database service; in this case, it is “mysql”.
restart: always: Ensures the container restarts automatically if it stops or encounters an error.
Environment: Sets the environment variables for the database service, including the root password, database name, username, and password.
Volumes: Mounts the “mysql” volume to the "/var/lib/mysql" directory inside the container. This sets up data persistence.
Service: “wordpress”
depends_on: Defines the dependency of the “wordpress” service on the “database” service. This ensures that the database service starts before WordPress.
wordpress:latest: Specifies the Docker image for the WordPress service using the latest version of the image.
restart: always Ensures the container restarts automatically if it stops or encounters an error.
ports: Maps port 80 of the host machine to port 80 of the WordPress container. This mapping is critical for accessing the WordPress site.
environment: Sets the environment variables for the WordPress service, including the database host, username, password, and database name.
volumes: Mounts the current directory (“.”) to the "/var/www/html" directory inside the container, allowing WordPress files to be accessed and modified.
volumes: mysql: {}: Defines the “mysql” volume for data persistence in the database service.
As you can see, this Docker Compose file sets up a WordPress application with a MySQL database. During this process, the two services are connected together.
Step # 4: Building WordPress Container
After creating the docker-compose.yml file, you need to start the WordPress and Database containers.
To begin, navigate to the “wordpress” directory with the following command:
#cd wordpress
Next, start the two containers by executing the following command:
#docker-compose up -d
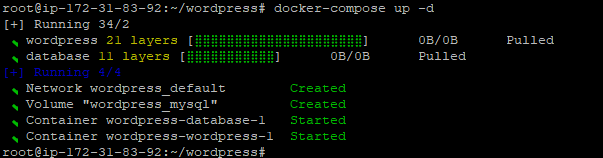
This command uses the .yml configuration file we defined in the previous step:
As the process starts, the command will download the WordPress and MySQL images from the Docker repository, start both containers in the background, and keep them running.
Verify Images and Containers
You can verify the downloaded container images specified in the docker-compose.yml file by executing the following command:
#docker-compose images
Here’s the sample output:

Next, you can verify the running containers by executing the following command:
#docker-compose ps
The output should look like:

You can also view the logs of the WordPress container with the following command:
#docker-compose logs wordpress
Similarly, you can view the logs of the Database container with the following command:
#docker-compose logs database
Step # 5: Access & Configure the WordPress Website
At this point, your WordPress site is ready.
Now, open your web browser and enter the URL http://your-server-ip. You will be redirected to the WordPress language selection screen.
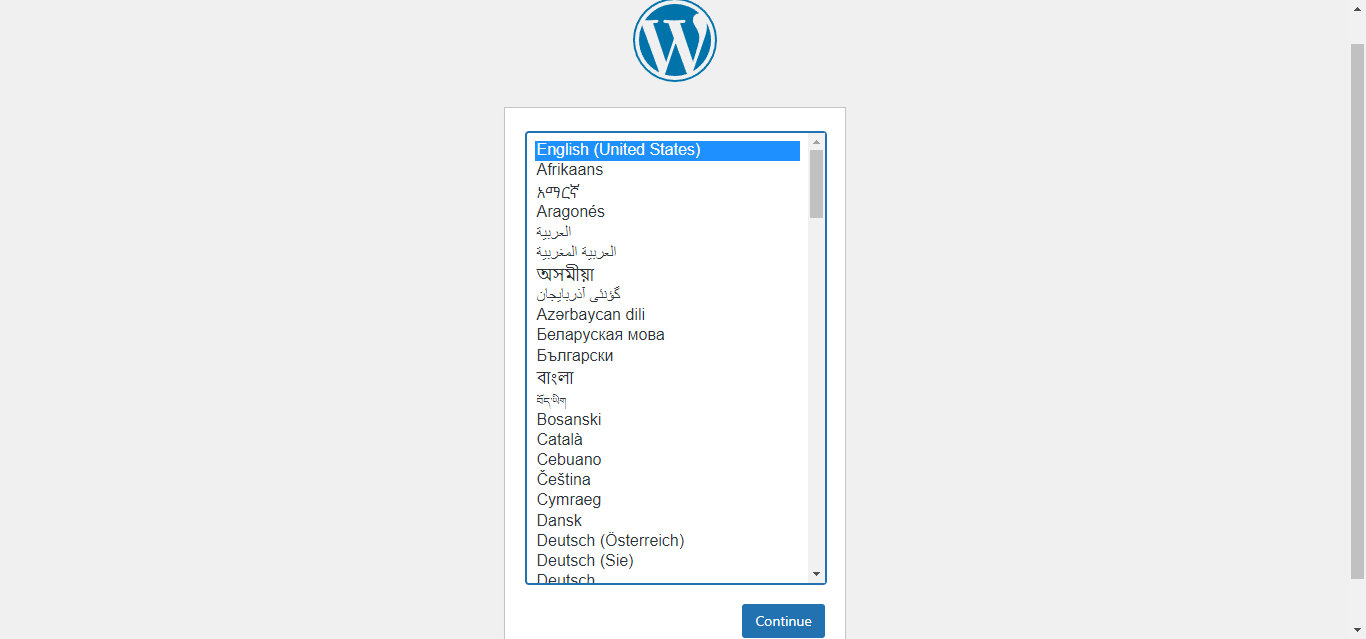
Choose your preferred language and click the “Continue” button. You will then be directed to the WordPress site configuration screen.
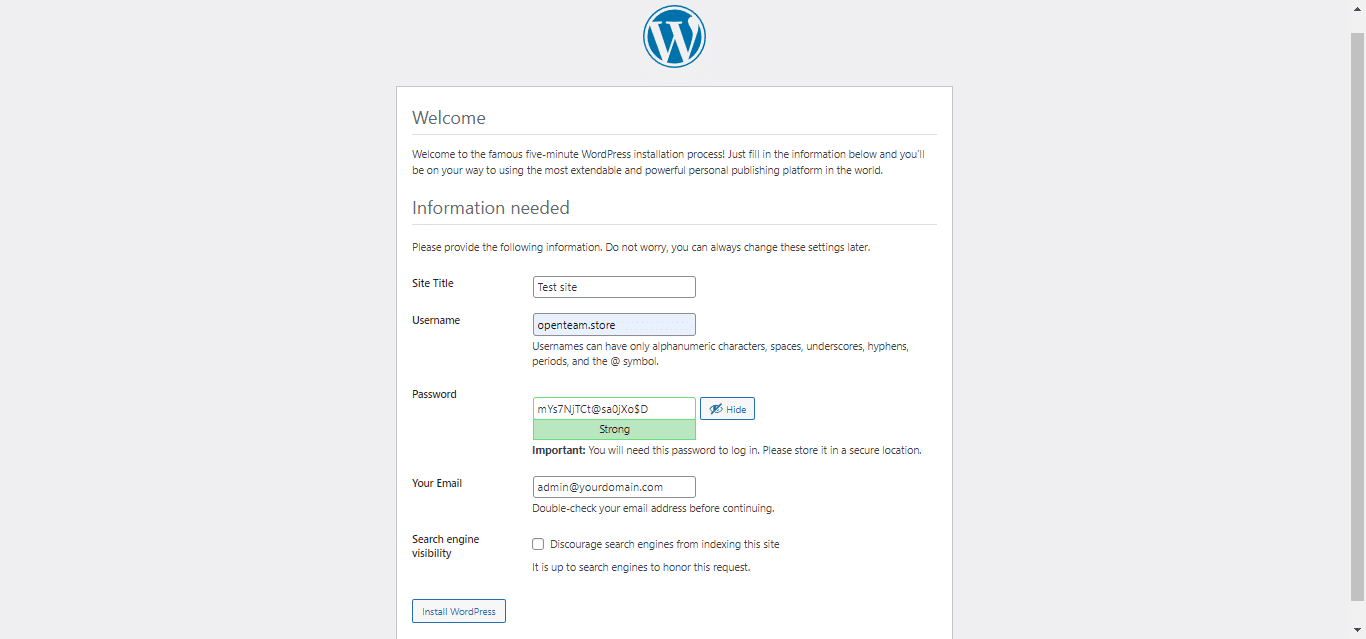
Enter your desired website name, admin username, password, and email, and click the “Install WordPress” button. Once the installation process finishes, you will be presented with the following screen:
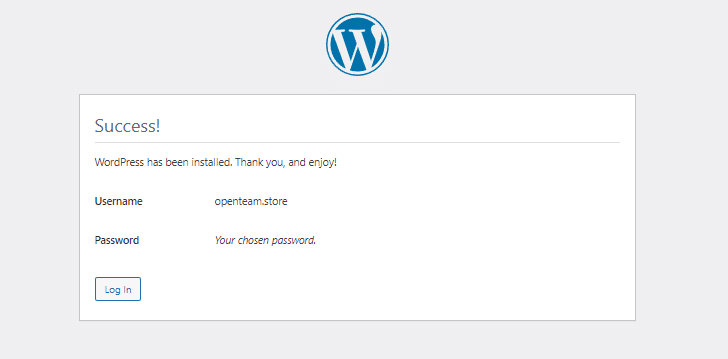
Log Into the WordPress Website
Click the “Log in” button. You will then be redirected to the WordPress login screen.
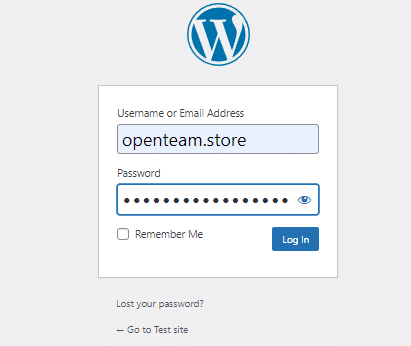
Enter your WordPress admin username and password, and click “Login”. You will then be redirected to the WordPress dashboard:
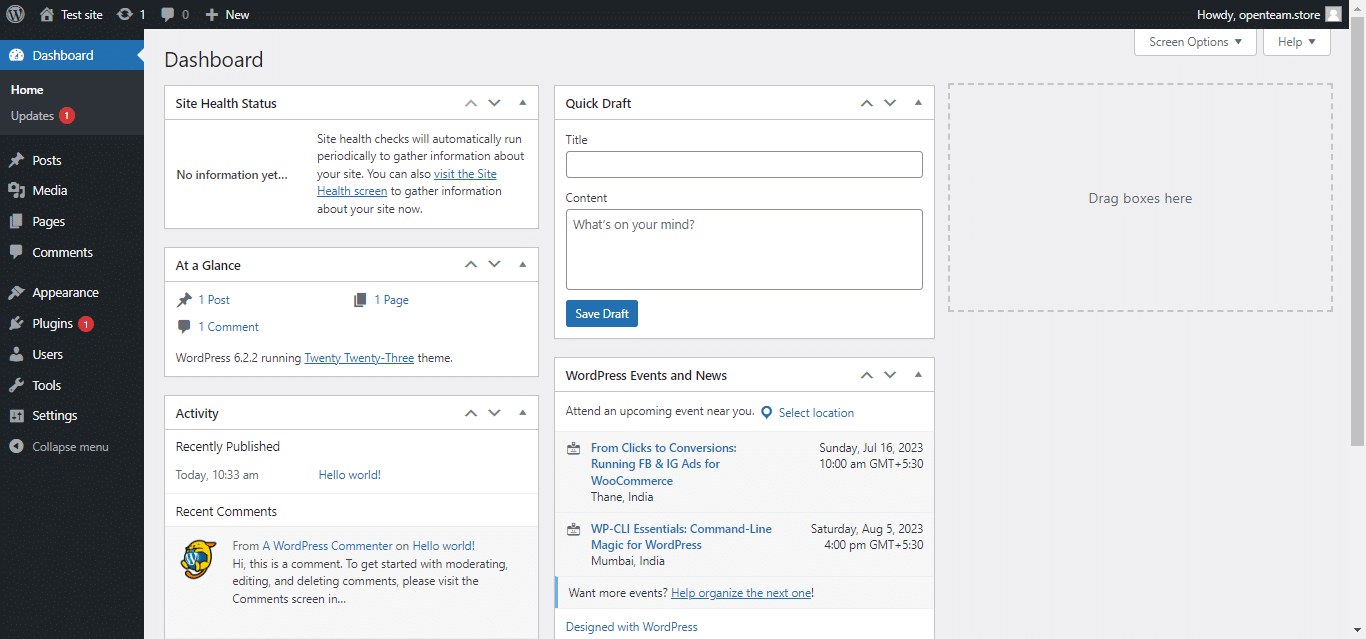
You now have a working WordPress site (complete with a MySQL database) deployed within a container.
Update WordPress Container
If your WordPress container has been up and running for a while, the active version might differ from the current WordPress and MySQL Docker images.
If so, you can update them by stopping and recreating all containers.
To begin, stop all containers using the following command:
#cd wordpress
#docker-compose down
Next, download the latest versions of the WordPress and MySQL images by executing the following command:
#docker-compose pull
Next, create and launch both containers using the following command:
#docker-compose up -d
Conclusion
In this article, we discussed the process of installing WordPress through Docker Compose. Now, you can set up WordPress in a containerized environment using Docker Compose. Docker Compose simplifies the process by managing the WordPress and MySQL containers, making deploying and managing your WordPress site easier.
At RedSwitches, our team of support engineers specializes in assisting customers in managing their Linux servers. We provide 24/7 support and prioritize proactively resolving your issues.
Contact us now to discover more about our services.
FAQs
Q: Can I use Docker on other operating systems?
A: Yes, Docker and Docker Compose are cross-platform tools, so that you can use them on macOS and Windows.
Q: Can I use a different version of MySQL or WordPress?
A: You can specify different versions in the Docker Compose file by updating the image tags.
Q: How can I access the WordPress files and database outside the containers?
A: Docker Compose creates volumes for persistent storage. You can find the volume paths using Docker commands.
- Open a terminal or command prompt.
- Use docker ps to list running containers.
- Identify the container ID or name for your WordPress service.
- Use docker inspect <container_id_or_name> | grep “Source” to find the file volume path.
- Use the same command with the MySQL container ID or name to find the database volume path.
- Copy the volume path and access files and database outside the containers.
Q: Can I deploy my Dockerized WordPress application to a cloud platform?
A: Yes, you can deploy your Dockerized WordPress application to cloud platforms like Amazon Web Services (AWS), Google Cloud Platform (GCP), or Microsoft Azure. Each platform has its deployment methods and services for containers.
Q: Can I use Docker Compose to deploy multiple WordPress sites on the same server?
A: Yes, you can define multiple WordPress services in the Docker Compose file, each with its configuration and volumes, allowing you to run multiple WordPress sites on the same server.
Q: Is it possible to scale the WordPress containers for increased traffic?
A: Yes, Docker Compose allows you to scale your services using the docker-compose upscale command. You can scale the WordPress service to have multiple instances running to handle increased traffic.
Q: Can I integrate external services like Redis or Elasticsearch with Dockerized WordPress?
A: You can define additional services in the Docker Compose file for external services like Redis or Elasticsearch and configure WordPress to use them. This enables you to enhance performance or add further functionalities to your WordPress application.
Q: Can I automate the deployment of my Dockerized WordPress application?
A: You can automate the deployment using CI/CD pipelines. Tools like Jenkins, GitLab CI/CD, or Travis CI can be used to automatically build and deploy your Dockerized WordPress application whenever there are changes to your codebase.
