
In Unix-like operating systems, the Linux tar command is a commonly used tool that lets users create, examine, and extract files from compressed or uncompressed archives.
Short for tape archive, the tar command has been around since 1979. It was originally designed to work with tape storage in AT&T Unix version 7. These days, the command has been rewritten to work in all modern Unix-like operating systems to bundle files and directories, create compressed archives, and facilitate data transfer.
This command is known for its flexibility and is often employed with other commands, such as the gzip tool or bzip2, to compress archives.
It can handle various file types, original directories, archive directories, and file permissions, making it an essential tool for managing and organizing archive files in a Unix environment.
In this tutorial, we will take a detailed look at the tar command and then look at 15 use cases where you can use it to create and manage archives and files in a Linux environment.
Table Of Contents
- The Syntax of the tar Command in Linux
- 15 Use Cases of the tar Command
- The Prerequisites
- Use Case #1: Create an Archive
- Use Case #2: Delete Files After Archive Creation
- Use Case #3: Extract Files from an Archive
- Use Case #4: Listing the Contents of an Archive
- Use Case #5: Create a Compressed Archive From a Directory
- Use Case #6: Add Files to an Archive
- Use Case #7: Extract Specific Files From an Archive
- Use Case #8: Excluding Files from an Archive
- Use Case #9: Preserve File Permissions
- Use Case #10: Locate a File in an Archive
- Use Case #11: Locate Multiple Files in an Archive
- Use Case #12: Extract a Single File From an Archive
- Use Case #13: Overwrite Control
- Use Case #14: Set a Custom Timestamp
- Use Case #15: Use tar in a Daily Backups Script
- Conclusion
- FAQs
The Syntax of the tar Command in Linux
The basic syntax of the tar command is as follows:,
# tar <operation mode> <option(s)> <archive> <file(s) or location(s)>
- The operation mode indicates which operation (creation or extraction) is performed on the files. You can only execute one operation in a tar command.
- Options are optional and change the method of operation.
- The archive name should include the archive file name and extension.
- The file name(s) is a list, separated by spaces, that the tar command uses for compression, extraction process, or wildcard matching.
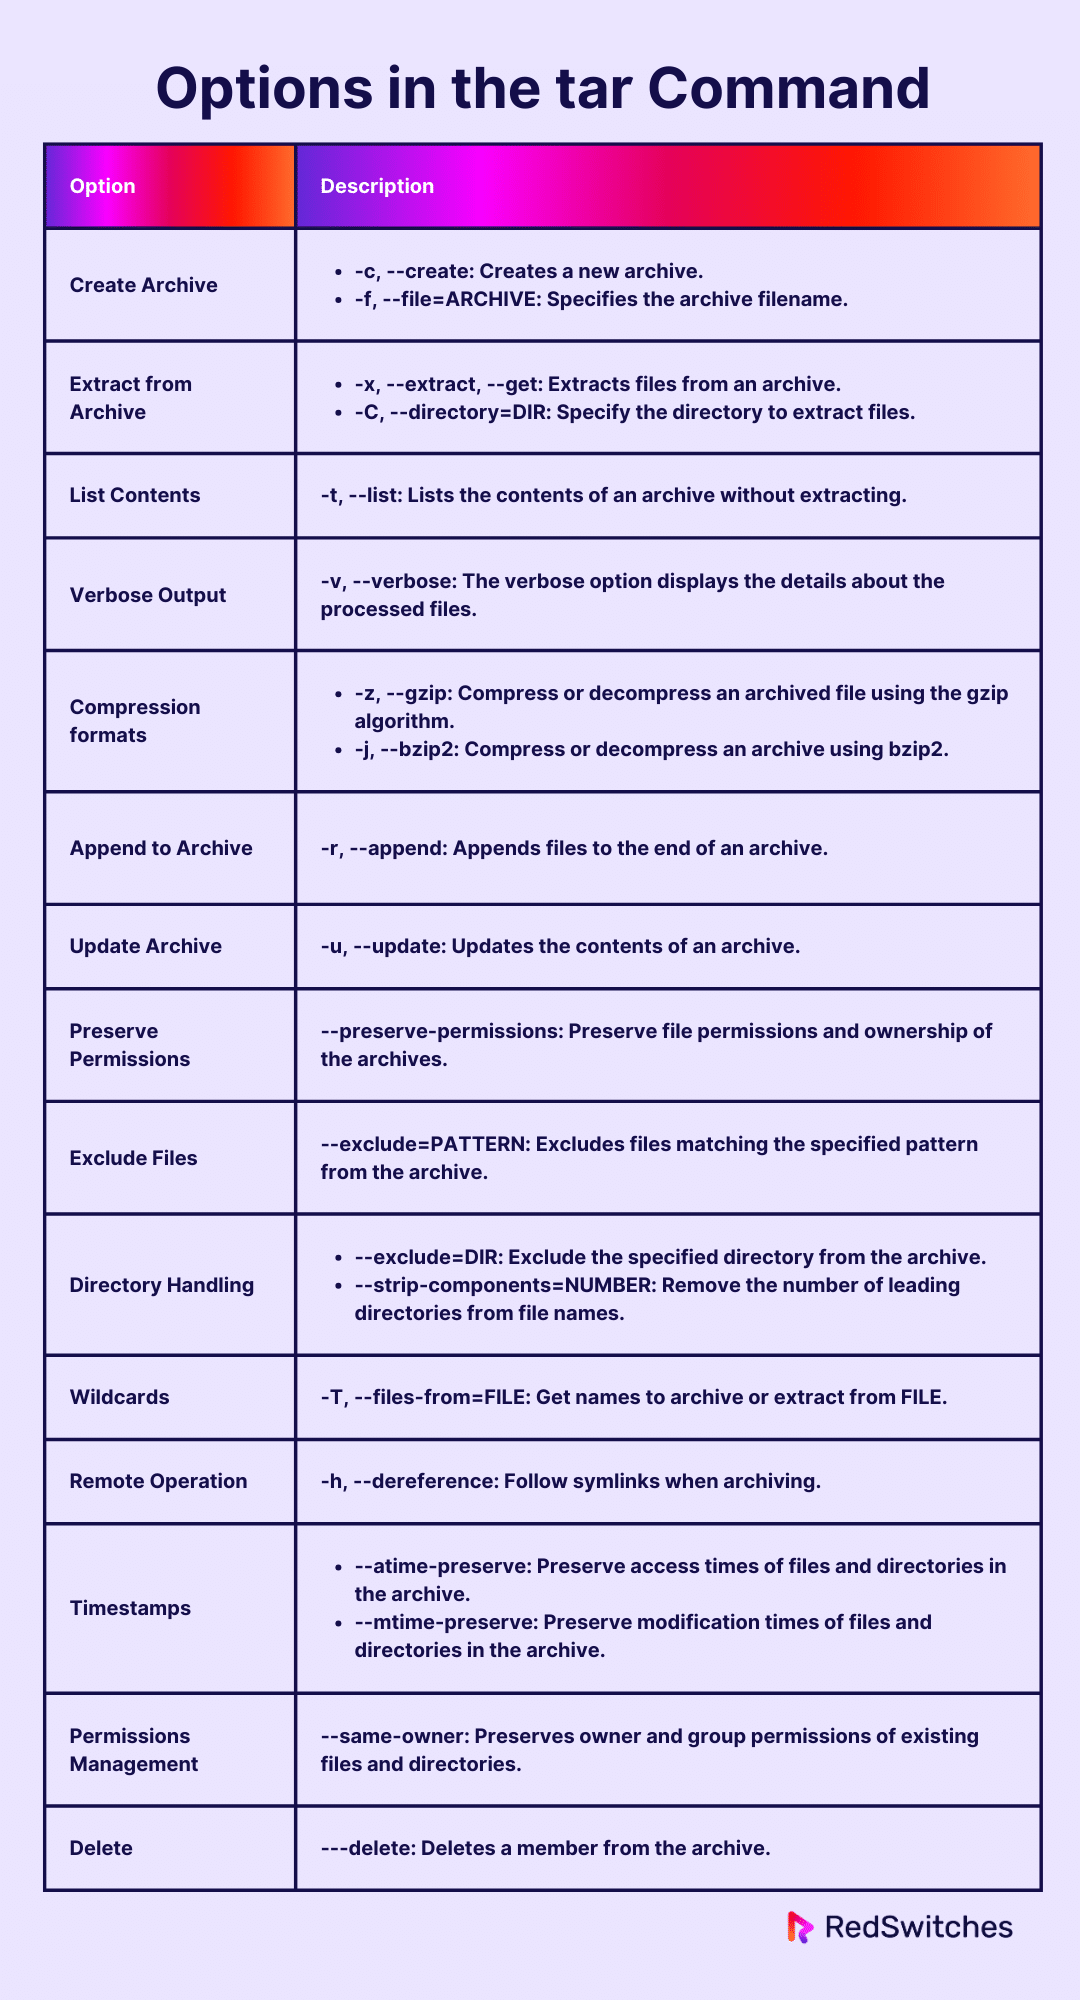
Options in the tar Command
The tar command in Linux offers a wide range of options to customize its behavior according to specific user requirements. Here’s a list of some common options:
In addition to tar, we recommend our tutorial on the zip command. It is another popular option for creating and managing archive files in Linux environments.
15 Use Cases of the tar Command
Now that you know about the syntax and common options, let’s discuss some critical use cases where you can use the tar command to view, create, and extract archives in a Linux environment.
The Prerequisites
Make sure you have the following in place before you try out the use cases we will discuss later on:
- A system running a mainstream Linux distribution.
- A user account with administrator or sudo privileges.
- One or more files to test the command.
Use Case #1: Create an Archive
The standard format of using the tar command for creating an archive is as follows:
# tar -cvf archive.tar file1 file2 directory

Create a compressed archive with tar.gz extension
To create a compressed GNUzip (gzip) file, add the -z option to the standard syntax:
# tar -czf <archive name>.tar.gz <file(s) or location(s)>

Create a compressed archive with tar.bz2 extension
bzip2 is an alternative to gzip algorithm for file compression. The process uses the bzip2 compression algorithm. For this, add the -j tag to a tar.bz2 file to use the bzip2 algorithm:
# tar cjf <archive name>.tar.bz2 <file(s) or location(s)>

Create a compressed archive with tar.xz extension
Add the -J option to the standard tar command to compress archives in the tar.xz file format:
# tar cJf <archive name>.tar.xz <file(s) or location(s)>

Compared to gzip and bz2, the xz compression takes the longest. Nevertheless, xz offers the best compression ratios for bigger files.
Use Case #2: Delete Files After Archive Creation
Use the –remove-files option to remove the files from storage after you have created an archive:
# tar cf <archive> <file(s) or location(s)> --remove-files

Use Case #3: Extract Files from an Archive
Use the following tar command syntax to extract files from an archive:
# tar -xvf archive.tar

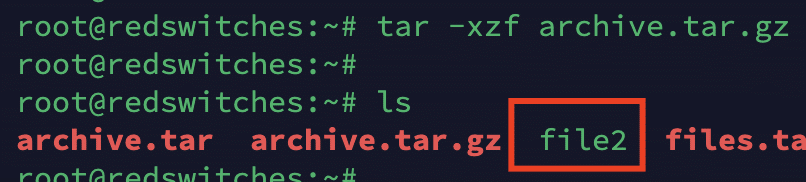
Extract files from a tar.gz archive
Run the following command that adds the -z option to extract files from a tar.gz archive:
# tar xzf <archive name>.tar.gz
Extract files from a tar.bz2 archive
Use the following command to extract files into the current directory from a tar.bz2 compressed archive:
# tar xjf <archive name>.tar.bz2

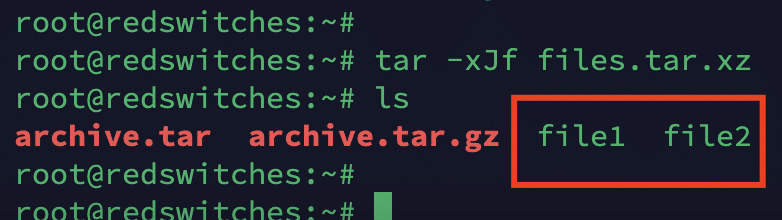
Extract files from a tar.xz archive
To extract from compressed tar.xz archives, add the -J option to the standard tar command:
# tar -xJf <archive name>.tar.xz
Use Case #4: Listing the Contents of an Archive
Use the following command to list the contents of an archive without extracting them to the local directory.
# tar -tvf archive.tar

Use Case #5: Create a Compressed Archive From a Directory
You can use the following command to create an archive of all the files in a directory:
# tar -czvf archive.tar.gz directory

Use Case #6: Add Files to an Archive
You can add files to an existing archive with the following command that appends a new file (file3) to the tar archive:
# tar -rvf archive.tar file3

Use Case #7: Extract Specific Files From an Archive
You can extract specific files from an archive without extracting the entire archive by adding the -v option:
# tar -xvf archive.tar file3

Use Case #8: Excluding Files from an Archive
You can exclude specific files when creating an archive. Use the exclude option to mention the file names or types for this. Consider the following command syntax that excludes all log files from the archive:
# tar -cvf archive.tar --exclude='*.log' directory

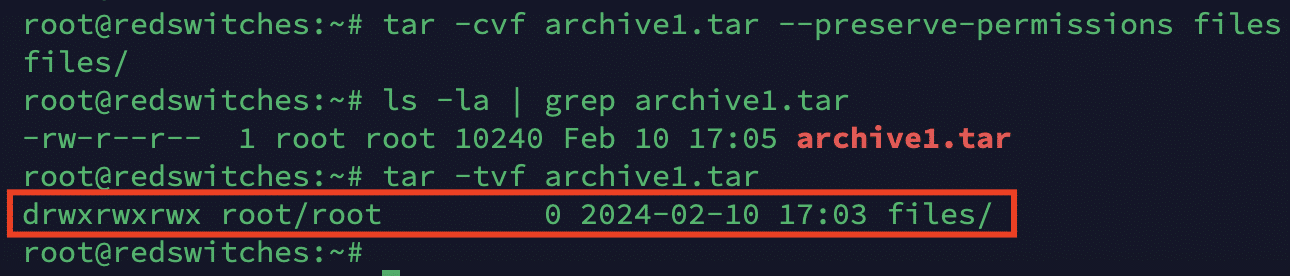
Use Case #9: Preserve File Permissions
Consider the following command that preserves file permissions when you use the tar command to create an archive from a directory:
# tar -cvf archive.tar --preserve-permissions directory
Use Case #10: Locate a File in an Archive
You can use the tar command to find a command in an archive. We will cover two scenarios in this context.
- Use the -t option to list the files in the archive and find specific ones. The syntax of the command is as follows:
# tar tf <archive> <file(s)>
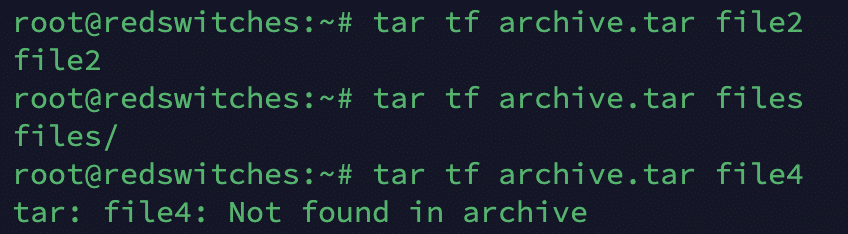
For instance, the following command checks whether file2 exists in the archive.tar archive:
# tar tf archive.tar file2
- Filter the output of the tar by piping it to the grep command:
# tar tf <archive> | grep <file(s)>
For instance, the following command syntax uses the grep utility to verify that file1 is in the archive.tar archive.
# tar tf archive.tar | grep file1

Use Case #11: Locate Multiple Files in an Archive
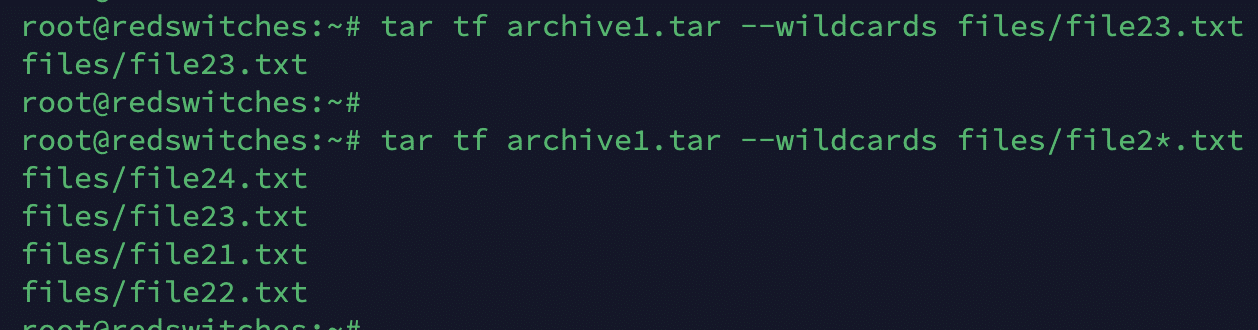
The tar command supports a comprehensive –wildcards option to match multiple file instances.
For instance, consider the following commands that use the wildcard filename matching to list all files that match the wildcard patterns.
# tar tf files.tar.gz --wildcards file/files5*.txt
# tar tf archive1.tar --wildcards files/file23.txt
# tar tf archive1.tar --wildcards files/file2*.txt
Use Case #12: Extract a Single File From an Archive
If you need just one file from an archive, you don’t need to extract the entire archive.
For this, first, verify that the desired file is part of the archive with the following command that uses grep to find the filename:
# tar tf archive.tar | grep file3
Next, run the following command to extract the file:
# tar xf archive.tar | grep file3

Use Case #13: Overwrite Control
Tar overwrite controls are used to manage scenarios in which the names of files in the working directory and the archive overlap.
Here are three overwrite scenarios:
- Replace files within the current working directory:
# tar xf <archive> <Optional file(s) or location(s)> --overwrite

- Do not change any files in the working directory:
# tar xf <archive> <Optional file(s) or location(s)> --keep-old-files
tar xf archive1.tar --keep-old-files

- Only extract files that are more recent than existing ones:
# tar xf <archive> <Optional file(s) or location(s)> --keep-newer-files

Use Case #14: Set a Custom Timestamp
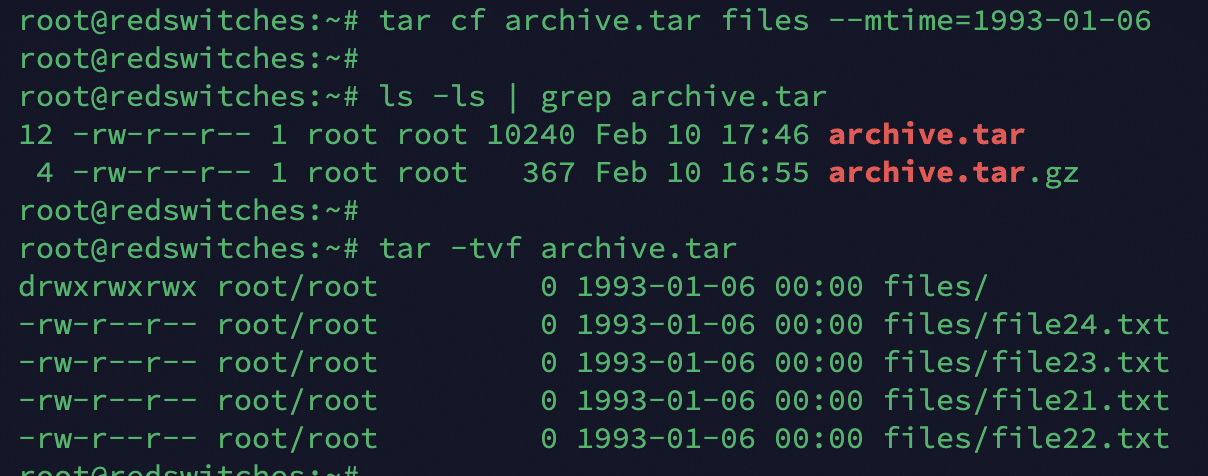
The tar command provides several options to change the date of the file. When creating an archive, you can specify a date and add the –mtime option to set a custom date:
tar cf <archive> <file(s) or location(s)> --mtime=YYYY-MM-DD
For instance, the following command creates an archive and enters January 6, 1993, as the date:
# tar cf archive.tar files --mtime=1993-01-06
Use Case #15: Use tar in a Daily Backups Script
At the end, let’s discuss a bash script that uses the tar command to automate daily backups
Step #1: Create the Bash Script
- Open your text editor and create a new file named daily_backup.sh.
- Start the script with the shebang line to specify the script should be run with Bash:
#!/bin/bash
Step #2: Define Backup Source and Destination
Set variables for the source directory you want to back up and the destination path of the directory where the backup should be stored:BACKUP_SRC="/path/to/source/directory" BACKUP_DEST="/path/to/backup/destination"
Step #3: Create a Timestamped Backup Filename
- Use the date command to generate a timestamp for the backup archive filename:
DATE=$(date +%Y-%m-%d-%H%M%S) BACKUP_FILE="$BACKUP_DEST/backup-$DATE.tar.gz"
Step #4: Use tar to Create the Backup
- Create the backup with tar, compressing the source directory into a gzipped tarball in the destination directory:
tar -czf $BACKUP_FILE $BACKUP_SRC
Step #5: Optional Cleanup
- (Optional) If you want to keep only a certain number of backups and delete the rest, add a cleanup section:
# Keep only the 7 most recent backups cd $BACKUP_DEST ls -1tr | head -n -7 | xargs -d '\n' rm -f --
Step #6: Make the Script Executable
- Save the script and exit the text editor. Then, make the script executable by running:
# chmod +x daily_backup.sh
Step #7: Automate with cron
- Schedule the script to run automatically using the cron scheduler. Open the crontab for editing:
# crontab -e - Add a line to run the script at a specific time every day. For example, to run it every day at 2 AM, add:
cron 0 2 * * * /path/to/daily_backup.sh
- Save and close the crontab.
The Complete Script
Here’s how you complete daily_backup.sh script might look:
#!/bin/bash
# Backup configuration
BACKUP_SRC="/path/to/source/directory"
BACKUP_DEST="/path/to/backup/destination"
# Create a timestamp
DATE=$(date +%Y-%m-%d-%H%M%S)
BACKUP_FILE="$BACKUP_DEST/backup-$DATE.tar.gz"
# Create the backup tar -czf $BACKUP_FILE $BACKUP_SRC
tar -czf $BACKUP_FILE $BACKUP_SRC
We will check the output of the script by changing the directory to the destination path.
# cd $BACKUP_DEST

# Optional: Cleanup old backups
# cd $BACKUP_DEST
# ls -1tr | head -n -7 | xargs -d '\n' rm -f --
Conclusion
The Linux tar command is a versatile tool for archiving files and directories, offering a wide range of options to tailor archive operations according to specific requirements. Through the examples provided, we’ve seen how tar enables users to create, extract, list contents, and manipulate archives efficiently.
Whether it’s creating backups, compressing files, or excluding specific content, tar offers flexibility and reliability in managing data. By mastering the usage of tar and its various options, Linux users can streamline their file archiving tasks and ensure the integrity and accessibility of their data.
At RedSwitches, we are eager to help you find the perfect server solutions to propel your company forward. Contact us today, and let’s kickstart your company’s technological advancement together.
We offer the best dedicated server pricing and deliver instant dedicated servers, usually on the same day the order gets approved. Whether you need a dedicated server, a traffic-friendly 10Gbps dedicated server, or a powerful bare metal server, we are your trusted hosting partner.
FAQs
Q. What does Linux’s tar command mean?
In Linux, the tar command is an effective tool for file archiving. It has the ability to compress an archive—a single file made up of several files and directories—using gzip to minimize file sizes.
Q. How can I make an archive with the tar command?
Using the tar command, create an archive with the following syntax: tar -cvf file1 file2 directory1.archive.tar. This will produce an archive with the name archive.tar that contains directory1, file1, and file 2.
Q. How can I extract the contents of a tar archive?
To extract files from an archive, use the -x option and the archive file name. Use the following command to extract the contents of a tar archive: tar -xvf archive.tar. The files from the archive.tar file will be extracted in this way.
Q. Can I use gzip to compress the tar archive?
Yes, you can compress the tar archive using gzip. To create a compressed archive, use the command: tar -cvzf archive.tar.gz file1 file2 directory1. This will create a compressed archive named archive.tar.gz.
Q. How to extract a tar archive through gzip?
To extract a tar archive that has been compressed using gziptar -xvzf archive.tar.gz. This will extract the contents of the compressed archive.
Q. Can the tar command be used to update files in an archive?
You can update files in an existing tar archive using the –update or -u option with the tar command. For example, tar -uv
Q. What does the -c option do in the tar command?
The -c option is “create” and creates a new archive.
Q. How does the Linux tar command optimize storage space when creating archive files?
The tar command efficiently bundles multiple files and directories into a single archive file, reducing storage overhead. By compressing the archive using options like gzip, it further minimizes the storage footprint while preserving the directory structure and original files.
Q. Can the Linux tar command maintain the original directory structure when creating archive files?
Yes, the tar command preserves the directory tree of the original files when creating archive files. This ensures that the archived contents retain their hierarchical organization, facilitating easy extraction and restoration of files and directories as they were in their original locations.
Q. What information does the Linux tar command reveal about the contents of an archive file?
The tar command provides comprehensive insights into the contents of an archive file, including the directory structure, original files, and their permissions. Users can utilize commands like tar -tvf to list the contents of the archive, gaining visibility into the stored files and directories without the need for extraction.
