The tail command in Linux is a crucial tool for displaying the last part of files.
This is particularly useful for monitoring log files in real-time for critical events such as web server updates. It complements the head command, which retrieves the beginning portions of files.
When you use the command without any arguments, it simply prints the last 10 lines of the target document. However, you can change this behavior by adding arguments such as -F option for continuous monitoring, -c option to specify bytes, -n to define lines, and -q for suppressing headers for multiple files.
This tutorial explains the tail command in detail. We will discuss the syntax and options, and then describe ten examples of using this command in real-world scenarios for effective file content management in Linux.
Table Of Contents
- The Linux tail Syntax
- The tail Command Examples
- The Prerequisites
- Example #1: Print the Last 10 Lines
- Example #2: Display a Fixed Number of Lines
- Example #3: Print Lines from Multiple Files
- Example #4: Combine Multiple File Contents
- Example #5: Use Bytes Instead of Lines
- Example #6: Use Piped Input
- Example #7: Use tail to Monitor Updates
- Example #8: Channel the tail Output
- Example #9: Save Output to File
- Example #10: Use tail with find to display the last lines of all files in a directory
- Conclusion
- FAQs
The Linux tail Syntax
The following standard syntax of the tail command in Linux displays the last part of the files:
# tail [OPTION]... [FILE]...
Where:
- OPTION refers to various options that can modify the behavior of the command.
- FILE is the name of the file(s) that the command operates upon. If no file is specified, or if the file specified is –, tail will read from standard input.
The Linux tail Options
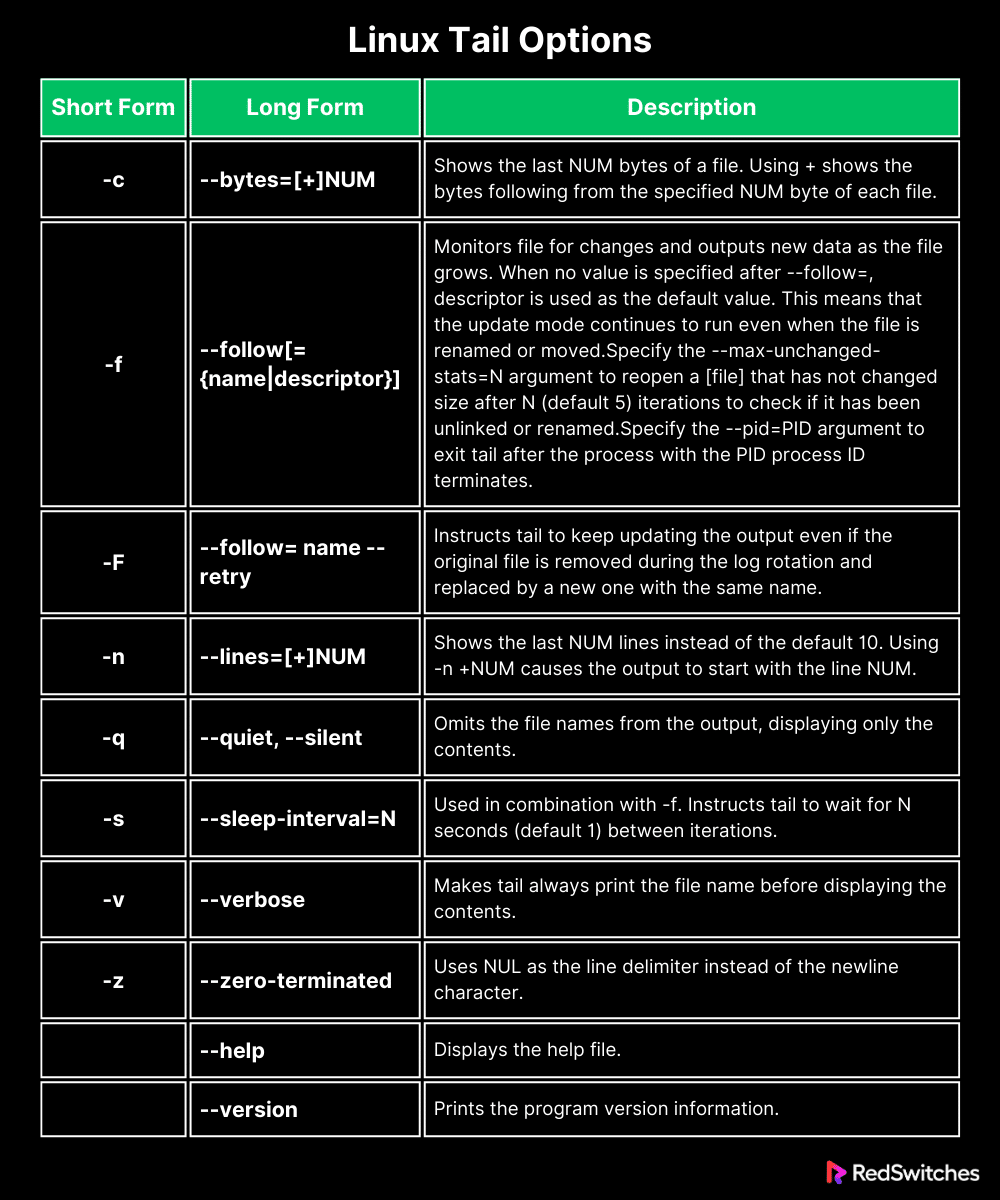
The tail command provides various options that enable users to tailor the output and modify the file processing behavior. As a component of the GNU Coreutils package, tail offers short- and long-form options for enhanced usability.
This table outlines the popular options you can use with the tail command in Linux:
Also Read: 13 Examples That Showcase the xargs Command in Linux
The tail Command Examples
The tail command is versatile, and can be used for tasks such as showing real-time updates of files to handling several files simultaneously and consolidating the output into one file.
The Prerequisites
Before trying the tail command applications we will discuss later on, ensure your setup meets the following requirements:
- A system running a mainstream Linux distribution.
- A user account with root or sudo privileges.
Example #1: Print the Last 10 Lines
When no specific options are given, the tail command automatically displays the final 10 lines of the given single file to the standard output. You only need to provide the path to the file, and the command will print the content to the terminal (the typical stdout option).
For instance, consider the following command:
# tail test.txt
Example #2: Display a Fixed Number of Lines
The -n option is used to modify the standard command output of the last ten lines, By using this option, you can specify a n +NUM limit to print the file’s contents from line number NUM. For instance, in the example below, the output begins from line 19 and continues to the end of the file:
# tail -n +19 test.txt
Example #3: Print Lines from Multiple Files
You can display the final lines from several files simultaneously by specifying the file names following the tail command. For instance, to view the last two lines from multiple files, use the following command syntax:
# tail -n 2 [file1] [file2] [file3] …
For instance, consider the following command that outputs the final two lines from the two designated files, attaching a file name header to the output.
# tail -n 2 text.txt test.txt
Example #4: Combine Multiple File Contents
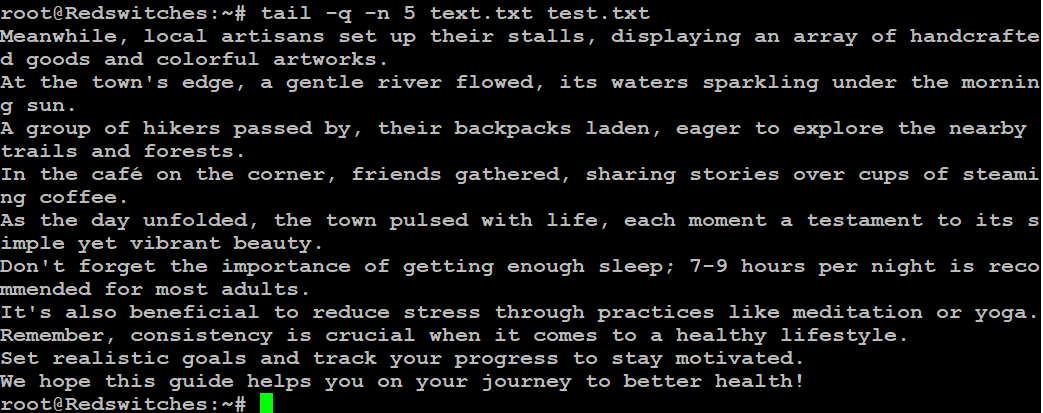
You can consolidate content from several files into a single output with the -q (or –quiet / –silent) option. This option eliminates the headers displaying file names, effectively blending the contents of all specified files into a single stream.
Consider the following example that outputs the final five lines from two given files, combining their contents without mentioning the file names explicitly.
# tail -q -n 5 text.txt test.txt
Example #5: Use Bytes Instead of Lines
By employing the -c option, you can ask the tail command to count in bytes rather than lines. This option works great for parsing ASCII data where each byte equates to a single character and the record length is consistent. When working with this type of data, remember that newline character is considered one byte as well.
For instance, the following command displays the final 24 bytes of the given file:
# tail -c 24 test.txt
Example #6: Use Piped Input
Instead of specifying files, the tail command can work with the input piped from other commands. For instance, you can funnel output from the cat command or the ls command through a pipe, allowing tail to display that output’s final lines of the piped input.
Consider the following example where tail uses the piped input from the ls command and prints the last five lines:
# ls -l | tail -5
Example #7: Use tail to Monitor Updates
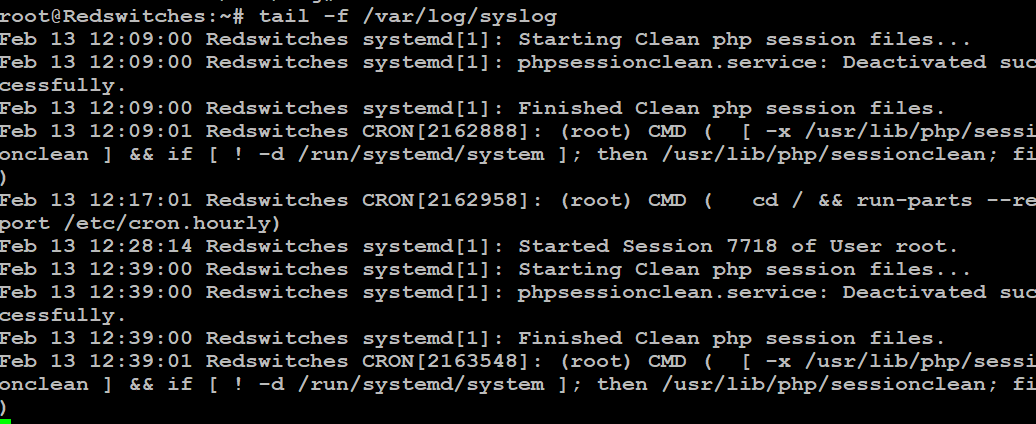
The -f flag (or –follow) parameter enables real-time monitoring of file changes, presenting the modifications directly in the output.
This feature is particularly useful for working with log files that are frequently updated with new entries at the file’s end. It’s important to note that for tail to read the updates, the log file must be in a supported text format.
The syntax of the tail command in this context is as follows:
# tail -f [file]
For instance, consider the following command that displays the log of the dpkg package manager and continues to display the new entries added to the log file. To exit the command, use the interrupt keystroke (Ctrl+C).
# tail -f /var/log/syslog
Also note that the display refreshes every second by default. For a custom refresh rate, use the -s option with the following format:
# tail -f -s <sleep interval in seconds> [file]
Example #8: Channel the tail Output
In addition to receiving input via pipes, the output of the tail command can be channeled into other commands like sort to organize the data in the desired format.
Consider this scenario where the output from the tail command is piped into the sort command. Here, we extract the final five lines of the text.txt file and pipe this output into the sort command.
The sort command shuffled the piped input into a random order using the -R option.
# tail -n 5 text.txt | sort -R
Example #9: Save Output to File
You can capture the output of the tail command and save it to a file for future use. For this, you can redirect the output of the tail command into a new file using the > symbol.
For instance, we used the following commands to redirect the output of the tail command into a file and display it using the cat command.
# tail -n 5 text.txt > last-5-text.txt
# cat last-5-text.txt
Also Read: lsof Command in Linux with Examples
Example #10: Use tail with find to display the last lines of all files in a directory:
To display the last lines of all files in a directory using tail in combination with find, you can use the following command structure. This example will find all files (-type f) within the specified directory and its subdirectories and then execute tail on each file to display the last few lines (for example, the last 5 lines):
# find /path/to/directory -type f -exec tail -n 5 {} +
Here’s a breakdown of the command:
- find /path/to/directory: This part specifies the find command to search within the given directory. Replace /path/to/directory with the actual path of your directory.
- -type f: This option tells find to look for files only (not directories).
- -exec tail -n 5 {} +: This part executes the tail command on each file found. The {} is a placeholder for the current file find is processing, and + at the end tells find to execute tail on multiple files at once if possible, which is more efficient than running tail separately for each file. The -n 5 option for tail specifies that the last 5 lines of each file should be displayed.
This command is useful for quickly inspecting the end of multiple files, such as checking the most recent entries in log files within a directory structure.
Also Read: 6 Simple Examples of Using the Linux watch Command
Also Read: Mastering the Linux tee Command for Redirecting Output In 9 Examples
Also Read: A Guide on How to Install and Use Linux Screen Command in 2024
Conclusion
The Linux tail command is a key utility for viewing the end portions of files, crucial for server management. It excels in showing the last lines of a file, with the default being the last ten lines, but is versatile enough to include options like tail -c for byte-specific output and tail -f for real-time updates.
This command-line tool enhances file monitoring and data analysis by offering features like quiet mode, error message suppression, and the ability to work with various input types, including Unicode characters. With its range of options, the tail is an essential tool for efficient file management in any Linux-based environment.
Visit RedSwitches for reliable dedicated hosting services tailored to your needs. We offer the best dedicated server pricing and deliver instant dedicated servers, usually on the same day the order gets approved. Whether you need a dedicated server, a traffic-friendly 10Gbps dedicated server, or a powerful bare metal server, we are your trusted hosting partner.
FAQs
Q. What is the tail command in Linux?
The tail command in Linux is a command-line utility that prints the last few lines of a file. While it commonly displays the last 10 lines by default, it can also be used to print a specific number of lines from the end of a file.
Q. What are some practical examples of using the tail command?
Practical examples of using the tail command in Linux include real-time monitoring of log files, displaying the last lines of continuously updating files, and extracting specific data from the end of a file.
Q. How does the tail command differ from the head command?
While the tail command prints the last few lines of a file, the head command prints the first few lines. Both are useful for quickly viewing the beginning or end of a file.
Q. How can the tail command be used with the grep command to search for specific patterns in the tail command output?
The tail command’s output can be piped into the grep command to search for specific patterns within the last lines of a file, enabling efficient data extraction and analysis.
Q. How does the tail command handle log rotation scenarios and updating files?
The tail command efficiently handles log rotation scenarios and updating files by continuously displaying the last lines of the file, even as the file undergoes updates or rotations.
Q. Can the tail command display the entire file contents when used with specific options?
Yes, by omitting the -n option or specifying a large number of lines, the tail command can display the entire contents of a file from the end to the beginning.
Q. How does the tail command handle extra lines added to a file while in update mode?
In update mode, the tail command automatically adjusts to display any extra lines added to the file, ensuring users receive the most up-to-date information without interruption.
Q. Where can I find support and resources for using the tail command?
For assistance and community support, consider visiting forums and online communities dedicated to Linux users, where you can interact with experienced users and find valuable resources on utilizing the tail command effectively.


